
The adoption of Cloud and modern software automation, provisioning and delivery techniques, are also requiring a much faster way to simplify the creation and disposal of Dev and Test environments. A typical lifespan of a Dev environment can go from minutes to just a few days and that’s it, we don’t need it anymore.
Regardless of whether you use a Windows, Apple or Linux based PC/laptop, virtualisation of environments via Virtual Machines, help with this problem, besides it leaves your host OS clean. Vagrant takes VMs to the next level, by offering a very simple, lightweight and elegant solution to simplify such Virtual Machine life-cycle management, easy way to bootstrap your software/libraries requirements and sharing files across your host and guest machines.
In this blog I am going to show you how to get started with Vagrant. You will find it a very useful to quickly create and destroy virtual environments that help you develop and test your applications, demystify a particular topic, connecting to cloud providers, run scripts, etc.
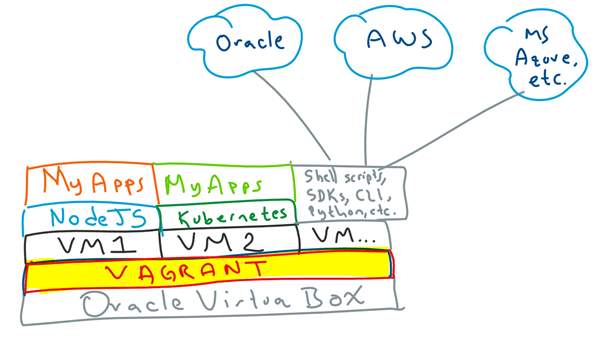
For example, typical scenarios I use Vagrant for include: Dev and Test my NodeJS Applications, deploy and test my Applications on Kubernetes, run shell scripts, SDKs, use CLIs to interact with Cloud providers e.g. Oracle, AWS, Azure, Google, etc. All of this from my personal laptop, without worrying about side effects, i.e. if I break it, I can simply dispose the VM and start fresh.
I can assure you that once you give it a go, you will find it hard to live without it. So, let’s wait no more…
Setting up Vagrant
Vagrant works as a wrapper for most common software virtualisation flavours out there, including VirtualBox, VMW, KVM, etc. In this blog I am going to use it with VirtualBox, which is my personal preference.
-
First, download and install Oracle VirtualBox if you don’t already have it. (https://www.virtualbox.org)
-
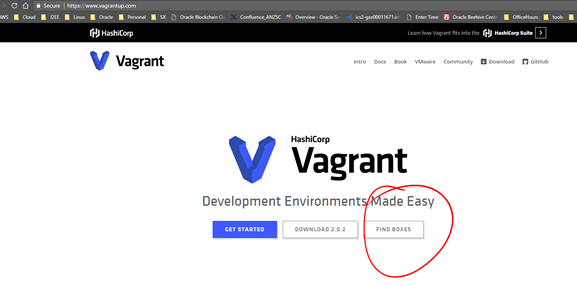
Then go to Vagrant website and download it as well. (https://www.vagrantup.com/downloads.html) – Choose the right version based on your OS. In my case I am using Windows 64bitm, in which case, you might have to restart your machine after the installation.
-
Vagrant runs on the concept of Projects and Boxes.
- Projects: As the name indicate, represents the project that will contain your Vagrant configuration and any files that you want to auto-sync with your target VM (the one configured in your vagrant config file). I recommend that you create a new directory for every new Project. For example, I am going to call it, myDevEnvUbuntu
-
Boxes: This represents a particular Vagrant configuration, that includes the type of VM to be used, any bootstrap to be run, port forwarding configuration, etc.
- As you can see, I am keen to use an Ubuntu VM. If you go back to www.vagrantup.com and click on “Find Boxes“, you can see a large catalogue of existing Boxes (VMs) that Vagrant makes it available to download.
- In my case, I am going to choose Ubuntu Trusty64 bit, but you can choose whatever you want/need.

-
Open a terminal window and move into your project directory (create it if you haven’t done so).
-
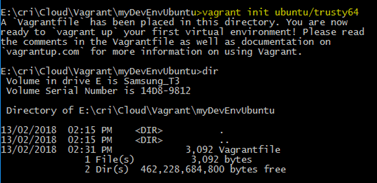
Initiate a new Vagrant configuration by typing “vagrant init” and the type of Box (VM) that you want to use.
vagrant init ubuntu/trusty64
- It is going to create a new Vagrant config file into this directory.
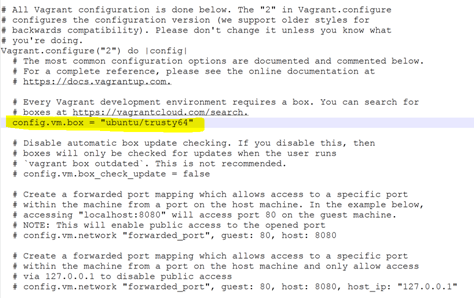
- Open it up and analyse its content. Notice the config.vm.box that is configured matches with the one that we selected when initiating the Vagrant file. Also scan through all the different settings that you can change.
- That’s it, you have successfully setup Vagrant, move to the next section to learn how to use it.
Most typical commands to use Vagrant
Once you have created your Vagrantfile, from a terminal window you can run various commands to bring it up, stop it, destroy it, etc.
-
To start your VM, type:
vagrant up
The first time you type this command, the VM will be downloaded. Future runs, even if you decide to remove the running VM, Vagrant will take it from the original local backup copy (i.e. under ~/.vagrant.d. For Windows it is under C:/Users/USERNAME/.vagrant.d/boxes)
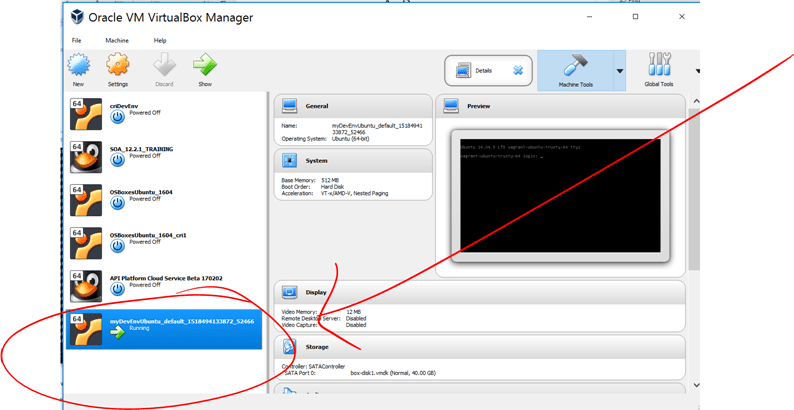
If you are an existing VirtualBox user, you will notice that this is just a normal VM running on VB. Vagrant simply makes it easier to use.
-
Once your VM is up and running, you can ssh into it by typing:
vagrant ssh
Default password is vagrant
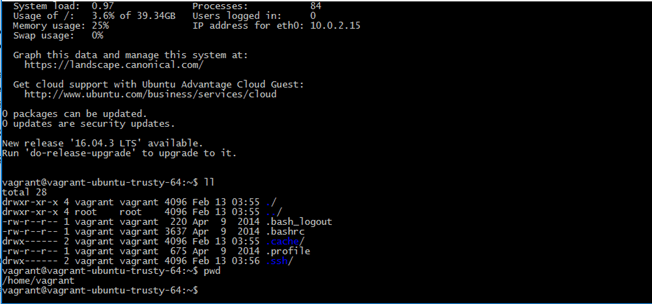
That’s it, you are now running a headless Ubuntu 16.04 LTS VM
-
To pause your VM, type:
vagrant suspend
Again, in VB this is a simple pause:
-
To shutdown your VM, type:
vagrant halt

-
To remove your running VM, type:
vagrant destroy

Notice that “vagrant destroy” does not remove your Vagrantfile, which means that any configuration that you made on it, such as bootstrap configuration, port fwd, GUI enablement, etc., will not be removed. As mentioned earlier, even after you destroy your running VM, you can still run “vagrant up” to bring it back up, but it will be taken from the original backup copy that was downloaded from the first time. This comes very handy, because very often you can totally break a dev environment, which means that you can simply destroy it and bring a fresh one back up!
Obviously, once you destroy and recreate an existing VM, it is quite fast, as it doesn’t have to download the VM anymore.
That’s it, that should be enough to get you moving.
Using Vagrant to Simplify the Synchronisation of files between your host and virtual machines (guest)
A nice feature of using Vagrant is that it will maintain your current project directory shared with your VM, this means that any file you create in your Vagrant project directory will be available within your VM. This can seriously be useful when working across Windows and Linux… It brings the best of the two worlds.
For example:
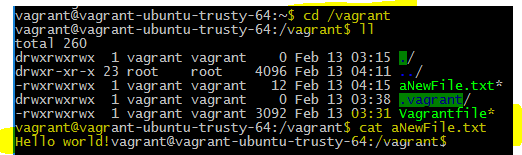
- I just created a new file under myDevEnvUbuntu project directory, I called it aNewFile.txt and I typed “Hello World” on it.
- Now, ssh into your VM and check under /vagrant directory – the file created in the Host machine (Windows in this case) is there.
- Now, open it up inside the VM and add a new line, save it and validate the change comes through in Windows.
- Call me crazy, but I really find this very cool… I know that for existing VB users, this is nothing new, you can setup your own shared directories, but I just like the way Vagrant makes it easier…
Using Vagrant to easily bootstrap scripts into your VMs
Vagrant also makes it easier to setup bootstrap scripts before starting your VM. For example, in the next instructions I am going to show you how to install NodeJS as part of the bootstrap process.
- Destroy your Ubuntu VM
- Create a new file and call it myBootstrap.sh
-
Enter whatever script or commands you want to run as part of your VM initialisation bootstrap process. In this case, let’s assume that for this Vagrant project, I need to install NodeJS 4.8.7 in order to test a specific application.
Have a look at this other blog I wrote some time ago that shows how. In this case, I used:
sudo curl -sL https://deb.nodesource.com/setup_4.x | sudo -E bash –
sudo apt-get install nodejs -y
-
Then open your Vagrantfile and at the end, before “end” add a reference to your bootstrap script.
config.vm.provision “shell”, path: “myBootstrap.sh”

Notice that you could simply enter the bootstrap commands inline within the same Vagrantfile under <<-SHELL xxx SHELL – It’s up to you, but I personally prefer to keep the Vagrantfile and bootstrap separate, as it gets clean and easier to maintain both. Especially, for the script, as this way, it is a plain shell script that you can reuse for other scenarios.
-
Now, bring your VM back up:
vagrant up
- You can see in the logs as it starts, that NodeJS installation steps were executed as part of the bootstrap script.
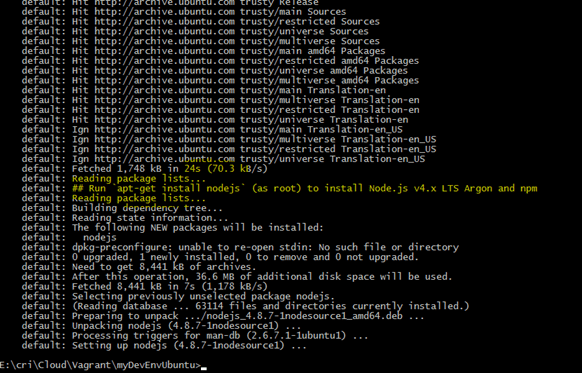
- Once it is up and running, ssh into it and confirm NodeJS 4.8.7 was installed successfully.

- Notice that you might also need to open up ports by configuring port forwarding, as part of your requirements. You can do that simply by uncommenting the config.vm.network lines and configure whatever ports you need to expose externally e.g. config.vm.network “forwarded_port”, guest: 80, host: 8080. Once you finish type: vagrant reload to force your Vagrantfile to be reloaded with the latest network changes.
I hope that you found this blog useful.
If you have any question or comment. Feel free to contact me directly on LinkedIn: https://www.linkedin.com/in/citurria/
Thanks for your time.

13 thoughts on “Teaching how to use Vagrant to simplify building local Dev and Test environments”