
In this blog, I am going to show you how to configure Oracle Load Balancer as a Service (LBaaS) to proxy/redirect traffic into multiple APIs. For the sake of this example, I am going to point to running APIs hosted on my Oracle API Gateway, as well as running on a 3rd party Cloud provider. However, you can use Oracle LBaaS to proxy traffic to any HTTP or HTTPS endpoint(s).
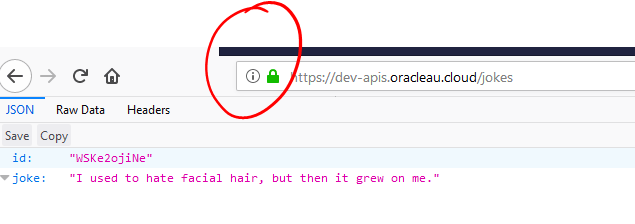
In this example, I am going to consume an existing API that I built some time ago that when invoked returns a random joke. In order to test it in high availability mode, I am also going to configure yet another “jokes” API that will serve as a redundant backend endpoint/API.
This is the high-level view of how Oracle LBaaS can easily enable multiple proxy/redirections to backend APIs hosted across various places:
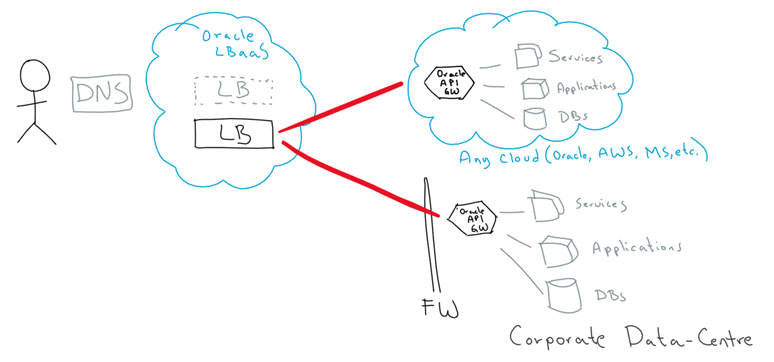
In this figure, we can see the following interactions:
- I am going to configure a CNAME DNS record to point to my LBaaS URL
- LBaaS itself is configured as a HA component
-
LBaaS will be configured to route to multiple backend endpoint/APIs
Before we start
In this blog I assume that you are familiar with the Oracle API Platform architecture, that allows you to download software-based API Gateways, with the ability to then install them wherever you want, including on Physical/Virtual hardware (perhaps on a corporate’s data-centre) or on top of Public Cloud vendor’s IaaS, including Oracle, AWS, MS Azure, Etc. If you need a refresher on how the Oracle API Platform works – see this previous blog.
Finally, if you don’t have yet access to the Oracle iPaaS, go to https://cloud.oracle.com/tryit and request a new trial, they are free and get provisioned on the spot.
If you have any question or comment, feel free to contact me directly via LinkedIn, at https://www.linkedin.com/in/citurria/
Obtaining the HTTPS certificates
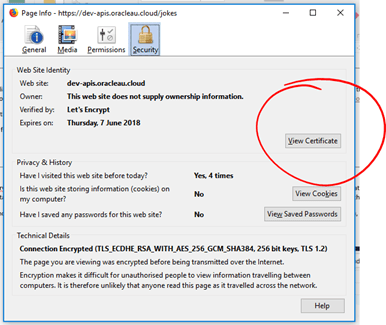
Unencrypted communications are every time more on common and the default norm is to always liaise with SSL enabled HTTPS APIs. This is great, as all communication between 2 endpoints is encrypted and we leave it to the browsers and Load balancers to have to liaise with the hassle to encrypt /decrypt data. As consumers of an existing HTTPS endpoint/API, we need to get its certificate. For that we can simply use a browser, such as Firefox to easily download it with a full chain, in case it exists.
- Using Firefox (adapt if using another browser), go to the HTTPS location where you want to connect/proxy/redirect traffic into. To the left to the bar menu, click on the green lock
- Click on the arrow in front of your domain and then More information. Then, click on” View Certificate”
- Click on the “Details” tab and then click on the last certificate in the chain (you might have only 1 level if it is self-signed). Then click on export and save it as PEM with full chain.

- If the other APIs/endpoints runs on other SSL certificate, then also download them.
Creating the LBaaS
Now, we are ready to create our LBaaS configuration.
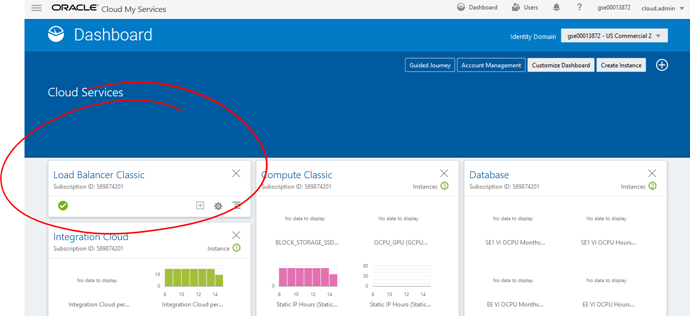
- Login into your Oracle Cloud My Services console and click on Load Balancer Classic. If using OCI (bear-metal) you need to adjust accordingly.
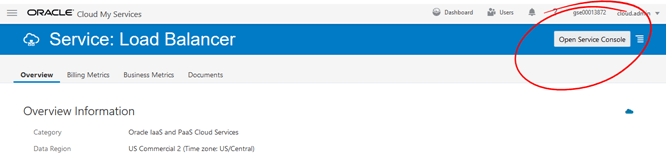
- Click on Open Service Console.
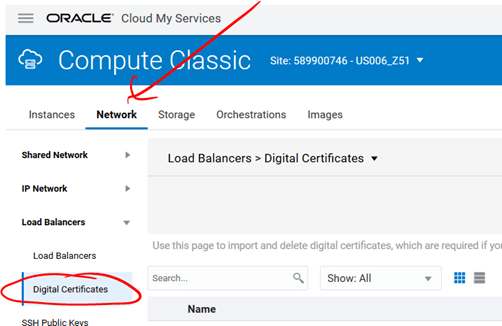
- We need to upload the HTTPS certificate(s) first, so click on Network tab and then Load Balancers -> Digital Certificates
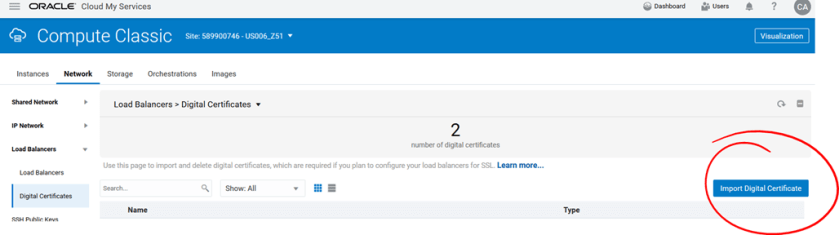
- Click on Import Digital Certificate button
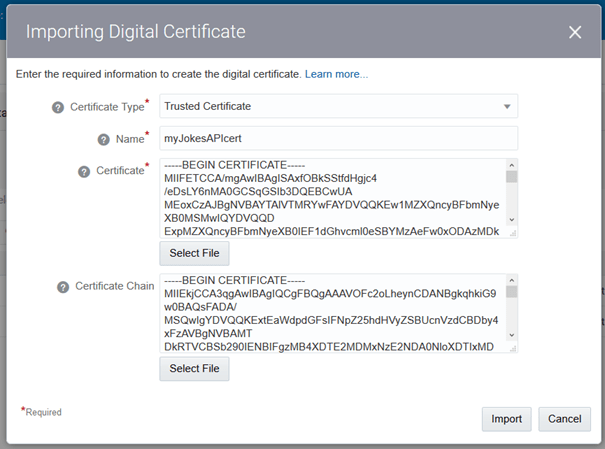
- Set your Certificate Type to Trusted Certificate, give it a Name and click Select File to import the SSL certificate with chain that you exported previously. Notice that when you select it will automatically populate the chain too. Then, click Import.
- Now, on the left menu, click on Load Balancers and click on Create Load Balancer.
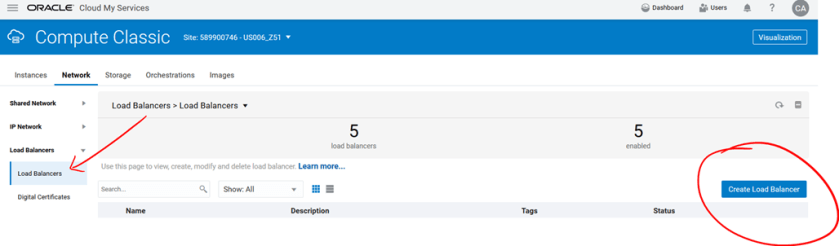
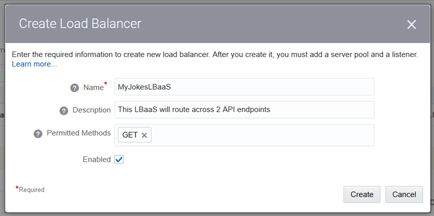
- Give it a Name, Description and type the permitted methods. In my case, I only need GET. Then click Create.
- If needed, click on the refresher link
 to reload the page. Your new LB will be displayed. Click on it.

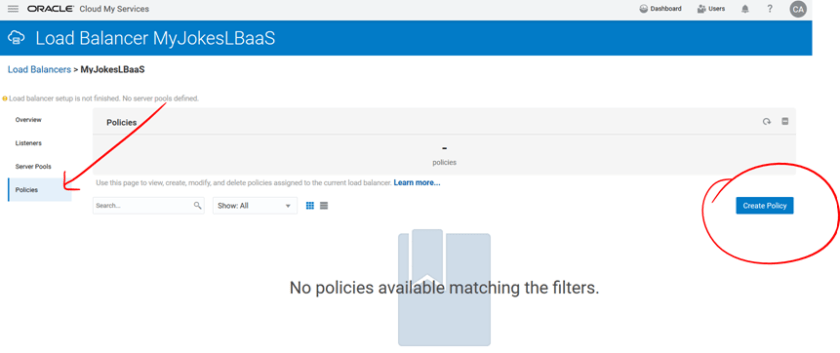
- First, let’s create the Trusted Policy pointing to the SSL certificate that we just defined previously. For this, on the left menu click on Policies. Then Create Policy.
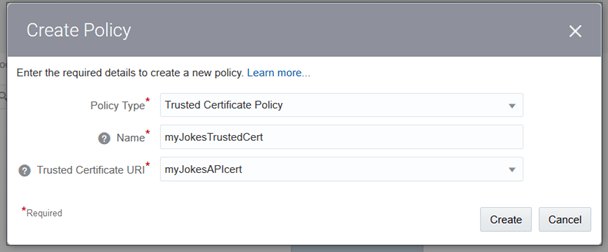
- Select Policy Type: Trusted Certificate Policy, give it a Name and select the Trusted Certificate URI that you created previously. Then, click Create.
- Next, let’s create a Server Pool, which is basically the list of APIs/endpoints that our LB will route to. For this, click on Server Pools and click on Create Server Pool.
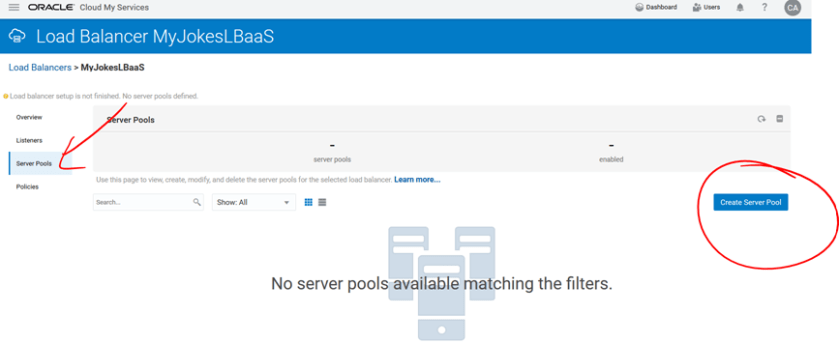
-
Give it a Name and enter your API endpoint(s) into the Server space, following this form:
Domain|IP:Port
Note: Hit Enter, after typing any Server pair.
- Also feel free to enable and configure Health Check, based on your requirements.
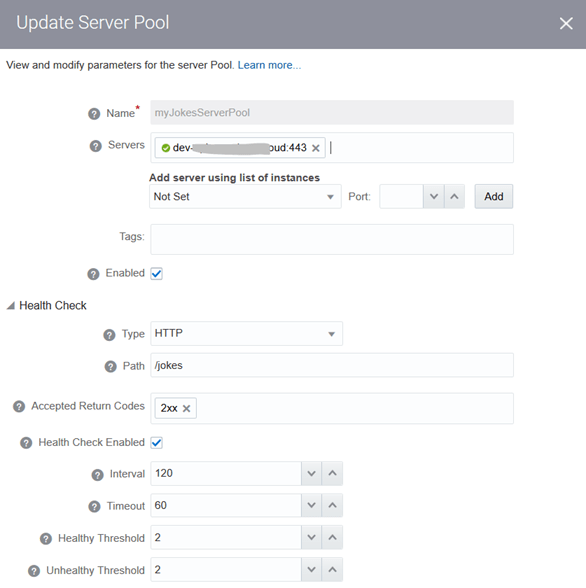
- When done, click Create.
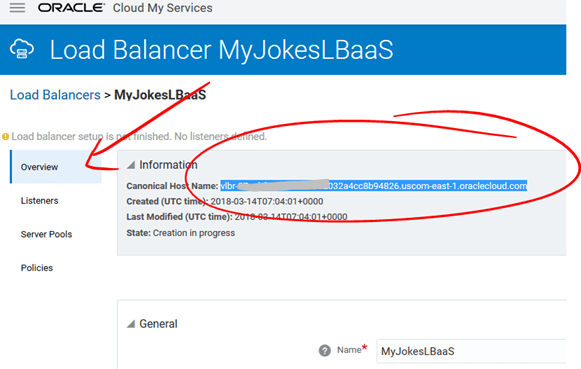
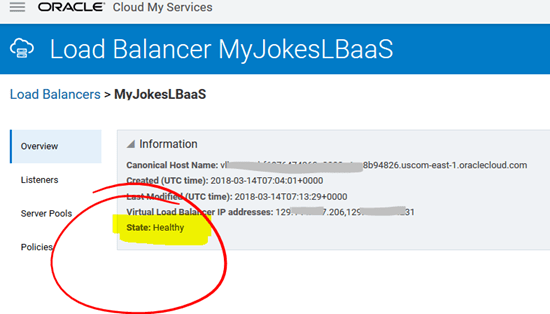
- Finally, we need to create the Listener(s), but first let’s copy the canonical name of our load balancer, for this, go back to the Overview tab and copy the canonical name.
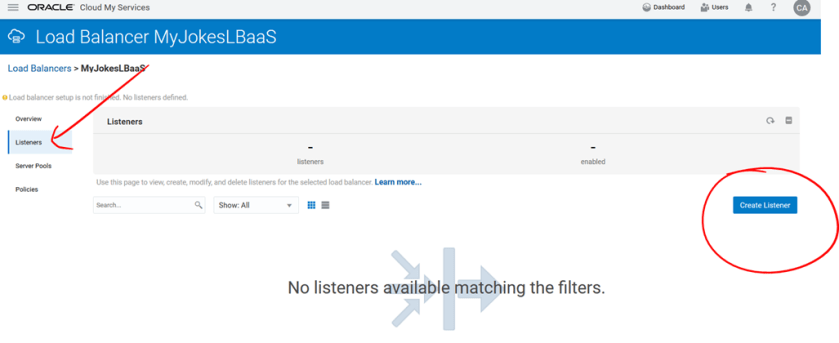
- Now, click on Listeners and click on Create Listener.
-
Fill in the listeners as per the following list:
- Name: Enter a name
- Port: Enter the port on which you want your listener to receive requests. Behind the scenes security rule will be applied to let that port being visible on your LB.
- Balancer Protocol: In this case, HTTP. It determines whether you want to accept HTTP or HTTPS requests. In my case I am choosing HTTP, but if you currently have a certificate, you can use HTTPS.
- Server Protocol: In this case HTTPS. It determines whether the underlying APIs/endpoints run on HTTP or HTTPS.
- Server Pool: Select the server pool that we created previously.
- Security Certificate: If using HTTPS for your Balancer Protocol, this is where you import your certificate. Otherwise you can leave it blank.
- Policies: By default, it runs on a Round Robin algorithm across the Server Pools, but you can change such behaviour here. Also, here is where we attach our Trusted Certificate Policy, so that we can talk to the HTTPS APIs/endpoints. There are multiple policies available, refer to this link for more information.
- Virtual Host: This is going to be used to determine if this listener is being used or not, for now paste the canonical name of your load balancer that we copied in the previous section. Later, we will add our DNS CNAME domain name.
- Path prefixes: Determine under which endpoints this listener will be accepting requests. For example, if you type /foo, only requests coming to your LB/foo would be routed to this listener. In our case, let’s leave it empty to allow all incoming requests on this listener.
- Tags: Add tags to identify /group your listener
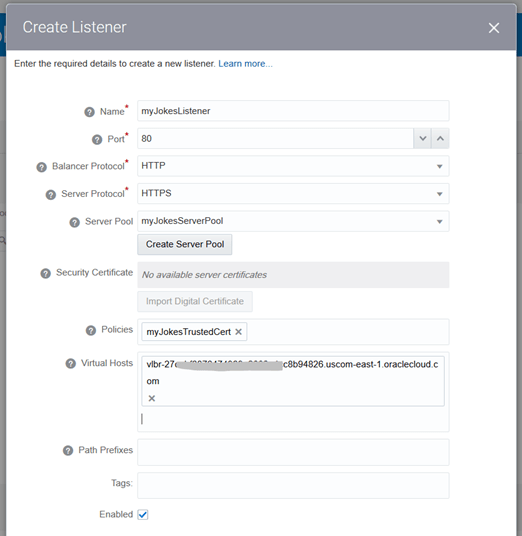
- When done, click Create.
- The first time you create a LBaaS it will take a bit longer as underneath al the virtual servers are being spun up and configured. Give it a minute or two. You can tell it’s done when the green circle on the name of the listener disappears and the State of the Load balancer in the Overview tab is set to Healthy.
- Now, it is time to test your load balancer, for this, let’s open a browser window and type the canonical name of the LBaaS + “/jokes” in my case, so that I return the random joke. I can disable one underlying server at a time and make sure that the LBaaS is still functional.
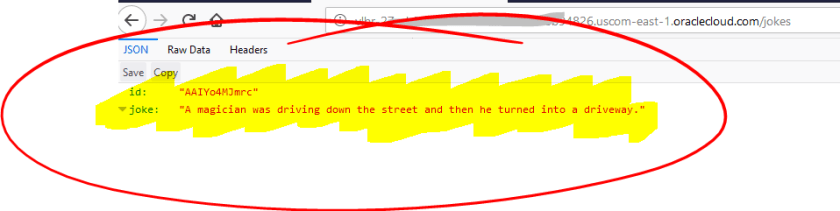
That’s a good joke!
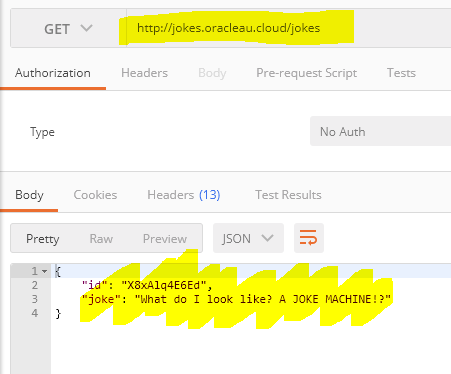
- Finally, if you want to map this domain to your own CNAME DNS record, once you do it, then enter your CNAME DNS name into the Virtual Hosts field under the Listener, so that the listener can be picked up even when using the CNAME, not only the canonical name.

- And the result should be:
I hope you found this blog useful, if you encountered any trouble or have further questions, feel free to contact me directly via https://www.linkedin.com/in/citurria/
Thanks for your time.

Thhank you for sharing this
LikeLike