March 2026 · 10-minute read
Here’s a situation I keep hearing about: an Oracle customer decides it’s time to build an AI agent, googles around, and immediately hits a wall — Fusion AI Agent Studio, OCI AI Agent Hub, OIC agents, Database Agent Factory, OCI Generative AI Agents… the list goes on. Same vendor, very different tools.
The good news? Oracle’s breadth here is intentional and useful — once you understand the logic behind it. Each framework lives at a different layer of the stack, solves a different class of problem, and is built for a different kind of builder.
This post cuts through it. I’ll walk you through what each framework is, what it’s genuinely good at, and — most importantly — when you should (and shouldn’t) reach for it.
First: why does Oracle have so many agent frameworks?
Oracle serves everyone from a hospital running Fusion HCM to a fintech startup building a custom AI pipeline on OCI bare metal. A single agent framework can’t serve all well.
So, Oracle has taken a layered approach — business layer, integration layer, data layer, platform layer. The framework you should use depends on which layer your problem lives in. The diagram below makes this concrete:
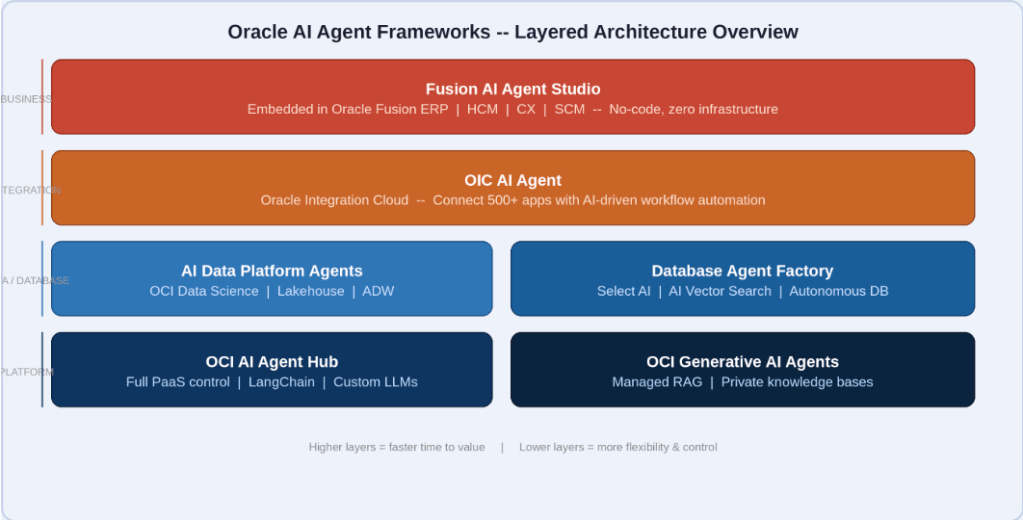
Figure 1 — Oracle AI agent frameworks organized by stack layer. Higher = faster to value. Lower = more flexibility.
A useful rule of thumb: the higher up this stack your problem lives, the faster you can ship. The lower down, the more you can customize. Neither extreme is inherently better — it depends on your situation.
The frameworks explained in simple wording here –
Fusion AI Agent Studio
If you’re an Oracle Fusion customer — ERP, HCM, SCM, or CX — this is your first stop. It’s embedded directly inside Fusion and lets business users build AI agents visually, no code required. The agents already understand your Fusion data model out of the box (invoices, purchase orders, employee records, etc.).
Best for: Extending or automating workflows you already run in Fusion. A payables clerk who wants an AI assistant that can answer “what invoices are overdue and why?” — this is exactly the right tool.
Skip it if: Your use case lives outside Fusion or requires custom reasoning over non-Fusion data.
OIC AI Agent (Oracle Integration Cloud)
OIC is Oracle’s middleware platform, and its AI agent capability embeds intelligence directly into integration flows. Think of it as AI that can make smart routing decisions, trigger approvals, and orchestrate processes across multiple Oracle and non-Oracle systems — all through a visual designer.
Best for: Scenarios that span multiple systems. An AI agent that watches for a new Salesforce opportunity, pulls contract terms from SharePoint, checks inventory in Fusion SCM, and routes an approval in ServiceNow — that’s OIC territory.
Skip it if: Your use case is self-contained within a single system, or you need deep ML/LLM customization.
AI Data Platform Agents
Part of Oracle’s broader AI and data platform (OCI Data Science, Oracle Analytics Cloud, Autonomous Data Warehouse), these agents are designed for data-heavy workflows. They can orchestrate pipelines, automate feature engineering, trigger model retraining, and reason over analytical queries.
Best for: Data engineering and analytics teams who want AI embedded in their data workflows — not bolted on afterward.
Skip it if: Your use case is business-process-oriented rather than data-pipeline-oriented.
Database Agent Factory
This one often surprises people. Oracle Database — especially Autonomous Database — has deep built-in AI capabilities: Select AI (natural language to SQL), AI Vector Search, and self-tuning agents. Database Agent Factory lets you build agents that operate natively at the database layer, without extracting data elsewhere.
Best for: DBAs and developers whose agents need to query, optimize, or reason directly over Oracle Database data. If your agent’s primary job is “ask questions about data in Oracle DB”, this keeps everything in one place.
Skip it if: Your use case extends beyond the database into broader application or process territory.
OCI AI Agent Hub
This is Oracle’s PaaS-level platform for building fully custom enterprise AI agents. You get a managed runtime on OCI, a tool and skill registry, memory management, and support for open frameworks like LangChain and LlamaIndex alongside Oracle’s own models. Maximum flexibility, maximum control.
Best for: ML engineers and architects building complex, multi-agent systems that don’t fit neatly into any SaaS product. If you need to swap LLMs, chain agents together, or integrate with non-Oracle infrastructure, this is your platform.
Skip it if: You need results in days, not months. Don’t reach for this when a higher-level tool already solves your problem.
OCI Generative AI Agents (RAG-based)
Oracle’s managed Retrieval-Augmented Generation service. You point it at your documents (stored in OCI Object Storage), and it handles chunking, embedding, vector indexing, and the conversational interface. You get a knowledge assistant grounded in your private content — policies, manuals, contracts — without building RAG infrastructure yourself.
Best for: Teams that want a Q&A bot over internal documents and don’t want to manage vector databases, embedding pipelines, or retrieval logic. Fast, managed, private.
Skip it if: You need agents that take actions beyond answering questions or require real-time data rather than document-based knowledge.
Oracle APEX AI
APEX has quietly become one of Oracle’s most capable low-code platforms, and its AI integration reflects that. You can embed conversational AI directly into APEX apps, use natural language to generate reports and queries, and connect to OCI Generative AI models declaratively — all without leaving the APEX environment.
Best for: APEX developers who want to add AI capabilities to their existing applications without standing up separate infrastructure.
At a glance — all seven frameworks
| Framework | Best For | Use Case | Approach |
| Fusion AI Agent Studio | Business / Functional | Extend Fusion SaaS | No-code |
| OIC AI Agent | Integration Teams | App & process automation | Low-code |
| AI Data Platform Agents | Data Engineers | Pipelines & analytics | Python / Config |
| Database Agent Factory | DBAs / Developers | DB-native AI tasks | SQL + API |
| OCI AI Agent Hub | Architects / ML Eng | Custom enterprise AI | Full SDK |
| OCI GenAI Agents | Developers | RAG / knowledge bots | SDK / REST |
| Oracle APEX AI | APEX Developers | AI inside APEX apps | Declarative |
Not sure where to start? Use this flowchart
Run through these questions in order and stop at the first YES:
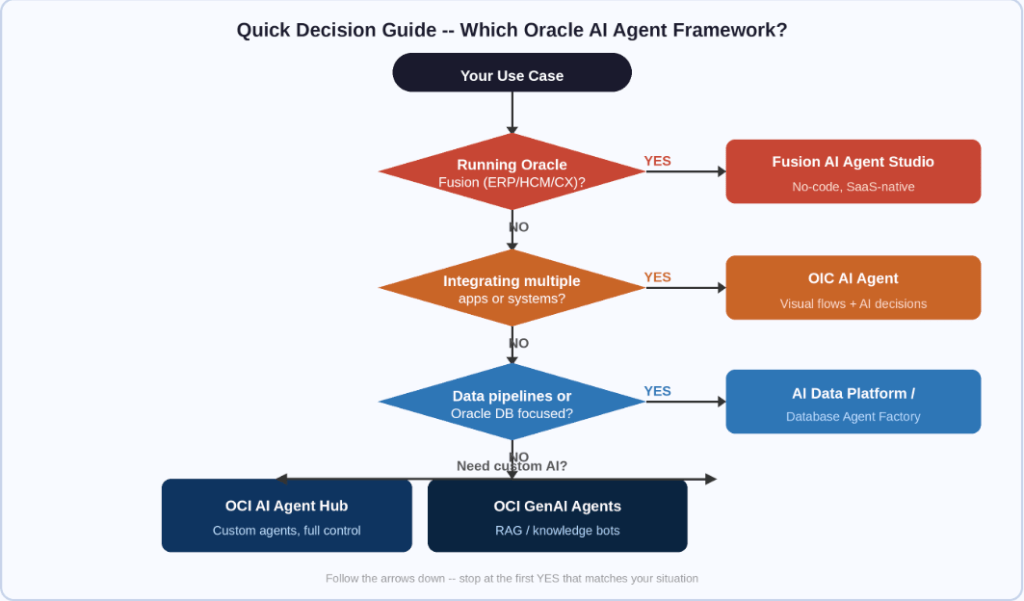
Figure 2 — Follow the decision path: stop at the first question that matches your scenario.
| Before you decide: three quick questions Where does your data live? (Fusion, Oracle DB, data lake, external systems)Who builds and maintains it? (Business user, integration specialist, data engineer, ML engineer)How fast do you need this live? (Days: reach for SaaS-native first; Months: platform-level is fine) |
One more thing: you can combine them
Oracle’s frameworks aren’t mutually exclusive. Some of the most effective architectures I’ve seen layer them deliberately:
- Fusion AI Agent Studio handles the user-facing business experience inside Fusion
- OIC AI Agent manages the orchestration logic across Fusion and external systems
- OCI AI Agent Hub runs the custom reasoning or specialized LLM calls underneath
Think in layers, not in silos. Fusion Studio gives you the UI. OIC gives you the plumbing. OCI Agent Hub gives you the brains — when you need custom ones.
The bottom line
Oracle’s AI agent ecosystem is genuinely broad — and that breadth is a feature, not a bug, once you understand the logic behind it. The question to ask isn’t “which framework is best?” It’s “which framework fits where my problem actually lives?”
Start at the top of the stack with what you already have. A Fusion customer who builds with OCI Agent Hub when Fusion Agent Studio could do the job isn’t being thorough — they’re adding months of unnecessary work. Conversely, an ML team building a multi-LLM agent topology has no business forcing that into OIC.
Match the tool to the layer. Ship something real. Then evolve.
Disclaimer: This post reflects Oracle’s product portfolio as of early 2026. Oracle’s AI roadmap moves fast — always validate specifics with your Oracle account team or the official Oracle Cloud documentation.