
In this blog, I am going to get you started with Oracle PaaS Service Manager (PSM) CLI – A great tool to manage anything API-enabled on any Oracle PaaS Service or Stack. For example, provisioning, scaling, patching, backup, restore, start, stop, etc.
It has the concept of Stack (multiple PaaS services), what means that you can very easily provision and manage full Stacks, such as Oracle Integration Cloud (OIC), that combines multiple PaaS solutions underneath, e.g. ICS, PCS, VBCS, DBCS, etc.
For this, we are going to use a pre-cooked Vagrant Box/VM that I prepared for you, so that you don’t have to worry about installing software, but moving as quickly as possible to the meat and potatoes.
This is a graphical view of what we are going to do:

Before we start
In this blog I assume that:
- It is advisable that you are familiar with Vagrant. If not, it will take you 5-very-well-spent minutes. Click here.
-
You are using the Vagrant Box VM that I prepared for following this tutorial – See here.
- Otherwise, you need to install: cURL, Python 3.3+ and pip3 – Official Oracle PSM information here.
-
You have an Oracle Cloud account, if not request a trial, they are free. Go to: https://cloud.oracle.com/tryit
Configure PaaS Service Manager (PSM) CLI
-
Clone my GitHub repository to get the Vagrant file with the required bootstrap script and other config files needed.
git clone https://github.com/solutionsanz/devops
-
Move inside the cloned directory, i.e. cd devops/usingPSM_CLI
-
Create within this folder a file called setEnv.sh and type the following commands to export your Oracle Cloud account credentials:
export user=”YOUR USER”
export passwd=”YOUR PASSWORD”
export idDomain=”YOUR_ID-DOMAIN”
-
Start the Vagrant box:
vagrant up
Note: If it is the first time, allow some time to download the VM. It will be much faster subsequent times.
-
When loaded, SSH into it:
vagrant ssh
-
Setup PSM CLI with your Cloud account details:
psm setup
-
An interactive configuration menu will initiate. Enter the information as required:
- Username
- Password
- Retype password
- Identity Domain (or IDCS tenant name – see here for more info)
- Data-centre region
- Preferred output: json (I like this one, but other options include short or html)
- Oauth: n (Not in my case – I will use basic authentication)
- After this, the CLI will show you the list of available services:

-
Now your PSM CLI is properly configured and you can easily interact with multiple Oracle Stacks and Cloud Services. However, if you have multiple Cloud environments or simply prefer to also automate the previous interactive menu, you can run “psm setup -c” and pass on a JSON file with credentials to a specific Cloud environment. For example:
psm setup -c [MY_JSON_CONFIG_FILE]
Where the JSON config file needs to follow the following structure:

If not using OAuth, simply get rid of this element completely (default is ‘n’).
-
Give it a go, modify the values of “psm_env_config.json” (as provided in my Git repo) and set your own configuration. You should also get the same satisfactory message by PSM giving you the full list of stacks and services that are available.
- Once you have PSM CLI configured. A typical use case for PSM CLI is to easily provision PaaS environments. For this, all you need from this point is a template that you pass on to the PSM CLI. Luckily Oracle builds and maintains templates for most PaaS environments and use cases.
Getting the right PaaS template and run it in the Browser – No CLI needed!!!
The intention of this blog is to show you how to use PSM CLI to automate the provisioning of Oracle Stacks in the Oracle Public Cloud. However, I don’t want you to believe it is the only way. You can easily do it manually on web as well, using a graphical window.
For example, if we wanted to provision a new DBaaS using PSM on web:
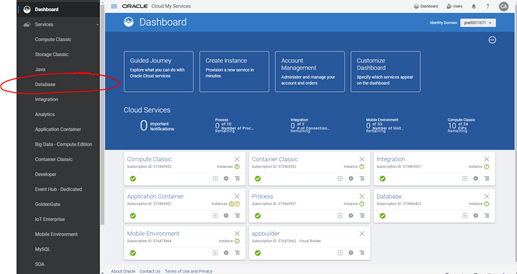
- Login to your Oracle Cloud My Service Portal
- Go to the PaaS solution that you want to provision. In this case, let’s go to DBaaS (Database)
- Open the top left burger menu and click on Cloud Stack.

- Cloud Stack landing page will be displayed. Here, you can easily click on Stacks tab and click on “Create Stack” to then follow a simple HTML form to provision a DBaaS.


Yes, it’s that easy! The same steps apply to other Oracle PaaS solutions.
Using PSM CLI to provision Oracle Stacks
Now that you know that Oracle Stack Manager can be used graphically via the browser, I want to continue with the idea of using the PSM CLI to achieve full automation in the provisioning of Oracle Public Cloud Stacks.
- Go back to the terminal window where you had setup PSM CLI to point to your Oracle Cloud environment.
- You can type psm help if you need to see all the available stacks and services again.

- From the list, determine the cloud service or stack that you need to provision or manage.
- You can get further help with a specific cloud service or stack. For this, type: psm [service|stack] help
-
You will find the following commands very useful:
- psm [service|stack] create-service help
- psm [service|stack] scale-up help
- psm [service|stack] start help
- psm [service|stack] create-service help
-
In order to provision a PaaS stack or service, you need to pass a JSON payload that describes the configuration of the target stack or service to be provisioned.
For this example, let’s continue with the example of provisioning a new DBaaS (dbcs) environment.
psm dbcs create-service -c [MY_DBCS_TEMPLATE_JSON]
Where MY_DBCS_TEMPLATE_JSON JSON file format can be found here or in my Git repo (psm_env_dbcs_instance_template.json) – Make sure you set your public key properly.
e.g. psm dbcs create-service -c /vagrant/psm_env_dbcs_instance_template.json
Note: You need to have created the Storage container first. See here if you need help. In a future blog I will show a full provisioning orchestration combing Terraform and PSM CLI… so, stay tuned!
- If everything is right, you should get a Job ID

-
You can further check the status using that Job ID, as follows:
psm dbcs operation-status -j [JOB_ID]

- Also, you can validate the provisioning on the actual Cloud Console, in this case Database Cloud Service Console.

After a few minutes, your PaaS instance (DBCS in this case) will be fully provisioned. You can determine that from a status SUCCEED and a last message “Activity Ended”.

The purpose of this blog is to get you familiar and up and running using PSM CLI. For this reason, in this blog we had to separately create the object storage associated with the DBaaS being provisioned, but that is not ideal. In a next blog, I am going to combine Terraform with PSM CLI to create a fully automated provisioning orchestration with no manual interventions.
I hope you found this blog useful and got you started playing with PSM CLI, a great tool to manage Oracle PaaS stacks and services.
If you have any question or comment, feel free to contact me directly at https://www.linkedin.com/in/citurria/
Thanks for your time.

4 thoughts on “Teaching How to use Oracle PaaS Service Manager (PSM) CLI to Provision Oracle PaaS environments”