
In a previous blog, I explained how to treat your Infrastructure as Code by using technologies such as Vagrant and Terraform in order to help automate provisioning and decommissioning of environments in the cloud. Then, I evolved those concepts with this other blog, where I explained how to use Oracle PaaS Service Manager (PSM) CLI in order to provision Oracle PaaS Services into the Cloud.
In this blog, I am going to put together both concepts and show how simply you can automate the provisioning of Oracle Integration Cloud with Terraform and PSM CLI together.
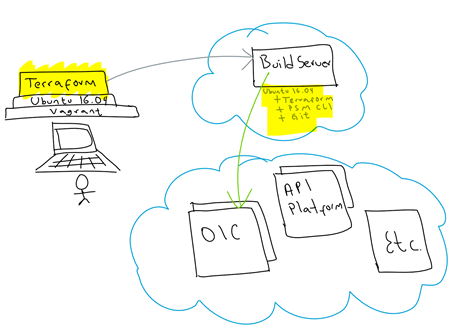
To provision a new PaaS environment, I first create a “Build Server” in the cloud or as my boss calls it a “cockpit” that brings all the required bells and whistles (e.g. Terraform, PSM CLI, GIT, etc) to provision PaaS environments. I will add all the tooling it requires as part of its bootstrap process. To create the “Build Server” in the first place, I am using Vagrant + Terraform as well, just because I need a common place to start and these tools highly simplify my life. Also, this way, I can also treat my “Build Server” as “infrastructure as code” and I can easily get rid of it after I built my target PaaS environments and save with that some bucks in the cloud consumption model.
Once I build my “Build Server”, I will then simply git clone a repository that contains my scripts to provision other PaaS environments, setup my environment variables and type “terraform apply”. Yes, as simple as that!
This is a graphical view of what I will be doing:
Before we start
In this blog I assume that:
- It is advisable that you are familiar with Vagrant. If not, it will take you 5-very-well-spent minutes. Click here.
-
I also encourage you to read the previous blogs, which I am building on top.
- How to use Vagrant and Terraform, click here.
- How to use PSM CLI, click here.
-
You need an Oracle Cloud account, if not request a trial, they are free. Go to: https://cloud.oracle.com/tryit
Create your Build Server:
For this exercise, I am going to use the Vagrant Box that I made available in my devops Git repo. Also, in order to get it in the first place, I assume that you have already Git installed on your Host OS.
To create the build server in the first place:
-
Clone my devops repository:
-
Move into the buildServer directory:
cd devops/buildServer
-
Now, start your vagrant box:
vagrant up
Note: Give it some time the first time. It will download the Box and install all dependencies. Subsequent times will be much faster.
- Once it finishes, as per the bootstrap process, your Vagrant VM is going to come with Git and Terraform ready to go.
-
Vagrant ssh into it.
vagrant ssh
-
Once in your guest VM, move to /vagrant
cd /vagrant
-
Create a folder called ssh and bring your SSH private and public keys. Call them: “myPublic_sshKey.pub” and “myPrivate_sshKey” (or adjust accordingly at variables.tf)
- Rename/Copy “terraform.tfvars_sample” to “terraform.tfvars“,
cp terraform.tfvars_sample terraform.tfvars
-
Open “terraform.tfvars” and set your variables, depending on where you want to deploy your “Build Server”.
Note: Have a look at this blog if you need assistance to know how to configure your VM image (i.e. I use Ubuntu, but you can use whatever you want).
-
Rename/Copy “scripts/psm_config/psm_setup_config.json_sample” to “scripts/psm_config/psm_setup_config.json” (or adjust accordingly at terraform.tfvars)
cp scripts/psm_config/psm_setup_config.json_sample scripts/psm_config/psm_setup_config.json
-
Open “scripts/psm_config/psm_setup_config.json” and set your variables, depending on where you want to target your PaaS services.
-
That’s it, now simply apply the Terraform plan to build your Build Server into the Oracle Cloud:
terraform apply
- Validate the Terraform plan and if all is right, accept by typing yes + enter
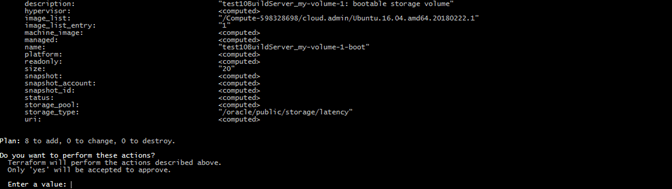
- Terraform is going to start building the storage, network, security rules and ultimately the Build Server compute VM instance. You can keep track of the progress by looking at the console output or by browsing through the various Compute consoles tab in your browser. It will take like a minute or two. Once it finishes, it will show you in green the Public IP Address for your Build Server.

-
Your Build Server is ready to go. It comes out-of-the box with:
- Terraform
- PSM CLI (fully setup, pointing to your target Oracle Public Cloud account as indicated in the psm_setup_config.json file)
- Python3
- Pip3
- Git
- Etc.
-
Since you used your public key to create the VM, now you can ssh into it using your private key.
ssh -i myPrivateKey ubuntu@IP_ADDRESS

- Congratulations, your Build Server is ready. Now we can create any type of Oracle PaaS you need. For example, in this case, let’s build a new Oracle Integration Cloud environment.
Let’s provision a new Oracle Integration Cloud (OIC)
Once that you have created your Build Server and have ssh into it, let’s provision a new PaaS environment such as Oracle Integration Cloud (OIC)
-
In your new Build Server, choose a folder to once again git clone my devops repo.
git clone https://github.com/solutionsanz/devops.git
Note: Previously we Git cloned devops repo in a Vagrant Box locally on your laptop, this time we are doing it inside the new Build Server VM that we just provisioned.
-
This time go into the provisionOICDev directory:
cd devops/provisionOICDev
-
Create a folder called ssh and bring your public SSH key. Call it: “myPublic_sshKey.pub“
- Rename/Copy “terraform.tfvars_sample” to “terraform.tfvars“,
cp terraform.tfvars_sample terraform.tfvars
- Open “terraform.tfvars” and set your variables, depending on where you want to deploy your OIC environment.
Note: use “prefix” to name your target resources. For example, a prefix dev would ultimately produce devOIC, devDB, devXXX, etc.
-
Now, inside the templates folder, you will find the JSON payloads that will ultimately configure your new OIC environment. Although I tried to parameterise with @xxx@ notations all those values that are more likely to change, I still encourage you to have a good look at the different configuration settings and make sure that they match your requirements. Especially in terms of region, api, shapes, editions, sizes, feature set, versions, etc. In my case I used Chicago DC in US.
These are the two JSON payloads that you want to look at:
- psm_IntegrationCloud_Dev_DBCS_Template.json: This template contains all the DBCS configuration to be applied to the underlying DB for your new OIC environment. Have a look at it and make sure all is correct. In my example, I assume a 12.1.0.2 EE DBCS with 1 OCPU shape (oc3) and 25 GB of storage. The rest of the values with @xxx@ notations are automatically replaced at runtime by using the values provided in your terraform.tfvars file.
- psm_IntegrationCloud_Dev_ Template.json: This template contains the OIC configuration to be applied to the new environment. In my example, I assume a 2 x 1 OCPU (oc1m) 12.2.1.2 cluster with ICS and PCS on it (EE). The rest of the values with @xxx@ notations are automatically replaced at runtime by using the values provided in your terraform.tfvars file.
- psm_IntegrationCloud_CloudStack_Template.ref: It is just for references purposes. Nothing to update here. It is one of the OOTB Cloud Stack templates for OIC. That can give you some idea of the various combinations that can be applied.
- psm_IntegrationCloud_original_Template.ref: This is just for references purposes as well. Nothing to update here. It is the full JSON payload with all optional and mandatory fields. I just used a subset of them in the actual JSON payload file.
-
Once you feel comfortable with your settings, go to the top provisionOICDev directory and run terraform init to download and configure the providers being used i.e. opc and null:
terraform init

-
Then apply the Terraform plan:
terraform apply
Review and accept the changes by typing yes + enter
- First, it is going to create the required Object storage containers.

- Then it will start the DBCS provisioning.

- Usually the DBCS provisioning takes around 30 minutes to complete. Then, it will start the OIC provisioning.


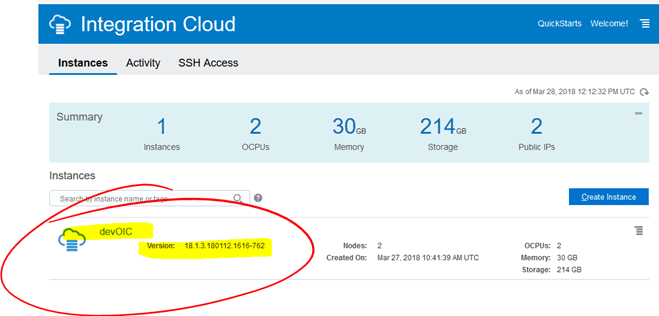
- After a little more, your new OIC environment will be ready to go:
I hope you found this blog useful. If you have any question or comment, feel free to contact me directly at https://www.linkedin.com/in/citurria/
Thanks for reading.

8 thoughts on “Teaching How to use Terraform to automate Provisioning of Oracle Integration Cloud (OIC)”