
In this blog, I am going to show you how quickly you can use data in an existing Excel spreadsheet with multiple tabs and use it to auto-generate API-based microservices using Oracle Visual Builder. Then, we are going to consume our own generated APIs via a rich set of HTML5 components.
For demonstration purposes, I am going to upload an Excel spreadsheet that contains 3 tabs (Order, Buyers and Products). This is a simple way to play with master/detail records. Feel free to use the same spreadsheet as an initial demo vehicle to auto-generate REST APIs and build Web Applications.
Before we start
In this blog I assume the following:
- You have an Oracle Cloud account, if not request a free trial. Here: https://cloud.oracle.com/tryit
Ok then, let’s have fun!
Provisioning Oracle Visual Builder
You can use Oracle Visual Builder stand-alone or as part of an existing OIC provisioning. In this workshop I am going to use an existing OIC instance that I provisioned using this previous blog.
However, if you choose to use Visual Builder separately, simply:
- Go to My Services Dashboard and locate Visual Builder. Customise the dashboard to show it if necessary.
- Click on its burger menu and click on “Open Service Console“

- Go to Instances and click on Create Instance.

- Enter the instance details and confirm the provisioning.
- Similarly, you can go from My Services console into Oracle Cloud Stack. Go to Templates, filter by “Visual” and select one of the existing Visual Builder templates (Autonomous or traditional). Then click on the create stack icon

-
Enter the required details, confirm and click on Create stack.
Note: Using Oracle Cloud Stack you can manage the whole Visual Builder as a single stack or unit, so that you don’t have to provision other components separately e.g. DBCS. This simplifies the provisioning and decommissioning of stacks.
Upload Excel spreadsheet into Oracle Visual Builder and auto-generate APIs
Once you have your Visual Builder environment, go to the main Visual Builder console. In my case, since I am using Visual Builder as part of the OIC installation, I am starting Visual Builder from within the OIC main menu:

- The Visual Builder console will open:
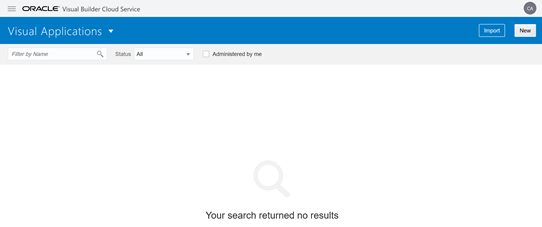
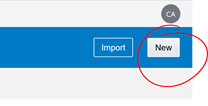
- Click New to create a New Application
- Give it a good name and description. Then click Create.

- In the left menu, click on Business Objects icon

- Click on the Business Object burger menu and click on Data Manager.

- Click on Import Business Object.

- Drag your Excel spreadsheet file into the droppable area.

- Let it finish with the import, make sure you get a successful message for each of the existing tabs in your Excel spreadsheet. Then click Next.

- Rename the objects if you want. Then click Next.

- Validate the fields and click Finish.

- Confirm a successful import and then click Close.

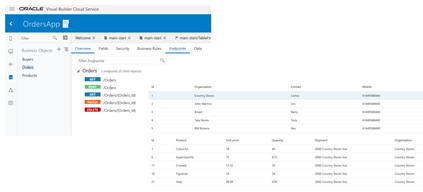
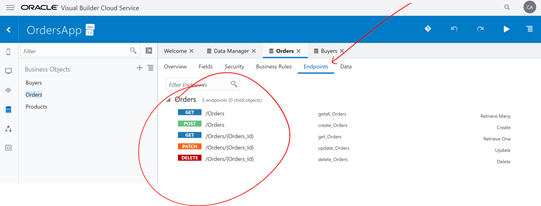
- You are going to have a new Business Object for each of your Excel spreadsheet tabs. In my case, I have 3 new business objects: Orders, Buyers and Products.

- Click on each of the Business Objects and then go to Endpoints. Notice that CRUD APIs where auto-created. Pretty awesome huh?
Creating a new Web Application in Oracle Visual Builder to consume the auto-generated APIs
Now that we have some Excel Data uploaded into our Visual Builder Application and we have also auto-generated REST APIs to interact with it, let’s create a quick Web Application that consumes those APIs.
- In the left menu, click on the Web Application icon.

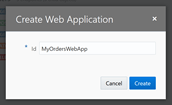
- Click on + Web Application.

- Give it a good name and click Create.
- From the Form composite palette drag and drop a Table into the empty canvas.
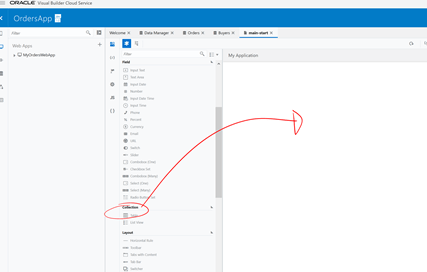
- Now, drag and drop a Horizontal Rule underneath the table.

- Lastly, drag and drop another Table underneath the Ruler. Your canvas should look like the one below:

- Now, select the top table and click on the “teacher” icon on the right. Then click on Add Data.

- Expand Business Objects and select your master record, in this case, Buyers. Then click Next.

- We want to use Organization as the link between Buyers and Orders, so at least select Organization. Make sure the Primary Key is “organization“. Then click Next.

- Click Finish. The first Table will be populated with the imported data from Excel.

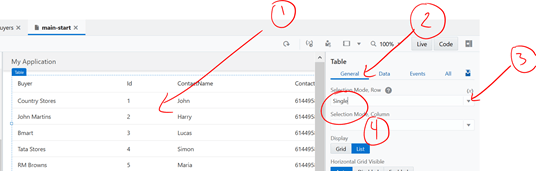
- While still keeping the top Table in focus, click on the General tab and set the Selection Mode Row to Single.
- Now, click on the bottom Table -> Teacher icon -> Add Data.

- Expand Business Objects and select Order. That is, from a selected Buyer (top table), we want to display all existing Orders (bottom table)

- Click Next.
- Select any
fields you want to present in the lower table. At least Organization, but feel free to also select: Contact, Product, Unit price, Quantity, Shipment, etc. Then click Next. - Click Finish.
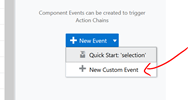
- The last thing to do is to create a new event on the top table, to filter the lower table, based on a selected row (buyer). Click on the top table and then click on Event -> + New Event.
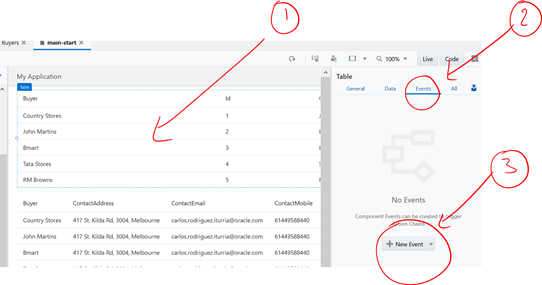
- Select New Custom Event
- Expand Property Changes and select first-selected-row.

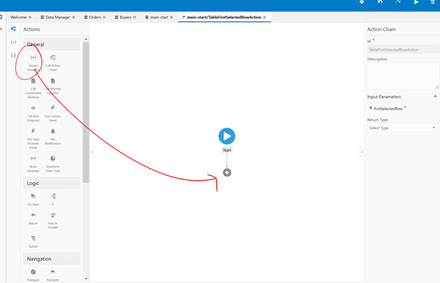
- Click Select and New Action Chain. A new Action chain will be displayed.
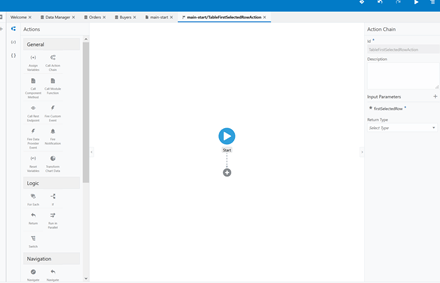
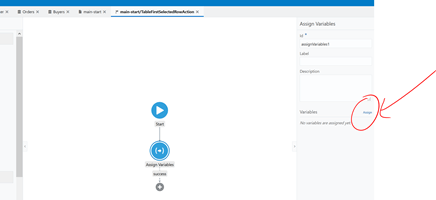
- From the left palette, drag “Assign Variables” action into the end of the chain.
- Click on Assign.
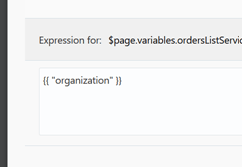
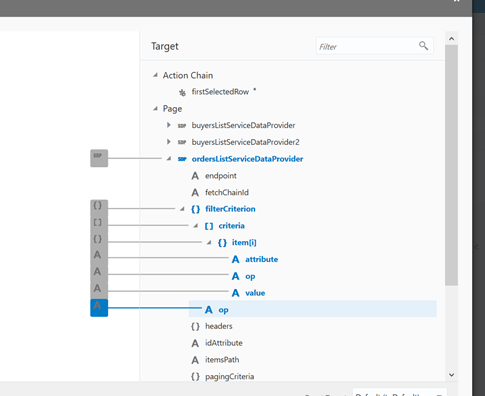
- On the right Target tree, expand Page > orderListDataProvider > filterCriterion > criteria > item[i] > attribute

- In the text area at the bottom enter: “organization” (Note: type the double quotes yourself, don’t copy them, as they can come with a weird formatting) – As you tab or click outside the text area, it will turn into {{“organization”}}
- Now, click on op and enter “$eq” (Note: type the double quotes yourself, don’t copy them, as they can come with a weird formatting) – It will turn into {{ “$eq” }}
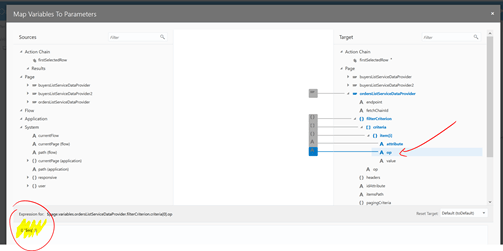
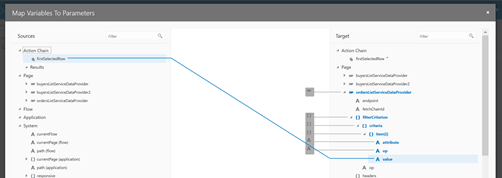
- Now, select value and this time, drag and drop the top left element “firstSelectedRow” under Action Chain into the value field on the right.
-
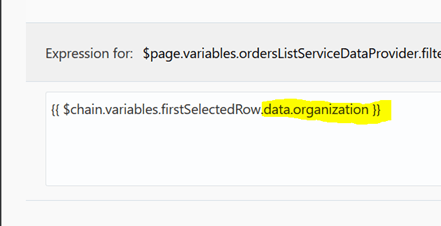
While the Source/Target link is still selected, at the bottom, append to the end of the expression: .data.organization
That is, bring the value of “organization” from the selected row (top table).
- Finally, select the last op on the right and enter in the bottom text area: “$or” (Note: type the double quotes yourself, don’t copy them, as they can come with a weird formatting) – It will turn into {{ “$or” }} after you tab or click outside the text area.

- Your Target configuration should look like this:
- When done, click on Save.
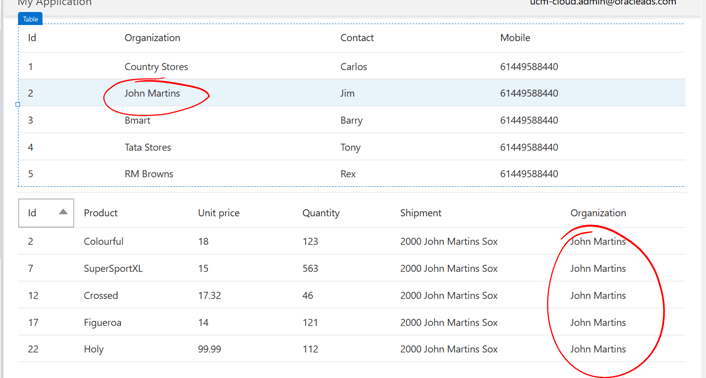
- Go back to your web app (main-start) and then click Live.
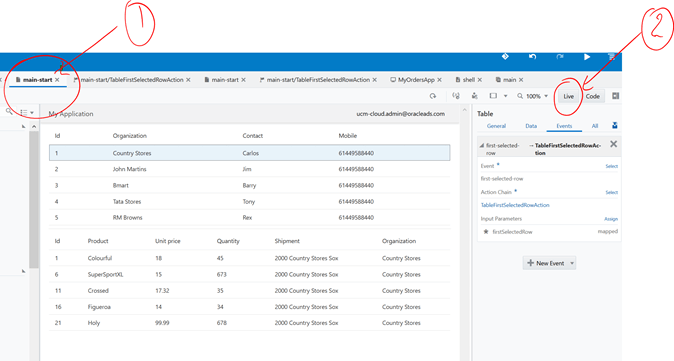
- Notice how as you select rows on the top table, the bottom table refreshes with the orders from that particular Organization (buyer).
Congratulations!!! You have enough to start creating your own Oracle Visual Builder Web Applications, consuming data from Excel spreadsheets.
I will keep publishing more advanced topics as I keep playing with consuming REST APIs from within Oracle Visual Builder. So, you better stay tuned!
I hope you found this blog useful. If you have any question or comment, feel free to contact me directly at https://www.linkedin.com/in/citurria/
Thanks for your time.

4 thoughts on “Teaching How to Get Started with Oracle Visual Builder 2.0”