
Oracle is adding a secret recipe to all their Cloud Services with a nice touch of Machine Learning. This makes it possible to have the new series of “Autonomous” Cloud Services that are self-driving, self-healing and self-securing. Stay tuned, because we are going to keep listening a lot about them.
In this blog I am going to show you how to provision an Autonomous API Platform environment and then provision and register an API Gateway, running on a separate Oracle Linux VM on IaaS.
This is a graphical view of what I will be doing in this blog:

Ready, get set, go!
Before we start
Things to consider before we start:
- It is advisable that you are familiar with Vagrant. If not, it will take you 5-very-well-spent minutes. Click here.
- We will use Terraform to build and configure the OL7.2 VM on IaaS, I encourage you to use a Build Server to simplify this process. Read our previous blog, on how to provision your own Build Server. Click here.
-
I assume that you already have an Oracle Cloud account to play with. In case you don’t, request a free trial: https://cloud.oracle.com/tryit
Provision an Autonomous API Platform stack using Cloud Stack:
Creating Oracle Cloud stacks is a simple task. For this, you can either use a Web browser UI or script it, for example, using Cloud Stack and Terraform. In this blog I am going to show how to simply use the web browser to do so.
- Login to your Oracle Cloud account.
- In the “Cloud My Services” dashboard locate the API Platform box. You might need to customise your Dashboard to show it.
- Once you have localise API Platform, click on its burger menu and select “Open Service Console“.

- Once open, click on the top left burger menu and click on “Autonomous API Platform“.

- Click on Create Instance button.

- Give it a good Instance Name and Description. Then click Next.

- Confirm and click Create.

- When ready, you will see your new Autonomous API Platform ready to go.

- Congratulations, your Autonomous API Platform is ready and waiting for you. Let’s move on registering an API Gateway to start deploying and running APIs.
Deploy an API Gateway – Provision IaaS VM
Oracle API Gateways are software-based appliances that can be installed wherever you want, that is, physical or virtual compute on premise or in the cloud. In this case, for simplicity reasons I am going to provision a new Oracle Linux 7.2 VM on Oracle IaaS to deploy there my API Gateway.
I am going to use Terraform in order to quickly provision my OL7.2 VM.
- Go to your Build Server (or something else where you can run Terraform commands)
- Choose a folder to git clone a Terraform plan that I prepared for this exercise.
-
Git clone my devops repo.
-
Go into the provisionOL72Env directory:
cd devops/provisionOL72Env
-
Create a folder called ssh and bring your private and public SSH keys. Call them: myPrivate_sshKey and myPublic_sshKey.pub respectively.
- Rename/Copy “terraform.tfvars_sample” to “terraform.tfvars“,
cp terraform.tfvars_sample terraform.tfvars
- Open “terraform.tfvars” and set your variables, depending on where you want to deploy your OL environment and how you want to prefix it.
-
Once you feel comfortable with your environment variables values, go back to the top provisionOL72Env directory and run terraform init to download and configure the providers being used i.e. opc and null:
terraform init

-
Then apply the Terraform plan:
terraform apply
Review and accept the changes by typing yes + enter
- First, it is going to create the required environment pre-requisites, such as Object storage, network configuration, compute, etc… It should take a few minutes to finish.
- Once ready, your new OL7.2 VM will be ready to go and configured with all its infrastructure dependencies:

Deploy an API Gateway – Install and configure API Gateway
Now that we have provisioned an Oracle Linux environment, we are going to use it to continue installing an Oracle API Gateway and configure it to join our Autonomous API Platform instance.
First let’s create the Logical Gateway configuration in our API Platform Management console. This is the space through which the physical API gateway will be in constant management and synchronisation.
- Go back to your new Autonomous API Platform instance landing page.
- Click on your new Autonomous API Platform instance and click on “Access API Platform Service Instance“.

- Click on the top left burger menu and select Gateways.

- Click on Create.

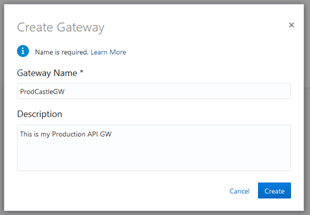
- Give it a good name and description. Then click Create.
- Your new Logical Gateway will be created. Click on it.

- On the left vertical menu, click on Nodes and then Download Gateway Installer.

- While it finishes downloading, click on Open Installation Wizard, it will help us build the properties file required to install and configure our physical API GW once downloaded.

- The Wizard will help us get all parameters auto-populated. Review and click next button.

-
In Step 2, set the next values:
- Give it a good Gateway name and description.
- Listen IP Address: Enter the internal IP Address of your OL 7.2 VM – You can get it by going back to Compute classic dashboard and look at the Private IT for your Oracle Linux VM created previously.

- Published Address: This time enter the Public IP Address assigned to the Oracle Linux VM.

- Proxy settings if needed.
- Node Installation Directory: Enter a location where you want to install your API Gateway within the Oracle Linux VM. In my case: /home/opc/ProdCastle/apigw/install
- Installation Archive Location: Enter the location where you are planning to have your (perhaps still downloading) API Gateway. In my case: /home/opc/ProdCastle/downloads – Note: Make sure you create this directory beforehand and unzip your downloaded API Gateway there.
- Review your parameters and if all is right, click on the next arrow.

- In Step 3, we are not setting anything else. Just take a note of the ports that your API Gateway will be using. This will be useful later. When done click on the next arrow.

- Step 4. Click Download file to get the configuration properties file. Then, click Done to finish.

Deploy an API Gateway – Creating API Manager and API Developer Users
We will be creating different types of users in Oracle Identity Cloud Service (IDCS), that is the underlying Identity Directory for Oracle Public Cloud Services.
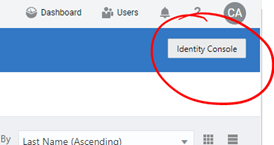
- Go to the IDCS console, one way you can do it is by clicking on Users, located at the top right of almost any console.

- Click on the “Identity Console” button at the top right.
- Once in the IDCS console, click on the top left burger menu and then click on Groups.

- Click on “+Add” to create a new Group.
- Give it a good name and description. Then click on Finish.

- Repeat the steps and add another group. This time it is for Developers.
- Your 2 groups should be visible now.

- Now, use the top left burger menu again to go to Users.
- Click on “+Add” to create a new API Manager user.
- Enter the name, last name and email. Make a note on the Username that you choose. You will need it later. When ready, click Next.

- Choose the Manager’s group that you created previously. Then when done click Finish.

- You should get a successful message.

-
Create another user, this time associate it to the Developer’s group.
Note: Make sure you enter a real email, as you will immediately receive and email to activate your user account and set the password.
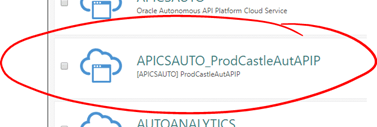
- Now, go back to the top left burger menu and this time select Applications

- Locate and click on the Application that corresponds to the Autonomous API Platform environment that you provisioned previously.
- Click on Application Roles tab.
-
For simplicity purposes add your API Managers group to at least APIManager, GatewayManager and GatewayRuntime. Di this by clicking on each of the role’s right end burger menu.
Note: This is just a simple test configuration. You might need to tighten your security for your own environments.
- Now, that we are here, click on the burger menu for ApplicationDeveloper and add your Developers group.

-
Taking advantage that we are here, click on the Configuration tab and copy to a safe place. We will need them to join the API Gateway in the next section.
- Client ID
- Client Secret

Deploy an API Gateway – Install and configure Physical API Gateway
It is time to do the actual installation of the API Gateway.
-
Assuming that you already finished downloading the actual API Gateway zip file. Make sure you unzipped it in the specified location during step 2 of the wizard.
Important: Replace the gateway-props.json file that is at the root of the just unzipped API gateway by the one that you just downloaded as a product of the Wizard.
-
If not already done, install Oracle certified JDK 1.8+ and set JAVA_HOME.
- Go to Oracle JDK download page and Accept the License prompt – Then, look for Linux x64 RPM version. Right click and Copy the “Copy Link Address”, so that we can wget it from within the SSH terminal on the OL7.2 VM.
- Go back to an SSH terminal of the OL7.2 VM.
-
Download the JDK:
sudo yum install wget -y && wget –header “Cookie: oraclelicense=accept-securebackup-cookie” http://download.oracle.com/otn-pub/java/jdk/8u171-b11/512cd62ec5174c3487ac17c61aaa89e8/jdk-8u171-linux-x64.rpm
- Install it with yum localinstall
sudo yum localinstall jdk-8u171-linux-x64.rpm
- JDK will be installed under: /usr/java/jdk1.8.0_171-amd64. Verify the installation with java -version

- Set JAVA_HOME. Edit the .bash_profile – Append at the end:
export JAVA_HOME=/usr/java/jdk1.8.0_171-amd64/
export JRE_HOME=/usr/java/jdk1.8.0_171-amd64/jre
PATH=$PATH:$HOME/bin:$JAVA_HOME/bin
export PATH
E.g.

-
Source it to take effect on the current terminal window:
source .bash_profile
- Test it:

- Run the following command to install, configure, start and join the API Gateway:
./APIGateway -f gateway-props.json -a install-configure-start-join
-
When prompted:
- Please enter user name for weblogic domain,representing the gateway node: weblogic + [ENTER]
-
Password: [WHATEVER YOU WANT] + [ENTER] – Make sure you remember your password.
-
The installation will continue. After a few minutes it will ask you to enter the API Gateway Manager user that we created previously:
- Please enter gateway manager user: API_Mgr_User (or whatever API Manager user you created in the last section)
- Please enter gateway manager user: API_Mgr_User (or whatever API Manager user you created in the last section)
- Password: Enter the password that you set for your API Manager user.
- Please enter gateway manager client id: Enter your Client ID that you captured in the last section.
- Please enter gateway manager client secret: Enter your Client Secret that you captured in the last section.
- Please enter gateway manager runtime user: Enter your user assigned to the GatewayRuntime role. In this case I have the same API Managers group, so it is the same admin user.
- Please enter gateway manager runtime client id: Enter your Client ID that you captured in the last section.
- Please enter gateway manager runtime client secret: Enter your Client Secret that you captured in the last section.
Note: For some reason I got an error saying that it could not find the original Gateway (100) that I originally indicated in the gateway-props.json. I don’t know why? I got around it by saying yes when it asked me to create-join instead. I will investigate this issue and come back here. In the meantime, selecting y + [ENTER] to create-join the node instead got me going to the end.
- The whole installation process should complete successfully.

- Go back to the API Platform Managers Portal and click on the new node. You should find a pending registration node.

- Click Approve. It will ask you to enter a brief description.
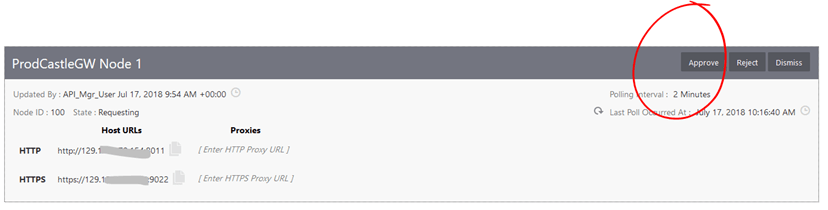
- Your Node should be active now.

Congratulations!!! You have enough to start creating APIs using your own Autonomous API Platform and API Gateway running in the Oracle Public Cloud.
I hope you found this blog useful. If you have any question or comment, feel free to contact me directly at https://www.linkedin.com/in/citurria/
Thanks for your time.
