
Infrastructure as Code is becoming very popular. It allows you to describe a complete blueprint of a datacentre using a high-level configuration syntax, that can be versioned and script-automated. This brings huge improvements in the efficiency and reliability of provisioning and retiring environments.
Terraform is a tool that helps automate such environment provisioning. It lets you define in a descriptor file, all the characteristics of a target environment. Then, it lets you fully manage its life-cycle, including provisioning, configuration, state compliance, scalability, auditability, retirement, etc.
Terraform can seamlessly work with major cloud vendors, including Oracle, AWS, MS Azure, Google, etc. In this blog, I am going to show you how simple it is to use it to automate the provisioning of Oracle Cloud Infrastructure from your own laptop/PC. For this, we are going to use Vagrant on top of VirtualBox to virtualise a Linux environment to then run Terraform on top, so that it doesn’t matter what OS you use, you can quickly get started.
This is the high-level idea:

Before we start
Before we start, I want to give big thanks to Cameron Senese, for providing guidance and being a great mentor when it comes to managing infrastructure as code. He is a true cloud guru!
- Vagrant: In this blog I assume that you are a bit familiar with Vagrant, if not, I would recommend that you spend 5 minutes and quickly read this other blog that I wrote some time ago. Trust me, it will make your life easier!
- Oracle Public Cloud account: If you still don’t have an Oracle Public Cloud account yet, go to https://cloud.oracle.com/tryit and request one. They are free and give you access to the full Oracle Cloud stack.
- SSH Keys: You will need a pair of SSH keys to login into the VMs once it is created. If you still don’t have your own pair, you can see here how to create them.
Now, let’s get our hands dirty.
Installing Terraform on your Laptop/PC
In this section I am going to explain the steps that are involved in installing and configuring Terraform on your laptop/PC Host Operating System. If you prefer to use a VM instead, skip this section and go to the next one.
You can install Terraform on your own OS, regardless of whether you use Windows, Linux, MacOS, etc. It is as simple as:
- Going to: https://www.terraform.io/
- Clicking Downloads

- Select your OS flavour

-
Unzip the Terraform package to whatever location you want to run it from. Then, add that location to your OS PATH.
-
E.g.
- Windows: set PATH=C:\LOCATION\terraform;%PATH%
-
Linux: export PATH=/LOCATION/terraform:$PATH%
-
- Make sure it is properly set up by opening a terminal window and typing: terraform –version

Note: When writing this blog, v0.11.3 was the latest Terraform version for Linux 64b.
This is how simple you can install Terraform on your OS of choice. However, instead of installing Terraform on your laptop/PC OS, I would recommend that you use a virtual machine and install it there. That way, you can keep your laptop or PC clean, allowing you to very quickly create and dispose VMs as you need them, without installing any external software on your laptop or PC. In order to quickly spin up VMs, we are going to use Vagrant – as suggested click here if you need a quick refresher on how Vagrant works (it takes 5 worth spent minutes).
Installing Terraform using Vagrant
The following instructions explain how to build your own Vagrantfile and configure Terraform as part of a bootstrap process. Follow them if you want to, but you don’t have to do them, as in the next section I explain how to do it using a pre-built GitHub repository.
The VM Vagrant Box that I am going to use is: ubuntu/trusty64, but you can choose whatever you prefer.
Once you run vagrant init [YOUR_BOX], open the Vagrantfile, so that we can add bootstrap instructions to also install Terraform.
That includes:
- Downloading Terraform
- Unzipping Terraform package into /usr/local/bin (so that it becomes part of the system PATH)
That would look like that:

In this case, I am downloading Terraform v0.11.3, but when you do it, update to the latest version.
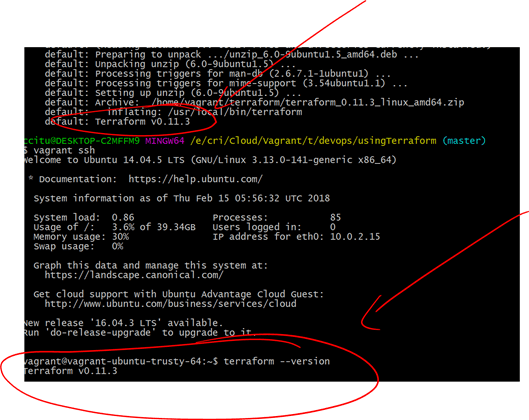
- Wait for the bootstrap process to finish, also if this is the first time that you use ubuntu/trusty64 box, Vagrant might have to download it.
- Once Vagrant finishes, you can see at the end the Terraform version, but just to double check, vagrant ssh into your VM. Then, validate by typing: terraform –version
Installing Terraform from my DevOps GitHub repository
Ok, now that you know how everything sticks together, you don’t have to do it, you can simply:
- Ensure you have installed Vagrant on your laptop/PC
-
Download or Git clone my GitHub repo:
git clone https://github.com/solutionsanz/devops
- In a terminal window, go to where you cloned/downloaded the repository (devops/usingTerraform) – Notice that the Vagrantfile is already in there.
- Run: vagrant up
- Voila! Your environment with Terraform is ready to go!
Using Terraform to build an Oracle IaaS VM
When you Git cloned my devops repository, you also downloaded some Terraform files (.tf) that come as a sample to spin up simple VMs in Oracle Public Cloud (IaaS).
We are going to learn how to create and remove a VM running on Oracle Public Infrastructure.
-
Open the file “firstPlan.tf” in a text editor. Let’s analyse its content.
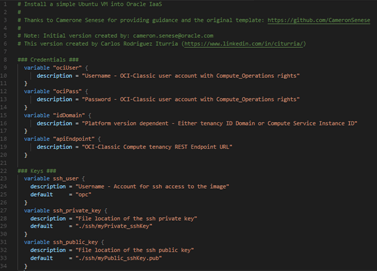
- The first section is the environment variables. We are going to use these ones to connect into our Oracle Public Cloud account.

- User and Password: These are your Oracle Public Cloud credentials
- Identity domain: This is the Identity domain that you opened when creating your Oracle Public Cloud account.
- Endpoint: You can get this endpoint by going into the Compute Cloud Console. Depending on your region you might have multiple Availability Zones:

- SSH Keys: These will be the SSH keys that you will use to SSH later into your VM. If you have not yet created your key pair, feel free to see here.
-
The second section is about the Network and Storage configuration that I want to apply to my VM provisioning.
-
Resource “opc_compute_ip_reservation” “my-reservation-ip-external”: This is my declaration used later to allocate an external IP address to my VM.
- Resource “opc_compute_security_list” “my-sec-list-1”: This is the default overall Security List that specifies that all inbound traffic to the new VM will be denied and all outbound traffic will be allowed. Then on top of this we will add exceptions, based on our requirements, e.g. open inbound ssh access.
- Resource “opc_compute_security_ip_list” “my-sec-ip-list-1”: This is a new security IP List range. In this case, I am using a 0.0.0.0/32 CIDR format to refer to any traffic from the Internet. This will be used below in a security rule to refer to open all SSH traffic from the Internet. You can restrict this more. For example, if you just want to allow your IP address, you can say: MyIP/32 – This implies a 32-bit mask which leaves only your own host. Have a look at this website if you need a refresher on Network subnetting and CIDR.
- Resource “opc_compute_sec_rule” “my-sec-rule-1”: This is our Security rule that combines the previous security lists, i.e. Deny all inbound traffic, except port 22 (SSH) and allow all outbound traffic.
- Resource “opc_compute_storage_volume” “my-volume-1”: This defines the type and size of Storage to create, as well as the type of VM image to spin up, in this case Ubuntu 16.04
-
Note: You can find the image name that you wish by visiting the market place, either externally or within your Compute Cloud Console. Then you can make it available on your Images tab.

-
The third and last section is about the characteristics of the VM that we want to Provision

- Resource “opc_compute_instance” “my-vm-instance-1”: This is the instance to be created. It combines the previous resources, i.e. image type, storage, network and ssh-key configurations.
-
Finally, we are displaying the external IP address for my new VM.
IMPORTANT: Notice that we are using variables as the values for each configuration, this is the recommended way to avoid storing into your version control repository sensitive environment values, such as credentials. Also, this way you can easily change variable values and reuse your Terraform plans. The variables are defined in a separate file called variables.tf, which you can also find in the same directory that you cloned from my devops git repo. Feel free to have a look at this file.
As you can see, we are using variables.tf to define the variables used in our Terraform plan and to specify default values for some of them. However, the actual variable value is a different file called terraform.tfvars. That way, you make sure to describe and provide default values on your variables, but never store real values, such as credentials in your version control repository.

NOTE: If your environment runs on IDCS, the idDomain needs to be set to the Server Instance ID, rather than the actual Identity Domain name.
Also notice that you need to enter the location of the image that you want to use to install your server. This can literally be whatever you want. You can choose from a range of out-of-the box Oracle Images, from the Market Place (e.g. Ubuntu images). The easiest way to move any of the Marketplace images into your Block Storage is by:
- Using the Compute Cloud Service to attempt to “Create Instance”
 , so that it takes you to Marketplace

- Search for the Image that suits your need and then “Select” it.

- Oracle will copy this image into a local Block Storage location, that then you can reference from Terraform.

Alternatively, you can even upload your own image that you can export from VirtualBox for example. For more information on how to import an Image refer to this link.
Remember, this file is never checked in into your version control repository. If using GIT, make sure to add it into your “.gitignore” file.
- Ok, now that we understand the structure of Terraform plan, let’s run it.
- First, move to folder /vagrant: cd /vagrant
- Create a folder called ssh and copy here your public and private keys
-
Now, we need to ask Terraform to generate a full plan to be executed (without being executed).
terraform plan

-
If we are happy with it, we could simply use apply to apply the default plan.
terraform apply
Then confirm typing yes to continue.
Note: You could alternatively use a “-out” directive when generating the plan to output the plan into a separate file. That way we can only execute the reviewed plan later.
- Terraform is going to follow your plan and create your VM in the Oracle Public Cloud as indicated. After 1 or 2 minutes, the VM will be up and running.
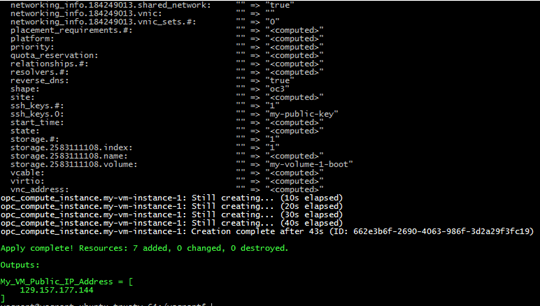
You can review in the Oracle Compute Console that your VM and all dependencies were provisioned properly!
-
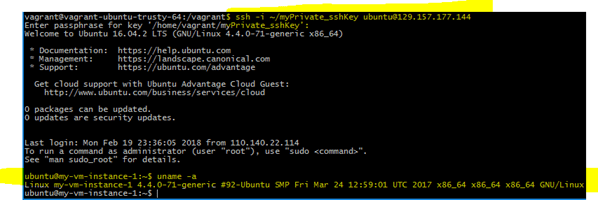
We can see the public IP address in the output of Terraform apply or in the Oracle Compute Console. Let’s use it to ssh into it. For this, use the private key that corresponds to the public key that you used in your plan.
Within the Vagrant VM you can SSH directly. You will be using your Private Key to Connect, as the VM was automatically provisioned with your Public Key. Also, inbound SSH access will be already enabled, as defined in your Security Rule.
-
When you are done using this environment, you can destroy your cloud VM with all its dependencies:
terraform destroy
Then confirm typing yes to continue.
Notice that the VM compute, as well as other dependencies (e.g. network, SSH keys, storage volumes, etc.) are removed by Terraform. This makes it easy to spin up environments in the Cloud based on your requirements and dispose them when you don’t need it anymore.

That’s it, we just learned how to use Vagrant and Terraform together to simplify managing Oracle Cloud infrastructure as Code from your own laptop/pc. In future blogs, I am going to extend this scenario, to build not only simple VMs on top of Oracle IaaS, but how to provision Oracle PaaS services, such as Databased Cloud Service, Integration Cloud, SOA Cloud Service, Application Container Cloud Service, etc.
I hope you found this blog useful.
For more examples on what is possible with the Terraform OPC provider, make sure to visit:
- OPC Classic: https://github.com/solutionsanz/terraform-provider-compute
- Terraform and Kubernetes: https://github.com/cameronsenese/opc-terraform-kubernetes-installer
- New OPC Provider: https://github.com/solutionsanz/terraform-provider-opc
If you have any question or comment, feel free to contact me directly via LinkedIn at: https://www.linkedin.com/in/citurria/
Thanks for your time.

6 thoughts on “Teaching How to use Terraform to Manage Oracle Cloud Infrastructure as Code”