
This section shows you how to create an SSH Key pair to be used to provision Oracle Cloud Services and later on to be able to authenticate via SSH connection from your SSH client.
Oracle Cloud services such as Oracle Java Cloud Service and Oracle Database Cloud – Database as a Service are built on top of infrastructure and functionality that are provided by Oracle Compute Cloud Service. When you create a service instance of one of these Oracle Cloud services, all the Oracle Compute virtual machines (VMs) required to support the service instance are provisioned and configured for you.
You can access the service instances and resources provided by the VMs by logging into the machine through a secure shell (SSH). To do so, you need an SSH public/private key pair for the VM. You will need the public key when creating a service instance, and you will need the paired private key when you access it using an SSH utility. This tutorial shows how to create the key pair.
Note: You can associate a single SSH public key with multiple service instances. However, you cannot associate an SSH public key with a service instance after you have created the instance.
This section covers how to create a secure shell (SSH) key pair in two ways:
- By using PuTTY on Windows. PuTTY and Puttygen are available from many sites, but you can reach the main download site http://www.putty.org
-
By using a command line with an SSH utility, such as those already included in many UNIX and UNIX-like systems such as Linux, Solaris, etc. Alternatively, you can install and use OpenSSH on UNIX or Cygwin on Windows.
If you don’t already have ssh-keygen installed, you can obtain it from any of a number of sources and install it yourself. Popular options are OpenSSH for UNIX and Cygwin for Windows. OpenSSH is available from http://www.openssh.com/portable.html. Cygwin is available from https://cygwin.com/install.html.
Before starting this tutorial, you should have:
- Installed PuTTY on your computer with a Windows operating system.
-
Installed the ssh-keygen utility by either:
- Making sure your UNIX or UNIX-like operating system already includes ssh-keygen; or
- Installing an SSH utility with a command line interface, such as OpenSSH for UNIX or Cygwin for Windows.
- Some knowledge of UNIX, for working at the command line.
Generating an SSH Key Pair using PuTTY Key Generator
-
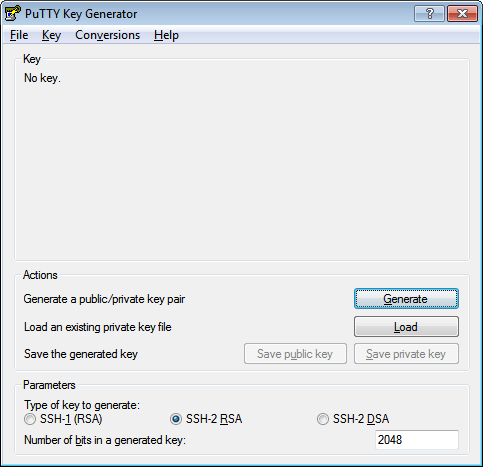
Find puttygen.exe in the PuTTY folder on your computer, for example, C:\Program Files (x86)\PuTTY. Double-click puttygen.exe to open it.
-
Accept the default key type, SSH-2 RSA.
SSH-2 is the most recent version of the SSH protocol (and is incompatible with SSH-1). RSA and DSA are algorithms for computing digital signatures.

-
Set the Number of bits in a generated key to 2048 bits, if it is not already set with that value.
This sets the size of your key and thus the security level. A minimum of 2048 bits is recommended for SSH-2 RSA.

-
-
Click Generate.

-
Move your mouse around the blank area to generate randomness to the key until the green bar completes the full empty bar. You will notice that the green bar will keep growing as you keep moving the mouse inside the area.
Note: The dotted red line in the image below is for illustration purposes only. It does not appear in the generator pane as you move the mouse. It only represents the random path that I chose.

-
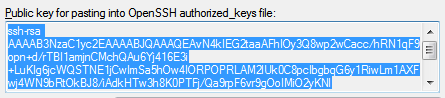
The generated key appears under Public key for pasting into OpenSSH authorized_keys file.

-
The key comment is the name of the key that you will use to identify it. You can keep the generated key comment or create your own.

-
I recommend that you enter key passphrase to ensure double factor authentication. This means that in the event that someone steals your private key, it will be useless as they will also need the key passphrase. Enter a Key passphrase and enter it again for Confirm passphrase. When you reload a saved private key, you will be asked for the passphrase, if one is set.

Note: There is no way to recover a passphrase if you forget it.
-
Save the private key of the key pair. Depending how you work with the private key in the future, you may need one saved in the PuTTY PPK format and one saved in OpenSSH format. Let’s do both.
-
To save the key in the PuTTY PPK format, click Save private key to save the private key of the key pair.

You can name it anything you want, although you may want to use the same name as you used for the key comment. The private key is saved in PuTTY’s Private Key (PPK) format, which is a proprietary format that works only with the PuTTY toolset.

You can use this key whenever you use Putty to perform SSH actions.
-
To save the key in OpenSSH format, open the Conversions menu and select Export SSH key. This will be the same key as above, just saved in a different format.
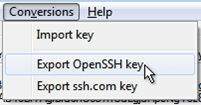
You can name it anything you want, but to keep track of your keys, you should give it the same name as the key you saved in PPK format in the previous step. You can also use any extension (or no extension), but let’s use .ssh, to make it clear what format it is.

You can use this key whenever you use OpenSSH to perform SSH actions using ssh utilities that support OpenSSH, for example when using Linux in a command shell or with Cywin for example.
-
-
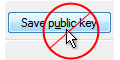
Now you need to create the public key to be paired with the private key(s) you just created. However, clicking the Save public key button will create a public key that will not work with Oracle Cloud services in certain cases. So, for the purposes of this guide, there is no reason to save a public key using the Save public key button.
Instead, proceed as follows.
-
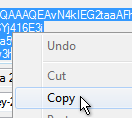
In the PuTTY Key Generator, select all of the characters under Public key for pasting into OpenSSH authorized_keys file.
Make sure you select ALL the characters, not just the ones you can see in the narrow window. If a scroll bar is next to the characters, you aren’t seeing all the characters.
-
Right click somewhere in the selected text and select Copy from the menu.
-
Open a text editor and paste the characters, just as you copied them. Start at the first character in the text editor and do not insert any line breaks.

-
Save the key as a text file, using the same root name as you used for the private key. Add a .pub extension. You can give it any extension you want, but .pub is a useful convention to indicate that this is a public key.

-
Write down the names of your public and private keys, and note where they are saved. You will need the public key when creating service instances in, for example, Oracle Java Cloud Service, Oracle SOA Cloud Service, Oracle Database Cloud, etc. – You will need the public key when provisioning the environment and the private key when trying to access a service instance’s virtual machine via SSH.
The way to remember when to use your public and private key is simple, use this simple analogy for this:
Public key = Padlock
Private key = Padlock’s key
That is, when you provision a cloud environment, it is safe to use your public key, as it is safe to close your house mailbox with a padlock. Everybody can see it, but nobody can open it. Only when using your “private key” you can get access to it, similarly as when you approach your mailbox with your padlock’s key.
If you don’t use padlocks to secure your mailbox at home, it doesn’t matter. You get the idea!
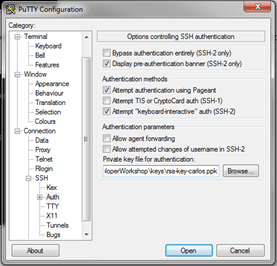
Once you generated your key pair, all you have to configure in PuTTY the private key in a connection where you intend to SSH to an environment that was provisioned using its associated public key. In order to setup the Private Key in PuTTY for a given connection, you have to select the PPK key file under Connection > SSH > Auth, as shown below:
Generating an SSH Key Pair on Command line
I am going to show you how to create an SSH key pair on the command line using ssh-keygen – You can still do this in Windows, if you are using things like a Cygwin terminal.
-
Open a shell for entering the commands.
-
At the prompt, enter the following:
ssh-keygen -t rsa -N “passphrase” -b “2048” -C “key comment” -f path/file_name
where the arguments are as follows:
| -t rsa | Use the RSA algorithm. |
| -N “passphrase“ | Passphrase to protect the use of the key (like a password). If you don’t want to set a passphrase, don’t enter anything between the quotes, but it is strongly recommended that you always protect the private key with a second factor authentication from any unauthorized use. |
| -b “2048” | Generate a 2048 bit key. You don’t have to set this if 2048 is acceptable, as 2048 is the default.
Note: A minimum of 2048 bits is recommended for SSH-2 RSA. |
| -C “key comment“ | A name to identify the key. |
| -f path/file_name | The location where the key pair will be saved and the file name for the files. For example, if you give the file name as id_rsa, the name of the private key will be id_rsa and the public key will be id_rsa.pub. |
For example,

-
Alternatively, you can simply enter ssh-keygen and then enter responses when prompted for a name and a passphrase. The keys will be created with default values: RSA keys of 2048 bits.

-
Type ls –l path/file_name*, to see both the private and public keys that were just generated:

-
Now, in order to use your private key when ssh’ing into any OPC server you should use the –i flag. For example:
ssh -i /home/carlosr/rsa-key-carlos opc@IP_ADDRESS
Where IP_ADDRESS is a public IP Address that you obtain when provisioning a cloud environment.
opc is the default username that is created in any Oracle Public Cloud Environment. Once you SSH into it, you can move to use other users.
Notice that you don’t have any PPK (private key for PuTTY). Well, the idea is that if you have a way to run shell commands, you can simply “ssh” into any environment using your private key. Most likely you will not need to use PuTTY to ssh into your Cloud environments. Having said that, if you still want to use PuTTY, you can obtain a PPK file based on your command line generated RSA Key. All you have to do is:
- Open PuTTY Key Generator
-
Click on Load

-
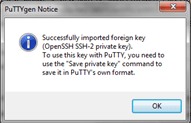
Select the private key that you generated with ssh-keygen. If you selected a passphrase, it will ask you to enter it

-
That’s it, your key will be imported
-
Now you can save it as PPK by clicking Save Private Key


3 thoughts on “Teaching How to Create SSH keys for Oracle Public Cloud (OPC) access”