
In a previous blog, I explained how to provision a new Kubernetes environment locally on physical or virtual machines, as well as remotely in the Oracle Public Cloud. In this workshop, I am going to show how to get started by deploying and running a Hello World NodeJS application into it.
There are a few moving parts involved in this exercise:
- Using an Ubuntu Vagrant box, I’ll ask you to git clone a “Hello World NodeJS App”. It will come with its Dockerfile to be easily imaged/containerised.
- Then, you will Docker build your app and push the image into Docker Hub.
- Finally, I’ll ask you to go into your Kubernetes cluster, git clone a repo with a sample Pod definition and run it on your Kubernetes cluster.

Before we start
In this blog I assume the following:
- You have already provisioned a Kubernetes cluster environment somewhere, as indicated in this previous blog.
- You are a bit familiar with Docker. At RedThunder we have written plenty of existing Docker blogs that will quickly get you familiar with it.
- You have a Docker Hub account. Create one otherwise.
- You are familiar with Vagrant. If not, read this blog.
- Also, I assume that you are familiar with Terraform. If not, read this other blog that I wrote some time ago. It explains Terraform in detail.
- You have an Oracle Cloud account, if not request a free trial. Here: https://cloud.oracle.com/tryit
Ok then, let’s have fun!
Build your Hello World App as a Docker Image
I am going to use a Vagrant Box as the dev environment to git clone, containerise my “Hello World” application and then push it into Docker Hub. This is for simplicity reasons, so that you don’t have to install Docker Engine on your laptop (I don’t personally like installing software on my laptop/host, I prefer to do so using disposable VMs). For this, I made a Vagrant Box publicly available in my devops Git repo, to be used as a dev env.
The Hello World Application that I am going to use is a simple NodeJS express application that returns “Hello World” when invoked. Nothing fancy, just enough to PoC.
-
Clone my kubernetes repository:
-
Move into the helloWorldApp directory:
cd kubernetes/helloWorldApp
-
Now, start your vagrant box:
vagrant up
Note: Give it some time the first time. It will download the Ubuntu Box and install all dependencies. Subsequent times will be much faster.
-
Once it finishes, as per the bootstrap process, your Vagrant VM is going to come with all necessary components installed, like Docker Engine, so that you can build your Hello World app as a Docker image.
-
Vagrant ssh into it.
vagrant ssh
-
Move into your host auto-mounted working directory.
cd /vagrant
- Feel free to explore the Dockerfile. It is doing the following:
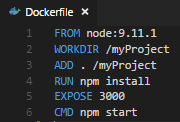
- Line 1: Starting from existing Docker Hub node image version 9.11.1 (the latest stable when writing this blog)
- Line 2: Setting the Working directory within the new Docker node image (creating and changing current directory)
- Line 3: Adding all the local directory (i.e. the “Hello World” App) content/files into the Working directory
- Line 4: It will run “npm install” to retrieve all the “Hello World” NodeJS App dependencies. In this case only the “express” module.
- Line 5: Defines the intended port on which the “Hello World” App is configured to run on.
- Line 6: Setting the command to run when “this” image is run. In this case, running the “Hello World” NodeJS App (as indicated in package.json).
- As for the “Hello World” NodeJS app, I tried to keep it extremely simple. The actual NodeJS app is app.js

- Lines 1 to 5: Require the “express” module and getting the config file that contains the port on which this Application will listen on (i.e. 3000)
- Lines 8 to 12: Define a GET API URI (i.e. “/”) and returning “Hello World from a NodeJS Application” – Feel free to change the message if you like.
- Lines 15 to 18: Defines the actual Listening service running on the configured port (i.e. 3000) and giving a welcome message.
- The other file that you might want to have a look is the actual NodeJS descriptor package.json

It is quite self-explanatory, but just pay close attention to:
- dependencies -> express – This is what is executed at “docker build” time, as defined in the Dockerfile (RUN npm install).
- scripts -> Start: node app.js – This is what will be executed at “docker run” time as defined in the Dockerfile (CMD npm start).
- Lastly, have a look at config.js – It defines the port on which the “Hello World” NodeJS app is going to run by default if not otherwise set as a system variable.
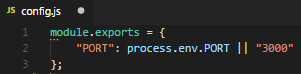
Also notice that this aligns with the Dockerfile EXPOSE 3000 directive.
-
Ok, now that everything is “crystal clear”, let’s build our Docker image. Since we already added the ubuntu user to the docker group during the bootstrap of this Vagrant Box instance. Let’s switch to ubuntu user.
sudo su ubuntu
-
Build the docker image:
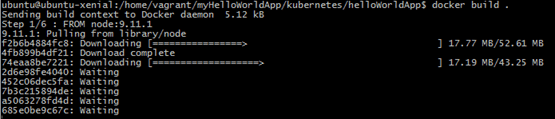
docker build .
Note: Notice the last dot “.”
- Give it some time the first time, as it has to pull the node image from Docker Hub first (~200MB).
-
As the Docker build process moves across the 6 steps, you will be able to see the progress in the console.
At the end it will show you the id of your final Docker image. Make a note of it, as you will need it later when tagging your image.

-
Let’s quickly test that our new Docker image works well. For this let’s run the image using its id as a reference. The command goes like this:
docker run -p [HostPort]:[ContainerPORT] -it [DockerImageId]
Note: -i is to run it in interactive mode, which means that you can stop it later on by ctrl+c.
For example:
docker run -p 3000:3000 -it c26c58862548
This will run a Docker container from our Docker image and start the “Hello World” NodeJS App. It will map the internal 3000 port from the container into also port 3000 in our Host.

- The provided Vagrant box is configured by default with NAT and Port-Forwarding on port 3000:3000, so you can open a browser on your host machine and go to localhost:3000 – You should be able to see the “Hello World from a NodeJS Application” message.
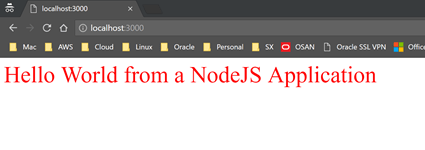
- Confirm that you get the “Hello World” message that you configured in the NodeJS application.
- Now that we know that our Docker image works as intended, let’s move on to the next section to push it into Docker Hub
Push your Hello World App Docker Image to Docker Hub
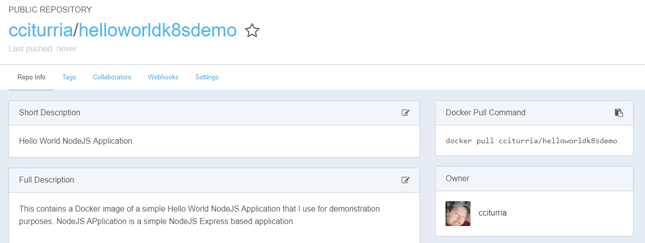
Now that we have created our Docker image and that we have briefly tested it. Let’s proceed to push it into a Docker Hub repository. For this, I assume that you already have a Docker Hub account and that you have created a repository. For example, I created one called: helloworldk8sdemo – Notice that Docker Hub repos are always prefixed with your Docker Hub username, so you might choose the same name if you like.
- Go back to your terminal window where you built your Docker image using the ubuntu user. Ctrl + C in case you are still running the container from last section.
-
In the terminal, first we need to set the Docker Hub login details.
docker login
Then enter your username and password when requested.

-
Tag the Docker image:
docker tag [Image_ID] [DockerHubUsername]/[DockerHubRepoName]
For example:
docker tag c26c58862548 cciturria/helloworldk8sdemo
Note: You could’ve tagged your Docker image at the moment of “docker building” by using -t [user/repoName]
- If you can’t remember your Docker image ID, you can type docker images

-
Then finally, Docker push the image:
docker push [DockerHubUsername]/[DockerHubRepoName]
E.g.
docker push cciturria/helloworldk8sdemo
- Give it some time as it uploads your compressed docker image into your specified Docker Hub repository.

- After a few minutes, your docker image will appear in your Docker Hub specified repo.

Run your Hello World App Docker Image in Kubernetes
Once your docker image resides in a Docker repository, like Docker Hub, we can easily pull it and run it on Kubernetes.
Applications in Kubernetes run within the concept of “pods”, that are logical runtime grouping of Docker Containers that make up a whole Application. In our case, for the “Hello World NodeJS App” there will be just one Docker Container. Pods are defined as YAML files.
-
SSH into the environment where you installed Kubernetes as part of the pre-requisites.
Note: If you have not yet built your Kubernetes environment, follow this previous blog and choose to either install it locally on your laptop, locally on Virtual Box VMs or in the Oracle Public Cloud (or any other cloud).
- Make sure your Kubernetes cluster is up and running (kubectl get nodes) with at least 1 worker node.

-
At the master node (already configured with kubectl), retrieve from GitHub a sample Pod yaml file already configured to pull our docker image.
-
Move into the helloWorldK8sDemo directory:
cd kubernetes/helloWorldK8sDemo
- Inside there is “helloWorldPod.yml“, the pod definition for our Hello World App demo.
- Most of the directives are self-explanatory, but let’s review the most important ones:
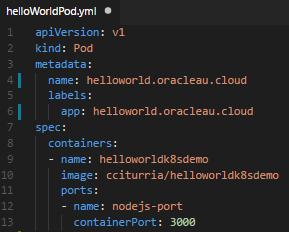
- Line 2: We are defining a Pod, so we use this as the type. In future blogs I will show how to use other types of elements, such as services.
- Line 4: The name of our Pod
- Line 6: A label for filtering purposes later.
- Line 8: This is where we define the containers that will make up this Pod (Application). In our case, there is only one container.
- Lines 9 and 10: The name and tag name of the Docker image to pull from Docker Hub
- Line 12: Canonical name of the port where our application will run. This is good practice, as later we can connect from other containers. That way we can just refer to this port name, instead of the actual port.
- Line 13: Actual Port where our application will run.
-
If you have not yet Docker Hub login, type docker login and enter your Docker Hub username and password as we did previously in our dev Vagrant box when pushing the Docker image.
-
Now, use kubectl to create a new pod, based on our Pod definition
kubectl create -f helloWorldPod.yml
- You should see a message saying that your pod was created. Give it some time, as your image needs to be downloaded.
-
Validate the status of your new pod:
kubectl get pod

-
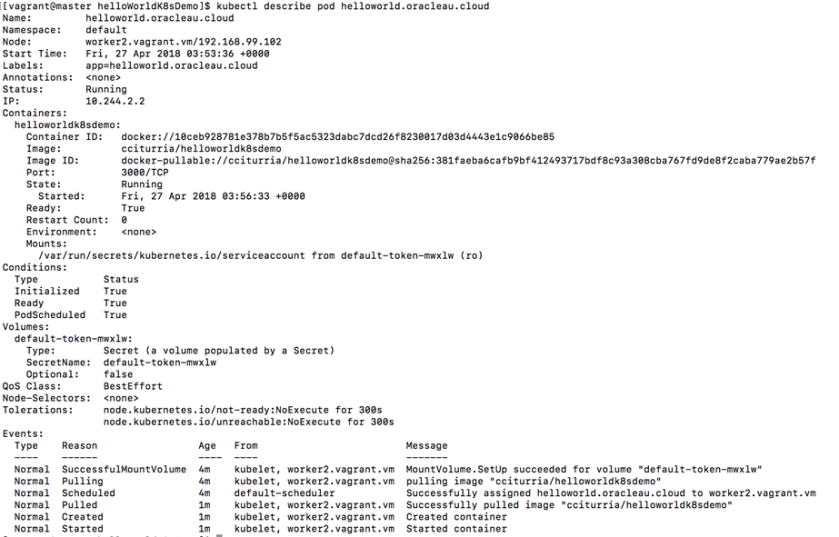
In this case it is still being created. If you want more details about your pod, you can describe it:
kubectl describe pod [YOUR_POD_NAME]
e.g.
kubectl describe pod helloworld.oracleau.cloud
-
After a few minutes your Pod should be up and running
kubectl get pod

-
Now let’s test our Hello World Application running on Kubernetes. For this, there are 2 simple ways we can do it:
-
1) Simply port-forward to the host machine, so that we can access it. This is good for simple tests, as this will keep the prompt engaged, so that a simple ctrl + c will break the port being exposed.
kubectl port-forward [POD_NAME] 8081:3000
E.g.
kubectl port-forward helloworld.oracleau.cloud 8081:3000
Similarly, as you did before, open terminal window/ssh and do a simple curl command, e.g. curl localhost:8081
-

You will get the “Hello World” message that you configured in the NodeJS application.
-
2) Create a service definition. If you wish to expose your Application as a long-running process, create a service definition instead.
kubectl expose pod [POD_NAME] –type=NodePort –name=[SERVICE_NAME]
E.g.
kubectl expose pod helloworld.oracleau.cloud –type=NodePort –name=helloworld-svc –port 8081
Note: Typically, your service definitions are also described as yaml files, so that you can version control them easily. Click here for more info.

You can gather information about your services:
kubectl get service

Or
kubectl describe services [SERVICE_NAME]
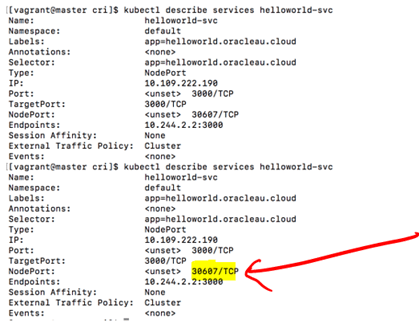
Pay special attention to the NodePort.
-
Notice that those IP addresses are internal to the Pod, which means that other containers in the pod could access them, but not externally.
-
If you are running your Kubernetes cluster with minikube, you can get the address of the service with:
minikube service [SERVICE_NAME] –url
-
Otherwise, a simple way to test your service is by looking at the NodePort:
http://%5Bkubernetes_master_address%5D:%5BNodePort%5D/
E.g.

If using a KubeDNS, refer to the kubernetes documentation.
Congratulations!!! Your Hello World Application is up and running on Kubernetes.
I will keep publishing more advanced topics on Kubernetes, especially around 12-factor principles. So, you better stay tuned!
I hope you found this blog useful. If you have any question or comment, feel free to contact me directly at https://www.linkedin.com/in/citurria/
Thanks for your time.

I have installed the master and workers using virtualbox the nodes are up and running but I got stuck with the instruction that follows .. i am in the /home/vagrant directory but i cannot do any git command i am missing anything here please help.
==
At the master node (already configured with kubectl), retrieve from GitHub a sample Pod yaml file already configured to pull our docker image.
git clone https://github.com/solutionsanz/kubernetes
LikeLike