
This time last year, people were excited talking about technologies such as Mesos or Docker Swarm to orchestrate their Docker containers. Now days (April 2018) almost everybody is talking about Kubernetes instead. This proves how quickly technology is moving, but also it shows that Kubernetes has been endorsed and backed up by the Cloud Giants, including AWS, Oracle, Azure, (obviously Google), etc.
At this point, I don’t see Kubernetes going anywhere in the coming years. On the contrary, I strongly believe that it is going to become the default way to dockerise environments, especially now that it is becoming a PaaS offering with different cloud providers, e.g. Oracle Containers. This is giving the extra push to easily operate in enterprise mission critical solutions, having the backup of a big Cloud Vendor.
So, if you have not yet got familiar with Kubernetes, you better do so and quickly. In this blog I am going to show you how to get started with a fully functional Kubernetes dev environment that will let you start playing with it. In future blogs I am going to explain different use cases using Kubernetes, mainly around the 12-factor principles of microservices, e.g. including deploying applications with concurrency, managing load balancers, managing replication controller, scalability, managing state post-container restarts, etc… But let’s start with the first and most important 12-factor: “Disposability”.

In this blog, you don’t have to install Kubernetes manually if you don’t want to. I am going to explain 3 different ways in which you can get started with a Kubernetes Dev environment ready to go:
- Option 1: Automate the provisioning of Kubernetes locally on a VM (using Vagrant Box).
- Option 2: Automate the provisioning of Kubernetes in the Oracle Public Cloud (using Terraform).
- Option 3: Manually install locally Kubernetes on an existing environment (using minikube) – This can be your own Host machine, a local VM, IaaS, etc.
Obviously, option1 and 2 will simplify the whole process and will give you the ability to treat your Kubernetes environment “as code”, so that you can destroy/recreate it quickly and easily – and that’s what “Disposability” is all about. Option 3 is more if you want to learn how to install Kubernetes on an existing environment, for example your own laptop or an existing VM.
Let’s get our hands dirty!
Before we start
In this blog I assume the following:
- You are familiar with Vagrant. If not, read this blog. It will take you 5-very-well-spent minutes.
- Also, I assume that you are familiar with Terraform. If not, read this other blog that I wrote some time ago. It explains Terraform in detail.
- You need an Oracle Cloud account, if not request a free trial. Here: https://cloud.oracle.com/tryit
Option 1: Automate the provisioning of Kubernetes locally on a VirtualBox VM (using Vagrant)
Spin up Vagrant VM
For this exercise, I am going to use an Oracle-managed Vagrant Box that luckily for us has ability to run a local nested virtualization. Yes, you read it well. Thanks to Oracle, we can now easily run a local HA Kubernetes cluster inside VirtualBox VMs!!!
It will create a topology with 3 VMs.
- 1 Master node
- 2 Worker Nodes
The GitHub repository is https://github.com/oracle/vagrant-boxes/tree/master/Kubernetes and it has a very comprehensive Readme file, but below I am writing a quick summary to get up and running.
Note: I assume that you have already:
- Installed Git
- Installed Oracle VM VirtualBox and Vagrant.
- You have an existing Oracle Container Registry account. Then, sign in to Oracle Container Registry and accept the Oracle Standard T&Cs for the Oracle Container Registry.
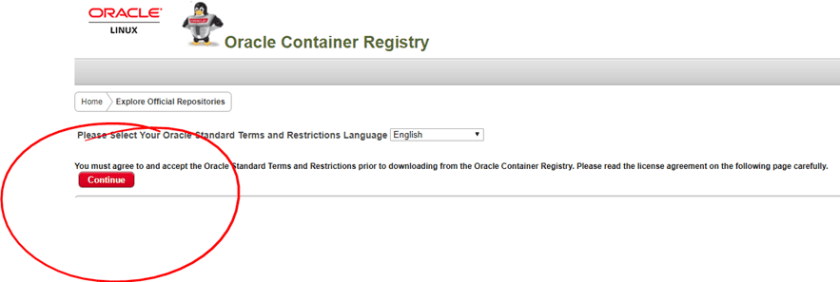
- After Accepting, it will show something like:
-
Clone Oracle’s Kubernetes Vagrant box repository:
git clone https://github.com/oracle/vagrant-boxes
-
Move into the vagrant-boxes/Kubernetes directory:
cd vagrant-boxes/Kubernetes
-
Now, start your vagrant box:
vagrant up master
Note: Give it some time the first time. It will download the Vagrant Box and install all dependencies. Subsequent times will be much faster.
-
Vagrant ssh into it.
vagrant ssh

-
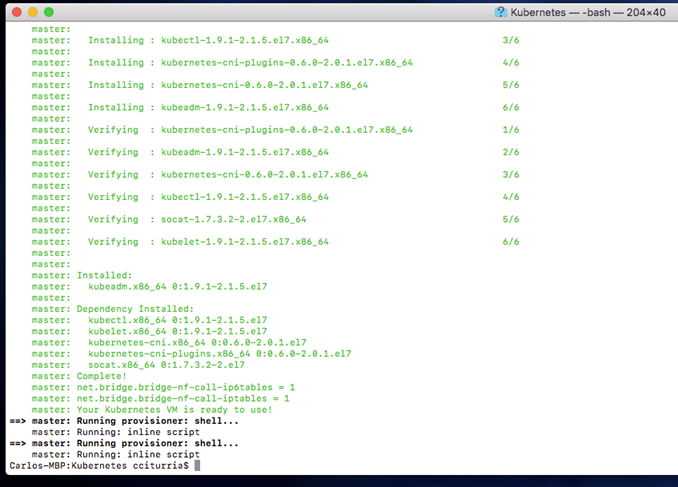
Setup your master node within the master guest VM. For this, within the master guest VM, run as root:
/vagrant/scripts/kubeadm-setup-master.sh
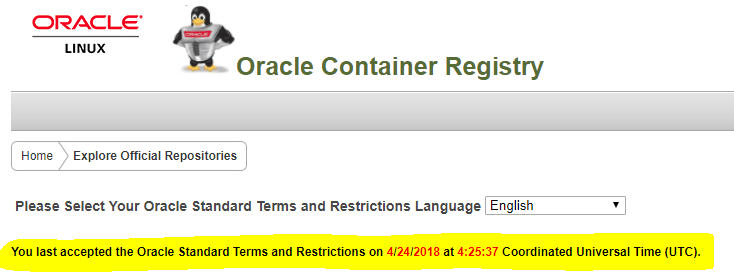
You will be asked to log in to the Oracle Container Registry. Use the same account from which you accepted the T&C’s already.
Note: If you get an error like this one:

It means that you have not yet accepted the T&C’s for the Oracle Container Registry!
- Once you run this script you will see a message asking you to be patient. They mean it! For me, it took around 30 minutes to download the associated Docker images and configure them.

-
Setting up your Master node should succeed with a message like the following:

-
Now, back to your Host machine, open other terminal windows and start the first worker node:
vagrant up worker1

-
Once it’s started, vagrant ssh into it:
vagrant ssh wroker1

-
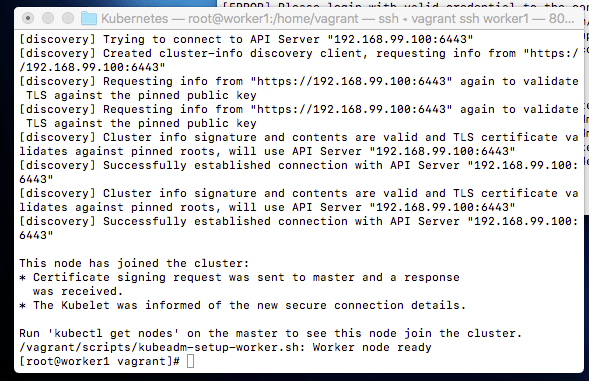
Setup your worker1 node within the worker1 guest VM. For this, within the worker1 guest VM, run as root:
/vagrant/scripts/kubeadm-setup-worker.sh
Once again, you will be asked to log in to the Oracle Container Registry. Use the same account from which you accepted the T&C’s previously.
-
Setting up your Worker node 1 node should succeed with a message like the following:
-
Finally, let’s setup the 3rd and last VM, in this case the second Worker Node. Go back to your Host machine, open a 3rd terminal window and start the second worker node:
vagrant up worker2
-
Once it’s started, vagrant ssh into it:
vagrant ssh wroker2
-
Setup your worker2 node within the worker2 guest VM. For this, within the worker2 guest VM, run as root:
/vagrant/scripts/kubeadm-setup-worker.sh
Once again, you will be asked to log in to the Oracle Container Registry. Use the same account from which you accepted the T&C’s previously.
- Setting up your Worker node 2 should succeed with a message like the following:

-
Congratulations your Kubernetes cluster with 1 Master node and 2 Worker nodes is ready to go.
-
Test your Kubernetes cluster. For this, within the master node/VM (not root, but back to the vagrant user) try the following commands:
kubectl cluster-info
kubectl get nodes
kubectl get pods –namespace=kube-system

For more information, please refer to the original Oracle Git repo readme file.
Option 2: Automate the provisioning of Kubernetes in the Oracle Public Cloud (using Terraform)
For this option, we are going to use Terraform to provision compute (IaaS) with Kubernetes on Oracle Public Cloud. If you have already installed Terraform locally or are using a BuildServer with Terraform installed, feel free to skip the next section. Otherwise if you don’t have Terraform installed and don’t want to install it, you can use a Vagrant Box that I already put together.
If you want to use a Vagrant Box that I previously put together that auto-installs Terraform:
-
Clone my devops repository:
git clone https://github.com/solutionsanz/devops
-
Move into the KubernetesDevEnv directory:
cd devops/KubernetesDevEnv
-
Now, start your vagrant box:
vagrant up
Note: Give it some time the first time. It will download the Ubuntu Box and install all dependencies. Subsequent times will be much faster.
- Once it finishes, as per the bootstrap process, your Vagrant VM is going to come with Terraform installed and ready to go.
-
Vagrant ssh into it.
vagrant ssh
-
Validate that Terraform is installed properly:
terraform –version
-
Now, we are going to use Terraform to install and configure Kubernetes on Oracle Compute Cloud. For this, we are going to git clone another repository that Cameron Senese has put together for this exact purpose.
-
First, Register an account at the Oracle Container Registry (OCR). Be sure to accept the Oracle Standard Terms and Restrictions after registering with the OCR. The installer will request your OCR credentials at build time. Registration with the OCR is a dependency for the installer to be able to download the containers which will be used to assemble the K8s control plane.
-
Git clone Cam’s repo:
git clone https://github.com/cameronsenese/opc-terraform-kubernetes-installer
-
Move to the opc-terraform-kubernetes-installer directory
cd opc-terraform-kubernetes-installer
-
Initialise Terraform:
terraform init
-
Apply the Terraform plan:
terraform apply
-
At this point the configuration will prompt for target environment inputs. Please refer to original Cameron Senese Git Repo Readme file if any of them is strange for you.
-
Depending on the number of modules selected to be installed, the whole provisioning might vary to up to 15 minutes to complete.
-
You can SSH into your new VM by using the sample private key proided by default under folder ssh.
-
Once inside the new VM, make sure the cluster is running properly by trying the following commands:
kubectl cluster-info
kubectl get nodes
Option 3: Manually Install and configure Kubernetes (with minikube) on an existing environment
Install Kubectl Manually (Optional)
- Get the latest stable version of Kubectl: https://storage.googleapis.com/kubernetes-release/release/stable.txt
-
Then replace the given release in the following URL:
- Linux: https://storage.googleapis.com/kubernetes-release/release/%5BREPLACE_HERE%5D/bin/linux/amd64/kubectl
- MacOS: https://storage.googleapis.com/kubernetes-release/release/%5BREPLACE_HERE%5D/bin/darwin/amd64/kubectl
- Windows: https://github.com/eirslett/kubectl-windows/releases/download/%5BREPLACE_HERE%5D/kubectl.exe
-
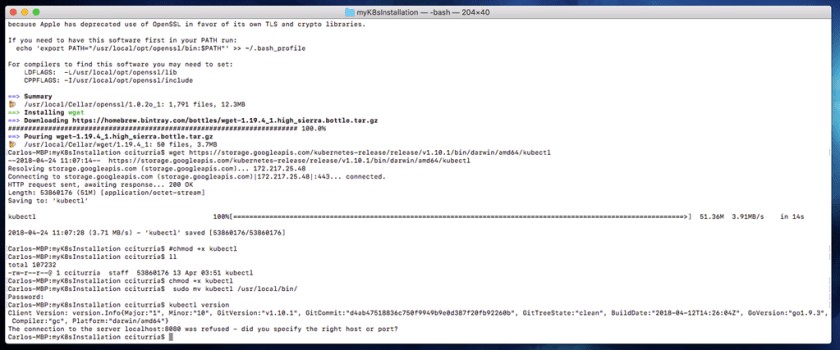
For example, at the moment of writing this blog the latest stable version is v1.10.1 and given I am using a Mac, so my URL is:
wget https://storage.googleapis.com/kubernetes-release/release/v1.10.1/bin/darwin/amd64/kubectl
chmod +x kubectl
sudo mv kubectl /usr/local/bin/
kubectl version
Make sure you get a successful response.
For more information on installing Kubectl: https://kubernetes.io/docs/tasks/tools/install-kubectl/#install-kubectl
Install Minikube Manually (Optional)
- Get the latest stable version of Minikube: https://github.com/kubernetes/minikube/releases
-
For example, at the moment of writing this blog the latest version is v0.26.0:
- Linux: curl -Lo minikube https://storage.googleapis.com/minikube/releases/v0.26.0/minikube-linux-amd64 && chmod +x minikube && sudo mv minikube /usr/local/bin/
- MacOS: curl -Lo minikube https://storage.googleapis.com/minikube/releases/v0.26.0/minikube-darwin-amd64 && chmod +x minikube && sudo mv minikube /usr/local/bin/
-
Start your Minikube cluster.
minikube start
Give it some time to download the latest minikube ISO and configure kubectl to use the cluster.
-
When it finishes, validate minikube is started and running
kubectl get node

-
If you wish to stop your kubernetes cluster:
minikube stop

Congratulations!!! Regardless of the approach that you took, your Kubernetes Development environment is ready to go.
If you want to also learn how to use it, read this other blog that shows you the basics of Kubernetes by deploying a HelloWorld Application.
Curating your Kubernetes cluster with other Cloud Native Technologies (Optional)
Recently, CNCF is pushing on various cloud native projects that are building great momentum. Technologies such as: Service Mesh (Istio, Envoy), Grafana, Prometheus, Zipkin, etc.
For this reason and in alignment with a recent Kubernetes workshop that we deliver in Australia and NZ, we provide a quick way to curate a local Kubernetes cluster, assuming you chose option 1 or 3 from this blog (kubeadm via using VirtualBox VMs or Minikube on a physical host).
Note: If you chose, option 2, i.e. suing Terraform to provision your Kubernetes cluster, then you don’t have to follow these steps. Your kubernetes cluster is already curated with all these open source technologies.
Once you have your Kubernetes cluster up and running, follow the next steps to deploy these open source technologies.
- Go to the master node or wherever you have kubectl installed.
-
Git clone the following repo:
git clone https://github.com/solutionsanz/opc-terraform-kubernetes-installer
Note: If git is not yet installed, do a quick: sudo [yum|apt-get] install git -y
-
Change directory inside the repo
cd opc-terraform-kubernetes-installer
-
Set execution privileges to curating script:
chmod 755 curate-k8s.sh
-
Run the script by specifying true or false, depending on whether you want to install the following open source components:
Order: [MonitoringDashboards SocksShopDemo CheesesDemo ServiceMeshDemo]
E.g.
./curate-k8s.sh true true true true
-
After the script execution, you should be able to see all specified services running inside your Kubernetes cluster
kubectl get services –all-namespaces

Notice that we have a variety of type of Services:
- ClusterIP: These services allow intra pod/container communication inside the cluster.
- NodePort: These services come with ClusterIP plus an assigned port on each Worker Node for external consumption
- LoadBalancer: If running on a Cloud provider, an external Load Balancer as a Service (LBaaS) will be mapped to this service
Ideally, at this point you are going to configure Ingress services to all those services that you wish to expose outside the Kubernetes cluster, fronted by LBaaS for easy external consumption by using a Cloud vendor.
For Dev purposes working locally on a Mac o PC, if you are running this Kubernetes cluster as option 1 (Vagrant based VirtualBox VMs), you might need to open up the assigned ports for those NodePort/Ingress services.
For example, in the image above: Traefik-ingress-service mapped to port 80 on 10.103.63.35
However, another way to quickly “hack” access into your internal services, even those of type ClusterIP is to establish SSH tunnels redirecting traffic from the host machine into the specific services internal IP Addresses and Ports.
For example, let assume that we want to gather access to the WeaveScope dashboard UI . Based on the configuration described above, I can:

-
If using Linux/MacOS, you can simply setup an SSH tunnel from within a terminal in your host:
ssh -L 180:10.108.222.2:80 vagrant@127.0.0.1 -p [2200|2201] -i private-key
Let’s analyse the previous command:
- 180: It is a random port I decide on my host machine through which all traffic will be SSH tunnelled.
- 10.108.222.2:80: It is the internal IP Address and Port on which I want to route all traffic. In this case it is the endpoint for the WeaveScope Dashboard UI.
- vagrant@127.0.0.1 -p 2200: Here I need to target any of the 2 worker nodes. If using the VirtualBox VMs, there is an out of the box Port forwarding already in place that maps 2200 to 22 for worker node 1 and 2201 to 22 for worker node 2. Either way will work. As the Kubernetes services are network constructs running on each of the worker nodes.
- -i private-key: It is referencing the SSH Private key (located under $GIT_REPO_LOCATION/vagrant-boxes/Kubernetes/.vagrant/machines/worker1/virtualbox/private_key)
-
If using PuTTY, first you would need to convert the Vagrant SSH private key into PPK (you can find the private key in your host machine under: $GIT_REPO_LOCATION/vagrant-boxes/Kubernetes/.vagrant/machines/worker1/virtualbox/private_key).
Then you would need to establish a tunnel configuration in your PuTTY session:

Finally, open a browser window in your Host machine and go point localhost:[YOUR_CHOSEN_PORT], e.g. localhst:180

I hope you found this blog useful. If you have any question or comment, feel free to contact me directly at https://www.linkedin.com/in/citurria/
Thanks for your time.

6 thoughts on “Teaching How to quickly provision a Dev Kubernetes Environment locally or in Oracle Cloud”