
I am thrilled with the Oracle’s Gen2 Cloud Infrastructure architecture, where Oracle completely separates the Cloud Control Computers from the User Code, so that no threats can enter from outside the cloud and no threats can spread from within tenants.
Obviously with more security, there comes more coordination, especially at the moment of invoking OCI resources APIs. Luckily, Oracle did a good job at providing a simple to use CLI and SDK (see here for more information).
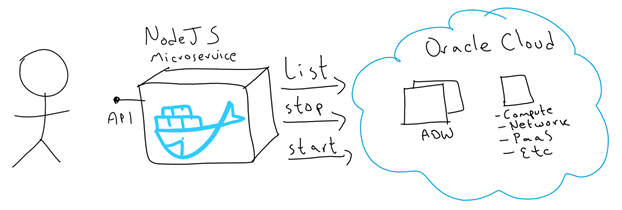
For the purpose of this blog, I built a simple NodeJS application that helps demystify the security aspect of invoking OCI APIs. Check this link for examples of running similar code across other Programming Languages.
My NodeJS application manages OCI resources in order to:
- List ADW instances
- Stop an ADW instance
- Start an ADW instance
I started this NodeJS application to list, start and stop ADW resources. However, I designed this application to easily extend it to invoke any other type of OCI resources.
I containerised this application with Docker, to make it easier to ship and run.
This is a picture of the moving parts:
Before we start
In this blog I assume the following:
- You have an Oracle Cloud account, if not request a free trial. Here: https://cloud.oracle.com/tryit
- You are a bit familiar with Docker. At RedThunder we have written plenty of existing Docker blogs that will quickly get you familiar with it.
- I hope you are familiar with Vagrant. If not, read this blog.
- You can run the NodeJS container locally on your laptop if you want. However, for a more long term option, Kubernetes is the option. If you have not yet provisioned a Kubernetes cluster, see how in this previous blog.
-
Similarly, it is a good idea to already have a Docker Hub account. Create one otherwise.
Ok then, let’s have fun!
Running the Application as a Docker Image
I am going to use a Vagrant Box as the dev environment to git clone, containerise my application, which I called “APIs 4 Harness”. This is for simplicity reasons, so that you don’t have to install Docker Engine on your laptop (I don’t personally like installing software on my laptop/host, I prefer to do so using disposable VMs). For this, I made a Vagrant Box publicly available in my apis4harness Git repo.
-
Ensure you have installed Vagrant on your laptop/PC. If you need help, read this blog.
-
Download or Git clone this Github repo:
git clone https://github.com/solutionsanz/apis4harness
-
In a terminal window, change directory to where you cloned/downloaded the repository (APIs 4 Harness) – Notice that the Vagrantfile is already in there.
-
Start up your Vagrant Dev VM:
vagrant up
-
A new Ubuntu VM will be provisioned and a bootstrap script will install all required utilities (e.g. docker).
-
You can now vagrant ssh into the Virtual Machine.
vagrant ssh
-
Go to your working directory (mounted from host OS – shred folder).
cd /vagrant
-
Use setEnv_template as a reference and create a new file. Called it setEnv – In there, set the properties of your OCI environment. If you need help to bring the parameters, read this reference or feel free to drop me a question via LinkedIn.
-
Note: Remember that the public key finger print comes from importing a PEM Public key into the user that you wish to use to invoke the OCI APIs.
-
-
Switch user to ubuntu
sudo su ubuntu
-
Containerise the application by using the provided Dockerfile:
docker build .
-
Execute locally your new Docker Image of your Application:
docker run --env-file setEnv -p 3000:3000 -it [image_id]
By default port 3000 was configured as a "Port Forward" by vagrant as part of your VM bootstrap during its creation.
-
Tag the Docker image:
docker tag [Image_ID] [DockerRepoUsername]/[DockerRepoName]:[version]
For example:
docker tag c26c58862548 cciturria/api4harness:1.0
Note, if you are unsure about the actual "image_id", you can use "docker images" to gather all images being generated.
Also notice that you could have tagged your Docker image at the moment of "docker building" by using -t [user/repoName]
-
In your host OS, open a browser and go to: http://localhost:3000 – Test your app.
-
Once you feel comfortable with the Docker image, push it to Docker Hub or OCI-R, so that you can run it easily on Oracle Container Engine for Kubernetes (OKE).
Note: I assume that you have already created a repository in your DockerHub or OCI-R, for example: cciturria/apis4harness
In Vagrant, login to Docker Hub/OCI-R:
docker login
Enter docker hub username, password and email.
docker push [DockerRepoUsername]/[DockerRepoName]
E.g. docker push cciturria/apis4harness
Deploy APIs 4 Harness application in Kubernetes
-
Go to where you have installed and configured kubectl.
Note: Read this blog if you need assistance to provision Kubernetes.
-
Download or Git clone this Github repo:
git clone https://github.com/solutionsanz/apis4harness
-
Go to where you cloned/downloaded the repository
-
Change directory to deploy/kubernetes
cd deploy/kubernetes
-
Use the template apis4harness-dpl.yaml_sample to create a new file apis4harness-dpl.yaml – In this file, at the end, set the Docker image tag name (e.g. xxx/apis4harness:1.0) and all the OCI properties that you used in setEnv.
-
Deploy APIs 4 Harness Kubernetes application resources (deployment, service, ingress)
./deploy.sh
-
Open up Kubernetes Dashboard UI or equivalent (e.g. WeaveScope) and validate all APIs 4 Harness resources were deployed successfully.
-
Test your application, open a browser and go to: http://YOUR_KUBERNETES_LB/xxx – Test your app.
Congratulations!!! You have a working NodeJS Application up and running hitting OCI resources APIs. The sky is the limit from now on.
I hope you found this blog useful. If you have any question or comment, feel free to contact me directly at https://www.linkedin.com/in/citurria/
Thanks for your time.

2 thoughts on “Teaching How to Invoke Gen2 Oracle Cloud Infrastructure (OCI) resources via REST APIs”