
In a previous blog, I explained how to provision a Kubernetes cluster locally on your laptop (either as a single node with minikube or a multi-node using VirtualBox), as well as remotely in the Oracle Public Cloud IaaS. In this blog, I am going to show you how to get started with Oracle Container Engine for Kubernetes (OKE). OKE is a fully-managed, scalable, and highly available service that you can use to deploy your containerized applications to the cloud on Kubernetes.
I recommend using OKE when you want to reliably build, deploy and manage cloud-native applications. Oracle takes full responsibility of provisioning the Kubernetes cluster and managing tiers (control plane), you simply choose how many Kubernetes worker nodes you want to have and then simply deploy your Kubernetes Applications there. Oracle manages the full Kubernetes Control plane, and wait, the best part is that Oracle does not charge for it, you just pay for the primitive IaaS that you use to run your application.
For the purpose of this demonstration I am going to show how to:
- Provision an OKE cluster
- Configure kubectl locally, so that you can run commands against your OKE cluster, e.g. deploy your application.
-
Finally, I am going to show you how to deploy a microservice into your OKE cluster.
For the purpose of this demonstration, I built a microservice earlier in a previous blog. It is a containerised NodeJS application called apis4harness that allows to interact with OCI API resources. In particular, it allows to: list, start and stop Oracle Autonomous Data Warehouse (ADW) instances.
This is a high-level visual representation:

Before we start
In this blog I assume the following:
- You have an Oracle Cloud account, if not request a free trial. Here: https://cloud.oracle.com/tryit
- You are a bit familiar with Docker. At RedThunder we have written plenty of existing Docker blogs that will quickly get you familiar with it.
- You have a Docker Hub account. Create one otherwise.
- You are familiar with Vagrant. If not, read this blog.
Ok then, let’s have fun!
Provision OKE Cluster
Now days, we rarely do things manually. We always want to automate most tasks, especially when provisioning environments. Provisioning OKE clusters is not an exception. I recommend using Terraform Oracle Cloud Infrastructure Provider to help version control your provisioning configuration of the Kubernetes cluster, together with the networking configuration, compute, etc.
We are saving for another blog, how to use Terraform to automate the provisioning of OKE clusters. For the purpose of this blog, I want to show how simple it is to spin up a new OKE cluster with just a few 2 clicks, without involving Terraform.
- Log in to the OCI Console.

- Click on the top left burger menu > Developer Services > Container Clusters (OKE)

- Click on Create Cluster button.

-
Configure it:
- Give it a good name
- Kubernetes version: Choose the latest version. E.g. v1.11.1
- Select “Quick Create” for now – By default a Virtual Cloud Network will be created, that includes: A new VCN, 2 new subnets for LBaaS and 3 worker node subnets.
- Create Node Pool: Select a “shape” that works for you. See info about available shapes here.
- Type how many nodes you want to have per subnet.
- Public SSH Key: Paste your Public SSH key.
- Leave Kubernetes dashboard and Tiller (Helm) enabled

- When done, click Create.
- Within minutes, you will have a working Kubernetes cluster ready to go! Simple, huh?

- Click on it and get familiar with its working nodes, IP addresses, subnets, etc.

- You can SSH into it using the private key pair. Also make sure to observe the Networking configuration that was created automatically. For example, click on Menu > Networking > Virtual Cloud Networks

Congratulations, your Kubernetes cluster is ready. In the next section, we will install kubectl, that is a CLI for running commands against your Kubernetes clusters.
Install Kubectl
In this section, we are going to install kubectl and configure it to point to your Kubernetes cluster, so that we can interact with it.
I am trying to summarise and simplify the steps here, but if you need more information at any point in time, refer to the official documentation.
First, we need to choose a platform to run kubectl. This is the place from which you are going to run CLI commands against your Kubernetes cluster, for example to deploy your microservices or in general to monitor and manage the state of your cluster. Make sure you satisfy these minimum requirements.
Normally, I build this platform as a Build server VM, also in the cloud, so that it can be shared among my devops-fellow colleagues. In previous blogs, I have explained how to achieve this. However, this time for simplicity purposes, your build server can also be a Vagrant VM running on your laptop.
For the purpose of this demonstration, I have prepared a Vagrant box in the same APIs 4 Harness project.
-
This will simplify the steps.
- Clone my APIs 4 Harness repository
git clone https://github.com/solutionsanz/apis4harness
- Move into the apis4harness directory:
cd apis4harness
- Now, start your vagrant box:
vagrant up
Note: Give it some time the first time. It will download the Ubuntu Box and install all dependencies. Subsequent times will be much faster.
- Once it finishes, as per the bootstrap process, your Vagrant VM is going to come with all necessary components installed, like Docker Engine, so that you can build your containerised app as a Docker image.
- Vagrant ssh into it.
vagrant ssh
- Move into your host auto-mounted working directory.
cd /vagrant
- Now, let’s install OCI CLI, so that we can grab the OKE cluster Kubeconfig easily:
bash -c "$(curl -L https://raw.githubusercontent.com/oracle/oci-cli/master/scripts/install/install.sh)"
- Leave all defaults and respond with Y to all requests to install extra libraries (e.g. python), modify PATH or CLI update, in case you had install older versions of OCI CLI before.

-
Before using the CLI, you must create a config file that contains the required credentials for working with Oracle Cloud Infrastructure:
bash
oci setup config
Note: The command prompts you for the information required for the config file and the API public/private keys. For simplicity purposes, let the setup dialog generates an API key pair and creates the config file.
- Be ready to enter a manager’s OCID, tenancy ID and leave the rest as default values. If you need help to bring the parameters, read this reference or feel free to drop me a question via LinkedIn.
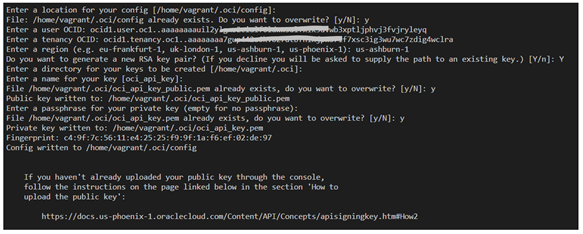
- By default, it will write a Config file into /home/vagrant/.oci/config
- Since we let it generate a new key pair, we need to upload the generated Public key to the manager user in OCI console. Keys are set by default at: /home/vagrant/.oci
- Now let’s retrieve the Kubeconfig from our OKE cluster. To access the kubeconfig for your cluster, run the following commands:
mkdir -p $HOME/.kube
oci ce cluster create-kubeconfig --cluster-id [OKE-Cluster_OCID] --file $HOME/.kube/config
You can get your OKE cluster OCID from within the console easily:

- It will create the kubectl config file under $HOME/.kube
-
Now, install kubectl (see here for more information):
sudo apt-get update && sudo apt-get install -y apt-transport-https

curl -s https://packages.cloud.google.com/apt/doc/apt-key.gpg | sudo apt-key add -

echo "deb http://apt.kubernetes.io/ kubernetes-xenial main" | sudo tee -a /etc/apt/sources.list.d/kubernetes.list

sudo apt-get update

sudo apt-get install kubectl
Note: If prompted, accept the installation.
- That’s it, kubectl is properly installed and configured to point to your OKE cluster, even though you are running it locally on a Vagrant Box on your laptop and your OKE cluster is somewhere around the world miles away.
- Test kubectl by retrieving the version of you Kubernetes cluster. Also retrieve all running services:
kubectl version
kubectl get services --all-namespaces
- If you are using RBAC, you need to run the following command to grant enough privileges to your OCI admin user (the one you chose to associate the public key):
kubectl create clusterrolebinding owner-cluster-admin-binding --clusterrole cluster-admin --user=[ENTER_YOUR_USER_OCID]
Note: Your [ENTER_YOUR_USER_OCID] can be retrieved from the OCI console (Menu > Identity > Users)
- I am going to use Traefik as an Ingress Controller in my Kubernetes cluster, so let’s install Traefik Load Balancer Controller and Traefik agent (to see the Pods in Weave Scope)
kubectl create namespace traefik-cheese
kubectl create -f /vagrant/deploy/kubernetes/traefik/traefik-complete-demo_pub.yaml
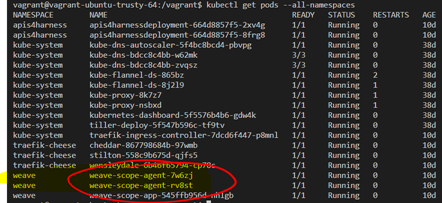
- Traefik controller and Traefik agent are installed now. Verify by retrieving all services and pods:
kubectl get services --all-namespaces

kubectl get pods --all-namespaces
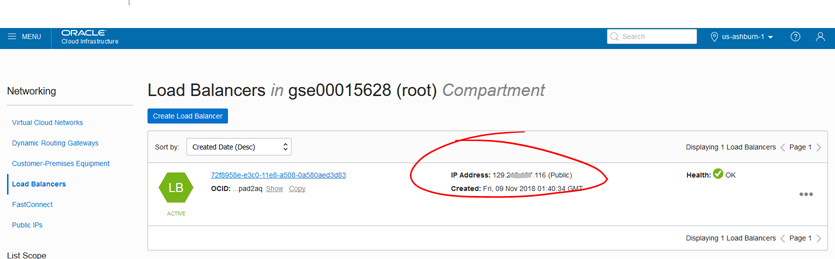
- Also, verify that you have a new LBaaS in your OCI console (Menu > Networking > Load Balancers):
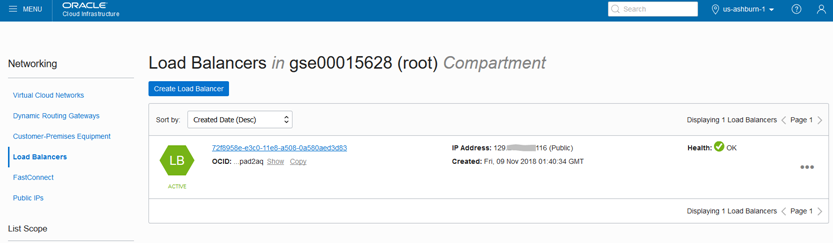
Congratulations, your OKE cluster is ready to run your microservices and expose them via LBaaS to Traefik Ingress Controller.
Deploy your microservice and expose it via LBaaS
At this point you can deploy any microservices into your OKE cluster. Let me show you the steps to deploy my APIs 4 Harness Application.
“APIs 4 Harness” application, contains the Docker file required to containerise our sample microservice.
- If you are not still there, go back to the same Vagrant Box SSH window, where we previously deployed kubectl.
-
Change directory to /vagrant:
cd /vagrant
Before deploying the APIs 4 Harness application, let’s analyse the Docker file.
- Feel free to explore the Dockerfile. It is doing the following:
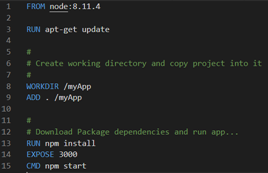
- Line 1: Starting from existing Docker Hub node image version 8.11.4
- Line 3: Update Ubuntu libraries.
- Line 8: Setting the Working directory within the new Docker node image (creating and changing current directory)
- Line 9: Adding all the local directory (i.e. the “APIs 4 Harness” App) content/files into the Working directory
- Line 13: It will run “npm install” to retrieve all the “APIs 4 Harness” NodeJS App dependencies. In this case only the “express” module.
- Line 14: Defines the intended port on which the “APIs 4 Harness” App is configured to run on.
- Line 15: Setting the command to run when “this” image is run. In this case, running the “APIs 4 Harness” NodeJS App (as indicated in package.json).
-
As for the “APIs 4 Harness” NodeJS app, I tried to keep it extremely simple. The actual NodeJS exposes the following APIs:
Note: The actual code is at router > routes > services.js
-
Get all existing ADW instances:
- GET: /services/adw
- GET: /services/adw
-
Get an existing ADW instance by ID:
- GET: /services/adw/{ocid}
- GET: /services/adw/{ocid}
-
Start an ADW instance by ID:
- POST: /services/adw/{ocid}?action=start
- POST: /services/adw/{ocid}?action=start
-
Stop and ADW instance by ID:
- POST: /services/adw/{ocid}?action=stop
- POST: /services/adw/{ocid}?action=stop
-
- The other file that you might want to have a look is the actual NodeJS descriptor package.json
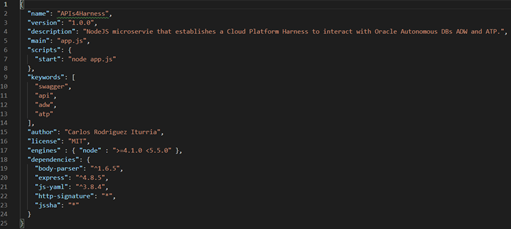
It is quite self-explanatory, but just pay close attention to:
- dependencies -> body-parser, express, js-yaml, http-signature, jssha – This is what is executed at “docker build” time, as defined in the Dockerfile (RUN npm install).
- scripts -> Start: node app.js – This is what will be executed at “docker run” time as defined in the Dockerfile (CMD npm start).
First, let’s test your Application locally
Before jumping and deploying your Application into Kubernetes, it is a good idea to run and test your application locally, just using Docker run.
-
Create a directory called ssh
mkdir /vagrant/ssh
-
Place inside your Private key. You will need to reference your private key in the next steps. By default I called it: id_rsa_pri.pem – You can change the name accordingly.
-
Use setEnv_template as a reference and create a new file. Called it setEnv – In there, set the properties of your OCI environment. If you need help to bring the parameters, read this reference or feel free to drop me a question via LinkedIn.
Note: Remember that the public key finger print comes from importing a PEM Public key into the user that you wish to use to invoke the OCI APIs.
-
Ok, now that everything is clear, let’s build our Docker image. Since we already added the ubuntu user to the docker group during the bootstrap of this Vagrant Box instance. Let’s switch to ubuntu user.
sudo su ubuntu
-
Build the docker image:
docker build .
Note: Notice the last dot “.”
- Give it some time the first time, as it has to pull the node image from Docker Hub first (~200MB).
-
As the Docker build process moves across the steps, you will be able to see the progress in the console.
At the end it will show you the id of your final Docker image. Make a note of it, as you will need it later when tagging your image.

- Let’s quickly test that our new Docker image works well. For this let’s run the image using its id as a reference. The command goes like this:
docker run –env-file setEnv -p [HostPort]:[ContainerPORT] -it [DockerImageId]
Note: -i is to run it in interactive mode, which means that you can stop it later on by ctrl+c.
For example:
docker run –env-file setEnv -p 3000:3000 -it c26c58862548
This will run a Docker container from our Docker image and start the “APIs 4 Harness” NodeJS App. It will map the internal 3000 port from the container into also port 3000 in our Host.

- The provided Vagrant box is configured by default with NAT and Port-Forwarding on port 3000:3000, so you can open a browser on your host machine and go to localhost:3000 – You should be able to see the “APIs 4 Harness” Swagger UI.

- Feel free to play with the APIs to confirm that you can List all ADW instances, as well as stop start individual ADW instances.
- Now that we know that our Docker image works as intended, let’s move on to the next section to push it into Docker Hub
Push your APIs 4 Harness App Docker Image to Docker Hub
Now that we have created our Docker image and that we have briefly tested it. Let’s proceed to push it into an Image Registry. We can use OCI-R, that comes included with OKE, but for now let’s use a Docker Hub repository. For this, I assume that you already have a Docker Hub account and that you have created a repository. For example, I created one called: apis4harness – Notice that Docker Hub repos are always prefixed with your Docker Hub username, so you might choose the same name if you like.

- Go back to your terminal window where you built your Docker image using the ubuntu user. Ctrl + C in case you are still running the container from last section.
-
In the terminal, first we need to set the Docker Hub login details.
docker login
Then enter your username and password when requested.

-
Tag the Docker image:
docker tag [Image_ID] [DockerHubUsername]/[DockerHubRepoName]
For example:
docker tag c26c58862548 cciturria/apis4harness:1.0
Note: You could’ve tagged your Docker image at the moment of “docker building” by using -t [user/repoName]
-
If you can’t remember your Docker image ID, you can type docker images
-
Then finally, Docker push the image:
docker push [DockerHubUsername]/[DockerHubRepoName]
E.g.
docker push cciturria/apis4harness:1.0
- Give it some time as it uploads your compressed docker image into your specified Docker Hub repository.

- After a few minutes, your docker image will appear in your Docker Hub specified repo.

Run your APIs 4 Harness App Docker Image in Kubernetes
Once your docker image is in a Docker repository, like OCI-R or Docker Hub, we can easily pull it and run it on Kubernetes.
Applications in Kubernetes run within the concept of “pods”, that are logical runtime grouping of Docker Containers that make up a whole Application. In our case, for the “APIs 4 Harness NodeJS App” there will be just one Docker Container. Pods are defined as YAML files.
- Go back to your Vagrant Box, if not already there.
- Important: If you are still under user ubuntu, switch back to user vagrant
sudo su vagrant
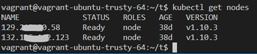
- Make sure your Kubernetes cluster is up and running (
kubectl get nodes
) with at least 1 worker node. I have 2 in this case:
-
Move to the /vagrant/deploy directory:
cd /vagrant/deploy
-
Inside there is a script called “deploy.sh“, that:
- Creates a “apis4harness” namespace
- Creates “APIs 4 Harness” Kubernetes Application deployment.
- Creates “APIs 4 Harness” Kubernetes Service.
- Creates “APIs 4 Harness” Kubernetes Ingress (leveraging Traefik Ingress controller that we deployed previously).
-
Before executing the provision.sh script, you need to set the Application environment properties. For this, use the template /vagrant/deploy/kubernetes/apis4harness-dpl.yaml_sample to create a new file /vagrant/deploy/kubernetes/apis4harness-dpl.yaml – In this file, at the end:
- Set the Docker image tag name (e.g. XXX/apis4harness:1.0)
- Set all the OCI properties that you used in setEnv while testing the microservice locally with Docker run.

- Now, let’s deploy APIs 4 Harness Application resources (deployment, service, ingress)
/vagrant/deploy/deploy.sh
- If you don’t get errors, it is a good sign. Validate the status of your Services:
kubectl get services --all-namespaces

-
Also, feel free to get the pods to see if they are ready or still being created. You can filter by namespace:
kubectl get pods --namespace=apis4harness
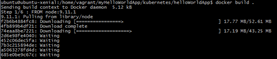
Note: The first time you deploy it, it will take a bit longer, as the Docker image has to be downloaded from Internet. Give it a minute or two and the Pods should be running.

- At this point your microservice is up and running.
- Test your APIs by pointing at your LBaaS. The external IP Address, can be retrieved from the OCI Console (Menu > Networking > Load Balancers)
Congratulations!!! Your APIs 4 Harness Application is up and running on Kubernetes. Also, you should know the steps to move microservices into your OKE cluster.
I hope you found this blog useful. If you have any question or comment, feel free to contact me directly at https://www.linkedin.com/in/citurria/
Thanks for your time.
