
A few days ago, we published an article that shows how to provision and connect to Oracle Autonomous Transaction Processing Database (ATP). Based on this, we got multiple requests to also demonstrate how to extend the connection to the Autonomous DB, not only from SQL Developer, but also from polyglot microservices.
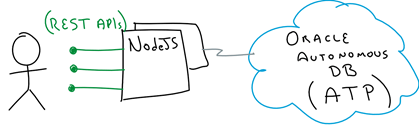
In this blog, we are going to take a step forward and create a simple “Hello World” NodeJS application that exposes some REST APIs that push and pull data using an Oracle Autonomous DB. The idea is to give you all knowledge required, to be start building your own microservices, consuming data from Autonomous DB.
Ok, let’s get to it!
Before we start
In this blog I assume the following:
- You have an Oracle Cloud account, if not request a free trial. Here: https://cloud.oracle.com/tryit
- It is assumed that you have already provisioned an Oracle Autonomous Database for Online Transaction Processing (ATP) and you have downloaded the Client Credentials (Security Wallet) and the Oracle Instant Client. Otherwise follow this previous blog that shows you how.
- We are using Vagrant. If you are not familiar with it, refer to this previous blog we wrote.
Configuring Oracle Instant Client and Client Credentials
We have put together a very simple Node JS microservice that exposes a few REST APIs that in the backend push and pull data from an Autonomous Database for online Transaction Processing (ATP).
-
Clone my APIs4ATP microservice repository:
-
Move into the APIs4ATP directory:
cd APIs4ATP
- Create a new directory structure oradbInstantClient/network/admin
mkdir oradbInstantClient
mkdir oradbInstantClient/network
mkdir oradbInstantClient/network/admin
- Assuming that you already have downloaded your Oracle Instant Client and Client Credentials (Security Wallet) – See here otherwise, expand the Oracle Instant Client zip file inside the root of your new oradbInstantClient directory structure.
- Now, expand the Oracle Client Credentials (security wallet) zip file inside oradbInstantClient/network/admin/
- Open the file: oradbInstantClient/network/admin/sqlnet.ora and set the DIRECTORY value to /myApp/oradbInstantClient/network/admin – This value will also align in the Dockerfile. It is used when building your Docker image. More information later on…

-
Go back to the root APIs4ATP directory, open “dbconfig.js” – Here is where we set the default user, password and connectString values.
Notice that user, password and connectString are already set to default values: “orders_admin”, “Welcome12345#” and “sydneyadw_low” respectively. If you follow the next section (i.e. creating table schema and DB user), you don’t need to change the user and password, as we will create this DB user and password. However, for the connectString parameter, you need to enter a valid TNS Name. You can see your valid TNS Names by opening the file “tnsnames.ora” from your downloaded Client Credentials (Security Wallet) – In my case, I am using sydneyadw_low, but it is likely to change in your case, depending on what region you live in.

Creating our Table Schema and DB user
Since we want to run a very simple service, let’s create a very simple database table that is enough to illustrate the steps that are involved in connecting and consuming data from an Oracle Autonomous DB.
For this, let’s use the approach described in our previous blog, to use SQL Developer to easily connect into our new Oracle Autonomous DB, create a simple table and a new user.
- Assuming that you already connected to SQL Developer as an admin user (see here otherwise), run this sample SQL file. It creates a simple table called “Orders” with just a few columns and also it creates a user called “orders_admin” to interact with it.

Putting together a Microservices that connects into an Oracle Autonomous DB
Project APIs4ATP is a working example of a simple NodeJS application that connects and uses Oracle Autonomous Database, which is not any different to any 12c Oracle Database, except for the simplicity of not having to patch it, tune it, secure it or manage it. We simply use it and forget about it, nice huh?
Note: We are using the amazing NPM node-oracledb package built and maintained by legend Christopher Jones (https://oracle.github.io/node-oracledb/)
Also, because we want to be as portable as possible, we are going to be using Docker to containerise our NodeJS application. The next steps show you how simple this is.
- Move APIs4ATP directory, if not already there.
-
Start your vagrant box:
vagrant up
Note: Give it some time the first time. It will download the Ubuntu Box and install all dependencies. Subsequent times will be much faster.
-
Once it finishes, as per the bootstrap process, your Vagrant VM is going to come with all necessary components and configuration needed to build and run your Hello World NodeJS app.
-
Vagrant ssh into it.
vagrant ssh
-
During the bootstrap process, we setup ubuntu user to be able to containerise your application. Change to ubuntu user:
sudo su ubuntu
-
Vagrant automatically mounts your working into /vagrant inside your VM. Move to this dorectory:
cd /vagrant
- Now, we are going to containerise the NodeJS Application as a Docker image. The Dockerfile should be self-explanatory, but let’s review it quickly:

- Line 1: Build an image starting from a public Debian-based Node 8.11.4 Docker image.
- Line 3: Do a quick update
- Line 8: Create and set working directory at /myAPp
- Line 9: Add all my current directory content into the working directory (/myApp)
- Lines 14 – 16: Install and configure node-oradb driver (as indicated here)
- Line 20: Download all my NodeJS application pre-requisite packages
- Line 21: Specifying what the expose port will be at runtime
-
Line 22: Specify the command to run when running my Docker image (i.e. starting my NodeJS application).
-
Run Docker build to build your image:
docker build .
Notice the last dot (i.e. “.” – It tells where the Dockerfile is located, ibn this case in the same directory where we are.)
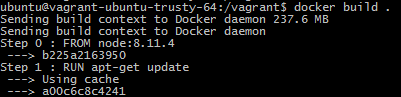
- Give it some time the first time. Ithas to download the original node image (~200MB). Once it finishes, you should see at the end that oracledb driver gets successfully installed. Also, at the end make a note to the resulting image id.

-
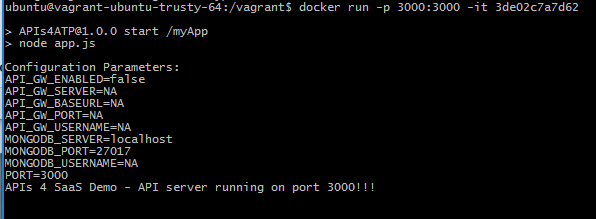
Now, let’s run the Docker image. I setup the Vagrant box to by default expose 3000 (port forward) externally, so let’ simply:
docker run -p 3000:3000 -it [YOUR_DOCKER_IMAGE_ID]
For example, in my case:
docker run -p 3000:3000 -it 3de02c7a7d62
Note: -it will make it run in interactive mode, so that you can stop it by typing Ctrl+C
- Go on a browser and browse for: http://localhost:3000

- The first time you try hitting the GET Orders API, you should get back the 2 records that you inserted into the DB previously via the init.sql script

- Feel free to play Posting (inserting) or Getting (selecting) records. Every time you hit the APIs, you will be hitting directly your Autonomous Transaction Processing DB (ATP). Pretty awesome huh?
Congratulations!!! At this point you have everything you need to start building your own microservices consuming Oracle Autonomous Transaction Processing DB (ATP). You can simply focus on using the DB, for your projects, without worrying on patching, securing and driving it.
I will keep publishing more advanced topics as I keep playing with the new generation of Oracle Autonomous Cloud Services. So, you better stay tuned!
I hope you found this blog useful. If you have any question or comment, feel free to contact me directly at https://www.linkedin.com/in/citurria/
Thanks for your time.

2 thoughts on “Teaching How to get Microservices to Consume Oracle Autonomous Transaction Processing Database (ATP)”