
In a previous blog, I showed how to develop microservices to connect to Autonomous Databases and consume data (read/write) via REST APIs. Although I still highly recommend that approach, the reality is that there is an easier way to do it using Oracle REST Data Services modules that come included with any Oracle Autonomous Database (ADW/ATP).
This way you simply have to:
- Configure the API endpoint (Method + URL) that you want to expose as a REST API
- Define the underlying SQL statement that will serve to your endpoint (i.e. SELECT, INSERT, UPDATE, DELETE statements or a more complex PL/SQL script)
-
Define the security mechanism to properly protect your APIs

That’s pretty much it, this should be a very quick, yet powerful alternative to building your own microservices to consume data from Autonomous DBs.
Before we start
In this blog I assume the following:
- You have an Oracle Cloud account, Otherwise request a free trial: https://cloud.oracle.com/tryit
https://cloud.oracle.com/home - It is assumed that you have already provisioned an Oracle Autonomous Datawarehouse instance (ADW) in your region of choice, in my case I chose us-ashburn-1. If you need help provisioning an Autonomous DB see this previous blog.
Create a new Workspace
The first step is to create a new workspace that we are going to use to create, expose and secure our REAPIs.
- Go to the ADW instance that you provisioned. If you just provisioned it, wait a couple of minutes until it comes fully available.
- Click on Service Console.

- Click on Development.

- Click on APEX

-
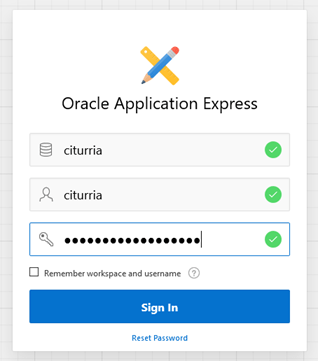
First, sign in to the internal workspace to create our own.
- Workspace: internal
- Username: admin
- Password: [The password that you used to create the ADW instance]

- Click Create Workspace.
-
Create a new workspace, for example in my case:
- Database User: citurria
- Password: [Enter something robust here]
- Workspace: Will auto-populate based on your username.

- Great, now log out using the top right Admin > Sign out option and then click Return to
Sign In page and login using your new workspace, username and password. Remember, that the workspace is by default the same as the username that you entered.
- Great, we are ready to start having fun!

Load some Data
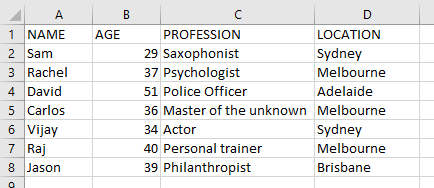
Now we need to load some data into our new schema. In order to keep thinks clean, let’s use a very simple table with just a few columns and rows. For this, I have my data in an Excel spreadsheet. It looks like this:
- You can start with your own data, but if you want to proceed with my sample data, download the spreadsheet here.
- To upload this data into our new schema, go to the top menu: SQL Workshop > Utilities > Data Workshop.

- Click on Load Data and select the Excel spreadsheet that you want to upload.

- Once it loads the data, enter a name for your table, in my case I will call it people.

- When ready click Load Data at the bottom right. In just a few seconds your data will be ready.

- Click View Table.
- Your table will appear in the left list.

- Click on it and then click on the Data tab to validate that the data is there.

- Great, now we are ready to expose APIs to get access to this data.
Expose Data with REST API
Now that we have a table with some data, we are ready to use Oracle REST Data Services (ORDS) to expose quick and simple APIs.
- Go to the top menu SQL Workshop > RESTful Services.

- Click on Register Schema with ORDS.

-
In the pop up, select:
- Enable RESTful Access: Yes
- Install Sample Service: Yes
- Authorization Required for Metadata Access: Yes
- Then Select Save Schema Attributes.
- Now go back to your table using the top menu: SQL Workshop > Object Browser > People. (or the table name that you chose) > REST.

-
Make sure that:
- REST Enable Object: Yes
- Authorization Required: Yes

- Then, click Apply.
- Now, copy the RESTful URI that it shows:

- In this blog we are keeping Basic Authentication to access your APIs. However, it is highly recommended that you configure OAUTH2.0 Token Based authentication, but that would be another blog.
- For now, go back to the top menu: SQL Workshop > RESTful Services and under Privileges select the table that you just REST enabled.

- Enter a sensible Title.
- After you set a title, go a bit below in the same page to the Roles section. Use the middle arrows to move to the left the 2 enabled roles and simply move to the right SQL Developer role.

- Finally, click on Apply Changes to save your updates.

- Great, we are ready to test our REST APIs
- For this, I am going to use Postman to test my APIs, you can use whatever REST client you prefer. (Although I recommend Postman).
-
In Postman:
- Paste the URI that you previously copied into Postman.
- Ensure the Method is set to GET.
-
Authentication: Basic Authentication
- Username: [Enter the username that you enter when creating your workspace]
- Password: [Enter the username that you enter when creating your workspace]

- Click Send to test the API. You should get the full list of rows in your database table in JSON format.

-
Great, now let’s create 2 new APIs:
- Another GET, but this time a custom one that returns records by LOCATION. (Change accordingly if you chose a different table).
- A POST, that will send a JSON payload with the new record to be inserted into the DB table.
- Let’s do the tailored GET first. Go back to APEX Console under SQL Workshop > RESTful Services.
- On the left menu, click on Modules.

- Click on Create Module.

-
Complete the ORDS Module Definition, for example:
- Module Name: people
- Base Path: /people
- Is Published: Yes
- Pagination Size: 25
- Origins Allowed: *
- Comments: Enter something there…

- When ready click on Create Module in the top right of the screen.

- Now, it is time to define the Templates (REST endpoints). Click on Create Template.

-
Let’s define our new GET REST endpoint.
- URI Template: location/:loc
- Comments: Enter something sensible there.

- When ready, click on Create Template.

- Click on Create Handler.

- Keep all setting as default.
-
In Source, enter the SQL query that will serve your REST API endpoint request. For example, in my case I want to return all people where Location matches the given one.

Notice that I use :loc to get access at runtime to the REST URI template.
- Click on Create Handler.
- Then click on Modify Changes. Make sure that at the top it says: Handler Updated in green.

- Copy the new URL

- Let’s paste it again in Postman to test the new API endpoint. If you paste it into a new Request/tab, make sure to add Authentication once again.
- Change the last bit that says :loc by the actual location value, for example in my case Sydney

- When ready click on Send. You should this time only get People from Sydney.

-
Great, let’s complete our test allowing another API to POST (INSERT) new records into our table.
We can simply add another template, but let’s create a new Module again, to make the base path a bit more generic (e.g. /records). This will also help as a refresher.
- Go back to the top Modules.

- Click on Create Module.
- Enter a more generic base path, e.g. /records – Also enter * for Origins Allowed.

- When ready, click on Create Module.
-
Now, click Create Template.
- URI Template: people
- Comments: Enter something sensible…

- When ready, click on Create Template.

-
Click on Create Handler.
- Method: POST
- Mime Types Allowed: application/json
- Comments: Enter something useful…
-
Source: Given POST require PL/SQL, we need to enter a quick an easy anonymous INSERT procedure.
Something like this would do (adjust yours accordingly):

NOTE: You only need to be careful that the variable names i.e. :name, :age, :profession, etc. match the names used in the incoming JSON Payload. For example, in my case:

-
Now at the bottom create an HTTP header mapping:
- Name: X-APEX-FORWARD
- Bind Variable: status
- Access Methos: OUT
- Source Type: HTTP-HEADER
- Data Type: INTEGER

- When ready, click on Create Handler.
- Then click on Apply Changes. (Once again make sure the top legend says Handler Updated)

- Copy the Full URL of your new REST API

-
Go to Postman:
- Create a new request tab.
- Paste the REST endpoint.
- Set the method to: POST
- Set Basic Authentication and enter the required username/password
- Add a Header: Content-type -> application/json
- In body, add the JSON payload that contains the record that you want to insert.
- When ready click on Send.

- Make sure that you get a HTTP 200 response code.

- Back in APEX Console, go to SQL Workshop > Object Browser > [Your Table] e.g. PEOPLE > Data. Your new record will be there:

Congratulations!!! At this point you have everything you need to start building your own REST APIs consuming data from Oracle Autonomous Databases (ADW/ATP).
I hope you found this blog useful. If you have any question or comment, feel free to contact me directly at https://www.linkedin.com/in/citurria/
Thanks for your time.

Thanks alot for sharing the details.. It really helped me understanding the configuration of ORDS with Apex for different API methods.
LikeLike
Thanks alot for sharing the details of configuration of ORDS and how the same can be used to expose different API methods.
LikeLike
I wish to show thanks to you just for bailing me out of this particular trouble. As a result of checking through the net and meeting techniques that were not productive, Same as your blog I found another one Oracle Fusion Financials .Actually I was looking for the same information on internet for Oracle Fusion Financials and came across your blog. I am impressed by the information that you have on this blog. Thanks once more for all the details.
LikeLike