
Oracle’s Cloud Infrastructure has been designed in an API-first manner, which is awesome for all sorts of infrastructure automation tasks. It also implements an interesting API security model, in which all requests must be signed using a private key, associated with a public key which has already been configured in OCI (here, the developers are showing their infrastructure roots, as this echoes how SSH Auth is normally handled). The documentation of this model provides sample code in a number of languages, which is perfect if you are writing automation scripts, but is a little inflexible for ad-hoc testing. Typically I much prefer to use a rich graphical REST client, such a Postman, so that I can easily tweak my parameters and try out different types of calls before I write any code. Unfortunately while Postman is well equipped for Basic and Token based Auth, HTTP-Signature is not natively implemented, and rather than abandon Postman for a new tool, I set out to implement it using Postman’s powerful scripting capabilities. In this blog post I provide the result of this, which is a downloadable collection which provides all of the required scripts, and discuss the approach used.
Note: There is now an Official Postman Collection from OCI, which contains some enhancements over the implementation described here, including better handling some service edge-cases, as well as including far more sample requests. I recommend moving to that Collection.
This post assumes you have generated a key-pair and uploaded the public key to OCI. This process is documented here. It also assumes a basic knowledge of Postman – and although this makes heavy usage of Pre-request Scripts and Environments, if you haven’t used these before, don’t worry.
When setting up your API key, will need to make note of the following:
- Your OCI tenancy OCID
- Your User OCID
- The uploaded key’s SHA Fingerprint (this is displayed in the OCI console, or you can get it from openssl or a similar tool)
- You will also need the private key in PEM format (with or without a passphrase)
The Postman collection, with all of the required scripts embedded is available here.
Note: This does involve working with the private key, and obviously normal security concerns apply. It is assumed that this is mostly used for dabbling and testing during development, and you ensure that the key is appropriately retired and not re-used when you roll out your automations. The key gives access equivalent to the user with which it is associated, so you might want to create a testing user restricted to a dedicated development compartment(s).
Usage:
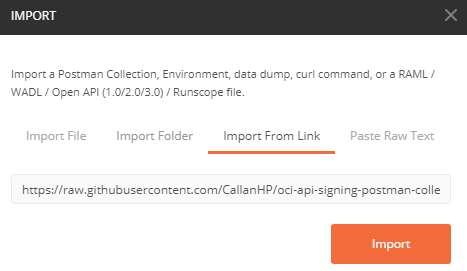
Download the collection from Github and import it into Postman via File->Import (or Ctrl+O in Windows), or import directly from the url:
https://raw.githubusercontent.com/CallanHP/oci-api-signing-postman-collection/master/OCI%20-%20API%20Signing%20Example.postman_collection.json
Create a new Postman environment by clicking the gear icon in the top right.

This brings up the ‘Manage Environments’ window. Environments are simply collections of variables, which can be used as part of abstract requests, and allow you to move easily between instances or dev/test environments by changing the drop-down.
Create a new environment for this API user by clicking ‘Add’. Initialise the environment with the following variables, and set an initial value for them using the values you noted down earlier (yes, this does involve working with the private key in clear text, or working with the passphrase openly, it is just for basic testing ok). You might want to name the environment for your API user if you are going to use several for different compartments or use-cases.
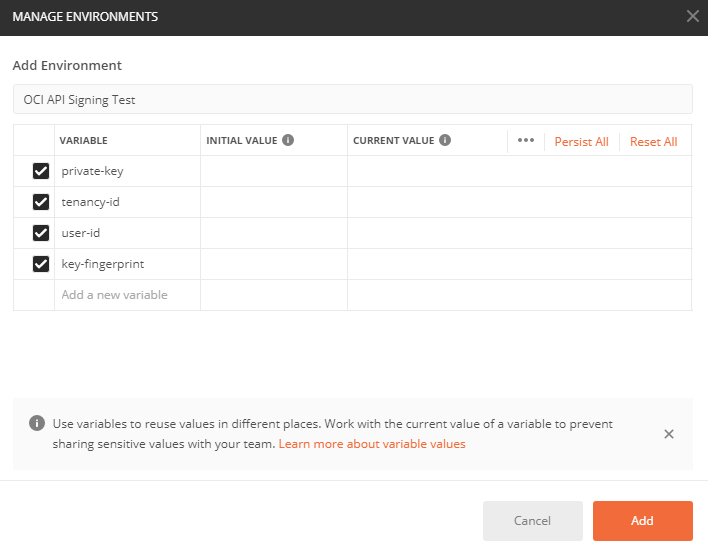
If you are using an encrypted key, you will need to create a variable called ‘key-passphrase’, populated with the passphrase for the private key.
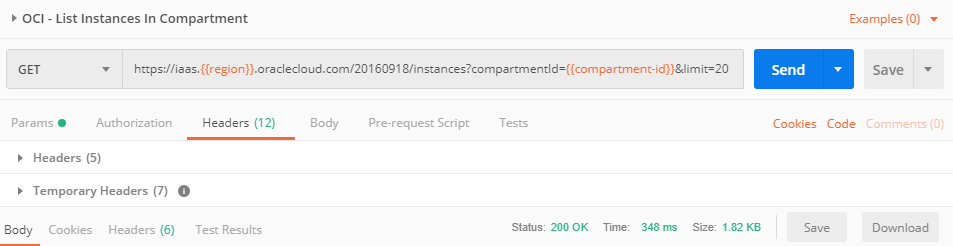
The sample requests included as part of the collection also require the ‘region’, ‘compartment-id’ and ‘instance-id’ variables, but those are not used as part of the signing script. As a quick test, you can try using the ‘OCI – List Instances In Compartment’ request to get a list of instances in a compartment. To do this, add a ‘region’ and ‘compartment-id’ variable to the environment variables (click the eye icon next to the environment name, then click ‘Edit’) and send the ‘OCI – List Instances In Compartment’ request (the list of region codes is available here, and you can find compartment OCIDs from Identity->Compartments from the main OCI menu). If you have set up the variables correctly, you should get a 200 OK response code, and a list of instances (or an empty array if you have no instances in the compartment).
I have tried to provide meaningful error messages as part of my environment validation, but if something has happened on the OCI side, you will probably get a message that looks like the following:
{
     "code": "NotAuthenticated",
     "message": "The required information to complete authentication was not provided or was incorrect."
}
Unfortunately this is not very helpful for debugging – it occurs if the signature is can’t be validated by the supplied public key; if the key identifier points to a key that couldn’t be located; if the specified compartment is not located in your tenancy or is not visible to the user associated with the key; and if the clock on your machine running Postman is out by more than five minutes…
As a first check, make sure that you are sending all of the headers required for the call. If you open an example in the collection, it will have five headers configured:
- Authorization
- hostname
- date
- Content-Length
- x-content-sha256
Ensure you are sending the first three on GET requests, and all five on PUT and POST. A common mistake I have made is editing a GET request, then forgetting to enable the additional headers.
It may also help your debugging by checking the environment variables which were set by the script (for instance, when I was testing this, I noticed I had a typo when I declared the ‘compartment-id’ variable, which meant that the resulting ‘request-target’ variable looked like ‘get /20160918/instances?compartmentId={{compartment-id}}&limit=20’ which naturally failed).
It is also worth noting that the following environment variables are set by the signing operation (so avoid creating these separately):
- auth-signature
- hostname
- request-date
- request-target
- content-sha256
- content-length
In order to extend this to invoke different OCI APIs, I recommend duplicating the calls in the collection, not only because this allows for you to build up a library of useful calls, but because the signing script runs at the collection level, and so the requests need to be part of that collection to be signed. You can also simply edit the two existing examples if you quickly want to test things out.
This collection takes advantage of Postman’s Pre-request Script capabilities, to pre-process the message and generate the signatures and injecting these into the environment variables, which are then inserted by Postman when it makes the request to OCI.
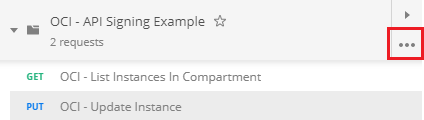
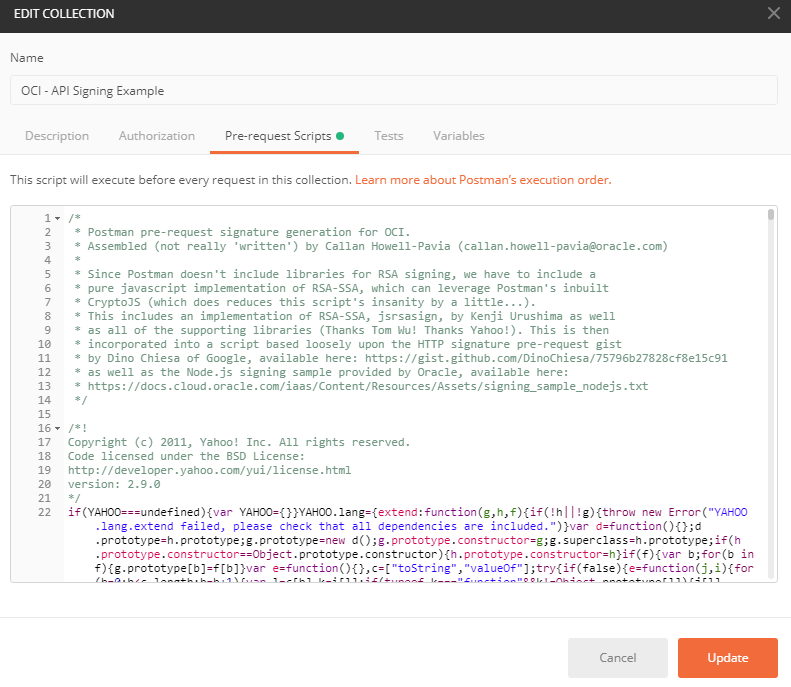
If you want to have a look at the script, you can select the ‘More Options’ button in the Collection, then click ‘Edit’.
The script used is then in the Pre-request Script tab. The comments there explain what is going on, but the high level summary is that since Postman doesn’t have many internal libraries, the script has to inline a minified implementation of RSA-SSA, which is the signing algorithm required by OCI. The actual script itself is not-minified for clarity and transparency and begins on line 52.
I hope that this helps in your early explorations of the OCI APIs – and helps to demonstrate some of the power of Postman, which is a lot of the reason why I didn’t want to have to find a different tool for API testing. While the sample code provided in the OCI documentation is handy, I find it very useful to be able to test the APIs this way rather than tweak a snippet of code each time I want to try a different parameter.
