
The Stack Monitoring service is a recent addition to the OCI Observability & Management family.
If you are running Oracle E-Business Suite (EBS) application today you will now be able to perform an auto discovery of all related resources in OCI Stack Monitoring. It will collect metrics specific for your EBS resources as well as ability to perform correlation across the EBS application and infrastructure stack as well as enable proactive alerting.
Components that will be auto discovered includes:
- Concurrent Processing Node
- Workflow Manager
- WebLogic
- Forms
Today, Stack Monitoring service supports EBS version 12.1 and 12.2 deployments hosted on OCI, On-Premise or Third Party Cloud (eg. AWS, Azure).
In the example, I will show you how you can configure Stack Monitoring for EBS version 12.2.
A. Setup IAM Policy Configuration
1. Setup IAM configuration
Please ensure that all IAM dynamic groups and policies. For details please refer to:
https://docs.oracle.com/en-us/iaas/stack-monitoring/doc/getting-started.html#GUID-94AE2DA7-C21A-4BA5-83DC-60624CC5469E
B. Agent and Plugin Deployment
1. If EBS is hosted on-premise or third party cloud, please ensure network communication is enable to destination *.oraclecloud.com on port 443 (HTTPS).
Although direct internet access is possible, we do recommend using FastConnect or VPN for connectivity to Oracle Cloud.
2. Install Agents
a) EBS Hosts running in OCI Compute Service – no manual installation of Oracle Cloud Agent (OCA) is required. To enable plugin simply follow the previous post on How to Enable OCA for O&M.
b) EBS Database Hosts – the Oracle Management Agent (OMA) needs to be installed as per previous post on How to Enable OMA for O&M.
3. Compatibility for EBS running DB version 12c or earlier.
a) If the Database version is 12c or earlier, or using an earlier DB password version than 12c (some 19c database can have this configured), then the following needs to be set in emd.properties files for all agents deployed.
Check the Password Version in Database:
select username, password_versions from dba_users where username in ('DBSNMP','APPS');

USERNAME             PASSWORD_VERSIONS
-------------------- -----------------
APPS                 10G 11G 12C HTTP
DBSNMP               11G 12C
Set the following parameter in the emd.properties file:
dbaas.ALLOWED_LOGON_VERSION = 8Location of emd.properties are as follows: OCA: /var/lib/oracle-cloud-agent/plugins/oci-managementagent/polaris/agent_inst/config/emd.properties OMA: /opt/oracle/mgmt_agent/agent_inst/config/emd.properties
b) Restart Agents
OCA:
sudo systemctl restart oracle-cloud-agent
OMA:
sudo systemctl restart mgmt_agent4. Verify that the plugin is deployed for Stack Monitoring to all agents (OCA and OMA) running on EBS App and Database hosts.
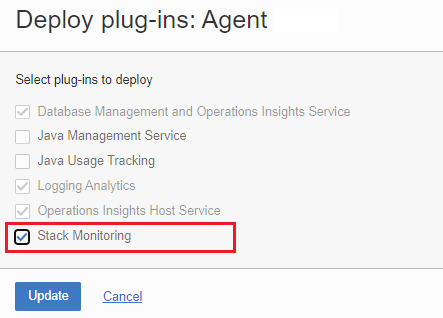
a. From OCI console menu, navigate to:
OBSERVABILITY & MANAGEMENT > AGENTS > MANAGEMENT > [Select Compartment eg. observability-cmp] > [Select Agent Host Name eg. ebs] Deploy Plugin


b. Click on Deploy Plugin

c. Enable Stack Monitoring if not already deployed
C. Configure EBS WebLogic
4. If WebLogic is running SSL then the following certificate needs to register with Agent.
1. Please see steps on how to Configure WLS SSL certificate import to Agent.
Note – If WebLogic is not configured for SSL, then this step can be skipped.
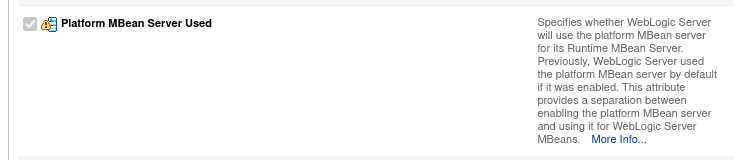
2. Verify that Platform Mbeans Used option is enabled in EBS WebLogic Admin Server
a. Login to WebLogic Console (eg. http://ebsapp:7001/console)
b. Navigate to Domain > Configuration > General : Advanced
c. Verify that Platform MBean Server Used check box.
D. Enable Forms Sessions
Enable Properties for Forms Sessions
1. Login to EBS console (eg. http://ebsapp:8000)
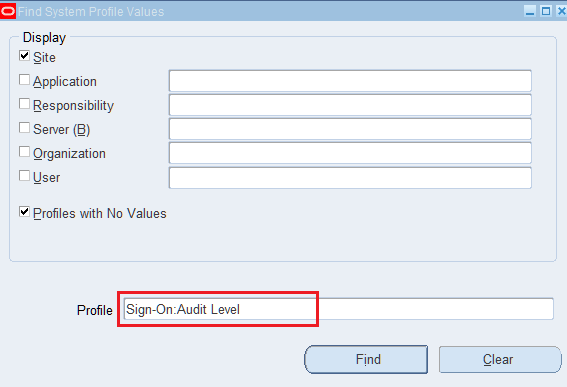
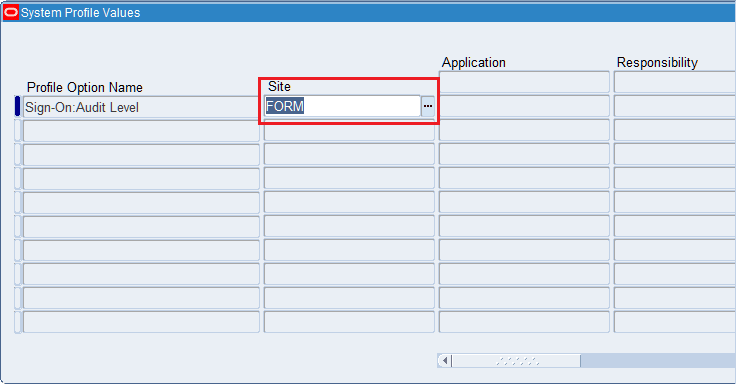
2. Navigate to System Administrator > Profile > System > Profile System Values > Open
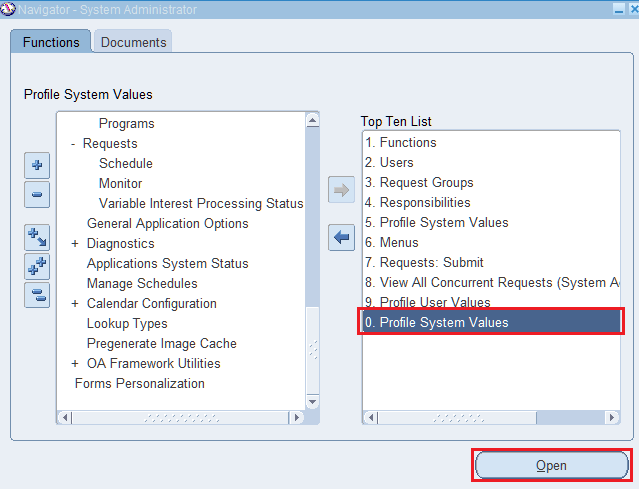
4. Search for Sign-On:Audit Level > Find
5. Set Sign-On:Audit Level = FORM
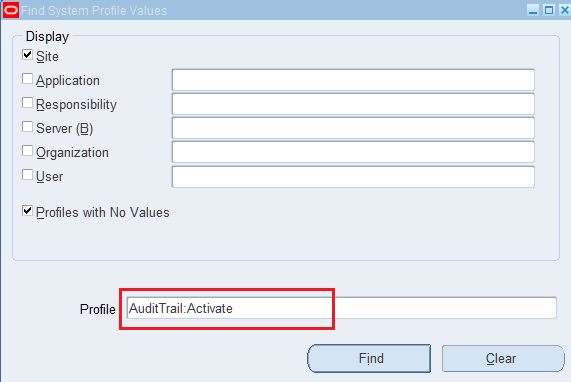
6. Search for AuditTrail:Activate > Find
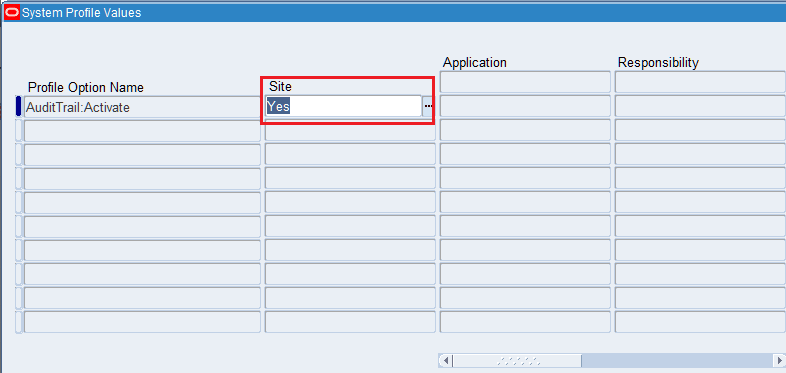
7. Set AuditTrail:Activate = Yes
E. DNS Registration for EBS Hosts
1. Verfiy DNS registration and lookup between all EBS Application and Database Hosts
a. From all EBS app hosts
[opc@ebsapp ~]$ nslookup ebsapp.xxx.com
Server:         169.254.xxx.xxx
Address:        169.254.xxx.xxx#xx

Non-authoritative answer:
Name:   ebsapp.xxx.com
Address: 10.0.xxx.xxx

[opc@ebsapp ~]$ nslookup ebsdb.xxx.com
Server: 169.254.xxx.xxx
Address: 169.254.xxx.xxx#xx

Non-authoritative answer:
Name: ebsdb.xxx.com
Address: 10.0.xxx.xxx
2. From all EBS database hosts
[opc@ebsdb ~]$ nslookup ebsapp.xxx.com
Server:         169.254.xxx.xxx
Address:        169.254.xxx.xxx#xx

Non-authoritative answer:
Name:   ebsapp.xxx.com
Address: 10.0.xxx.xxx

[opc@ebsdb ~]$ nslookup ebsdb.xxx.com
Server: 169.254.xxx.xxx
Address: 169.254.xxx.xxx#xx

Non-authoritative answer:
Name: ebsdb.xxx.com
Address: 10.0.xxx.xxx
F. Grant EBS Database Monitoring Privileges
A Database Monitoring Credential is required for Stack Monitoring.
If you are using the EBS Schema (eg. APPS) for monitoring you can skip this step. If you wish to use an alternative account to monitor (eg. DBSNMP), additional grants to EBS objects are required for discovery.
1. Grant the DBSNMP account user access to objects owned by the EBS schema (eg. APPS) for discovery and monitoring.
NOTE [1]: For EBS 12.2, It is recommended to use the AD_ZD package.
NOTE [2]: Alternatively this step can be skipped if you intend to provide the Database Monitoring Credential using the EBS Schema (eg. APPS) account.
conn APPS@<EBS_DB_SERVICE_NAME>
SQL> desc AD_ZD
-- NOTE: if returns output, use this method.

exec AD_ZD.grant_privs('SELECT', 'FND_OAM_CONTEXT_FILES', 'DBSNMP');
exec AD_ZD.grant_privs('SELECT', 'FND_PRODUCT_GROUPS', 'DBSNMP');
exec AD_ZD.grant_privs('SELECT', 'FND_CONC_PROG_ONSITE_INFO', 'DBSNMP');
exec AD_ZD.grant_privs('SELECT', 'FND_CONCURRENT_PROGRAMS_VL', 'DBSNMP');
exec AD_ZD.grant_privs('EXECUTE', 'FND_OAM_EM', 'DBSNMP');
exec AD_ZD.grant_privs('SELECT', 'FND_CONCURRENT_REQUESTS', 'DBSNMP');
exec AD_ZD.grant_privs('SELECT', 'FND_APPLICATION_VL', 'DBSNMP');
exec AD_ZD.grant_privs('SELECT', 'FND_CONCURRENT_QUEUES', 'DBSNMP');
exec AD_ZD.grant_privs('SELECT', 'FND_LOOKUPS', 'DBSNMP');
exec AD_ZD.grant_privs('SELECT', 'FND_CONCURRENT_WORKER_REQUESTS', 'DBSNMP');
exec AD_ZD.grant_privs('SELECT', 'FND_CONCURRENT_QUEUES_VL', 'DBSNMP');
exec AD_ZD.grant_privs('SELECT', 'FND_OAM_FNDUSER_VL', 'DBSNMP');
exec AD_ZD.grant_privs('SELECT', 'FND_FORM_SESSIONS_V', 'DBSNMP');
exec AD_ZD.grant_privs('SELECT', 'FND_CP_SERVICES', 'DBSNMP');
exec AD_ZD.grant_privs('SELECT', 'FND_CONCURRENT_PROCESSES', 'DBSNMP');
exec AD_ZD.grant_privs('SELECT', 'FND_SVC_COMPONENTS', 'DBSNMP');
exec AD_ZD.grant_privs('SELECT', 'FND_LOG_MESSAGES', 'DBSNMP');
exec AD_ZD.grant_privs('SELECT', 'FND_CONCURRENT_PROGRAMS', 'DBSNMP');
exec AD_ZD.grant_privs('SELECT', 'FND_CONFLICTS_DOMAIN', 'DBSNMP');
exec AD_ZD.grant_privs('SELECT', 'FND_ORACLE_USERID', 'DBSNMP');
exec AD_ZD.grant_privs('SELECT', 'FND_APP_SERVERS', 'DBSNMP');
exec AD_ZD.grant_privs('SELECT', 'FND_NODES', 'DBSNMP');
exec AD_ZD.grant_privs('SELECT', 'ICX_SESSIONS', 'DBSNMP');
exec AD_ZD.grant_privs('SELECT', 'FND_USER', 'DBSNMP');
exec AD_ZD.grant_privs('SELECT', 'FND_RESPONSIBILITY', 'DBSNMP');
exec AD_ZD.grant_privs('EXECUTE', 'FND_PROFILE', 'DBSNMP');
exec AD_ZD.grant_privs('SELECT', 'WF_DEFERRED', 'DBSNMP');
exec AD_ZD.grant_privs('SELECT', 'WF_NOTIFICATION_IN', 'DBSNMP');
exec AD_ZD.grant_privs('SELECT', 'WF_NOTIFICATION_OUT', 'DBSNMP');


-- Required for Concurrent Processing Node Monitoring
GRANT INHERIT PRIVILEGES ON USER "DBSNMP" TO "APPS";
G. REGISTER EBS DATABASE
The EBS database needs to be first registered as an External Database for:
– Container Database
– Pluggable Database
NOTE: For EBS databases deployed on Non-Container Database, where applicable choose this option instead.
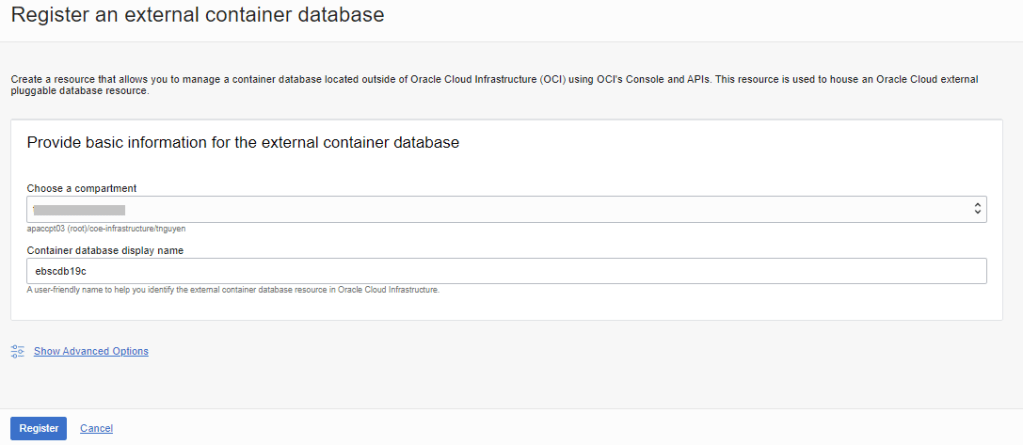
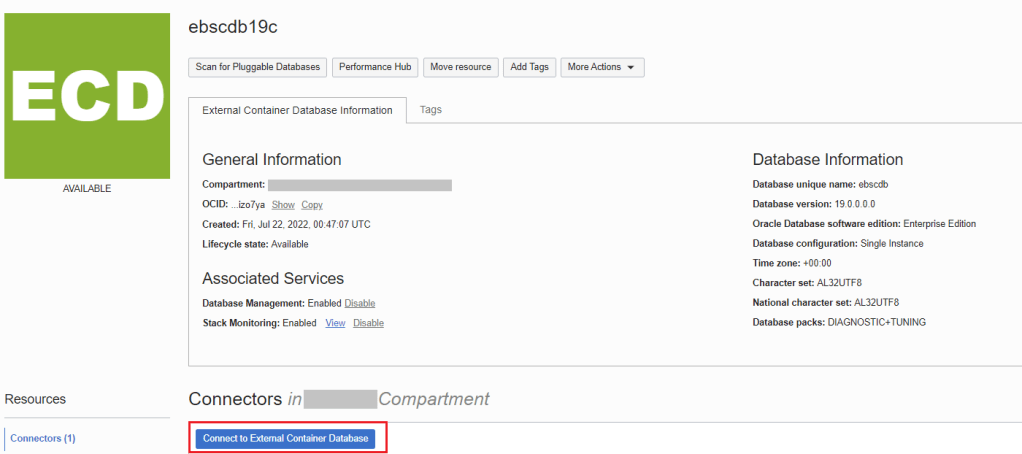
- In the OCI console menu, navigate to:
ORACLE DATABASE > EXTERNAL DATABASE > CONTAINER DATABASE > REGISTER EXTERNAL CONTAINER DATABASE
Specify the following:
a. Compartment (eg. observability-cmp) where agent is deployed to for target database host.
b. Container Database Display Name (eg. ebsdb19c)
2. Click on Connect to External Container Database
3. Complete details for the Container database
a. Connector Display Name (eg. ebsdb19c_conn)
b. Connector Agent (Agent on target Database Host)
c. DNS hostname or SCAN Name (Database host or scan name)
d. Port (Database Service Port eg. 1521)
e. Service (Database Service Name eg. ebsdb)
f. Protocol (g. TCP)
g. Database Monitoring Credential (eg. DBSNMP)
h. Database Password
NOTE: Make sure DBSNMP account meets password policy requirements.
Password length must be between 14 to 127 characters.
Password must have at least 1 lowercase, 1 uppercase, 1 digit, and 1 special character.
Use alphanumeric characters and the characters eg. _, $, and #.
i. Credential Name Prefix (eg. ebsdb19c_cred)
j. Role (Database Role eg. NORMAL)
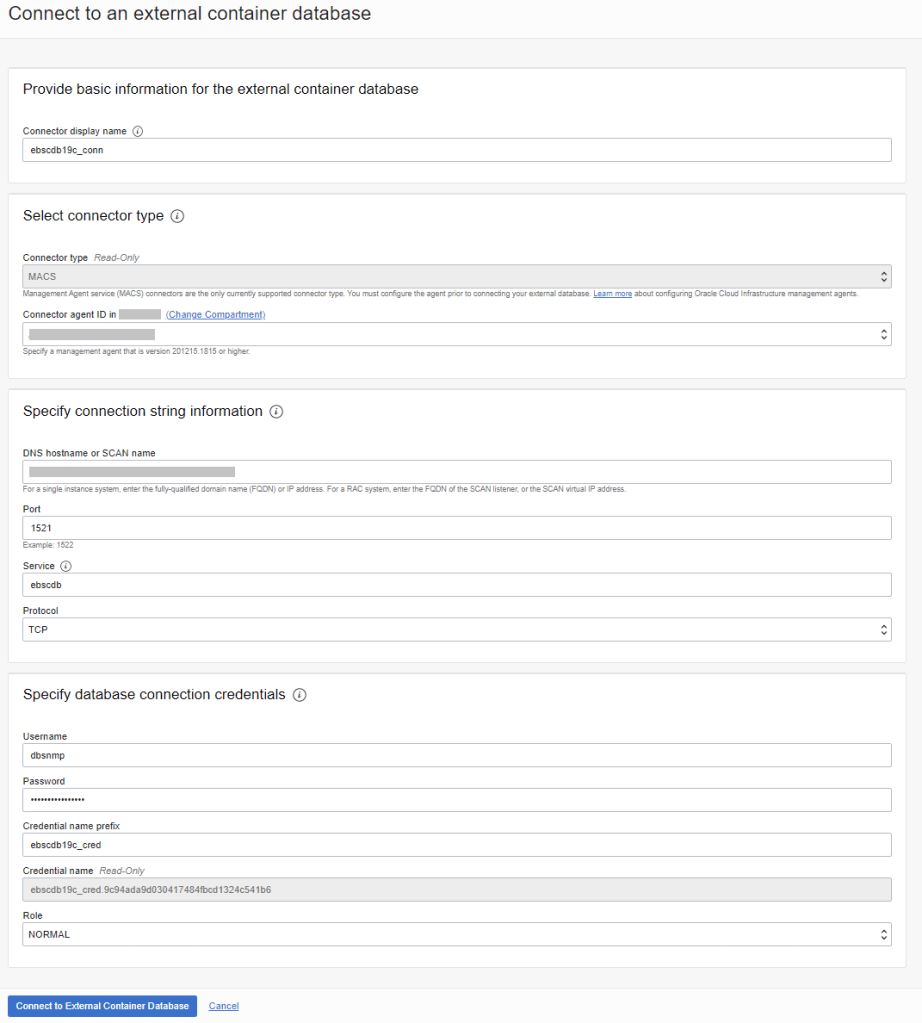
4. Wait for Creation of External Container Database Connector to complete
5. Under Resources, select External Pluggable Databases, and then click on Regsiter External Pluggable Database
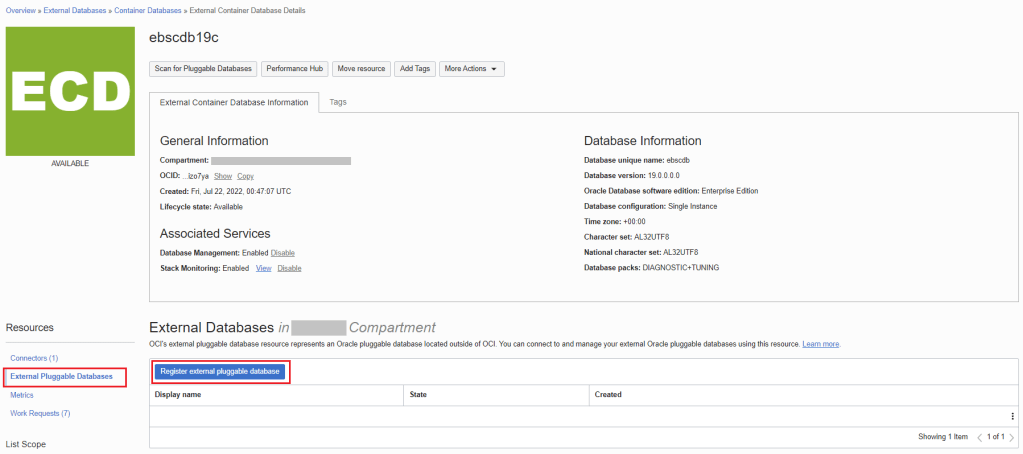
6. Specify the following:
a. Compartment (eg. observability-cmp) where agent is deployed to for target database host.
b. Container Database Display Name (eg. ebspdb19c)
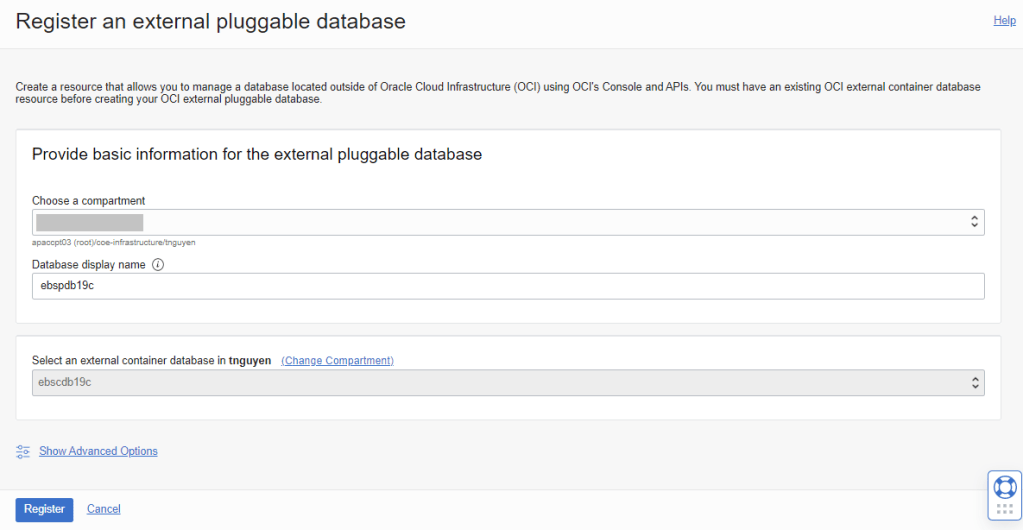
7. Click on Connect to External Pluggable Database
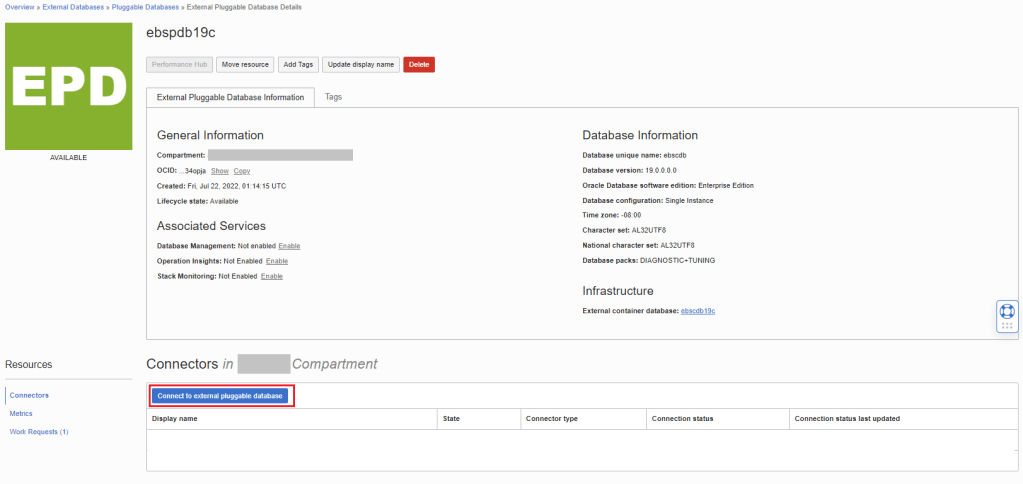
8. Complete details for the Pluggable database
a. Connector Display Name (eg. ebspdb19c_conn)
b. Connector Agent (Agent on target Database Host)
c. DNS hostname or SCAN Name (Database host or scan name)
d. Port (Database Service Port eg. 1521)
e. Service (Database Service Name eg. ebspdb)
f. Protocol (g. TCP)
g. Database Monitoring Credential (eg. DBSNMP)
h. Database Password
NOTE: Make sure DBSNMP account meets password policy requirements.
Password length must be between 14 to 127 characters.
Password must have at least 1 lowercase, 1 uppercase, 1 digit, and 1 special character.
They can contain only alphanumeric characters and the characters _, $, and #.
i. Credential Name Prefix (eg. ebspdb19c_cred)
j. Role (Database Role eg. NORMAL)
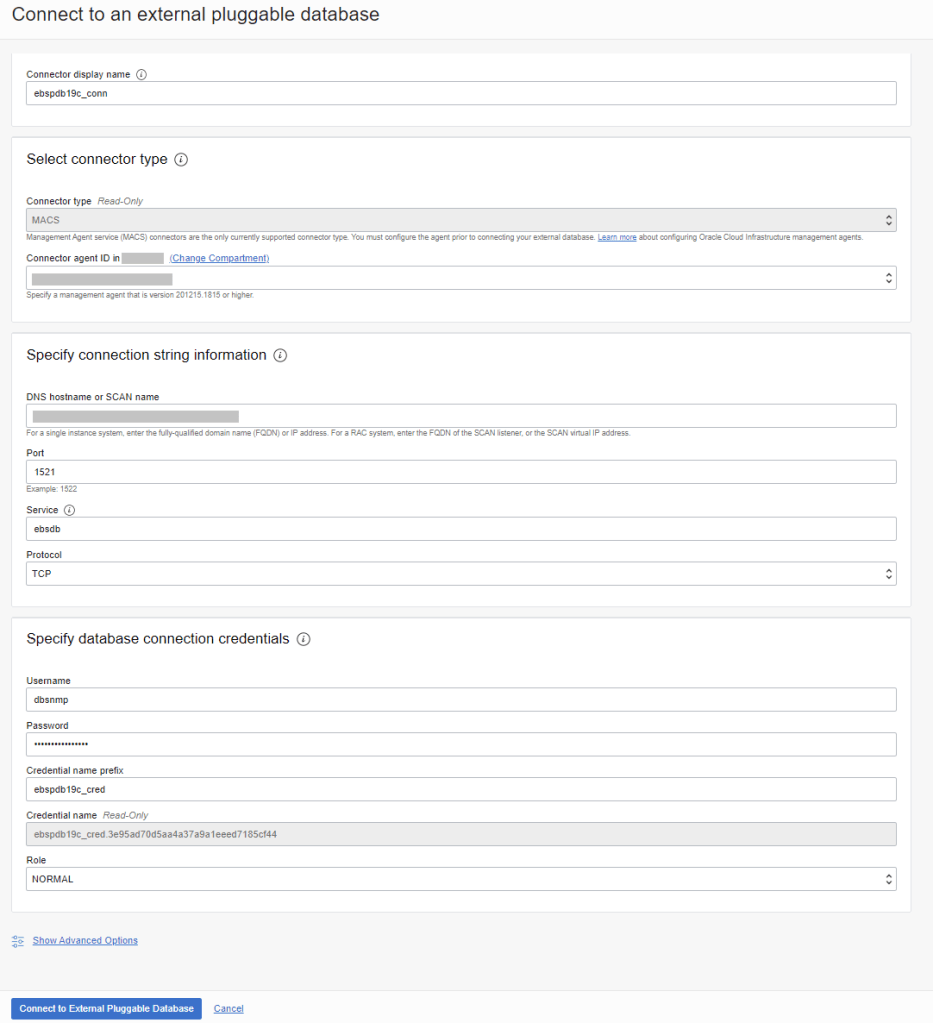
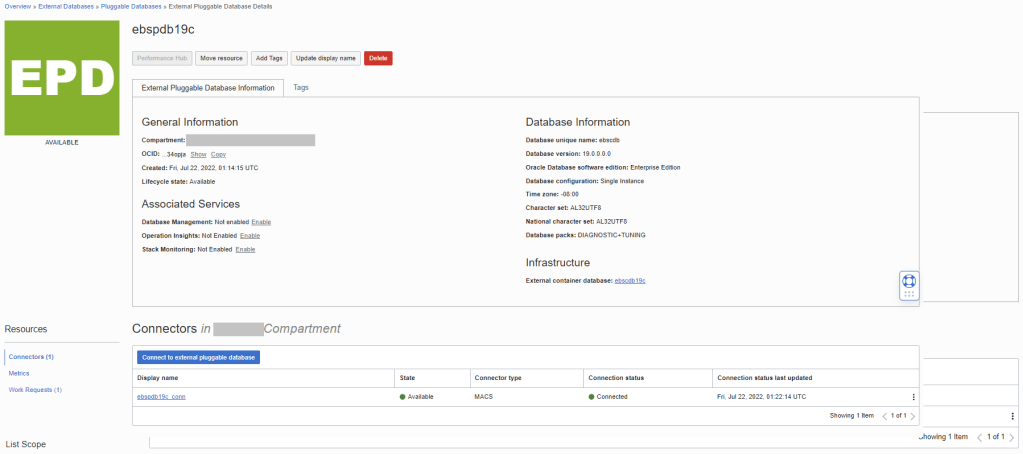
9. Wait for Creation of External Pluggable Database Connector to complete
H. ENABLE EBS DATABASE FOR STACK MONITORING
Now that EBS database been registered as an External Database we will now enable Stack Montoring for:
– Container Database
– Pluggable Database
NOTE: For EBS databases deployed on Non-Container Database, where applicable choose this option instead of Container Database or Pluggable Database.
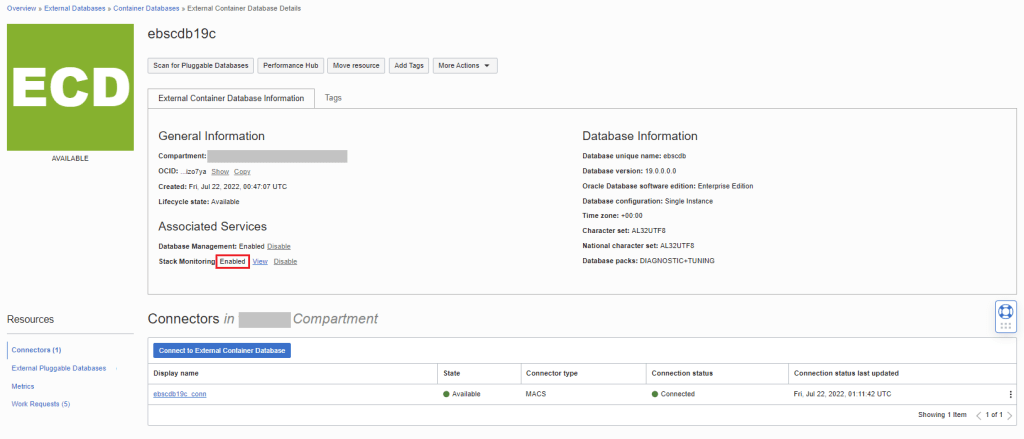
1. In the OCI console menu, navigate to:
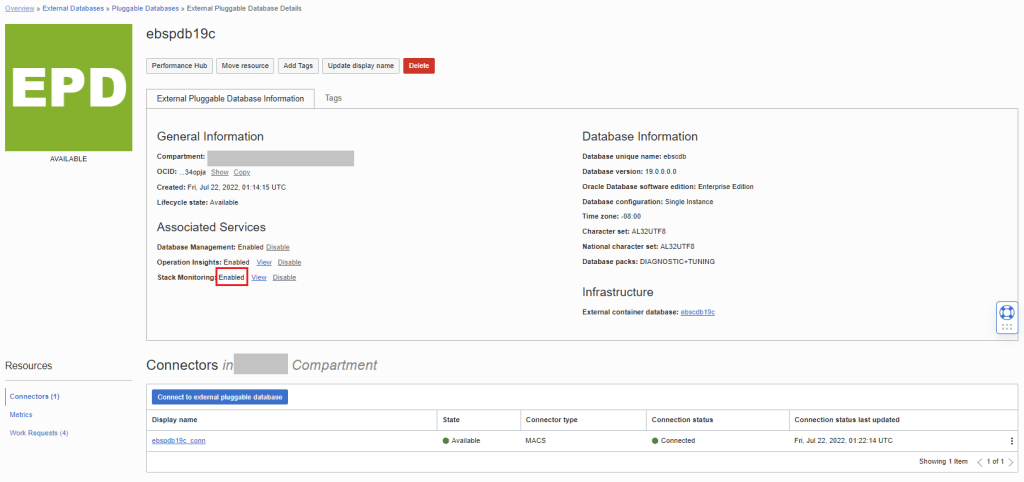
ORACLE DATABASE > EXTERNAL DATABASE > CONTAINER DATABASE > [Select Container Database eg. ebsdb19c]
2. Under Associated Services for Stack Monitoring click on Enable
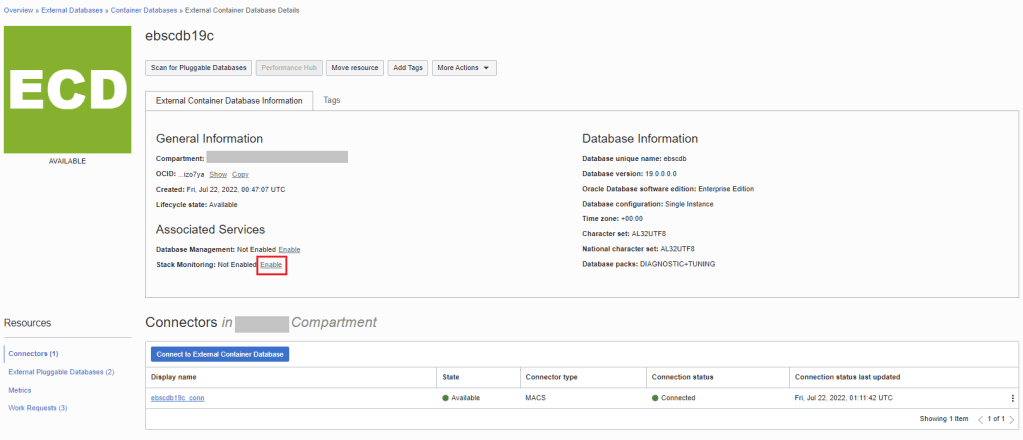
3. Choose the license option. If you already have a license for you database, click on Bring Your Own License (BYOL) option and click on Enable.
NOTE: If you don't have Database Diagnostic and Tuning Pack License for this target Database, then click the License Included
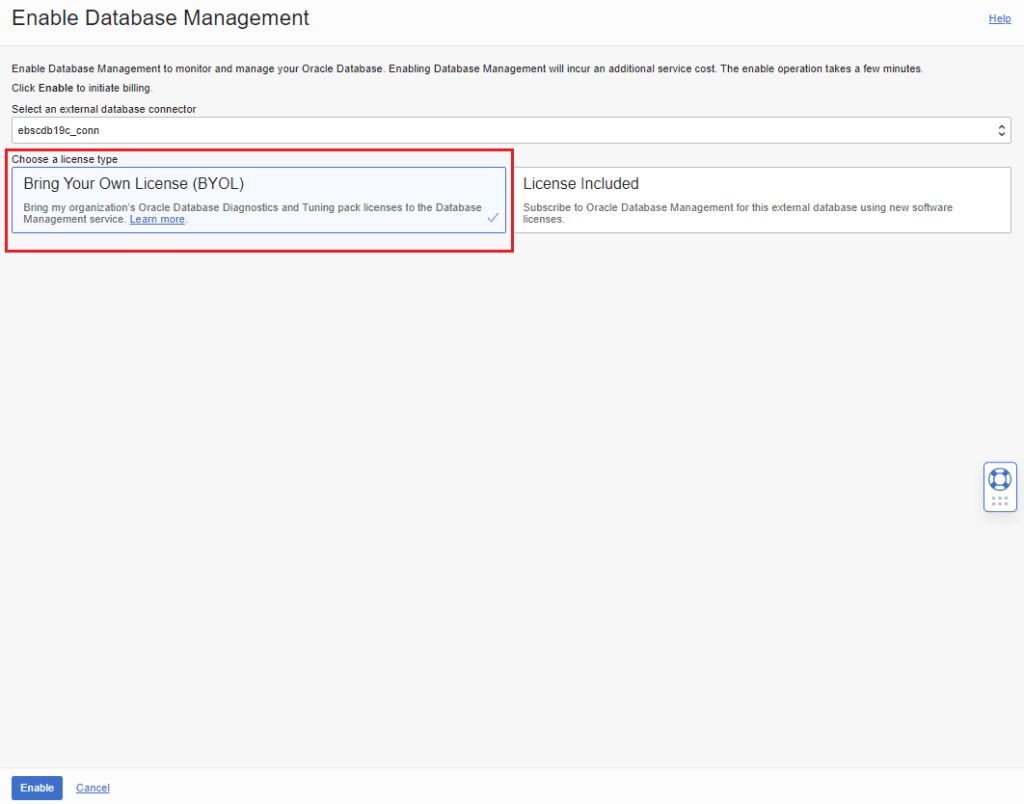
4. Wait for update, to confirm that Stack Monitoring is Enabled
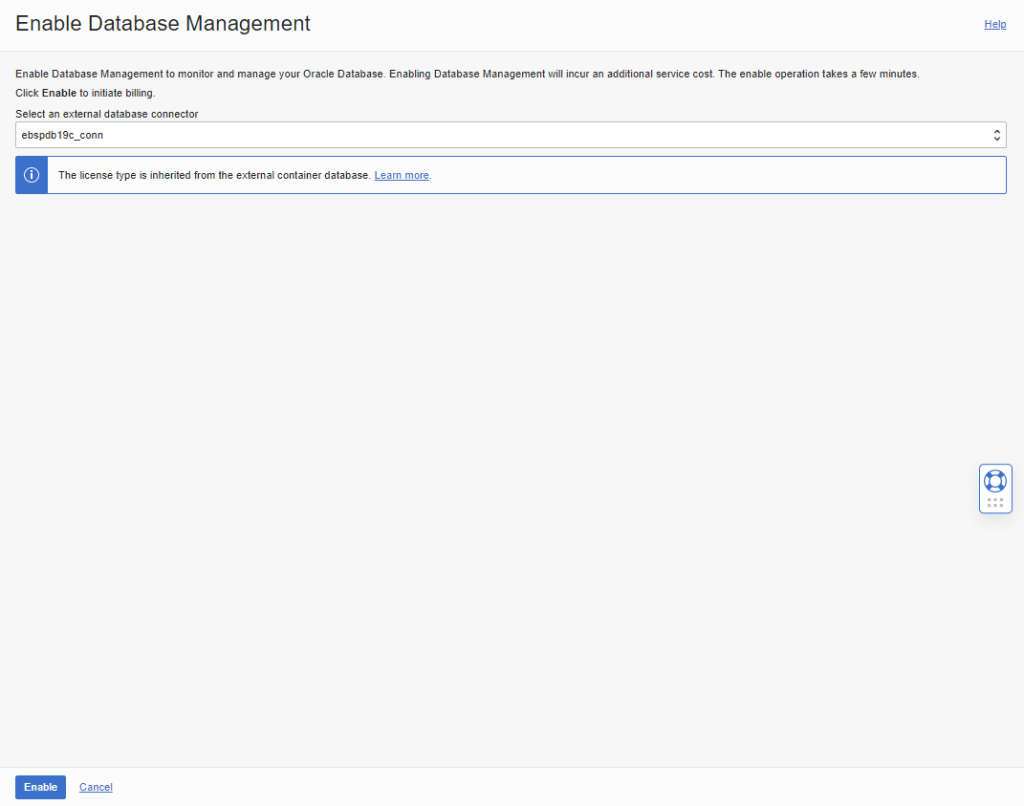
5. Navigate to External Pluggable Databases and Click on eg. ebspdb19c

6. Under Associated Services for Stack Monitoring click on Enable
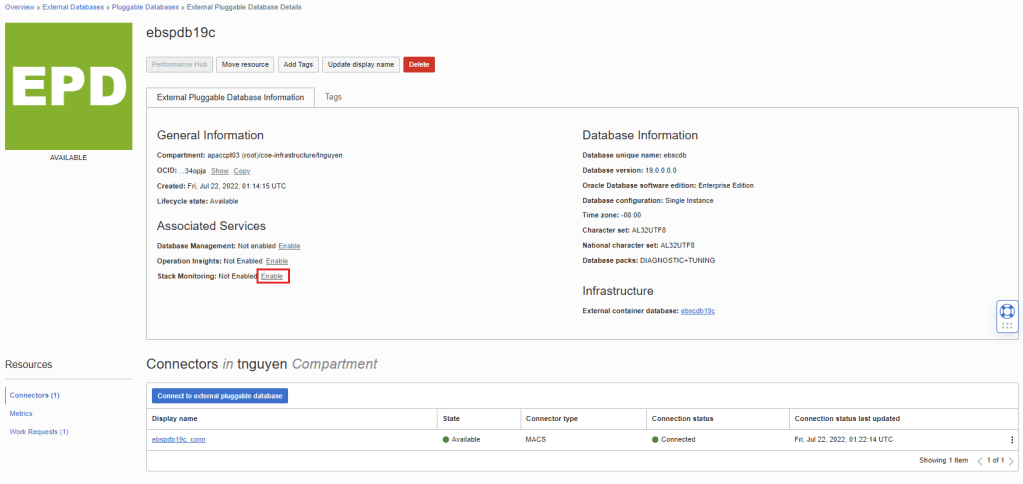
7. Click on Enable
8. Wait for update, to confirm that Stack Monitoring has been Enabled.
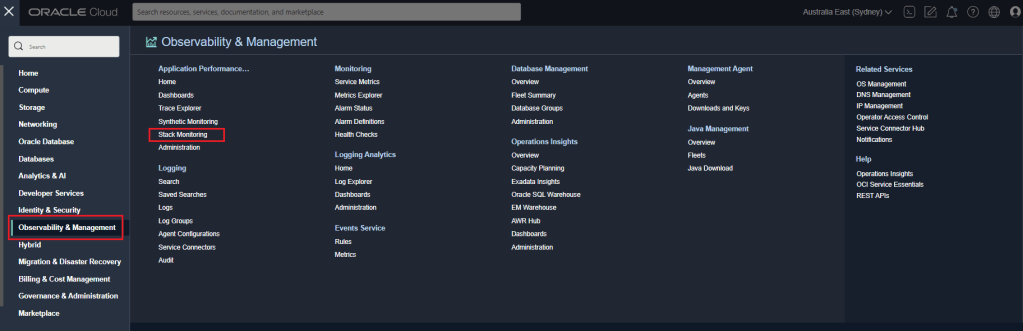
I. DISCOVER EBS IN STACK MONITORING
Now we will discover EBS resources in Stack Monitoring.
1. In OCI console menu, navigate to:
OBSERVABILITY & MANAGEMENT > STACK MONITORING
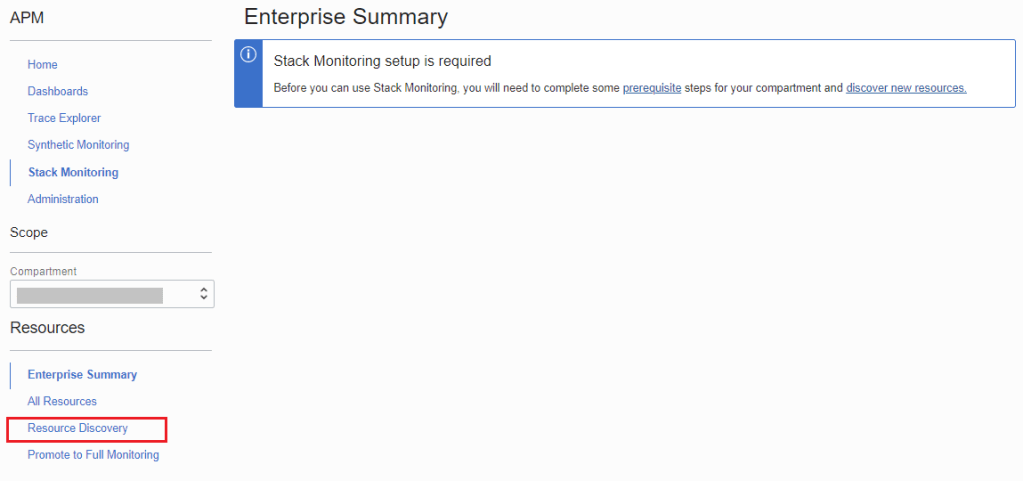
2. Select Resource Discovery
NOTE: Make sure you are in the Compartment where the EBS application host agent are deployed to.
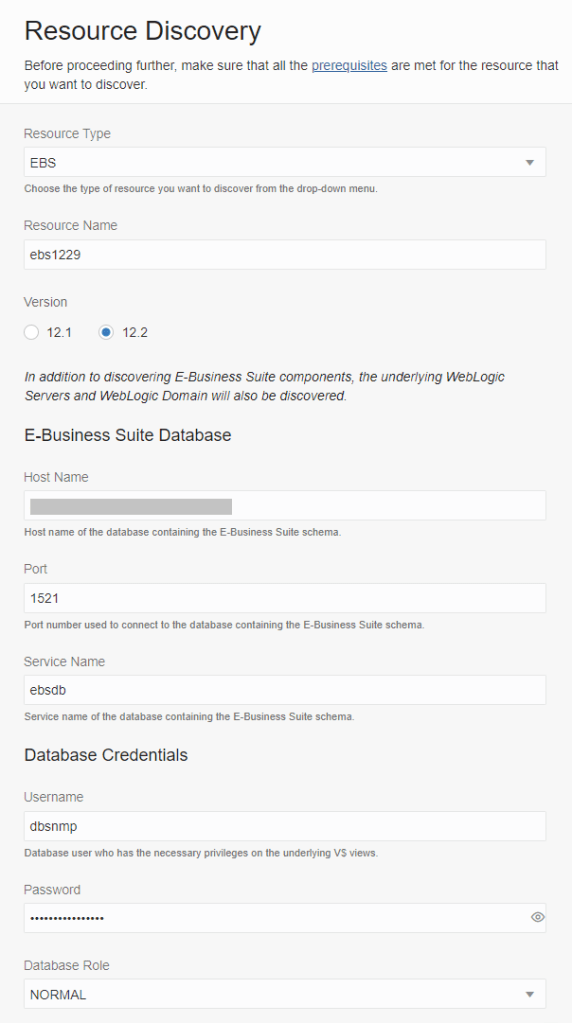
3. Click on Discover New Resource
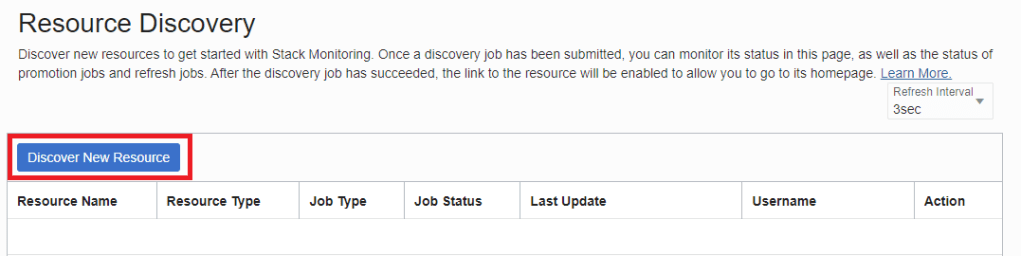
4. Complete the inputs for EBS Auto Discovery
a. EBS Resource Type = EBS
b. EBS Resource Name (eg. ebs1229)
c. EBS Version (eg. 12.2)
d. Host Name (Database Host or Scan Name)
e. Port (Database Service Port eg. 1521)
e. Service Name (Database Service Name eg. ebsdb)
f. Database Username (Database Monitoring Credential eg. DBSNMP or APPS)
NOTE: Use DBSNMP or EBS Application Schema eg. APPS
g. Password (Database Password)
h. Database Role = NORMAL
i. EBS Host (EBS WebLogic Admin Host)
j. Port (WebLogic Port eg. 7001)
h. Protocol (WebLogic Protocol eg. t3)
i. Username (WebLogic Username eg. weblogic)
j. Password (WebLogic Password)
k. Management Agent (Agent on Target EBS WLS Admin Host)
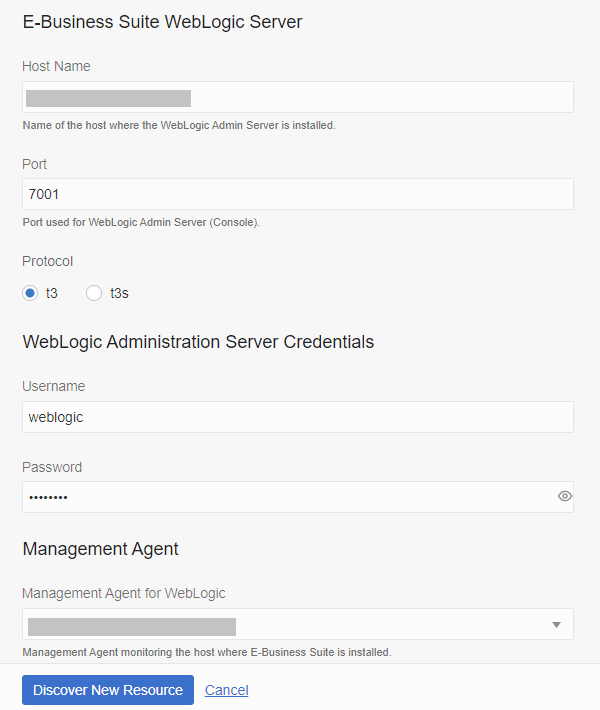
5. Wait for Discovery to Complete.
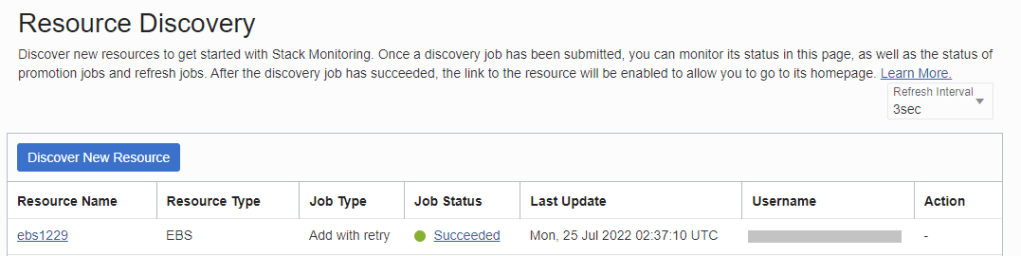
6. Reivew All Resources discovered.
In OCI console menu, navigate to:
OBSERVABILITY & MANAGEMENT > STACK MONITORING > ALL RESOURCES
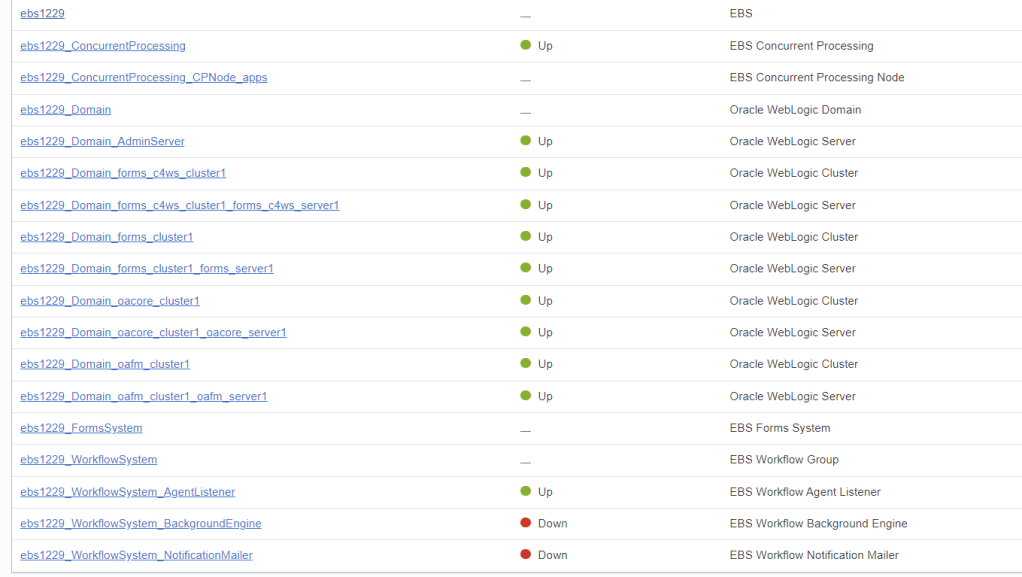
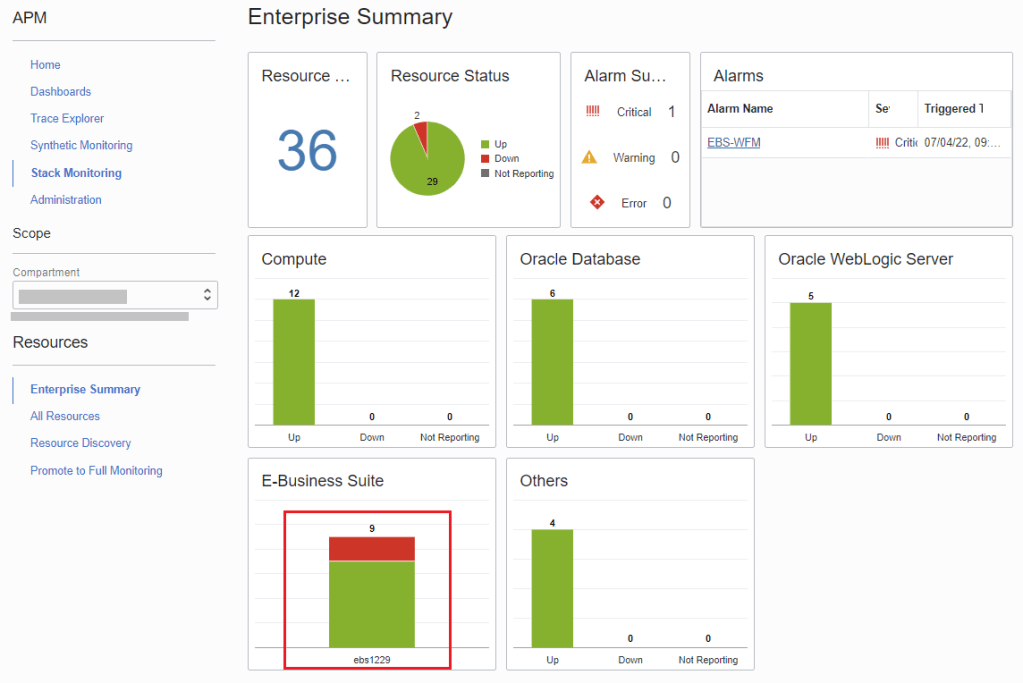
6. Review EBS in the Enterprise Dashboard
In OCI console menu, navigate to:
OBSERVABILITY & MANAGEMENT > STACK MONITORING
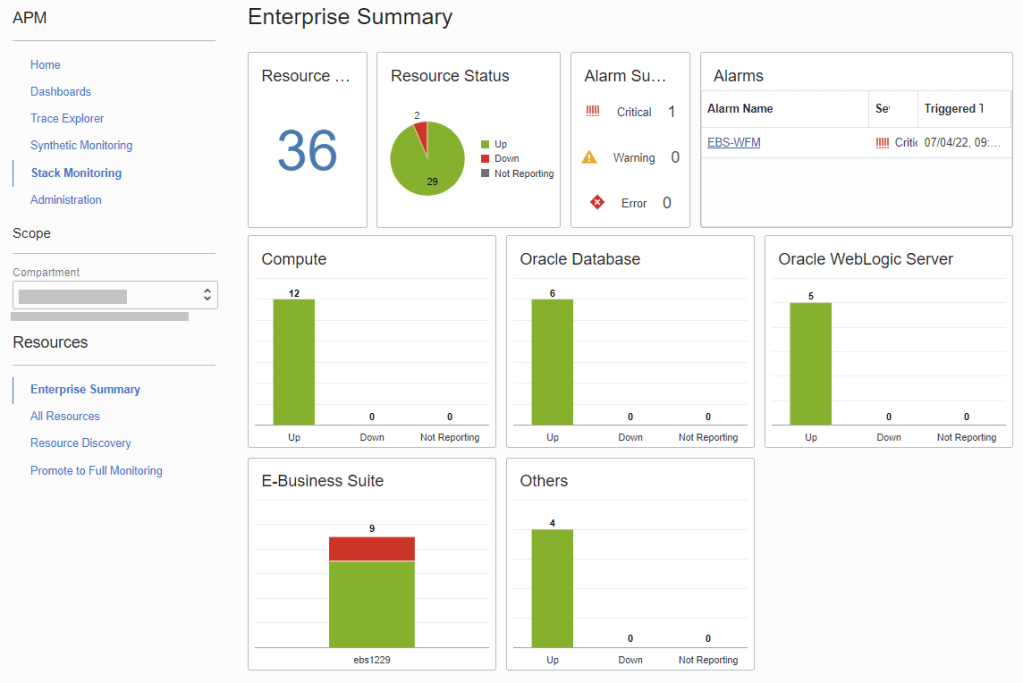
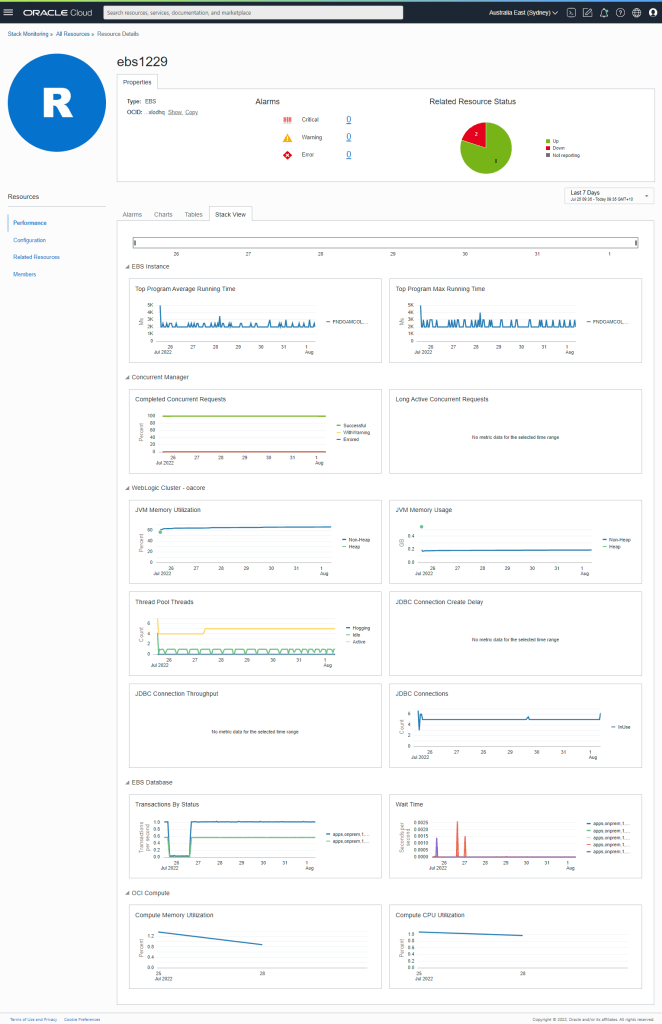
7. Drill into resources for E-Business Suite.
8. Then navigate to Charts tab.
View active sessions, active request and programs
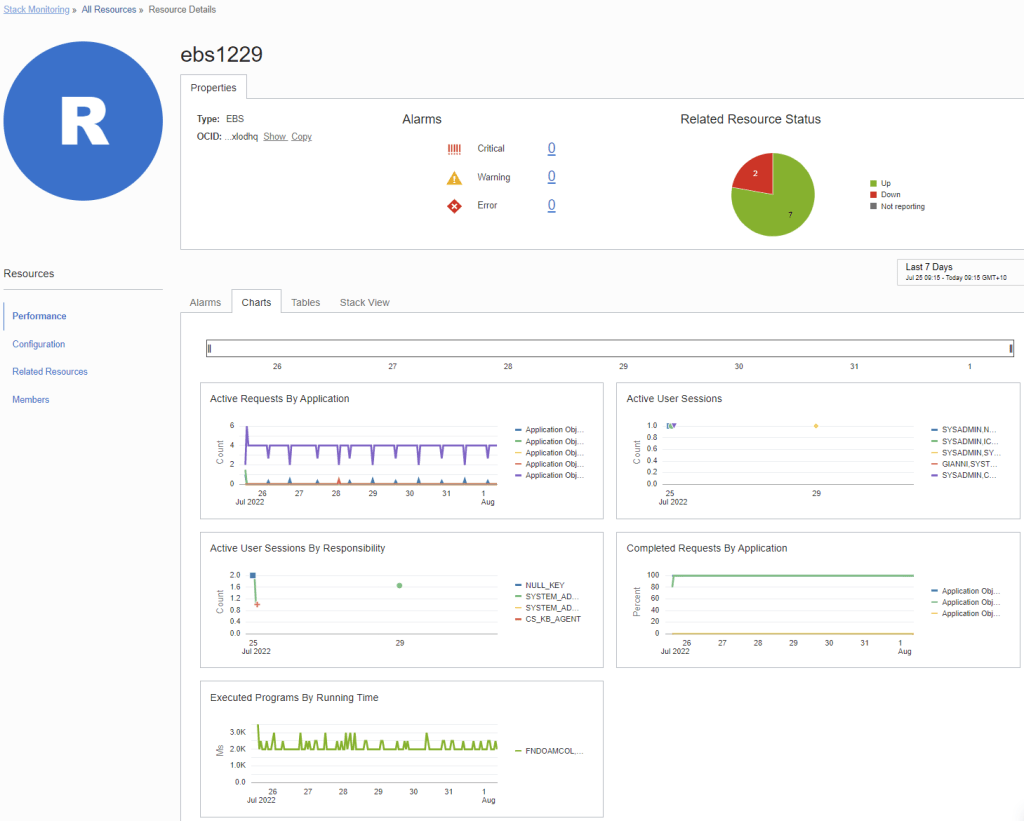
9. Navigate to Tables.
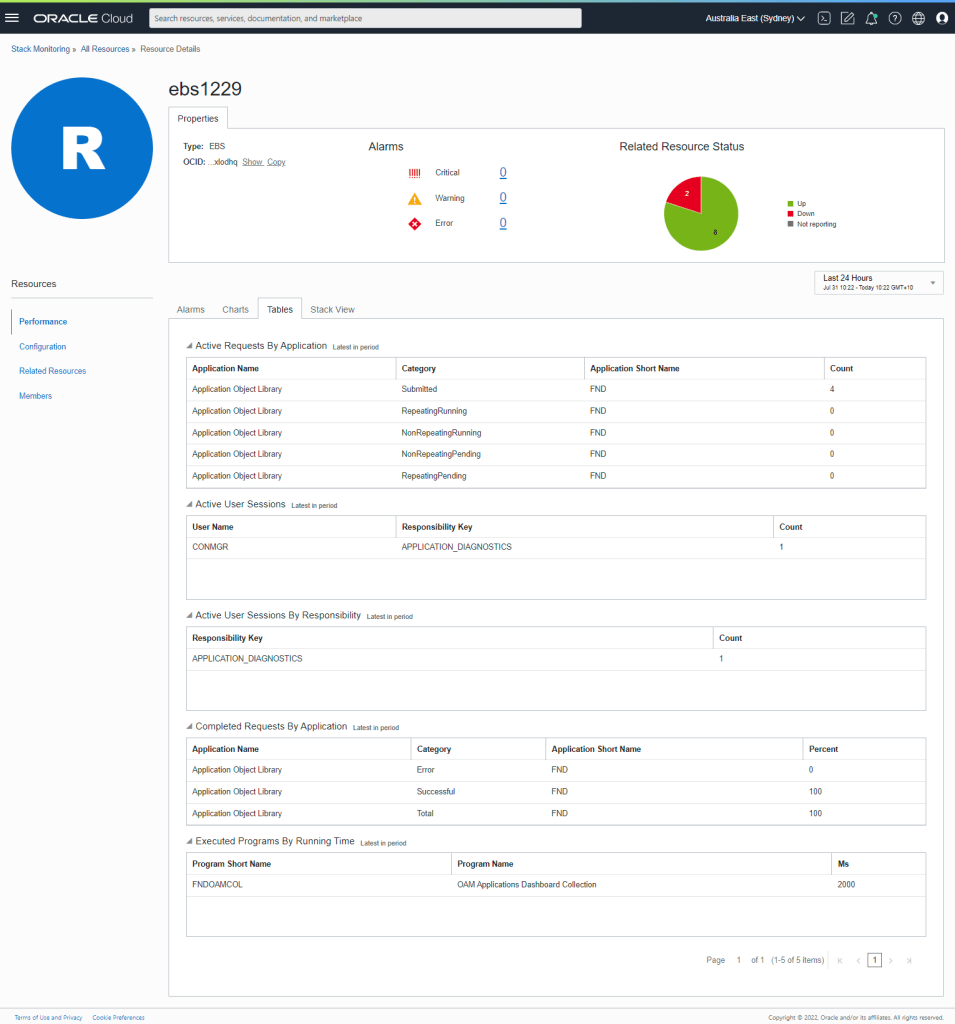
10. Navigate to Stack View tab
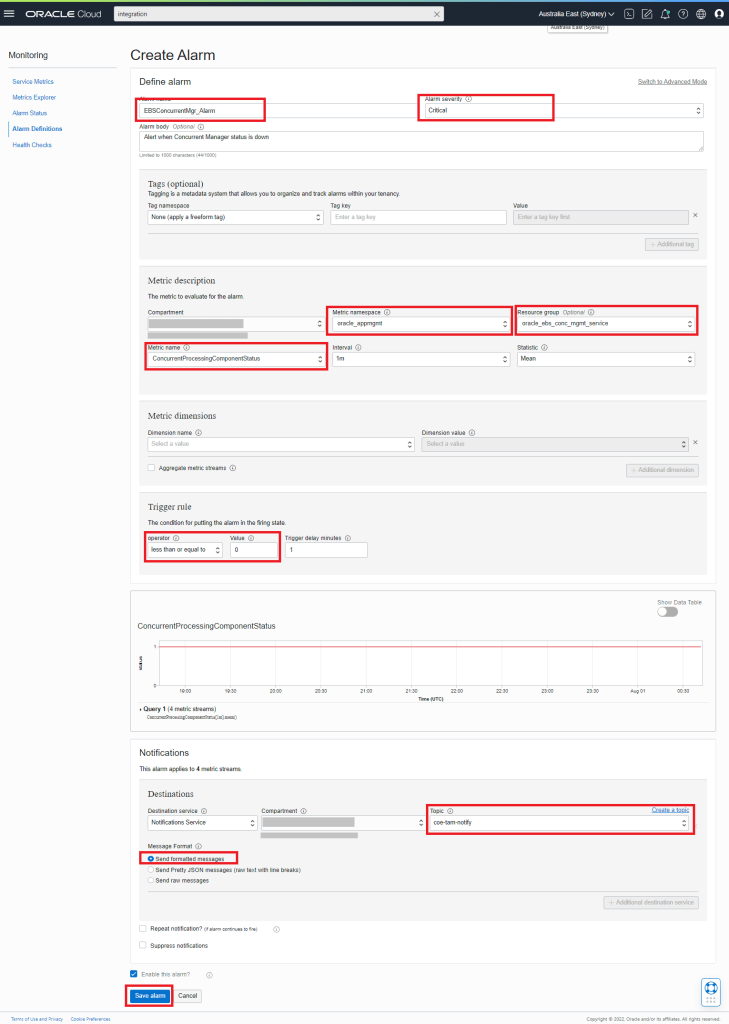
J. CONFIGURE EBS FOR ALERT NOTIFICATION
Once EBS resources has been discovered in Stack Monitoring, the out of box EBS metrics will now be exposed to OCI Monitoring Service.
You can now set alarm notification rules for your EBS metrics.
1. In OCI console menu, navigate to:
OBSERVABILITY > MONITORINING > ALARM DEFINITIONS > CREATE ALARM
NOTE: For list of out of box metrics for EBS that be can configure for alarming, please refer to:
EBS Stack Monitoring Metric Reference
Conclusion
That completes the Observability & Management enablement for EBS Stack Monitoring.
To get further visibility and enhance the EBS operational experience, I will be posting shortly additional use cases on how you can configure Observability & Management services:
1. Using Logging Analytics to rapidly troubleshoot EBS logs across the topology and detect potential issues.
2. Explore Application Traces to isolate performance issues to a EBS component with Application performance Monitoring service.
