

HTTPS is essential as it protects the privacy of our data over the Internet. W3’s 2022 report shows nearly 80% of all websites use HTTPS as their default web protocol, up 6% on the previous year.
Getting started with HTTP/TLS is fairly straightforward. Obtain a CA signed certificate, configure it on your web servers and reverse proxy load balancers and you’re good to go. But how do you ensure your configuration stays up-to-date with current industry standards?
CyberSecurity is an arms race. As hardware and software evolves, so do the tools and techniques created to exploit them. This fierce race largely drives the innovation that we see in the industry today.
How does this relate to TLS? Since the inception of SSLv1 by Netscape in the 90’s there’s been many revisions, SSLv2, SSLv3, TLSv1.1, TLSv1.2 with the current version being TLSv1.3. TLSv1.1 was deprecated in 2021, with new versions being released approximately every 5 years. Given the rate at which exploits are discovered these release cycles will also need to keep pace.
For organisations this poses a number of interesting challenges because you can only control what TLS versions you support. Also if your website or API is public then it’s likely you have no control over the connecting client, or which TLS versions they’re able to use.
So how do you know when to remove support for older, less secure TLS versions? After supporting several migrations I learned:
- Customers often use devices that no longer receive OS updates, and therefore don’t get cryptographic library and software updates. This limits the TLS versions they are able to use.
- API’s are used everywhere. They power everything from IoT devices to Point-of-Sale systems, and even Car Washes (more on that later). Often these devices are installed, forgotten and either not updated, or not capable of receiving updates.
- Enterprise systems are complex, and it can be hard to gain visibility into what components support which TLS versions, and where HTTPS request originate.
- Enterprises take significant time to investigate and make changes to their systems, therefore requiring significant advance notice.
- B2C and B2B service notification emails are often ignored. Even when it clearly states they need to take action or risk a service disruption.
- Making uninformed or poorly informed changes to TLS protocol support will more often than not result in customer complaints, brand damage, and an inevitable rollback.
I quickly developed an appreciation for adequate planning regarding changes of this nature. Back in 2016 during a TLS migration a support ticket was raised by someone who I’ll refer to as Bob. Bob was wondering why customers at his Car Wash were unable to pay using their EFTPOS and Credit cards. Looking at the ticket it was clear he was visibly frustrated (to put it lightly), and understandably so as it was impacting his business revenue. After investigating, we determined his Car Wash was running Windows XP terminals that made API calls. Now remember Windows XP went EOL in 2014, but Bob had no idea as these were maintained by another 3rd party. Also in this case, we didn’t have Bob’s details nor the details of his 3rd party, so he didn’t get the many notifications from 6 months prior that this change was occurring. From this, to minimise risk the business learnt we needed to take a more informed, proactive approach to engaging customers regarding such critical service changes.
The Challenge
Most of you will be familiar with the concept of a Web Server, Load Balancer & Reverse Proxy. These essentially terminate, process, or route HTTP traffic. Additionally they can perform SSL offloading and other web acceleration tasks.
Most web applications & API’s require the ability to scale and therefore require a Load balancer or Reverse Proxy. The downside of this is that they’ll be terminating HTTPS connections and establishing a new connection to your web servers. As a result client TLS versions will only be logged in load balancer access logs, meaning you will only be able to determine what percentage of your traffic is of a specific version, and any other metadata that your terminating device may provide such as URL and IP address.
I’ve logged client TLS versions, isn’t that enough?
If you provide applications & API’s that drive critical business processes, and can impact customers’ revenue streams then an outage is going to cause lots of headaches. Before undertaking a migration, you need to consider:
- What percentage of my customers would be impacted by turning off a specific version?
- Of those customers, are any of those “key accounts”?
- How fast are my customers acting on TLS migration service notifications, if at all?
- Is there any traffic that I don’t need to worry about? E.g. Bots, or traffic from a foreign country that my business doesn’t operate in.
To answer these questions, you need to be able to link users, to specific TLS versions, and geolocate their originating client IP address; and most cloud provider’s load balancers don’t have these required logging capabilities.
Extending Reverse Proxy Logging
My solution to this problem is fairly simple. It uses:
- Your existing OCI tenancy, VCN’s, Subnets & Application servers.
- An Oracle Linux 8 Virtual Machine running OpenResty as a HTTPS Load Balancer / Reverse Proxy.
- Lua scripts to extend the logging capabilities of OpenResty.
- Oracle’s Unified Monitoring Agent to collect my custom JSON logs into OCI Logging.
- A Service Connector to push my custom logs to Object Storage.
- A Log Collection Rule, to ingest my logs into Logging Analytics.
- Dashboards & Log Explorer in Logging Analytics to visualise the data.

The great thing about this approach is it requires minimal changes existing architectures, and I can leverage OCI’s cool native services to do the heavy lifting like log collection and analysis.
Setup & Configuration
I’m going to show you how to configure OpenResty, and the other required OCI services. First we need to create our VCN, Subnets, and Internet Gateway:

Now we need to add rules to our Security List to allow TCP 443 (HTTPS) traffic into our Public Subnet:

I’m using Stateless rules as these are faster so I’ve added a second rule to permit bidirectional flows. Note that the source CIDR for the second rule is the CIDR of the Public Subnet. Your rules should look like:

I should also point out that by default SSH is allowed into your public subnet. For production environments I would recommend removing this rule, and using OCI’s Bastion Service.
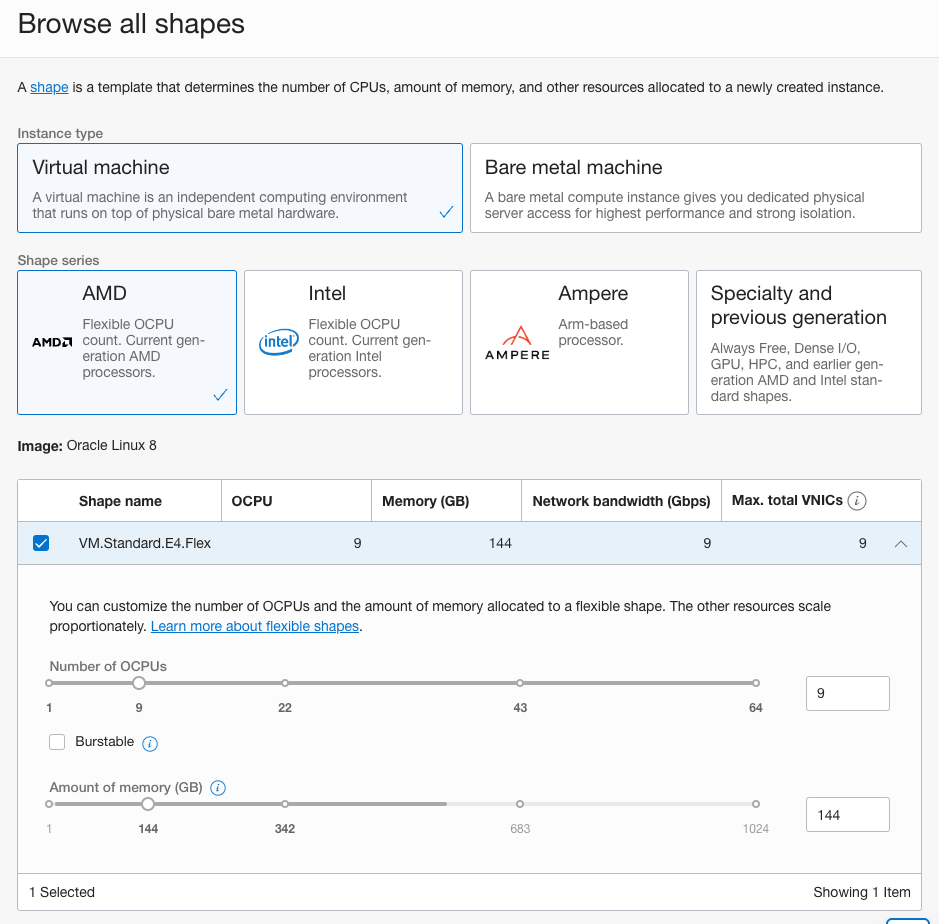
Now I’m going to create an Oracle Linux 8 Virtual Machine to run OpenResty. Select Oracle Linux 8 as the image, and ensure you choose a shape with adequate CPU, memory, and network resources to handle your incoming network traffic:
Select the Public Subnet for the VCN, ensure “Assign a public IPv4 address” is selected. You will also need to upload an existing SSH public key, or download a randomly generated key. My recommendation is to use a randomly generated key, and don’t re-use keys between environments:

Click “Create” to provision the compute instance.
If you’re trying out this demo and don’t have a web server to forward traffic to, you can follow these instructions and create another Oracle Linux 8 virtual machine running Nginx. Note you only need to follow the instructions in the “Install and enable Nginx” section.
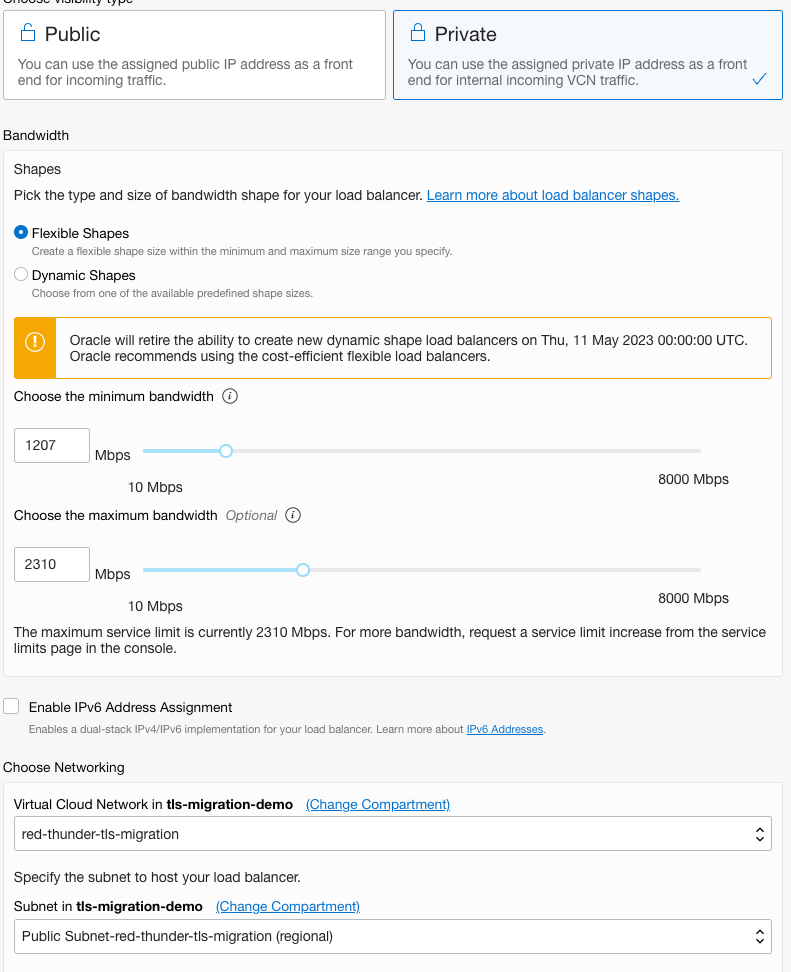
Now we want to create an OCI Load Balancer that we’ll use to proxy traffic between our OpenResty server, and our web server. Again ensure you select a shape that supports your expected network traffic:
Add the backend web server that you created:

Configure a HTTPS listener. If you haven’t got an SSL certificate you can generate a self-signed cert using:
$ openssl req -x509 -newkey rsa:4096 -keyout key.pem -out cert.pem -sha256 -days 365Select “Load Balancer Managed Certificate” and upload the cert, private key and enter the password for the private key.
You can optionally enable logging if required. Click Submit to create the Load Balancer. Note down the IP address once it’s created as we’ll need that shortly.
Now we’ll install OpenResty on our Virtual Machine. Connect to the instance via SSH or the OCI Bastion Service:
$ ssh -i ~/.ssh/[your ssh key].key opc@[ip address]Run the following commands to install OpenResty:
$ wget https://openresty.org/package/oracle/openresty.repo
$ sudo mv openresty.repo /etc/yum.repos.d/
$ sudo yum check-update
$ sudo yum install -y openresty-resty
On your local machine copy the SSL certificate and keys to the OpenResty server using scp:
$ cd /path/to/cert/folder
$ scp -i ~/.ssh/[your ssh key].key *.pem opc@[ip address]:.
Now on the OpenResty VM copy the cert files to the required location.
$ sudo mkdir -p /etc/pki/nginx/private
$ sudo cp cert.pem /etc/pki/nginx/
$ sudo cp key.pem /etc/pki/nginx/private/
$ sudo touch /etc/pki/nginx/private/key_password
$ sudo vi /etc/pki/nginx/private/key_password
Add the private key password to the file, save and exit Vi.
Now we want to replace the OpenResty Nginx configuration:
$ sudo rm /usr/local/openresty/nginx/conf/nginx.conf
$ sudo vi /usr/local/openresty/nginx/conf/nginx.conf
add the following code block:
#user  nobody;
worker_processes  1;

#error_log  logs/error.log;
#error_log  logs/error.log  notice;
#error_log  logs/error.log  info;

#pid        logs/nginx.pid;


events {
    worker_connections  1024;
}


http {
    include       mime.types;
    default_type  application/octet-stream;
    sendfile        on;
    keepalive_timeout  65;

    include migration-server.conf;
}
Save and exit Vi. Now we wan’t to get the required Nginx config and Lua files from Github. As always check any code downloaded from the Internet before running it.
$ cd /usr/local/openresty/nginx/conf/
$ sudo wget https://raw.githubusercontent.com/scotti-fletcher/tls-migration/main/migration-server.conf
Using Vi, edit the migration-server.conf file updating the required lines server_name, ssl_certificate, ssl_certificate_key, ssl_password_file, and proxy_pass. The proxy_pass value needs to be the private IP address of the load balancer you created earlier.
Now we need to get the required Lua script:
$ sudo mkdir /usr/local/openresty/nginx/lua
$ cd /usr/local/openresty/nginx/lua
$ sudo wget https://raw.githubusercontent.com/scotti-fletcher/tls-migration/main/request-logger.lua
In this file you can customise the specific information you want to capture, in this example I’m covering both HTTP Basic Authentication (for API’s) and HTTP POST Parameters, such as when a user logs in. Depending on your use case and login username parameters you will likely need to update this file:
json = require("cjson")
local b64 = require("ngx.base64")
local ssl = require "ngx.ssl"

local data = {request={}}
local req = data["request"]
req["host"] = ngx.var.host
req["uri"] = ngx.var.uri
if ngx.req.get_headers()['user_agent'] then
    req['user_agent'] = ngx.req.get_headers()['user_agent']
else
    req['user_agent'] = 'Unknown'
end
if ngx.req.get_headers()['authorization'] then
    -- We're assuming the auth header is HTTP Basic & Base64 encoded, update as per your requirement
    auth_header = ngx.req.get_headers()['authorization']
    i, j = string.find(auth_header, " ")
    decoded_value = b64.decode_base64url(string.sub(auth_header, i+1))
    k, l = string.find(decoded_value, ':')
    username = string.sub(decoded_value, 1, k-1)
    req['api_username'] = username
end
tls_version, err = ssl.get_tls1_version_str()
req['client_ip'] = ngx.var.remote_addr
req['tls_version'] = tls_version
req["time"] = ngx.req.start_time()
req["method"] = ngx.req.get_method()
-- Customise to capture usernames on login
if ngx.req.get_post_args()['username'] then
    req['username'] = ngx.req.get_post_args()['username']
end

local file = io.open("/usr/local/openresty/nginx/logs/tls.log", "a")
file:write(json.encode(data) .. "\n")
file:close()
Now we need to create the log to store our captured JSON data:
$ sudo touch /usr/local/openresty/nginx/logs/tls.log
$ sudo chmod 666 /usr/local/openresty/nginx/logs/tls.log
I’d also recommend setting up Logrotate for the tls.log file.
Now we need to enable the local firewall to permit TCP traffic on port 443:
$ sudo firewall-cmd --zone=public --permanent --add-port=443/tcp
$ sudo firewall-cmd --reload
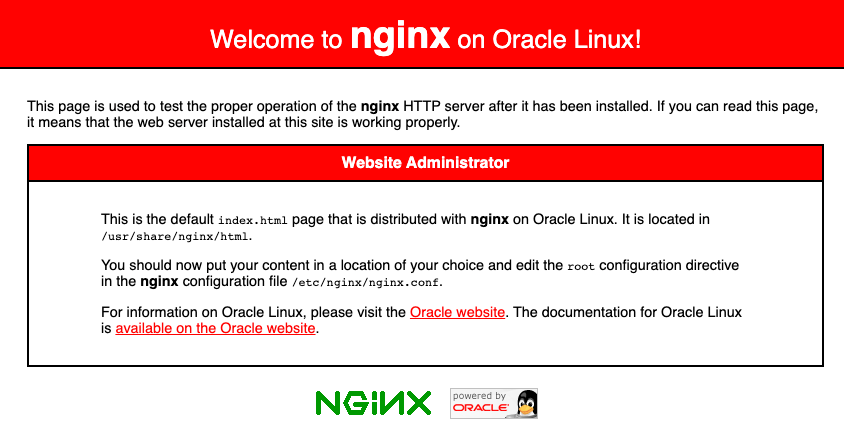
$ sudo firewall-cmd --list-portsYou should now be able to browse to your site in your web browser. If you opted for the self-signed certificate, then you will need to accept the browser certificate warning message. You should see a page that looks like:
Now we’re going to simulate some traffic, to demonstrate capturing and logging. First we’ll send an API request:
$ curl -k -X POST -u "scott:password" -H "Content-Type:text/json" --tlsv1.3 --tls-max 1.3 https://[Public IP Address of the OpenResty Instance]/authand if I look at the tls.log file I can see:
{"request":{"user_agent":"curl\/7.79.1","method":"POST","api_username":"scott","tls_version":"TLSv1.3","time":1657766981.205,"client_ip":"redacted","host":"redacted","uri":"\/auth"}}If I make another request simulating a browser login:
curl -k -X POST -d "username=jackson" -d "password=test123" -H "Content-Type:application/x-www-form-urlencoded" --tlsv1.3 --tls-max 1.3 https://[Public IP Address of the OpenResty Instance]/loginI can see:
{"request":{"user_agent":"curl\/7.79.1","username":"jackson","method":"POST","tls_version":"TLSv1.3","time":1657767062.466,"client_ip":"redacted","host":"redacted","uri":"\/login"}}I can also adjust the version of TLS used:
curl -k -X POST -u "scott:password" -H "Content-Type:text/json" --tlsv1.0 --tls-max 1.0 https://redacted/authAnd I can see that TLS version reflected in my JSON logs:
{"request":{"user_agent":"curl\/7.79.1","method":"POST","api_username":"scott","tls_version":"TLSv1","time":1657767151.891,"client_ip":"redacted","host":"redacted,"uri":"\/auth"}}At this point, you want to make sure you’re only logging the bare minimum required. The script by default only includes the values that you specify. I would advise against capturing and logging all POST parameters as you will likely capture sensitive PII.
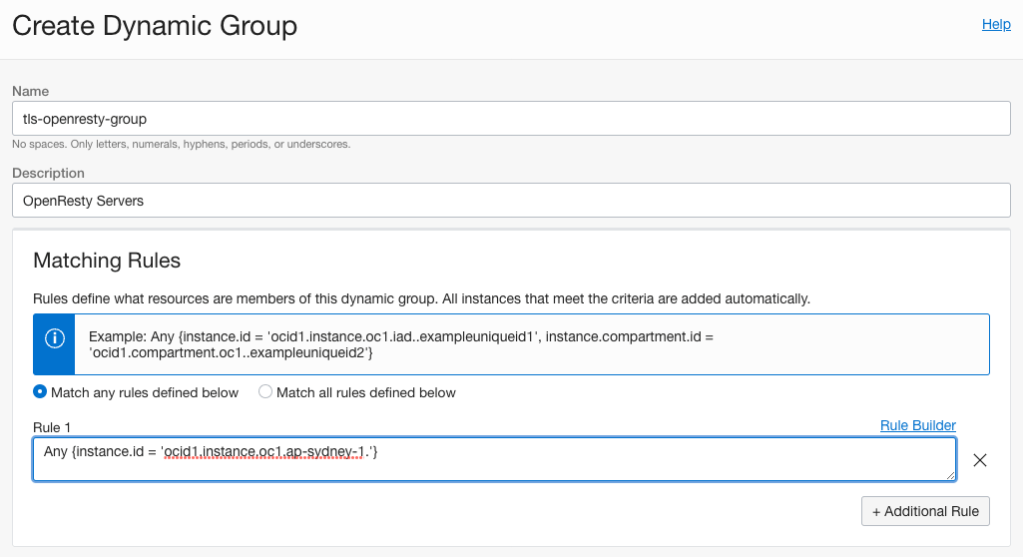
Now we need to ingest our logs so we can make those informed decisions I talked about earlier. First we need to create a Dynamic Group:
Now we create a Log Group:

Now we create a custom log:

Now we add an agent configuration to collect our custom JSON tls.log:

Ensure you click “Create policy to allow instances in dynamic group to use logging service.” and under “Advanced parser options” ensure JSON is selected:
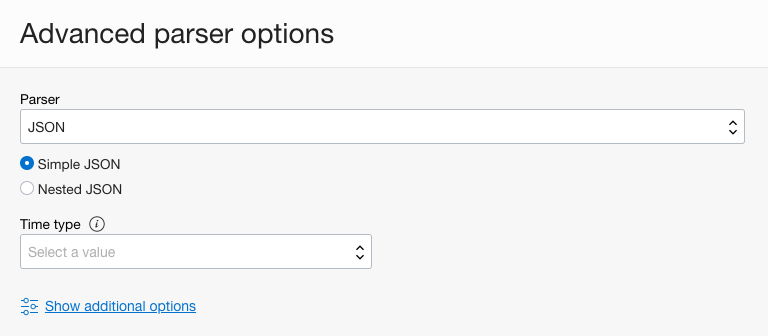
By selecting JSON as the parser my JSON logs will be imported into OCI Logging correctly, making it easier to map the fields in Logging Analytics.
It may take up to 30 minutes for your configuration to become active and begin collecting logs, if you want to speed things up a little you can run (on the OpenResty VM):
$ sudo systemctl restart unified-monitoring-agent_config_downloaderYou should then be able to see your logs in OCI Logging:

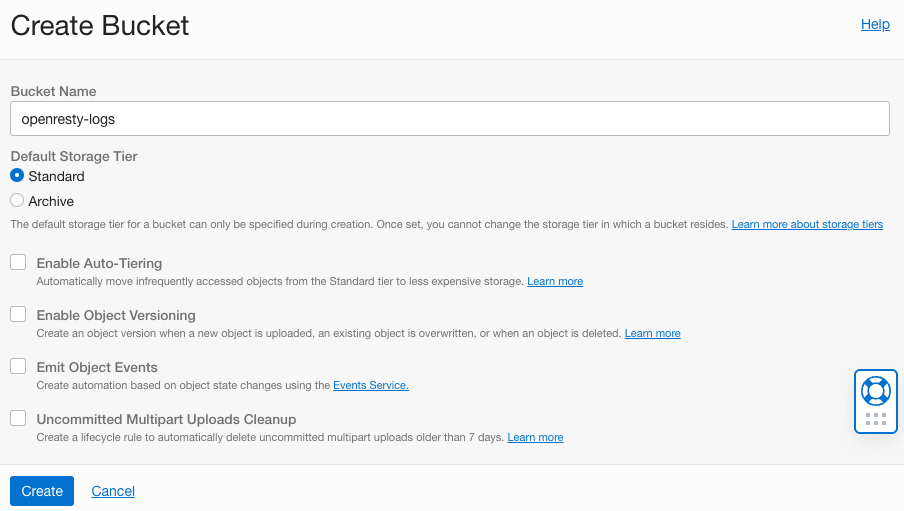
Now we need to create a bucket to move our logs between Logging and Analytics:
Now we need to create a Service Connector to move logs into our Bucket:

Make sure you click “Create default policy” and then click Create.
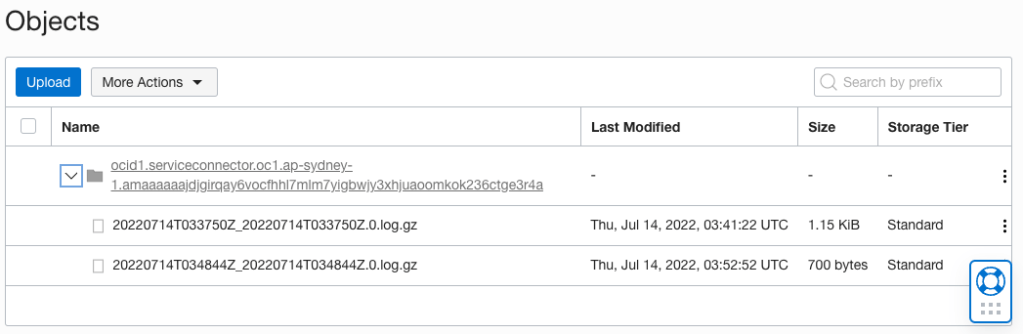
Now generate some more traffic via Curl, or via your web browser. After 5-10 minutes you should see logs in your Object Storage Bucket:
In Logging Analytics create a Log Group to hold our TLS logs. I’ve called mine “tls-logs”:

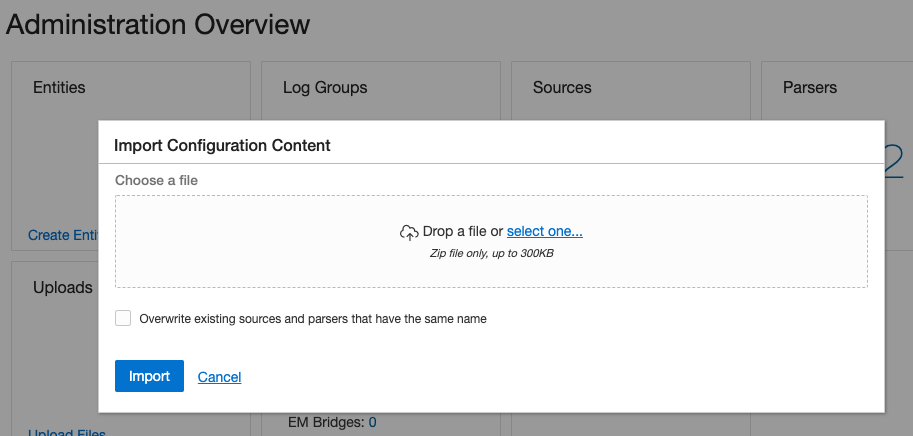
Download the Logging Analytics Log Source & Parser configuration if you haven’t retrieved it from GitHub https://github.com/scotti-fletcher/tls-migration/blob/main/tls-migration-source.zip
Click “Import Configuration Content”, select the ZIP file and click Import:
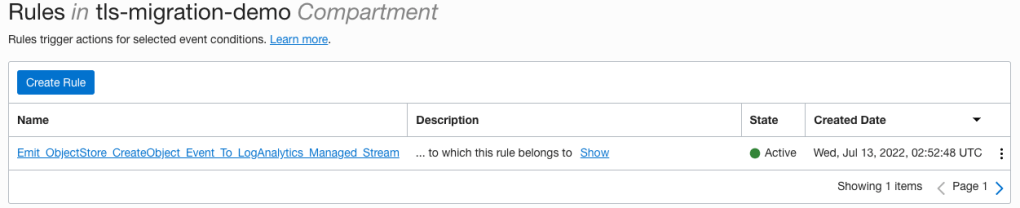
Now we need to create an Object Collection Rule that enables collection of the logs from our openresty-logs bucket and loads them into our tls-logs Log Group.
$ oci log-analytics object-collection-rule create --name tls-collection-rule --compartment-id [Your Compartment OCID] --os-namespace [Your Object Storage Namespace] --os-bucket-name openresty-logs --log-group-id [The OCID of the tls-logs Log Group] --log-source-name tls-migration-source --namespace-name [Your Object Storage Namespace] --collection-type HISTORIC_LIVE --poll-since BEGINNINGThe CLI should return a JSON response, indicating your rule creation succeeded. You should also be able to see an Event Rule created:
Download the Logging Analytics Dashboard if you haven’t already from GitHub https://github.com/scotti-fletcher/tls-migration/blob/main/tls-migration-dashboard.json. You’ll need to find and replace all values of “ENTER_COMPARTMENT_ID” with the OCID of the compartment where you want to create the dashboard.
Using the CLI run the following command. You’ll also need to update the URL to the endpoint for the region where you want the Dashboard to be created:
$ oci raw-request --target-uri https://managementdashboard.ap-sydney-1.oci.oraclecloud.com/20200901/managementDashboards/actions/importDashboard --http-method POST --request-body file://tls-migration-dashboard.jsonYou should then be able to view your dashboard and data:

The Dashboard I’ve created shows you where your traffic originates, over time how much traffic is of which version, which non TLSv1.3 user agents are connecting, and information about which API and Web based users are not connecting via TLSv1.3.
From here you would be able to answer those earlier questions:
- What percentage of my customers would be impacted by turning off a specific version?
- Of those customers, are any of those “key accounts”?
- How fast are my customers acting on TLS migration service notifications, if at all?
- Is there any traffic that I don’t need to worry about? E.g. Bots, or traffic from a foreign country that my business doesn’t operate in.
If you had other specific questions, you can use Log Explorer to write your own custom queries. To view the queries used in the dashboard, click the button at the top right of each widget.
Some Final Thoughts
TLS migrations can be hard! Hopefully I’ve shown you how you can tackle the problem, make better decisions, and help your customers migrate to stronger TLS versions.
From here you could easily extend the solution to include a serverless function that emailed customers when they were found to be using an older TLS version.
Depending on your application / API you might want to only capture requests where a username is present, E.g. /login for web browsers, or a specific URL for API’s. This can be achieved easily enough by modifying the Lua code:
if req["uri"] = '/login' then
    -- do something here
end
For simplicity my demo only has one OpenResty instance. If you were to use this in a production environment, I would recommend setting up HA so there’s no single point of failure.
Lastly, OCI logging is simple, easy to use, and fast to set up. Managing 3rd party agents and logging infrastructure, collecting logs, and analysing them takes a lot of time. OCI does almost all of this heavy lifting for you with its Unified Monitoring Agent and native services.
