Last weekend, I was at the Code Network Winter Hackathon event in Brisbane – https://codenetwork.co/winter-hackathon-2018/. I was there as a sponsor, workshop presenter, mentor and just a general supporter. As such there was some down-time between different activities. So, what a great time to sit down and work on something that I have no idea about (technically) – #Blockchain and Hyperledger. So, as a normal person does – I went searching for relevant content to help. Here’s a couple of the searches that I did.
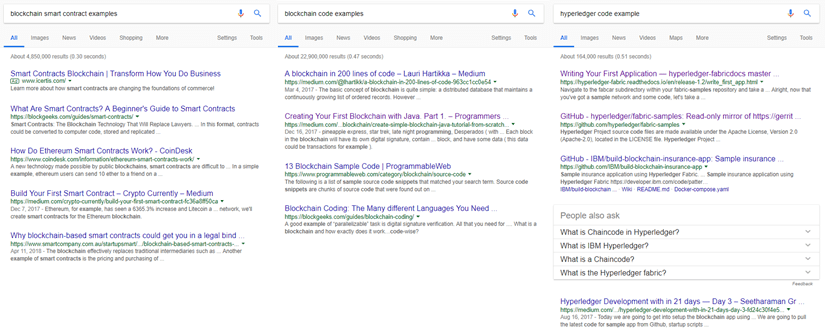
Unfortunately, through many different searches and reading lots of things it became apparent that I didn’t know much and there was lots to learn. There seemed to a massive amount information that looked great. There was content that talked about what a Blockchain is. There was content that talked about the business use cases and examples of why you use a Blockchain technology. There was code that built a Blockchain. I found plenty smart contract examples on github. I learnt more about what I needed to know but it didn’t get me to the place that I wanted to be.
So – how do I develop and play with a Smart Contract?
The main learning for me through this process was the fact that my literacy around Blockchain was not very good. And as hard as I tried, “my search as only as good as my question”. Here’s my attempt of simplifying the landscape so as a developer, you can get started with the valuable bit of blockchain – ie building apps.
For the purposes of the Winter Hackathon, I was inspired by 3 relevant occurences – the Coles promotion called My Little Shopper – https://shop.coles.com.au/a/a-national/promo/little-shop-online (it’s amazing what people and parents would do); Tixel which is a safe and legit way to buy and sell tickets – https://tixel.com.au/Queensland (recently finished their tour of the CEA’s Collider accelerator program for creative tech); and CargoSmart which simplifies the global shipping industry to improve planning and on-time deliveries https://www.cargosmart.com/en/default.htm (and recently working with us on their Blockchain implementation).
WRITING YOUR SMART CONTRACT
When first looking into the implementation and specifically for HyperLedger, it felt like a Smart Contract was this mythical being that protected all intruders and evil spirits from tampering with the legendary Ledger. Oh was I mistaken.
Hey. I see what you truly are. You’re just a Data Access Object with some validation, integrity and
transformation logic with three types of bitbucket calls – GetState, PutState and wait for it …
DeleteState (which doesn’t delete it but only removes the lookup but keeps the transaction history).
With the mystical aura removed and a few different patterns emerging, it has become pretty simple. Here’s a few snapshots of what makes up the Smart Contract. Oh … most implementations are based upon Go. Some other implementations are now in NodeJS.
 |
This is the start of the source file. The main imports are the Fabric Shim and Peer that relate to the Fabric Go SDK. The other imports are more about data manipulation. |
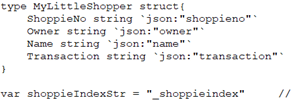 |
This is the main structure of the state being managed. The json reference is a mapping to the attribute as described in JSON.
The index string is used as a key into data that is stored in the ledger. |
 |
This is the main function that is called by the exposed REST API. The payload itself has references to the chaincode (the Smart Contract implementation) as well as the function to execute and the arguments to pass to the function.
The references to t.read(), t.delete() or t.write()function calls are to delegate functions that implement the underlying GetState, PutState and DelState calls. |
 |
This is an example of a GetState call. Notice that data comes back as a byte array.
There are shim.Error() and shim.Success() functions to return failure and success states. |
 |
This is an example of a PutState call. Notice that data comes back as a byte array. |
 |
This is an example of a DelState call. |
Once I wrote the basic CRUD Chaincode, then it needed to be packaged for Oracle Autonomous Blockchain Cloud Service which was my target platform for the purposes of what I was doing at the hackathon. It is quite easy. Zip up the one .go file. And now it was ready for me to install and instantiate on the Blockchain Cloud Service.
GETTING IT TO RUN
With the fun bit over, I needed to create the network that the chaincode would be installed and instantiated. There can 3 main steps:
- Create the network (ie. the environment in which the code is run) and organisations (ie. the participants of the interaction)
- Configure the network (ie. exchange keys and configuration)
- Deploy the chaincode and Run the chaincode via a REST API
Before I started provisioning this service, I went through a fair number blogs, articles, youtube clips and stack overflow questions about how to configure up the Blockchain infrastructure. There were a million and one ways to do it. All of them were detailed and more than what I wanted to do. So, I got an instance of Oracle Autonomous Blockchain Cloud Service and started working on it. The following sections will guide through this process.
1. Creating the Network and Organisations
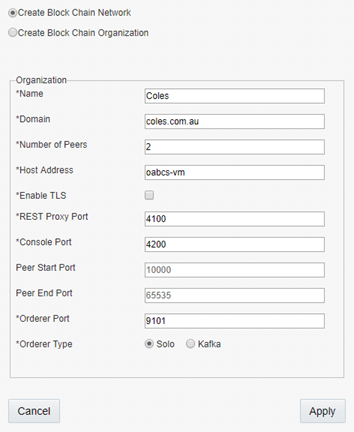
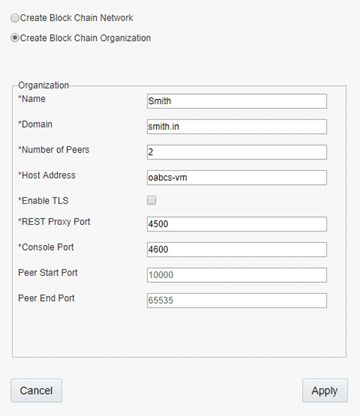
For this example, I created one network and two organisations. That’s the first thing that I did. What happens is that the different blockchain services are provisioned for the network and organisations. In the default configuration, there’s a Blockchain Management console started to manage the network and organisations. This in default scenarios is deployed on port 3000 so go to http://<host>:3000.
|
|
|
I create one network and two participant organisations each with their own REST Proxy and Console.
Specifically for the network configuration, there is an additional port for the Orderer.
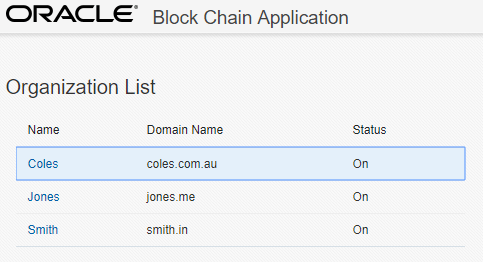
The result of this was the network and organisations are created and are started.
2. Configuring the Network
With the network and organisations operational, the next step is to configure the network and associate the different participating organisations. What this means is that there is configuration and keys that are shared between these entities.
a) Export Orderer Settings
We’ll click on the link for the network (and in this case it’s Coles) and this opens a new console for managing the Blockchain network. Under the Network tab, the different organisations exist. The Orderer settings are extracted to be shared with the participant organisations. This process downloads a JSON file with some configuration.

b) Participants Joining the Network
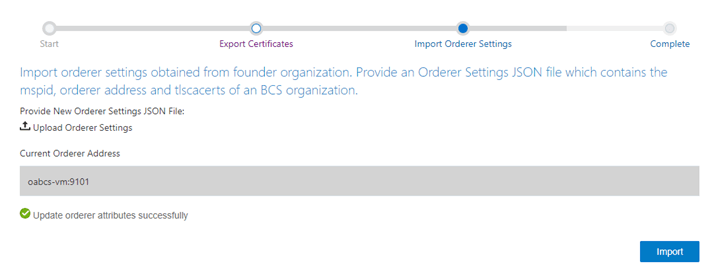
Going back to the http://<host>:3000 console, we’ll click on the link for managing a Blockchain organisation (and this is repeated for each organisation). Each participant organisation requires to export a set of certificates and import the network Orderer settings. Once completing the import process, we are operational.
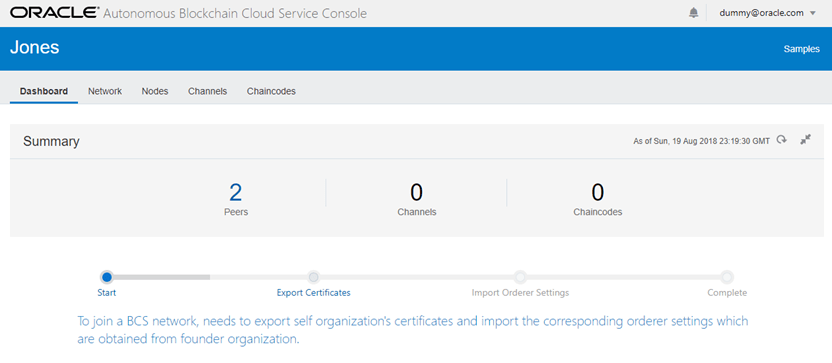
Here’s a screenshot of the workflow to export the certificates which exports a JSON file and import the Orderer settings.
Once everything is complete, we can either go back to the network configuration (ie Blockchain Network console)
or repeat the process for another participant organisation.

Here’s a screenshot of the existing Orderer network configuration as shown in the Blockchain Network console.
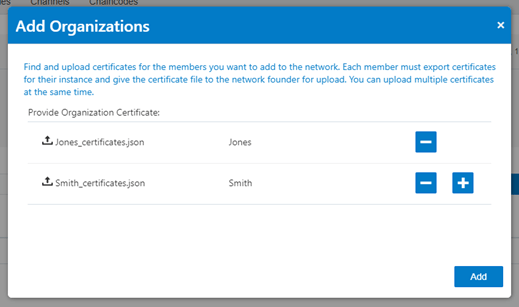
By adding organisations to the network, we upload the JSON files exported from the participating organisations
(using the Blockchain Organisation consoles). In this scenario, we have two different organisations Jones and Smith.

Here’s a screenshot of the existing Orderer network configuration with the newly imported participant organisations.

This is another view of the relationship between the organisations and the network. We are now ready to deploy the chaincode.
3. Deploy the Chaincode
We are now just moments away from the true task we wanted to get it – running the chaincode. With the zip file of our Go code, we can install and instantiate it to be exposed through the REST API of the network.

We navigate to the Chaincode tab in the Blockchain Network console. This is where we see the different chaincodes deployed including different versions.
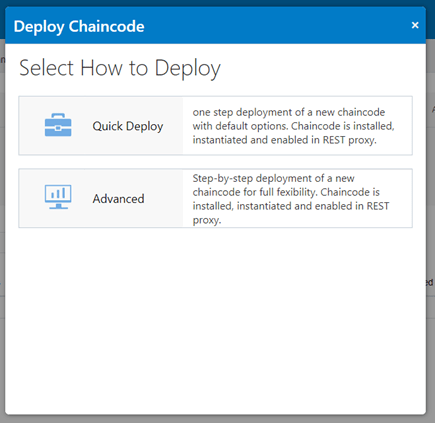
There are a couple of different ways to deploy – Quick and Advanced. I’ve just chosen Quick Deploy to keep the process simple.

The configuration that is required to deploy a chaincode includes: version, which peers to install and instantiate,
uploading the zip file and adding endorsement policies which leads to signing of different transactions.

With a few seconds (less than minutes), the chaincode is deployed to the network.
The next part to this is to run it. To save time, I’ve used postman to execute the REST APIs.
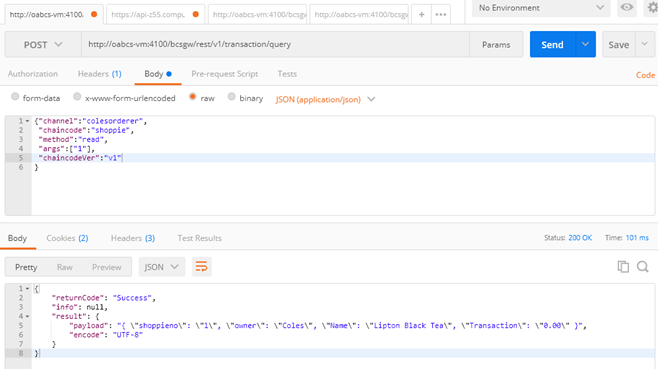
Here we go. The chaincode is deployed and operational. The REST API resources and formats are available here –
https://docs.oracle.com/en/cloud/paas/blockchain-cloud/rest-api/rest-endpoints.html
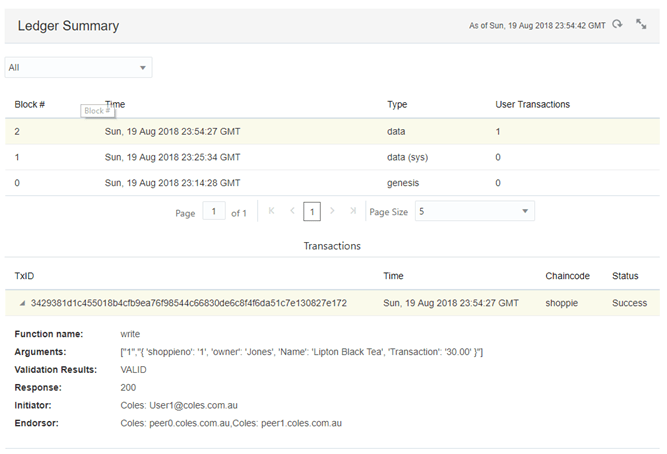
Having a look at the Blockchain Network console and under the Channels tab, I can look at the state of the ledger and other statistics.
We are now done. We’ve built the chaincode (ala the Smart Contract), we’ve spent a little time
configuring the network and organisations that participated in the network
and then we deployed the chaincode (as a zip file) and ran it.
If you want to try this out yourself, you can get trial from https://cloud.oracle.com/tryit and provision an Autonomous Blockchain Cloud Service for yourself.
At the end, as I was looking for search results for this article, I found exactly what I was wanting to find (within seconds) “Blockchain chaincode examples”. Here’s a couple of references that I have found to be useful and simple to get your head around without delving into the depths of the Blockchain infrastructure:

2 thoughts on “Building a Smart Contract with Oracle Blockchain Cloud Service @ #WinterHack2018”