
Oracle introduced the Real Time Integration Business Insight product as part of its Integration offering in 2016. For a 2 minute overview check out Insight Overview Video .
The good news is that this capability is now available in the Oracle Public Cloud as part of the SOA Cloud Service and can be provisioned using the Integration Analytics Cluster service type.
In this blog I plan to do the following;
-
Briefly introduce Integration Analytics and Real Time Integration Business Insight (Insight)
-
Walk through the Provisioning Steps
-
Walk through the Post Provisioning Steps
In a related blog post I will cover how to interact with the Integration Analytics capability via REST.
Introduction
Oracle Integration Analytics Cluster is a provisioning type under the SOA Cloud Service capability. The Oracle Real-Time Integration Business Insight is included with the Integration Analytics Cluster service type. Cloud instances of this application work with SOA Suite 12.2.1.2 and Oracle Service Bus 12.2.1.2 SOA Cloud Service instances. Other versions and on-premise deployments are not supported.
It should be noted that Integration Analytics exposes a REST API which allows other applications and services to leverage the cloud based Real-Time Integration Business Insight provided in the Integration Analytics SOA Cloud Service. This REST interaction is what I want to ultimately show, so I have structured my blog for this a couple of blogs. It is my understanding that the REST API is not available in the on-premise Insight software.
-
My First Experience Provisioning SOACS – Integration Analytics (this blog post),
-
My First Experience Using SOACS – Integration Analytics REST API
According to the official Oracle Product documentation, “Oracle Real-Time Integration Business Insight is an application designed for business users. The application provides a business-friendly experience, allowing users to model, collect, and monitor business-level metrics using web-based dashboards, and reports. There is no need to modify already-deployed integrations and applications.”
This means that one of the very real benefits for existing SOA and Service Bus customers is that they can easily get a business friendly view of what is occurring within their Integration layer without having to modify their deployed composite projects by adding add data sensors, redeploy, re-test and re-release. The Integration layer within an organisation is relied upon heavily to support many business flows. As such, customers often build their integrations, deploy them and as much as possible leave them alone. Many SOA projects start with the intention of providing a business view over the Integration layer but often due to time pressures in the project, this business view gets shelved to a later project Phase. In many cases however after the integration project goes live, the business often doesn’t have the appetite to go through the required additional testing against a backdrop of perceived risk to get the insight they would like.
To explain the issue further. Previously, in order to add a Business Activity Monitoring dashboard that utilised data from sensors within a BPEL or Service Bus flow, broadly required the following;
-
The integration specialist would have had to revisit their Integration Service Composites,
-
Check out from source control,
-
Add Data Sensors to feed a Business Activity Monitoring Dashboard.
-
Build a BAM Dashboard where often the users are not quite sure what they want to see, so you just know it is going to require multiple trips around the block to get to an outcome.
-
Check In code
-
Build project(s)
-
Deploy and Testing (IT and Business Users)
-
Move to Production
Any changes to production environment assets introduces some risk, however as integration flows can touch many application systems, the risk may be higher and therefore the testing overhead ( that involves IT and business users) also requires a more comprehensive test plan to be executed. The fact that now with Integration Analytics in the cloud and Real Time Integration Business Insight (on-premise) we can now provide this business insight for existing (SOA/ Service Bus) integration flows without having to modify our integration code in any way is really welcome news. A value-adding business view over the top of an integration is now possible, with low risk and is not difficult.
Despite the fact that surfacing business information from integration flows is simple I don’t intend to cover the SOA Suite / Service Bus Use Cases. In my blog that covers My First Experience Using the Integration Analytics Service , I simply want to leverage the REST API exposed by the Integration Analytics cloud capability. My basic premise is, that if I can achieve this interaction via a REST Client (Postman), then I will move on (in another blog post) to show how it can be achieved using something like Oracle Integration Cloud Service. Also if I find the time I plan to look into the SOA / Service Bus capability in the context of Integration Analytics. When I do I will document the steps required to get it working.
Interestingly in the Known Issues document there is a note highlighting the fact that the Oracle Real-Time Business Integration Insight instances provisioned with Oracle SOA Cloud Service 17.1.3, has a Create Connection dialog that displays an ICS (Integration Cloud Service) as a valid connection type in the Type list. Whilst in the 17.1.3 release we don’t have this as an OOTB integrated capability between ICS and SOACS – Integration Analytics, it appears that it is not far away.
So what does the Integration Analytics cloud capability do for us?
The Insight REST API enables you to collect metrics from non SOA Suite components and products. Every invocation of the API publishes a business event to Insight with milestone information and metrics that are correlated in the Insight console. You can then gain Insight into your business through pre-configured dashboards as well as create your own dashboards based on your requirements.”
The features and capabilities of Oracle Real-Time Integration Business Insight at a high-level are:
-
Provides a web-based feature to allow business users to:
-
Model business concepts
-
Map models to implementation
-
Monitor business progress through dashboards
-
-
Provides efficient workflow and runtime
-
Zero development effort
-
Minimal impact to runtime
-
-
Provides advanced analytics
-
Bundles reporting capabilities.
Service Provisioning
Just a quick reminder to read the Known Issues document for the various Cloud Services you plan to use, including Integration Analytics. When working with on-premise software, we would read the README.txt file to get some awareness of known issues before we started an install. I can assure you that reading the equivalent Cloud Service documentation can save you a chunk of elapsed time, which is really important when you start these steps late at night and you realise that you just created a database that is not supported by the SOA Cloud Service including Integration Analytics….arghhh!
The Known Issues document for the Integration Analytics Service can be found at http://docs.oracle.com/cloud/latest/soacs_gs/CKISB/toc.htm .
One of the issues under the SOA Issues section of the document is that Oracle Database Cloud Service (DBCS) version 12.2.0.1 is not supported by the current version of Oracle SOA Cloud Service. Integration Analytics is a component of the SOACS and therefore that issue applies, as I found out. There are also a number of simple Post-Provisioning steps that need to be followed for you to have a ready to use Integration Analytics service.
Assuming you have access to a free trial or a subscription to the SOA Cloud Service you can follow the documented steps to provision the Integration Analytics Service.
As a first step you need to provision some Cloud Storage and then an Oracle Database. I haven’t screen snapped the steps to do this as they are covered well in the product documentation (Refer http://docs.oracle.com/cloud/latest/soacs_gs/index_analytics.html ) and the following solutionsanz blog posts already detail the flow.
https://solutionsanz.blog/2016/03/28/how-to-provision-an-oracle-soa-cloud-service-environment-storage/
Of course once you get more comfortable with the Oracle Public Cloud environment you can provision the required Storage, Database Cloud and SOA Cloud Services using REST APIs.
Once you have your Storage Container and Database Service created, then we can provision the Integration Analytics Service Type from the SOA Cloud Service Console.
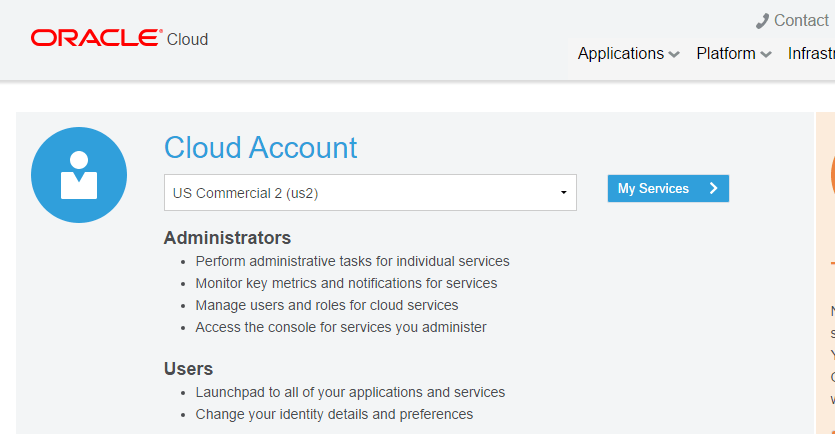
If not already open, Sign in to the My Services application at https://cloud.oracle.com/sign_in .
The My Services Dashboard appears. Select your availability zone, e.g. US Commercial (us2), and click on Sign In to My Services.
Enter your Identity Domain (eg US2) and click Go.

Then enter your username and password and click Sign In.

In the My Service Dashboard, find the Oracle SOA Cloud Service.

Click SOA from the dashboard.

Click Open Service Console then scroll down in the list of available Service Types to find Integration Analytics.
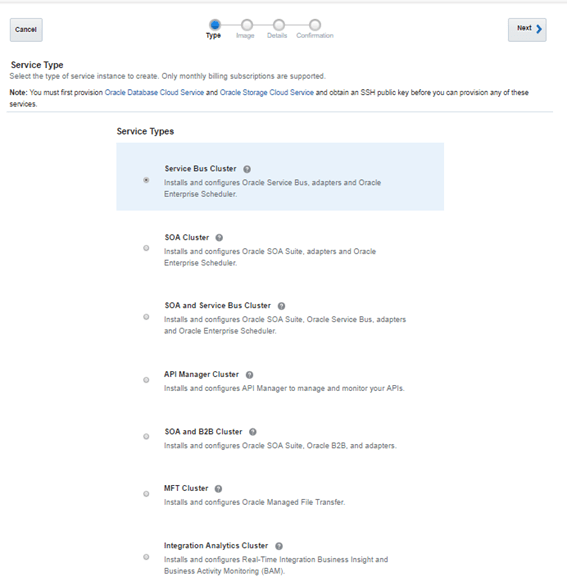
Select Integration Analytics Cluster and press Next
Note: This service type will install and configure Oracle Real-Time Integration Business Insight and Oracle Business Activity Monitoring.
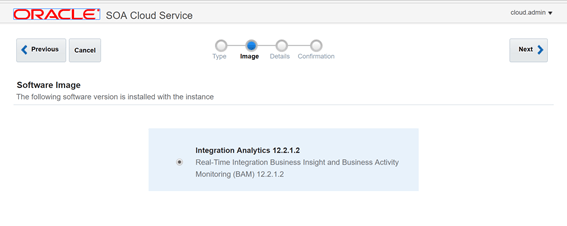
Choose Integration Analytics 12.2.1.2 and press Next.
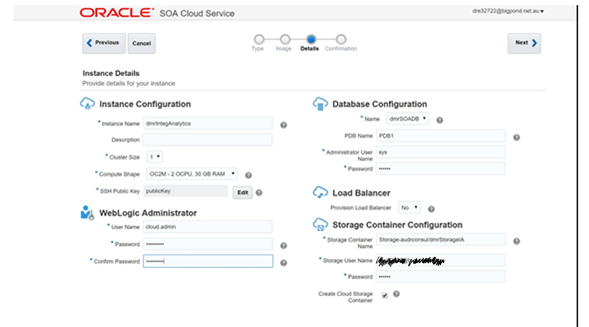
On the Details page, select the database that you provisioned from the pull down list and also specify your Storage Container.

Press Create to complete the provisioning. It takes a while but when the service is provisioned you will see your service in the Instances section.

Post Provisioning Steps
There are now a number of post Provisioning Steps required before the Integration Analytics Service is ready for use. These steps are quite well documented in the Known Issues document under Integration Analytics Issues. After you have provisioned an Integration Analytics cluster (which includes Insight), you must perform post-provisioning tasks to connect this instance to the SOA Suite/Service Bus SOA Cloud Service instances you want to monitor.
Mandatory Patching
After provisioning an Integration Analytics instance, you must apply mandatory patches to resolve known issues before using Real-Time Integration Business Insight and Business Activity Monitoring.
The patching involves the following;
- Stopping the running Managed and Admin Servers
-
Establish ssh access to the Virtual Machine running Integration Analytics
- Connect as opc user
- sudo su – oracle
-
Creating a patches directory under the middleware home OPatch directory
- Note: no MW_HOME variable is defined but is /u01/app/oracle/middleware
- Downloading patch id = 25304625 from Oracle Support
-
scp the downloaded patch to the Virtual Machine. I used putty pscp to do this from my Windows 10 desktop by using the following command.
pscp -P 22 -I myprivatekey.ppk p25304625_122120_Generic.zip opc@MyVMIPAddress:/tmp
Note: the instructions say to target the $MW_HOME/OPatch/patches directory but as this is owned by oracle, the opc user doesn’t have privileges.
So I copied the zip file to /tmp and then I ssh to the VM connecting as opc and then sudo su – oracle.
cp /tmp/ p25304625_122120_Generic.zip $MW_HOME/OPatch/patches/
-
Apply the patch
-
ssh to the VM then sudo -su – oracle
As the oracle user we first unzip the $MW_HOME/OPatch/patches/p25304625_122120_Generic.zip
unzip $MW_HOME/OPatch/patches/p25304625_122120_Generic.zip
- cd $MW_HOME/OPatch/patches/25304625
-
chmod a+rx $MW_HOME/OPatch/patches/25304625
-
apply the patch as oracle .
Note the Known Issues doc Known Issues for Oracle SOA Cloud Service Release 17.1.3 E55688-17 February 2017
says to use the following command sudo $MW_HOME/OPatch/opatch apply -invPtrLoc $MW_HOME/oraInst.loc
However if you use the above command you will be prompted for an oracle password as per screenshot below.
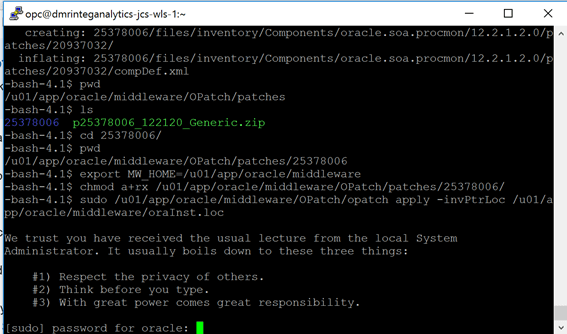
As we are already in the shell as the oracle user we can drop the sudo from the above command and simply use the following command;
$MW_HOME/OPatch/opatch apply -invPtrLoc $MW_HOME/oraInst.loc
-
-
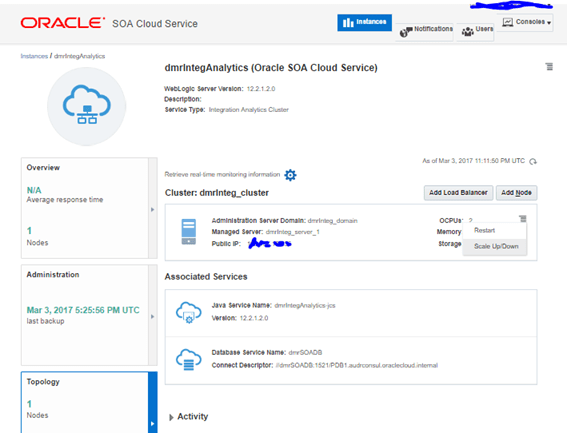
A restart of the Administration and Managed Servers is now required and as the WebLogic Administration Server is down we have no WebLogic Console. I restarted my Instance from under the Topology Tab. You can click the Hamburger menu in the top right, or
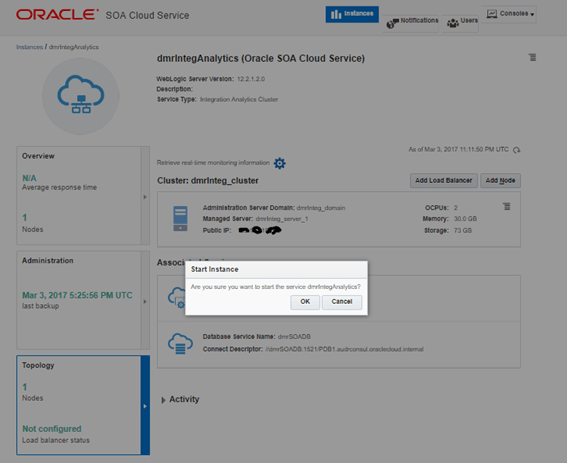
Click the hamburger menu for the Application Server Domain and press Restart.
Post-Provisioning WebLogic Server Configuration Changes
Well that’s the instance provisioned, the mandatory patching complete! What’s next? Well unfortunately we still have a little more to do before the service is ready. We now have to do some Weblogic Server configuration. The steps provided in the Know Issues document are pretty good but have a step missing which will result in the following error when you fire a json payload to the REST API — No Object found with JNDI Name \”jms/insight/InsightServerConnectionFactory . I have highlighted the missing but required step in red within section 7 below. It is understood that the documentation has already been updated and will soon be pushed to the cloud documentation library.
You perform most of the following steps in the WebLogic Server Administration Console. See Accessing an Administration Console for Software that a Service Instance Is Running to sign in to the Administration Console for your Integration Analytics instance.
- In the WebLogic Administration Console for your Integration Analytics instance, click Lock and Edit.
- Create a JDBC Persistent Store:
-
In the Domain Structure section, expand Services, and then click Persistent Stores.
- Click New, and then click Create JDBCStore.
- In the Name field, enter InsightServerJDBCStore_auto_1.
- In the Prefix field, enter Ins_1_, and then click Next.
- In the Data Source list, select BamNonJTADataSource, and then click Next.
- In the Target list, select the required migratable managed server, like pit07jww_server_1 (migratable), and then click Finish.
- Create a JMS Server:
- From the Domain Structure section, expand Services, expand Messaging, and then click JMS Servers.
- Click New.
- In the Name field, enter InsightServerJMSServer_auto_1, and then click Next.
- In the Persistent Store list, select InsightServerJDBCStore_auto_1, and then click Next.
- In the Target list, select the required migratable managed server (like pit07jww_server_1 (migratable)), and then click Finish.
- Create a JMS Module:
- From the Domain Structure section, expand Services, expand Messaging, and then click JMS Modules.
- Click New.
-
In the Name field, enter InsightServerJMSModule, and then click Next.
- Note: Ensure you leave the other options empty or as their default values.
- In the Targets list, select the cluster, like pit07jww_cluster, and then click Next.
- Ensure that the Would you like to add resources to this JMS system module option IS NOT selected, and then click Finish.
- Create a Subdeployment:
- Click the InsightServerJMSModule module you created in the previous step.
- Click the Subdeployments tab, and then click New.
- In the Subdeployment Name field, enter InsightServerSubDeployment, and then click Next.
- In the Targets list, select the InsightServerJMSServer_auto_1 JMS server you created, and then click Finish.
- Create a Connection Factory:
- Click the Configuration tab.
- Click New.
- Select Connection Factory, and then click Next.
- In the Name field, enter InsightServerConnectionFactory.
- In the JNDI Name field, enter jms/insight/InsightServerConnectionFactory, and then click Next.
- Click Finish.
- Create a JMS Queue:
- Click New.
- Select Distributed Queue, and then click Next.
- In the Name field, enter ExternalEventQueue.
- In the JNDI Name field, enter jms/insight/ExternalEventQueue.
- Ensure that Uniform is selected in the Destination Type list and that None is selected in the Template list, and then click Next.
- Click Advanced Targeting. (this step was missing from the version of the document I used resulting in runtime JNDI error)
- In the Subdeployments list, select InsightServerSubDeployment, and then click Finish.
When successful, you see the queue and the connection factory you created in the Summary of Resources table.
- Click Activate Changes.
Now I am getting very close to having something I can use.

Click on the instance name eg dmrIntegAnalytics.

Click the hamburger menu (upper right)
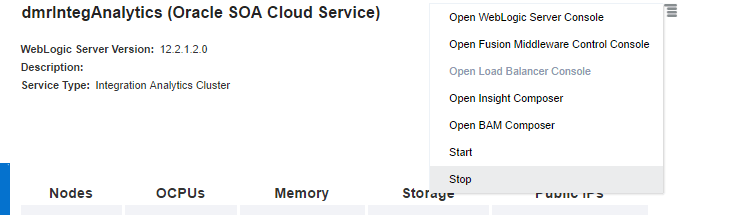
Click Open Insight Composer
You will get the not secure message – accept the risks and move on ..

There you have it. The Integration Analytics service instance is provisioned, patched and configured ready for business milestones to be modelled. I would now simply enter the credentials that I specified during interactive steps with the provisioning wizard eg cloud.admin / mypassword. I am sure that the next version of Integration Analytics will reduce the number of post provisioning steps but after I read the Known Issues it really wasn’t too painful and I am ready to start. In my next post I will cover, My First Experience Using SOACS – Integration Analytics REST API .

One thought on “First Experience Provisioning SOACS – Integration Analytics”