
Logs are often voluminous can be challenging to navigate through, but it can be a gold mine of valuable data to help administrators troubleshoot and identify issues or trends for operational activities.
To overcome the burden of manually eye-balling millions or (even billions) of rows in log records, bringing that data into OCI Logging Analytics (which is part of the Observability & Manageability Portfolio) will allow administrators to get quick insights, to reduce the time to isolate issues, minimising downtime and prevent impact to end users.
OCI Logging Analytics leverages Machine Learning under the cover. You don’t need to be a data scientist, as all the correlation, clustering, anomaly modelling is built-in to the platform and ready to use. It also supports both Oracle and Heterogenous (Non-Oracle, Third Party) log sources. For details on the Out of box Logs Sources we support please see:
https://docs.oracle.com/en-us/iaas/logging-analytics/doc/oracle-defined-sources.html
| NOTE: We will continue to grow the Out of Box Log Parsers and Sources as demand grows. Alternatively if you have a bespoke or log parser or source we have not yet defined, you can create your own custom one. For details please visit: https://docs.oracle.com/en-us/iaas/logging-analytics/doc/administration-guide.html |
To bring logs into OCI Logging Analytics, the Management Agent software OS owner “mgmt_agent” will need to have access to read the logs owned by another OS user (eg. oracle)
In this example I will show you how you can achieve this to enable log ingestion for the Oracle Database Alert Log Source into OCI Logging Analytics.
1 – PREREQUISITES
- Install Management Agent
- Deploy the Plug-in for Logging Analytics to Management Agent
- Ensure you have the correct IAM Policies set for Logging Analytics
2 – INSTALL AND VERIFY ACL PACKAGE
- Verify ACL package is installed
By default the diag directory for all oracle db instances is not readable to other users or groups
$ ls -ld /u01/app/database/diag/rdbms/*
drwxr-x---. 3 oracle oinstall 34 Nov 17  2020 /u01/app/database/diag/rdbms/db19c
drwxr-x---. 3 oracle oinstall 34 Oct 11  2019 /u01/app/database/diag/rdbms/emrep
3 – SET AND VERIFY FILE ACCESS PERMISSIONS USING SETFACL
- When using setfacl, you need to consider the appropriate permissions for your file access.
Please see below on how you would use setfacl to configure file permissions to enable the mgmt_agent OS user to access the files for log ingestion.
- The -R option: set recursive on subdirectories to inherit permission
- The -m option: is to modify the access control list
- For traversal access on subdirectory that don’t have read permission, you need: “r-x” (apprarently “r” is not enough)
- For new files generated you need to specify the default permission “d:u:mgmt._agent:r-x”
$ sudo setfacl -Rm u:mgmt_agent:r-x,d:u:mgmt_agent:r-x /u01/app/database/diag/rdbms/db19c
2. Verify that the appropriate permissions are set for mgmt_agent OS user to access files
$ sudo getfacl /u01/app/database/diag/rdbms/db19c
getfacl: Removing leading '/' from absolute path names
# file: u01/app/database/diag/rdbms/db19c
# owner: oracle
# group: oinstall
user::rwx
user:mgmt_agent:r-x
group::r-x
mask::r-x
other::---
default:user::rwx
default:user:mgmt_agent:r-x
default:group::r-x
default:mask::r-x
default:other::---

$ sudo getfacl /u01/app/database/diag/rdbms/db19c/db19c
getfacl: Removing leading '/' from absolute path names
# file: u01/app/database/diag/rdbms/db19c/db19c
# owner: oracle
# group: oinstall
user::rwx
user:mgmt_agent:r-x
group::r-x
mask::r-x
other::---
default:user::rwx
default:user:mgmt_agent:r-x
default:group::r-x
default:mask::r-x
default:other::---

$ sudo getfacl /u01/app/database/diag/rdbms/db19c/db19c/trace
getfacl: Removing leading '/' from absolute path names
# file: u01/app/database/diag/rdbms/db19c/db19c/trace
# owner: oracle
# group: oinstall
user::rwx
user:mgmt_agent:r-x
group::r-x
mask::r-x
other::---
default:user::rwx
default:user:mgmt_agent:r-x
default:group::r-x
default:mask::r-x
default:other::---

$ sudo getfacl /u01/app/database/diag/rdbms/db19c/db19c/trace/alert_*.log
getfacl: Removing leading '/' from absolute path names
# file: u01/app/database/diag/rdbms/db19c/db19c/trace/alert_db19c.log
# owner: oracle
# group: oinstall
user::rw-
user:mgmt_agent:r-x
group::r--
mask::r-x
other::---
3. Confirm that you can logon as mgmt_agent OS user and can access and read files.
$ sudo -u mgmt_agent /bin/bash

bash-4.2$ id
uid=985(mgmt_agent) gid=980(mgmt_agent) groups=980(mgmt_agent),1000(opc) context=unconfined_u:unconfined_r:unconfined_t:s0-s0:c0.c1023
bash-4.2$ ls -ld /u01/app/database/diag/rdbms/db19c
drwxr-x---+ 3 oracle oinstall 34 Nov 17  2020 /u01/app/database/diag/rdbms/db19c
bash-4.2$ ls -ld /u01/app/database/diag/rdbms/db19c/db19c
drwxr-x---+ 16 oracle oinstall 4096 Nov 17  2020 /u01/app/database/diag/rdbms/db19c/db19c
bash-4.2$ ls -ld /u01/app/database/diag/rdbms/db19c/db19c/trace
drwxr-x---+ 2 oracle oinstall 28672 Jul 13 05:00 /u01/app/database/diag/rdbms/db19c/db19c/trace
bash-4.2$ ls -ld /u01/app/database/diag/rdbms/db19c/db19c/trace/alert_*.log
-rw-r-x---+ 1 oracle oinstall 606027 Jul 13 13:48
bash-4.2$ tail /u01/app/database/diag/rdbms/db19c/db19c/trace/alert_db19c.log
2021-07-13T13:15:25.412008+00:00
Thread 1 cannot allocate new log, sequence 79
Checkpoint not complete
  Current log# 3 seq# 78 mem# 0: /u01/app/database/oradata/DB19C/redo03.log
2021-07-13T13:16:27.199618+00:00
Thread 1 advanced to log sequence 79 (LGWR switch),  current SCN: 34375030
  Current log# 1 seq# 79 mem# 0: /u01/app/database/oradata/DB19C/redo01.log
2021-07-13T13:48:28.031231+00:00
Thread 1 advanced to log sequence 80 (LGWR switch),  current SCN: 34375038
  Current log# 2 seq# 80 mem# 0: /u01/app/database/oradata/DB19C/redo02.log

bash-4.2$ exit

$ sudo systemctl restart mgmt_agent
● mgmt_agent.service - mgmt_agent
   Loaded: loaded (/etc/systemd/system/mgmt_agent.service; enabled; vendor preset: disabled)
   Active: active (running) since Tue 2021-07-13 13:54:24 GMT; 5min ago
  Process: 26388 ExecStop=/opt/oracle/mgmt_agent/agent_inst/bin/agentcore stop sysd (code=exited, status=0/SUCCESS)
  Process: 26508 ExecStart=/opt/oracle/mgmt_agent/agent_inst/bin/agentcore start sysd (code=exited, status=0/SUCCESS)
 Main PID: 26586 (wrapper)
    Tasks: 79
   Memory: 435.9M
   CGroup: /system.slice/mgmt_agent.service
           ├─26586 /opt/oracle/mgmt_agent/agent_inst/bin/./wrapper /opt/oracle/mgmt_agent/agent_inst/bin/../config/wrapper.conf wrapper.syslog.ident=mgmt_agent wrapper.pidfile=/opt/oracle/mgmt_a...
           └─26605 /usr/lib/jvm/java-1.8.0-openjdk-1.8.0.292.b10-1.el7_9.x86_64/jre/bin/java -Dorg.tanukisoftware.wrapper.WrapperSimpleApp.maxStartMainWait=5 -Djava.security.egd=file:///dev/./ur...

Jul 13 13:54:12 xxxdemo.domain.com systemd[1]: Starting mgmt_agent...
Jul 13 13:54:12 xxxdemo.domain.com agentcore[26508]: Starting mgmt_agent...
Jul 13 13:54:18 xxxdemo.domain.com agentcore[26508]: Waiting for mgmt_agent.........
Jul 13 13:54:24 xxxdemo.domain.com agentcore[26508]: .....running: PID:26586
Jul 13 13:54:24 xxxdemo.domain.com systemd[1]: Started mgmt_agent.
4 – CREATE ENTITY IN OCI LOGGING ANALTYICS
- In OCI Console, navigate to:
OBSERVABILITY & MANAGEMENT > LOGGING ANALYTICS > ADMINISTRATION > CREATE ENTITY - Complete the fields for creating entity and then click on “Create”:
- Entity Type eg. Oracle Database Instance
- Name (Name of the Database)
- Management Agent Compartment (Compartment where your Agent is permitted to upload to)
- Properties for the database configuration
To get the properties value :
sqlplus / as sysdba
SQL> show parameter audit_file_dest
SQL> show parameter diagnostic_dest
SQL> show parameter service_name;
SQL> select name, value from v$diag_info where name in (‘ADR Home’,’ORACLE_HOME’);
SQL> select instance_name as sid from v$instance;
SQL> exit
lsnrctl status |egrep -e “HOST|PORT”
- Properties for the database configuration

3. Review the Entity has been created

5 – ASSOCIATE ENTITY WITH LOG SOURCE
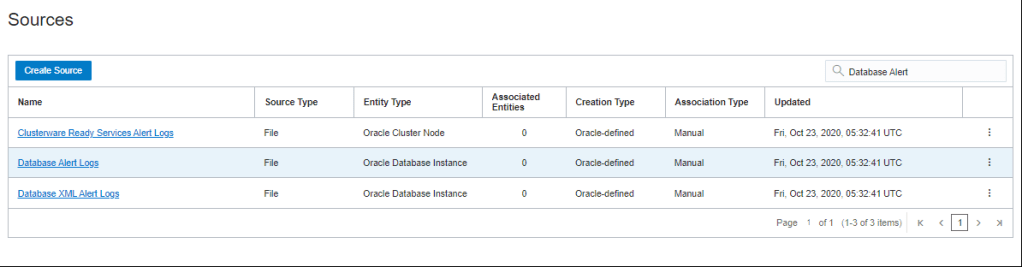
- From the menu, choose “SOURCES”
(HINT: OBSERVABILITY & MANAGEMENT > LOGGING ANALYTICS > ADMINISTRATION > SOURCES)

2. Search for “Database Alert” and Drill into the “Database Alert Logs”
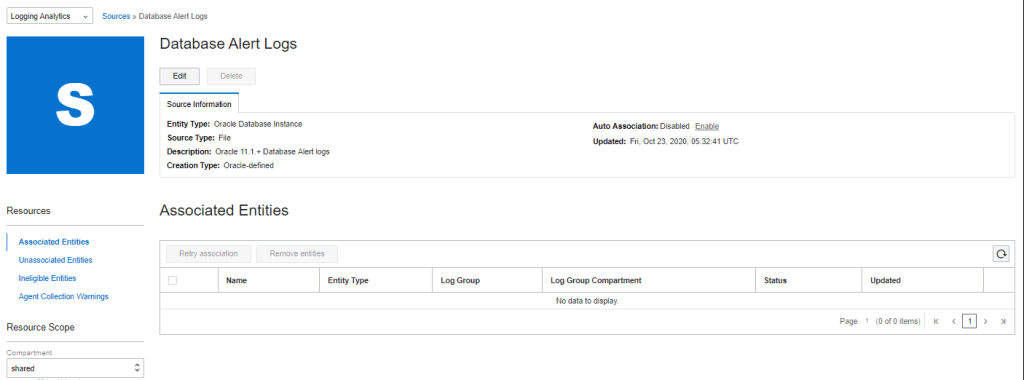
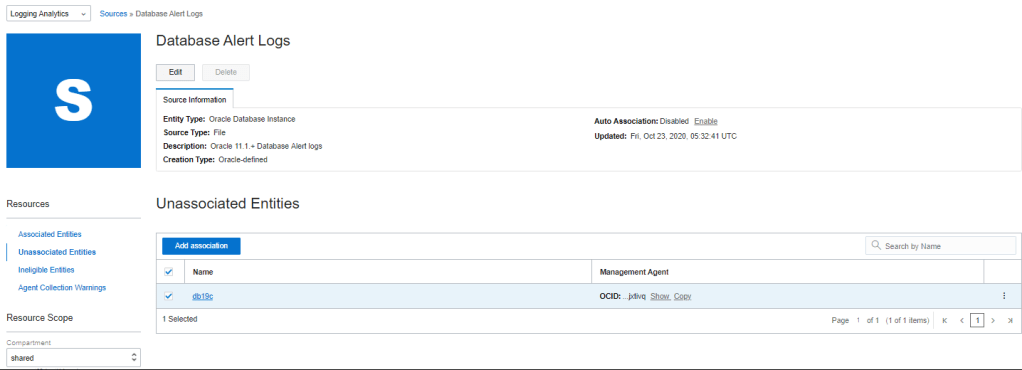
3. Click on the “Unassociated Entities“
4. Check the box for your database entity and click on “Check Association”
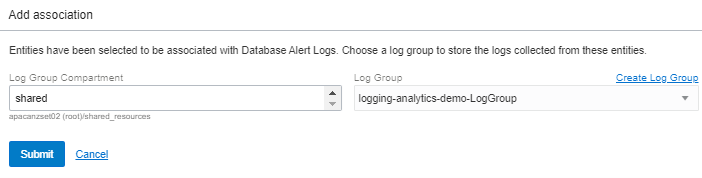
5. Then choose the Log Group Compartment where you want to place the Logs that will be ingested and Specify the Log Group you want to store logs.
Then click on “Submit”
NOTE: If you don’t have a Log Group created, click “Create Log Group” to create.
6. Return to “Associated Entities” to confirm the Database Entity is now associated.

7. Wait until association is completed and the status show as “Success”

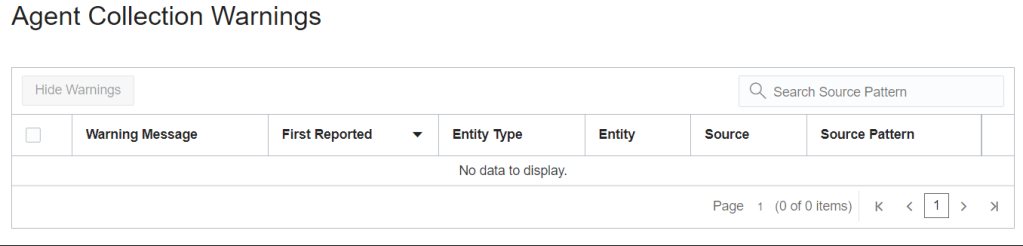
8. Navigate to the “Agent Collection Warnings” page and validate there are no errors or issue reported.
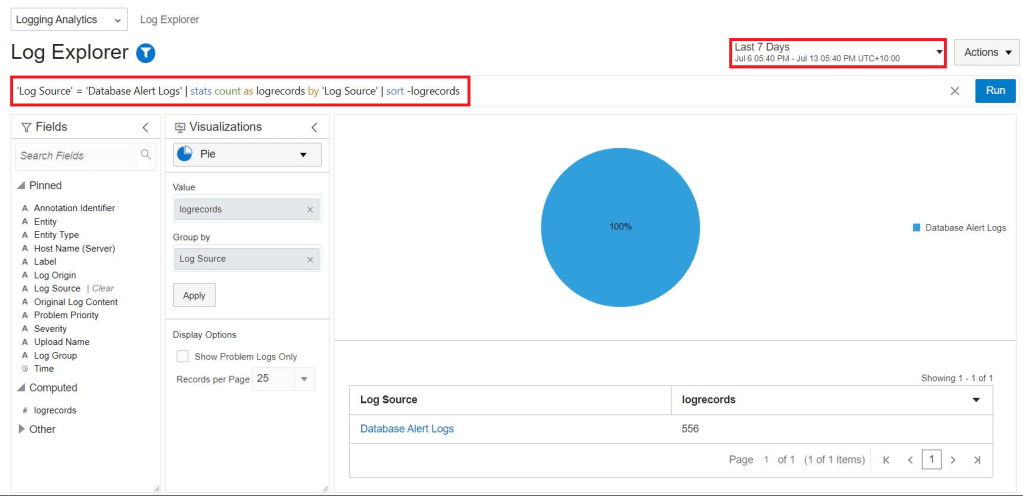
9. Navigate from the menu to Log Explorer

10.Change the time period to “Last 7 Days” and filter on the Log Source for “Database Alert Logs” to confirm logs are now getting ingested into OCI Logging Analytics.
Filter:
'Log Source' = 'Database Alert Logs' | stats count as logrecords by 'Log Source' | sort -logrecords
6 – UNCOVER POTENTIAL ISSUES IN LOGS
1. Navigate to:
Visualisations and click on the Cluster icon


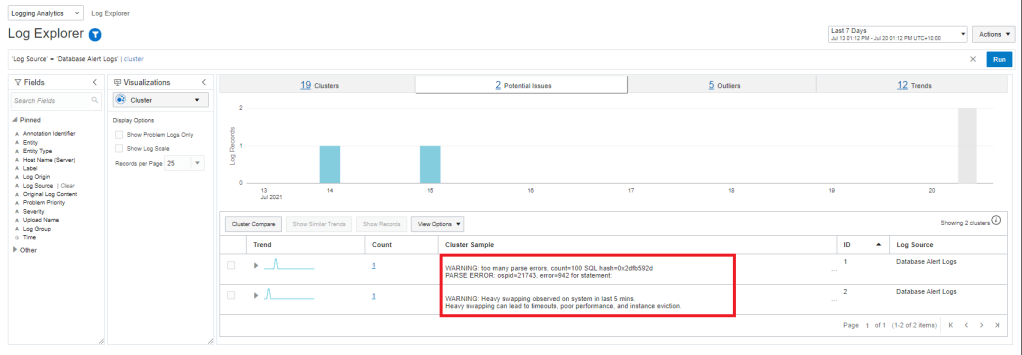
2. The following will show you a group of common patterns grouped together known as “Clusters”. Now navigate to “Potential Issues” tab
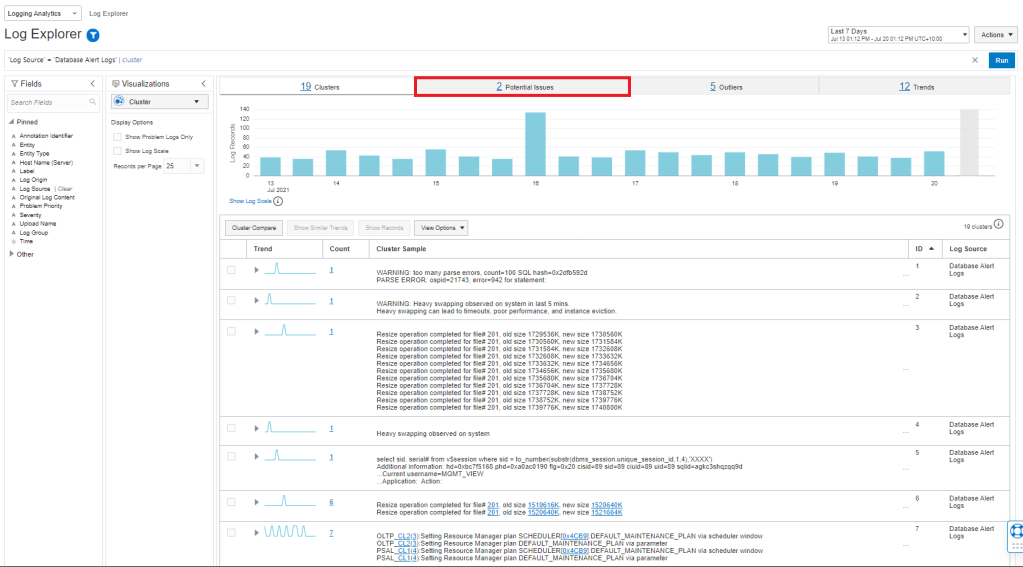
3. The following Potential Issues are listed for you to resolve.

3 thoughts on “Ingesting Logs into OCI Logging Analytics (via Agent Based Deployment)”