
Last week, I had a question about a customer wanting to migrate their issue management to Oracle Developer Cloud (https://cloud.oracle.com/en_US/developer_service). They had hundreds of issues to migrate and saw that it was a big task to re-enter all of the detail. Also, it was all in Excel. This article is about the experiences and steps that we took to import the issues from Excel. And as the title of the article eludes to, we used the APIs available.
Step 0 – Pre-Requisites
For this example, we used the following:
- A Developer Cloud instance is up and running. You can try this out with an Oracle Public Cloud Trial (https://bit.ly/2pM0Gfa)
- A Project already created in the Developer Cloud instance with credentials.
- An installation of Postman (https://www.getpostman.com/) or your favourite REST API tool.
- An Excel spreadsheet (or CSV file) of your issue data.
Step 1 – Check Out The Documentation
It’s useful to see what the REST APIs that are available for Developer Cloud. It’s through these REST APIs that we integrate. Check out the documentation – (https://docs.oracle.com/en/cloud/paas/developer-cloud/rest-api/QuickStart.html).

In addition to the documentation, the Base URL of the REST End-Point has the following syntax:
https://<host-name>/<organisation-id>/rest/<project-id>

https://anz01-anz01.developer.ocp.oraclecloud.com/anz-anz01/rest/anz01-anz01_jlo-customer/
The easiest way to get this information is from the Maven Repository which is available on the Project landing page:

Step 2 – Get The Create Form Format (from Developer Cloud)
The REST APIs for Issues has a resource that we can call to get the specific format to Create Issues. Doing a GET call against the resource returns a JSON template for the Create Issues API.

Using Postman, we make a call to the Developer Cloud instance to get the specific format.
https://<host-name>/<organisation-id>/rest/<project-id>/issues/v2/issues/create-form

The Create Issue JSON payload template is embedded in the response payload. The JSON payload template contains only mandatory fields as well as custom fields as defined in Developer Cloud. Strip the “createIssue” tag and the links array and you’ll be left with the JSON object that you need.
Finally, saving the request into a collection will help later.
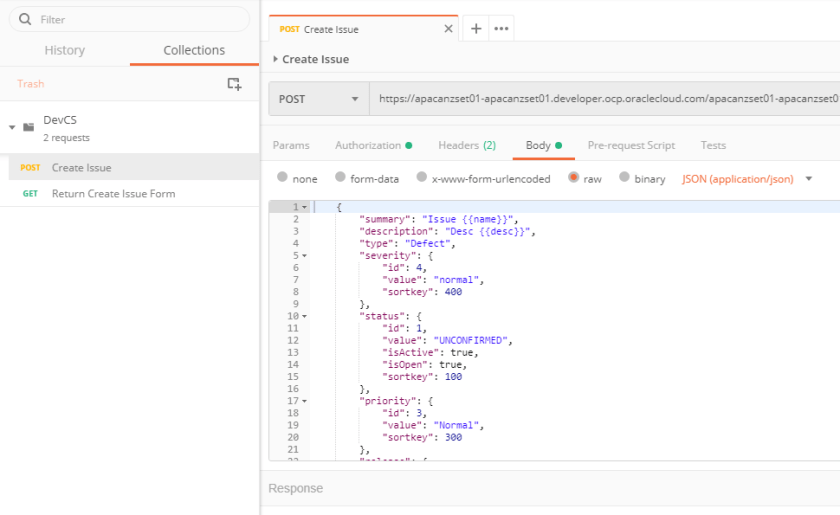
Step 3 – Test Creation Form (from Developer Cloud)
The REST APIs for Issues has a resource that we can Create Issues. Doing a POST call against the resource to Create Issues API.

Using Postman, we make a call to the Developer Cloud instance to create an issue.
https://<host-name>/<organisation-id>/rest/<project-id>/issues/v2/issues
This is the payload that we got from the previous call. Use this initially, so you can test it out.
{
"summary": "Issue {{name}}",
"description": "Desc {{desc}}",
"type": "Defect",
"severity": {
"id": 4,
"value": "normal",
"sortkey": 400
},
"status": {
"id": 1,
"value": "UNCONFIRMED",
"isActive": true,
"isOpen": true,
"sortkey": 100
},
"priority": {
"id": 3,
"value": "Normal",
"sortkey": 300
},
"release": {
"id": 1,
"value": "---",
"sortkey": 0,
"product": {
"id": 1
}
},
"product": {
"id": 1,
"name": "Default",
"description": "default product",
"isActive": true,
"defaultRelease": {
"id": 1,
"value": "---",
"sortkey": 0,
"product": {
"id": 1
}
},
"defaultComponent": {
"id": 1,
"product": {
"id": 1
},
"name": "Default",
"description": "default component"
},
"releases": [
{
"id": 1,
"value": "---",
"sortkey": 0,
"product": {
"id": 1
}
},
{
"id": 2,
"value": "0.0.1",
"sortkey": 10,
"product": {
"id": 1
}
}
],
"components": [
{
"id": 1,
"product": {
"id": 1
},
"name": "Default",
"description": "default component"
}
],
"releaseTags": []
}
}

Once you’ve done that and submitted the request, then you should get a 200 return code. You can go into the Developer Cloud Project and see in the activity stream, the newly created Issue.

Finally, saving the request into a collection will help later.
We now have everything we need to start running a bulk load of the issues.
Step 4 – Update and Run
Now, Postman has the facility to run a series of requests over a CSV file. Check out this Postman article to learn more – https://learning.getpostman.com/docs/postman/collection_runs/working_with_data_files/. By putting the column name as tags in the JSON request (that is saved in the Collection), these tags can be replaced with data from the CSV file. Below is the sample CSV that I used and the corresponding change to the JSON request payload.

We then use the Collection Runner pointing to the Collection as well as to associating with the data file.

And the result from within Developer Cloud is:

From here, it’s all about extensions. Which tags do we use (and referring back to the REST API documentation), which fields from the CSV to map, whether this API is orchestrated, where this API is integrated with other systems like Jira. These are all possible.
