
So following on from my earlier article, Policies let your teams play safe, I have been given another challenge: Can we give our users single sign on now that each team can play safely in their own Oracle Cloud Infrastructure compartments?
Single sign on delivers a number of really important benefits. Firstly, the user experience is much smoother and seamless as users don’t get prompted for multiple passwords and don’t have to remember even more passwords. More importantly, single sign on eliminates the need to manage multiple stores of identities. This can be a big overhead for administrators and sometimes open up additional risks. Finally, an enterprise wide identity solution can often provide additional capabilities can be leveraged by your Oracle Cloud Infrastructure.
Oracle Cloud Infrastructure supports a couple of different flavours of enterprise identity solutions: Oracle Identity Cloud Service and Microsoft Active Directory Federation Service (ADFS). The great news is that Oracle Cloud Infrastructure is pre-integrated with Oracle Identity Cloud but you’ll probably want to provide finer grained access.
In this example, I’ll explain how configure Oracle Identity Cloud Service as an external identity provider for Oracle Cloud Infrastructure. I will also explain how to map groups from the external identity provider to Oracle Cloud Infrastructure so you can use the policies from my earlier article, Policies let your teams play safe.
At a high level this is what we’ll do:
- Setup trust between Oracle Identity Cloud and Oracle Cloud Infrastructure using the Client ID and Secret
- Create a couple of Marketing groups and users then assign each group to different users
- Map the groups from Identity Cloud to Oracle Cloud Infrastructure
- If you haven’t tried my earlier article, you’ll need setup policies as described in Policies let your teams play safe
- Try it out by logging in as one of the Marketing Users
The good news is that this is a one-off configuration to ensure that your Oracle Cloud Infrastructure service and your Identity Cloud Service trust each other. Once you have configured the trust and mapped your groups the users will have a seamless SSO experience with policies enforced by Groups.
You will need an active cloud subscription and create a Compute Instance which you can do from the Cloud Services Console below. Oracle Identity Cloud is enabled by default. Don’t worry if you haven’t got an active subscription because you can sign up for a trial for free.
So let’s get started. Firstly login to the Oracle Cloud Services console with credentials provided by your administrator or from Oracle Cloud if you’re the super user. The Cloud Services console should look like my screenshot below.

Compute Application Information
You’ll need to get the Application Client ID and Client Secret from Identity Cloud so that you can map the groups later in this article.
Click on the Users icon at the top of the screen (I’ve circled it in red above).
Click on the Identity Console button.
Click on the Menu Button next to the Oracle logo in the top left of the screen
Click on Applications and search for COMPUTEBAREMETAL
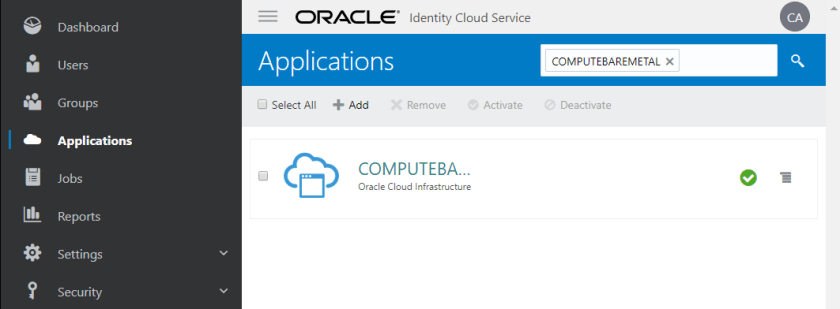
Select the COMPUTEBAREMETAL application and click on the Configuration tab
Copy the Client ID and Client Secret from the General Information section. You’ll need to click on the Show Secret button to see the Client Secret. Remember that this information is very sensitive – DON’T POST IT ON BLOGS like this or github etc. The screenshot below shows what to copy (with bits obscured to protect the innocent).

Create Marketing Groups
In my earlier article, Policies let your teams play safe, I created a couple of groups for the Marketing department in Oracle Cloud Infrastructure: Marketing-Users and Marketing-Admins. I create these groups in my external identity provider so that when users login from Identity Cloud, the groups associated with the user will be passed onto Oracle Cloud Infrastructure. This is how Oracle Cloud Infrastructure knows which policies to enforce.
Click on Groups -> Add
Create a group called Marketing-Users
Give it a description and optionally check the Users can request access checkbox. This checkbox allows users who have already been registered in Identity Cloud to request access to the Marketing-Users group. In my example, I don’t mind anyone in the enterprise using the Marketing resources. Of course, you may decide this is appropriate in the real world.
Click Finish
Click Add
Create a group called Marketing-Users
Give it a description but this time don’t check the Users can request access checkbox. In my example, admin level access is privileged so users are not permitted to request access to this group.
Click Finish
Assign the groups to some users
Go and create a couple of users (I’m assuming you can work this out yourself). Click on Users in the menu and go from there. Assign one user to Marketing-Users and another user to Marketing-Admins. These will be used later to tryout your SSO and make sure that the policies from my earlier article are applied to these new users.
You’re done with Identity Cloud for now so log out.
Map the Groups
Mapping groups from the Identity Provider (Oracle Identity Cloud Service in this case) to groups in Oracle Cloud Infrastructure is the secret sauce that allows you to enforce fine grained access controls. For example, by assigning a Marketing Admin group to a user in Identity Cloud, you’ll then be able to restrict access for that user to Marketing resources using policies defined in Oracle Cloud Infrastructure.
Oracle Cloud Infrastructure is automatically federated with your instance of Oracle Identity Cloud Service. All you need to do is map the groups from Identity Cloud (aka the Identity Provider) to groups in Oracle Cloud Infrastructure.
Login to the Oracle Cloud Services console again with credentials provided by your administrator or from Oracle Cloud if you’re the super user. This is the console that you first logged into at the beginning of this article.
Click on the Compute instance

Click on the Open Service Console button
TIP: I find it very useful to create a bookmark for this URL in my browser. I’ll refer to this later as the Oracle Cloud Infrastructure Console.
Click on Menu -> Identity -> Federation
Select the active Identity Provider. It should be called something like “OracleIdentityCloudService”.
Click on Edit Mapping
Enter the Client ID and Client Secret that you saved earlier and click Continue
Click on Add Mapping
Select Marketing-Users from IDENTITY PROVIDER GROUP drop down.
Select Marketing-Users from the ORACLE CLOUD INFRASTRUCTURE GROUP drop down.
Click on Add Mapping
Select Marketing-Admins from IDENTITY PROVIDER GROUP drop down.
Select Marketing-Admins from the ORACLE CLOUD INFRASTRUCTURE GROUP drop down.
Click on Submit
Log out!
Create Some Policies
If you haven’t followed my earlier article then now is the time to do so. Go have a look at Policies let your teams play safe.
Try it Out!
Click on the Oracle Cloud Infrastructure Console bookmark that you saved in your browser earlier.
Click on Continue in the Single Sign-On (SSO) box. This will take you to Oracle Identity Cloud.
Login as the Market Admin user that you created in Oracle Identity Cloud Service earlier in this article.
Marketing Administrators Can’t See Non Marketing Resources
We should see a Forbidden message

Marketing Administrators Can See Resources in the Marketing Compartment
Now select the Marketing compartment from the drop down on the left
We should see a different message now: “There are no Autonomous Data Warehouses in Marketing that match the filter criteria.”
This is because the Marketing Policy allows us to see objects in the Marketing Compartment, however, we haven’t created any warehouses in the Marketing Compartment yet.

Conclusion
Integrating Oracle Cloud Infrastructure with Oracle Identity Cloud gives you big benefits in terms of user experience and significantly less time managing users. You can extend the benefits even further with Policy Based Multi Factor Authentication.
