
In this blog, you will get familiar with the Kubernetes Cluster UI Dashboard and with the various components that are pre-deployed in your sandbox environment.
Kubernetes Dashboard UI is a web-based interface that lets you visually see all the different components of the Kubernetes cluster, as well as to deploy and manage Applications via Containers running on Pods. It also provides ability to overview the health of the various components and troubleshoot your various components specifications.
The Kubernetes Dashboard UI comes with a vertical menu. Let’s review the main sections in this menu:
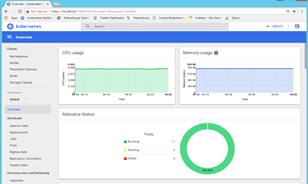
Cluster Overview
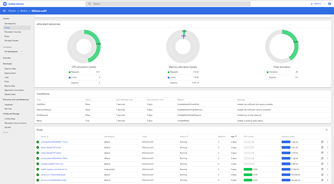
The landing page is the Cluster Overview. It will give you generic information and health status of the various workloads installed. Let’s review one by one:
- Overall CPU and memory utilisation in the cluster:
- Overall Pods status

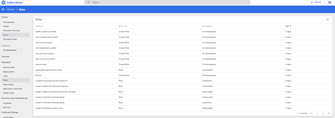
- Pod list, status, age, CPU, and memory utilisation, etc.

- From each Pod, you can gather to the real-time log files by clicking on it right-end icon


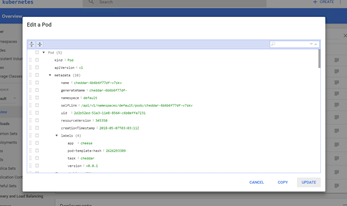
- By clicking to the right-end 3-dotted icon, it lets remove or see/edit the actual Pod definition YAML file

- Then, by clicking on the actual Pod link, it will take us to a more in-depth Pod monitoring.


-
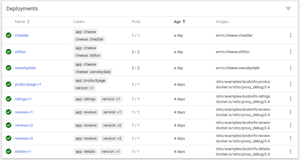
Back to the Overview page, it will show all Deployments, which is basically the actual applications (microservices) that are deployed.
Deployments let you:
- Create a deployment of an application
- Update a deployment (e.g. deploying a new version of the application)
- Zero-down time rolling updates
- Undo a deployment to the previous version
- Roll-back to a specific older version
- Pause/Resume a deployment
- Clicking at the right-end icon, it lets us Scale, Delete or View/Edit the Deployments specification YAML file.

- Selecting the Scale option, let’s you modify the current “desired” number of Pods to run this Application. Changing this number will force and match the number of pods replicas being set at design or runtime. That will either cause to terminate some pods (scaling in) or create new pods (scaling out)


- Back to Overview, it then shows Replica Sets. Replica Sets are the evolution of Replication Controller (although given its simplicity, Replication Controllers, are still widely used). Replica Sets also help scale in and out Applications, but it does it based on a richer selection filtering based on a set of values, e.g. env is “dev” or “qa”.

- Similarly, as with replication controller or applications, replication sets let you scale your Applications, by defining a desired replica count.

- Back to the Overview page, it then continues with the Ingresses. In this case, we have 2 ingresses, cheeses, and gateway.

-
Ingresses allows you to create load balancing rules to give services external access/routing outside the kubernetes cluster to services within the kubernetes cluster. It can provide load balancing traffic, SSL termination, name-based routing, etc. Ingresses are purely definition/rules-configurations, they require an Ingress Controller (basically a Load Balancer) within the Kubernetes cluster. Traefik is the Ingress Controller that we are using as part of this HOL.
-
Back to the Overview page, we continue with Services. As we have referred to, Pods are very dynamic. They are constantly terminated as we change the replicas counts. We use Services to bridge from a conceptual endpoint regardless of the actual Pods serving the requests in the backend, i.e. it could be 1 or 2 or many and back to 1 later. Services ensure there is an external reference of an Application outside the Kubernetes cluster and isolates the actual Pod elasticity in the backend.

- Clicking on a Service name/link, it takes gives the ability to edit the Service YAML definition, delete the service, as well as to see the Number of Pods associated with the Service. From there we can easily drill down into Pod land.

- Back to the Overview page, we then see Secrets. Secrets are a way to provide credentials, keys, passwords, or any secret data to your applications living inside the Pods. For example, if an application requires a username and password to access a MongoDB, SSH Key or a certificate, this can easily be done via secrets propagation. Secrets can be in files or directly in YAML files.

- For example, if you click on any of the secrets names/links, you can see the actual Secret YAML definition:
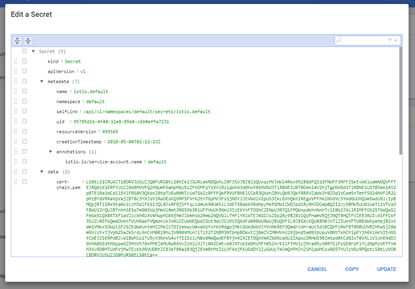
- Then, this secret can be used within a Pod or Application YAML definition as environmental key/value properties.
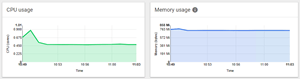
Cluster
On the left vertical menu, if you click on Cluster, you will find information about the various components associated to the cluster, including: namespaces, nodes, persistent volumes, roles, and storage classes. In the sections below, we will review each of this cluster components.
CPU and Memory usage
Similarly, as in the Overview page, you can gather the overall cluster CPU and Memory utilisation:

Namespaces
Namespaces provide a virtual sub-domain to related resources within the cluster. For example, namespaces can be applied to resources that are part of the same Application or to divide cluster resources among multiple users. When not defined, resources are defined as part of a default namespace. As part of this HOL, we have namespaces for:
- Istio-system: Isolates Service Mesh resources
- Sock-shop: Isolates resources that are part of the Sock-shop Application Demo
- Weave: Isolates Weave Scope resources.
- Kube-public: Used internal on Kubernetes clusters (built with kubeadm). This namespace is created automatically and readable by all users (including those not authenticated). This namespace is mostly reserved for cluster usage, in case that some resources should be visible and readable publicly throughout the whole cluster. The public aspect of this namespace is only a convention, not a requirement.
- Kube-system: The namespace for objects created by the Kubernetes system
- Default: The default namespace for objects with no other namespace

Nodes
Nodes are worker machines in Kubernetes. It holds the Pods that run the Containers with the actual Applications. For High Availability purposes it is recommended to run at least 2 Nodes across different servers, sites or Availability Domains. For simplicity, this HOL environment was provisioned with only 1 worker node. However multiple worker nodes can be easily spun up and joined to the cluster.

By clicking on the Node link, we will drill down into more details, including:
- CPU and Memory utilisation
- CPU and Memory allocation and capacity
- Pods allocation (from which further drill downs are available)
- Various conditions, e.g. running out of disk, memory, etc.
Persistent Volumes
Containers are not storage-persistent, which means that when a Pod terminates, the state of its associated container(s) terminates as well. In order to persist state, persistent volumes can be used. Persistent Volumes (PV) have an independent lifecycle to pods and can capture details implementation of different types of storage, being that NFS, iSCSI, cloud-provider specific storage systems, etc. We are not using Persistent volumes in this HOL.
Roles
Kubernetes introduced role-based access control (RBAC) in version 1.6. Kubernetes defines two resources for roles: Role and ClusterRole. The main idea with Roles is to support enforcing policy-based Authentication, Authorisation and Accounting (recording who does what and when) by segregating resources based on namespaces. For example, we can enforce that an account for a monitoring system has only read-only access to pods in a specific namespace or across all namespaces.
In this HOL, we have defined multiple roles with a wide “Cluster Role” scope, that cover resources across all namespaces. Similarly, we have defined roles with a more constraint “Role” type to resources under a specific namespace, e.g. kube-system.
Storage Classes
A Storage Class provides a way for administrators to describe the “classes” of storage they offer. Different classes might map to quality-of-service levels, backup policies or arbitrary policies determined by the cluster administrators. We are not using Storage classes in this HOL.
Namespaces
This section allows you to filter by specific namespaces. By default, it is set to “All namespaces”, but specific namespaces can be chosen. By doing so, all the rest of the sections, will only show resources belonging to the filtered namespace.

For example, filtering by default, will only show CPU, Memory, Pods, Deployments, etc. associated under the default namespace. This is a great tool to filter by related resources, therefore it is a best practice to always associate your resources with specific namespaces.
Workloads

Various workloads have already been introduced as part of the Overview page, these include:
-
Daemon Sets: Mini processes that we might choose to run on all/some Pod(s), to undertake specific actions. For example, there are DaemonSet to ensures that:
- All (or some) Nodes run a copy of a Pod.
- As nodes are added to the cluster, Pods are added to them.
-
As nodes are removed from the cluster, those Pods are garbage collected.
-
Deployments: (See Overview Page)
-
Jobs: Ae commonly used to ensure that a certain set of tasks are reliably undertaken. For example, a job can create one or more pods and ensures that a specified number of them successfully terminate. As pods successfully complete, the job tracks the successful completions. When a specified number of successful completions is reached, the job itself is complete. A Job can also be used to run multiple pods in parallel.
-
Pods: (See Overview Page)
-
Replica Sets: (See Overview Page)
-
Replication Controllers: (See Overview Page)
-
Stateful Sets: Intended to be used with stateful applications and distributed systems. It helps manage the deployment and scaling of a set of Pods associated with a stateful application and provides guarantees about the ordering and uniqueness of these Pods. Unlike a Deployment, a StatefulSet maintains a sticky identity for each of their Pods. These pods are created from the same spec but are not interchangeable. Each has a persistent identifier that it maintains across any rescheduling. Click here for more information.
Discovery and Load Balancing

- Ingresses (See Overview Page)
- Services: (See Overview Page)
Config and Storage
- Config Maps: ConfigMaps allow you to decouple configuration artefacts from image content to keep containerized applications portable. Click here for more information.
- Persistent Volume: (PV) is a piece of storage in the cluster that has been provisioned by an administrator. It is a resource in the cluster just like a node is a cluster resource. PVs are volume plugins like Volumes but have a lifecycle independent of any individual pod that uses the PV. This API object captures the details of the implementation of the storage, be that NFS, iSCSI, or a cloud-provider-specific storage system. Click here for more information.
- Persistent Volume Claims: (PVC) is a request for storage by a user. It is similar to a pod. Pods consume node resources and PVCs consume PV resources. Pods can request specific levels of resources (CPU and Memory). Claims can request specific size and access modes (e.g., can be mounted once read/write or many times read-only). Click here for more information.
- Secrets: (See Overview Page).
Recap
At the end of this section, you should be familiar with generic Kubernetes Dashboard UI concepts, such as:
- Knowledge how to get access to your Kubernetes Dashboard UI
- Monitor health and utilisation of the various resources running on your Kubernetes cluster
-
Understanding of Kubernetes architecture, such as:
- Cluster
- Nodes (Master and Worker)
- Kube-API-Server
- Kube-Controller-Managers
- Kube-Scheduler
- Kube-Proxy
- Kubelet
- Kubectl
- DNS
- Etcd
-
Understanding of Kubernetes resources, such as:
- Pods
- Containers
- Deployments
- Ingress/Egress
- Services
- Replica Controller/Replica Sets
- Namespaces
- Labels
- Roles
- Persistent Volumes
Also, you should be familiar with your HOL components, including:
- Your Windows based Remote Desktop Terminal
- Knowledge of the existence of the various microservices (Deployments) running on your Kubernetes cluster.
- You should be familiar to navigate across the different Microservices and gather different runtime metrics.
- Scale out/in resources in your Kubernetes cluster.
- Start/Stop Application Deployments
I hope you found this blog useful. If you have any question or comment, feel free to contact me directly at https://www.linkedin.com/in/citurria/
Thanks for your time.

2 thoughts on “Kubernetes Dashboard Deep Dive…”