
In this blog, we will use Oracle Managed File Transfer Cloud Service to perform batch loads into Oracle HCM Cloud.
Use cases for this include updating Employee data from external systems e.g. recruitment, uploading employee pictures from a badge creation system or syncing data while running hybrid with PeopleSoft.
About MFT
MFT is Oracle’s strategic platform for batch file transfer in all our SaaS services (and more). It provides cool capabilities such as zip/unzip, splitting large files, PGP encryption, retries, embedded FTP/SFTP services that are HA-clustered with user credentials that can be stored in your external Identity Management System. All offered through a dashboard interface.
In short, no more messing around in command-line, OS-level scripting tools to manage your file transfers!
MFT also provides a flexible callout extension framework to trigger downstream activities after a file has been transferred. This is important in the case of the HCM.
About HCM Data Loading
HCM uses a concept called HCM Data Loader to perform batch load. This can be performed in either a user front-end through a function called “Import and Load Data” or through Webcenter Content and SOAP interfaces.
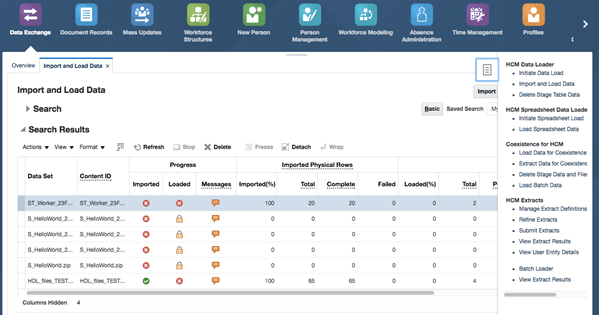
This is what the manual load page looks like in HCM:
Note: Some users of HCM might still be on a format called File-Based Loader (FBL). This is legacy loader format with limited operations. In this case, you would utilize the “Load Data for Coexistence” page and difference web services for this load. Check out Jack Desai’s blog – Fusion HCM Cloud – Bulk Integration Automation Using Managed File Transfer (MFT) and Node.js for more info on the interfaces.
HDL files look like the below. For the load to work for say the Worker object, the file should be called the business object aka. Worker.dat.
METADATA|Worker|SourceSystemOwner|SourceSystemId|EffectiveStartDate|EffectiveEndDate|PersonNumber|ActionCode|StartDate|DateOfBirth|CountryOfBirth|WaiveDataProtectFlag|CategoryCode|SourceRefTableName=PERSON|SourceRef001=EMPLID
MERGE|Worker|HRC_SQLLOADER|HRC_SQLLOADER_PER117|2015/08/01|4712/12/31|HRC_SQLLOADER_PERSON117|HIRE|2015/08/01|1975/01/01|US|N|PER_EIT||HRC_SQLLOADER_PER117
MERGE|Worker|HRC_SQLLOADER|HRC_SQLLOADER_PER118|2015/08/01|4712/12/31|HRC_SQLLOADER_PERSON118|HIRE|2015/08/01|1975/01/02|US|N|PER_EIT||HRC_SQLLOADER_PER118
For more details how to construct this file check out:
HCM Data Loader Data Loading Documentation
HCM is great in that all loading functions are also implemented as Web Services, so you can do all this activity in the no-touch fashion. This is a 2-step process.
-
Upload the file into WebCenter Content / UCM
Note: WebCenter Content (sometimes called Universal Content Management – UCM) is the file transfer method utilized for Oracle Fusion-based systems vs. SFTP server. It provides more granular security than just a generic OS-based service account. WebCenter Content single-signs on with the same credentials as the HCM instance, allowing anyone with relevant HCM access to perform file-based transfers.
-
Make a SOAP call with the WebCenter ContentID of the uploaded file.
https://[HCM_Base_URL]/hcmCommonDataLoader/HCMDataLoader?WSDL
In this blog, we will perform a transfer from an Embedded SFTP server to the HCM WebCenter server. After which we will make a Post-Processing Java Callout to load the file.
Create SFTP Embedded Source
Login to MFT and select the [Design] tab

We first enable the Embedded SFTP server for the user hcmload. This user utilises an SFTP folder called /hcmload. Follow Carlos’ blog Teaching How to build Oracle Managed File Transfer (MFT) Transfers to learn how to do this.
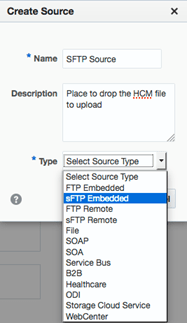
Now create an SFTP embedded Source.
Select [Sources] from the left menu and created one using SFTP Embedded.
Note, In a situation where you are performing a HCM Extract, you would use WebCenter as a source then poll the WebCenter system for new files to retrieve and drop into an external system.
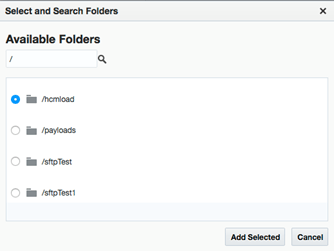
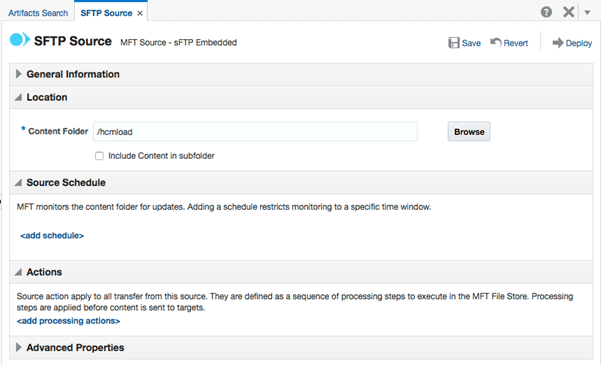
Browse for Available Folders. We are using the /hcmload folder which has been assigned to the hcmload user. Multiple users can use the same folder (or vice-versa).
You can also add a polling schedule to minimize the time window to check file or pre-processing actions such as encryption, zipping or only certain files you wish to monitor. After this select [Deploy].
Note: MFT prevents folder collisions, so you can’t deploy 2 SFTP sources pointing to the same folder.
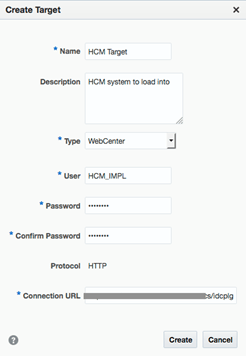
Create HCM Target
Select [Create Target].
Choose WebCenter enter the URL: https://[HCM_Base_URL]/cs/idcplg
Enter a user that has access to the WebCenter system.
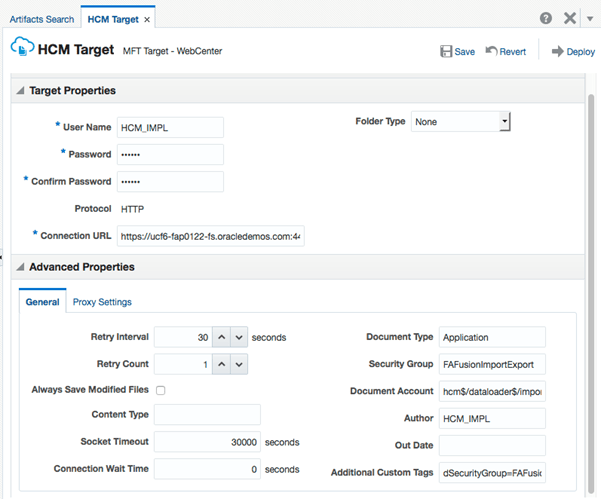
There are some details for the WebCenter transfer we need to further configure. Click on Advanced Properties in the Target.
Under Advanced Properties, fill in the following fields:
- Document Type: Application
- Security Group: FAFusionImportExport
- Document Account: hcm$/dataloader$/import$
- Author: [YOUR USER]
- Additional Custom Tags: dSecurityGroup=FAFusionImportExport,dExtension=zip,dWebExtension=zip,dFormat=application/zip
Here’s a good reference I used for configuration:
Configuring MFT WebCenter Content (UCM) Endpoints with SSL for Fusion Applications
Click on [Deploy]
Note: To prevent integration hell, first check if your user has the rights to perform the upload by logging into the WebCenter console: https://[HCM_Base_URL]/cs:
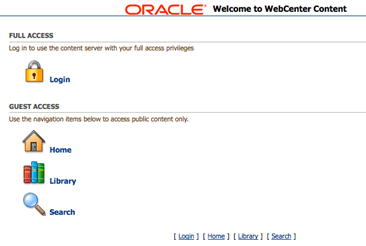
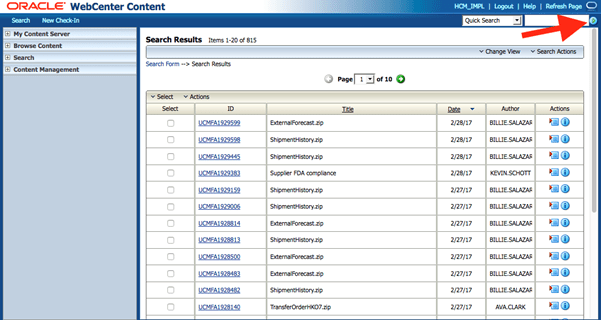
Once in, click on the “Play” button to see the most recent files uploaded. You can also perform an upload from this console.
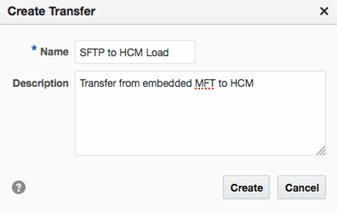
Create an MFT Transfer
Click on [Transfers] and [Create] to create a transfer
Click on [add source] and select “SFTP Source” or you can drag the source from the left.
Click on [add target] and select “HCM Target” or you can drag the target from the left.
You also apply a Content Filter. In this case, the HCM file must always be .zip

Add a Post-Processing Action to the Target
Now we’ve setup the transfer to upload the file to WebCenter. Next we need to make sure the ImportAndLoadData function gets called.
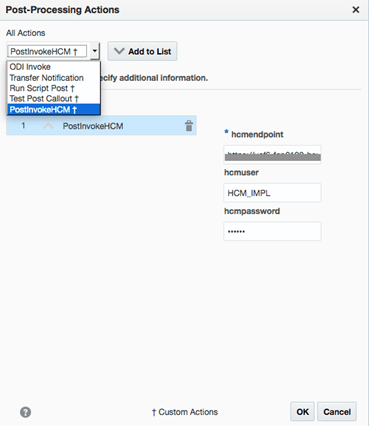
Click on “add post processing actions” under the HCM target.
We’ve previously created a custom Java Callout called PostInvokeHCM.
MFT provides 2 scaffolds to utilise for pre-processing and post-processing actions. More information can found at: Processing Transfers with Custom Callouts
If you’re interested in the design and registration of the Post-Processing Callout, head over to Part 2 of this series. In the meantime, you can grab this sample code for reference developed by my esteemed colleague Pandurang Parwatikar.
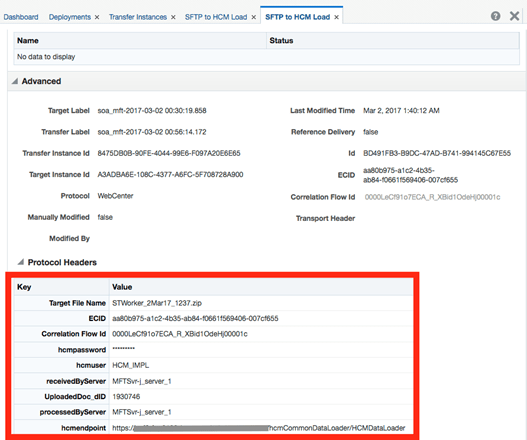
When a file is uploaded using the MFT’s WebCenter method, the name of the file its ContentID. This is automatically picked-up from the environment parameters by the Callout.
Key in these parameters:
- hcmendpoint: https://[HCM_Base_URL]/hcmCommonDataLoader/HCMDataLoader?WSDL
- hcmuser: [Your_HCM_USER]
- hcmpassword: [Your_HCM_PASSWORD]
Note: To prevent integration hell, make sure this user can access this function from the front-end.
Login to https://%5BHCM_Base_URL%5D/hcmCore/faces/FuseWelcome?fndThemeName=Vision
Navigate to [Data Exchange] -> [Import and Load Data]
Or search for “Import and Load Data” in the top menu.
You should be able to view this page.
Now we are all done with the transfer setup and ready to test. Let’s [Save] and [Deploy]
Create a HCM Payload to Transfer
We would like to test this transfer with a payload of four employees hired.
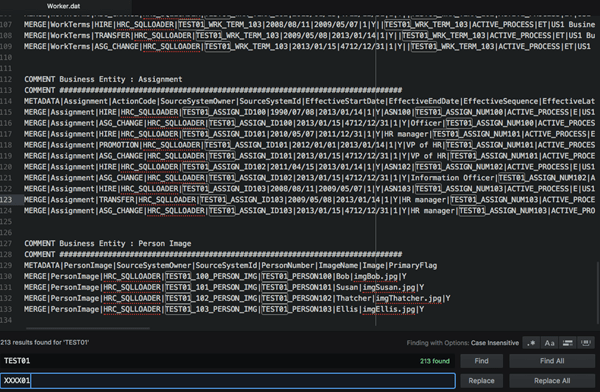
A valid payload should always be a zip file, which holds the names of the objects to be loaded. In this situation, we are uploading Worker objects, so my filename is Worker.dat.
Here’s a sample payload we can use: EmployeeHireHDLPayload.zip
The sample Worker.dat contains 4 employees with:
- PersonName
- PersonNationalIdentifier
- PersonEmail
- PersonPhone
- PersonAddress
- PersonCitizenship
- PersonEthnicity
- PersonLegislativeData
- WorkRelationship
- WorkTerms
- Assignment
- PersonImage
In addition, we would like to upload photos for those employees. Put that in the zip’s subfolder called /BlobFiles with the titles of those pictures included in the PersonImage fields of Worker.dat.
For ease of Person Search, modify all the “TEST01” values to something that suits you.
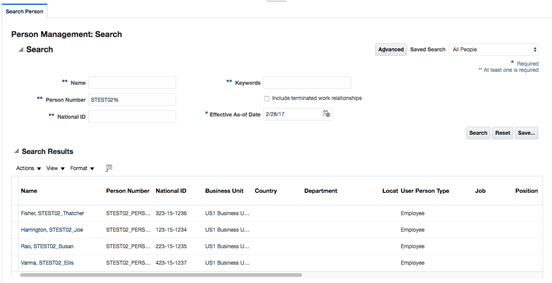
You can go to [My Workforce] -> [Person Management] or search for “Person Management” to make sure the employees don’t exist.
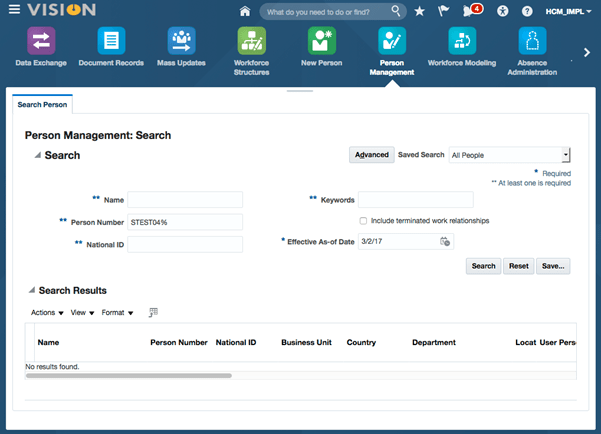
Performing the Transfer
Now let’s fire-up the SFTP client to perform the transfer.
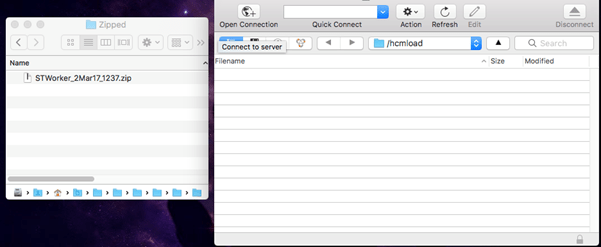
You will notice the moment the file drops in, it disappears as the MFT server picks it up.
Quickly navigate over to the WebCenter system and perform a search all. You will see that the file has been uploaded. This file will disappear once the HCM server has processed it.

Navigate to the Dashboard of MFT and you see the transfer in process
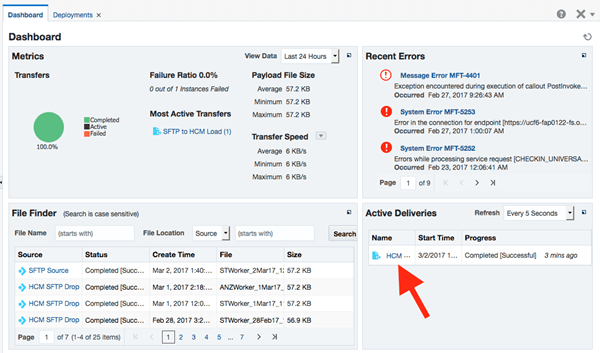
Click on [Transfer Instances] -> [SFTP to HCM Load] -> [Instances] tab. This shows all transfers that have occurred. In this case we only have 1.
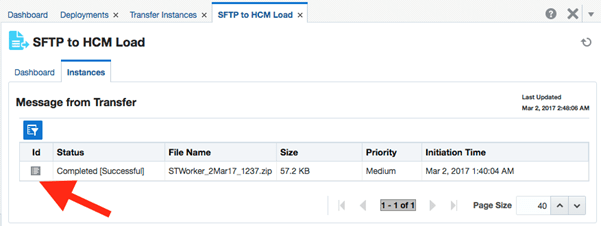
Click on the “Id” to look at the details. You can see a successful visual flow.
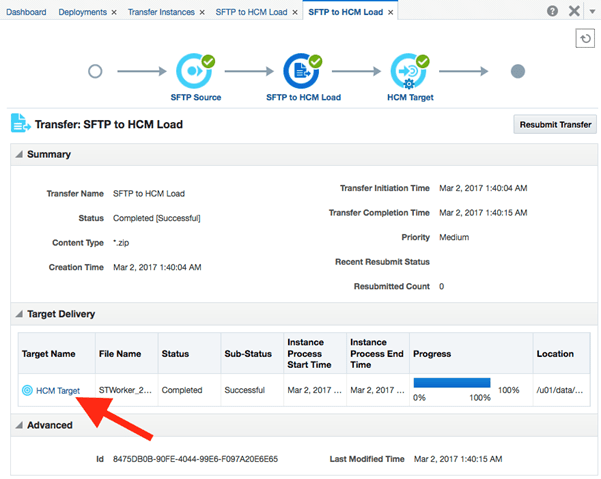
Click on the delivery target for more details. You can see further information of the file that was uploaded and the endpoint that was triggered.
Note: In our sample, we are doing a fire-and-forget so we are not polling the HCM system to check if the file has been imported successfully, just that the trigger was successful. We can extend this code to add a further check or for complex orchestrations trigger a Post-Processing call to Integration Cloud Service / SOA Cloud Service instead the HCM Loader directly.
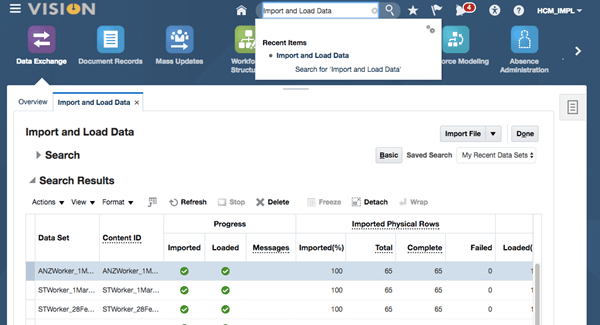
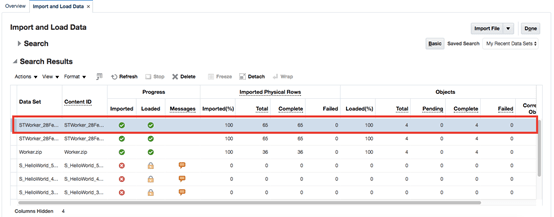
Now let’s navigate over to the HCM system to see what happened. We will go to [Data Exchange] -> [Import and Load Data]
You can see my process has run successfully with no messages and 4 objects have been updated.
Moving back to WebCenter, you will also notice that my file has been consumed.
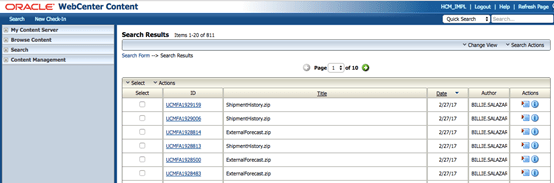
Note: If the job had not been successful, this file will sit in WebCenter and can be run again manually from [Import and Load Data] by selecting [Import File]. A list of available files from WebCenter will be displayed.
Note also: If you attempt to re-uploaded a file of the same name, it will fail as this file already exists in WebCenter till you purge it!
Synchronizing and Indexing Person Data
Now at this point the records have been inserted into the HCM system. However, they will not show up yet. Two more functions have to be called before we can see them.
In this blog, we are performing this manually. Typically, we would have this configured in HCM as a scheduled job that updates person info periodically.
Alternatively, if immediate update is required, all Scheduled Processes are accessible as ESS Scheduler Web Services: https://[HCM_Base_URL]/ess/esswebservice?wsdl
See the blog Using the Web Service for Enterprise Scheduling Service (ESS) for more info.
We could utilise SOA Cloud Service or Integration Cloud Service to orchestrate this post-processing callout. Simply utilise the same code base provided above and connect to an ICS or SOACS SOAP service.
Navigate to [Tools] -> [Schedule Processes]
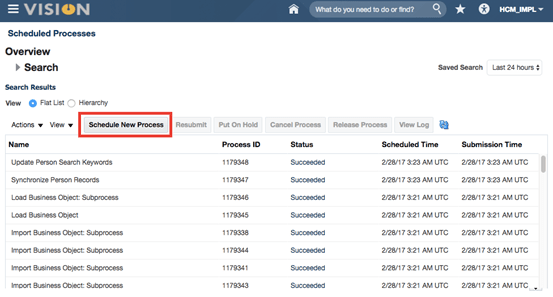
Click on [Schedule New Process] and search for [Synchronize Person Records]
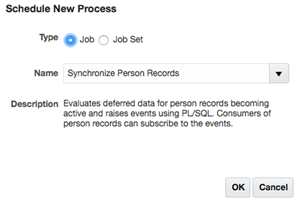
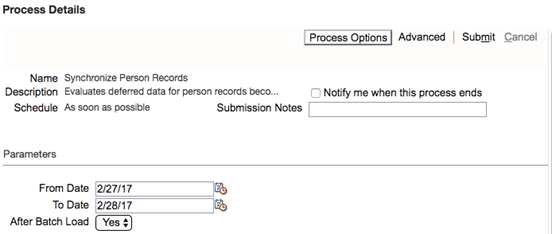
Run the “Synchronize Person Records” process with the following parameters:
- From Date = [Enter the earliest date for which the load could have been run]
- To Date = [Enter today’s date]
- After Batch Load=Yes
Now wait for job to be complete (Status = Succeeded)
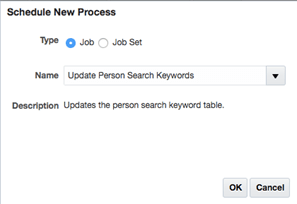
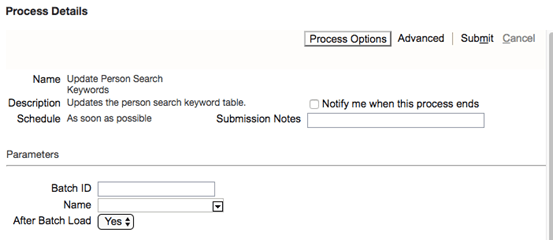
Run “Update Person Search Keywords” with parameter After Batch Load = Yes
View Successful Insertion in Person Management
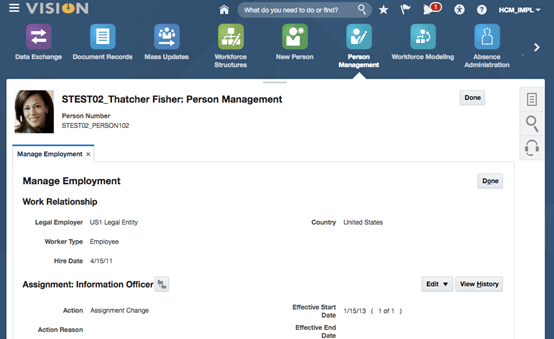
Go back to the Home screen and select [My Workforce] -> [Person Management]
We can see our Employees and their photos successfully inserted!
* Content in post is thanks to: Rakesh Singh, Pandurang Parwatikar and Dave Berry

2 thoughts on “Using MFT Cloud Service to Automate HCM Batch Uploads – Part 1”