
I am using the pre-built virtual image that Oracle provides as a public VM in OTN (http://www.oracle.com/technetwork/middleware/soasuite/learnmore/soa-vm-2870913.html). If you don’t have an existing environment, you can download this VM and use it as part of the following exercises.
In this blog we are going to use Oracle JCA JMS adapter. You will realise that the JMS adapter is part of the JCA framework, together with all the Technology Adapters (300+), such as Database, File, FTP, LDAP, Socket, REST, SOAP, AQ, Coherence, etc. This basically means that all of these technology adapters will be created and configured almost identically.
Creating JMS resources in WebLogic
Make sure that your WebLogic Server is running.
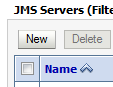
- Open the WebLogic Console and go to Services > Messaging > JMS Servers

- Add JMS Server by clicking on the “New” button
- Set the name of the JMS Server to “MyJMSServer” and “FileStore” as the Persistent Store

- Click Next
- Select AdminServer as the Target and click Finish

- Make sure that all the changes have been successfully activated and that you can see your new JMS Server.

- Go to Services > Messaging > JMS Modules and click “New”

- Add “MySystemModule” as the name and click “Next”

- Assign it to AdminServer and click “Next”

- Tick: Would you like to add resources to this JMS system module? Then click Finish

- Ensure that you get a successful message

- Now add New Resource by clicking “New”

- Select Queue and click “Next”

- Give “RequestQueue” as the Name and JNDI Name. Then click “Next”

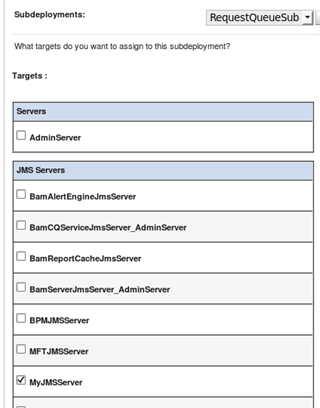
- Create New Sub-deployment and set “RequestQueueSub” as the “Subdeployment” name. Click “OK”

- Associate the sub-deployment to the “MyJMSServer” JMS Server that you created earlier and click “Finish”.

-
At the end you should have a JMS System Module -> JMS Server -> JMS Subdeployment -> Resources -> JMS Queue. Now let’s create a Connection Factory that will point to your JMS Queue.
-
Go back to the summary of your resources inside your system module where now it should show only one queue resource:

- Click on new again, but this time chose Connection Factory. Then Next

- Call your connection Factory TestConnectionFactory and as the JNDI name type jms/TestConnectionFactory. Leave the rest of the fields as the default. Then click Next

- In the association step, click Advance Targeting
and select your RequestQueueSub for the JMS subdeployment and MyJMSServer as the JMS Server. Click on Finish.
- Your JMS System Module, should look like this:

- Now, similarly as we did for the DB database, let’s update the JMS Adapter by creating a JMS Adapter Connection Pool, which is the one that we are going to invoke from within SOA Suite. For this, in the WebLogic console, go to Deployments and then click on the JmsAdapter

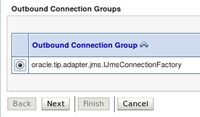
- Select Configuration > Outbound Connection Pools and click on New button.
- Select the Outbound Connection Group and click Next
- In order to conform with the nomenclature, we will call our JMS connection Pool “eis/wls/TestQueue” – Note that this JNDI name is also the name we will use later, when creating a JMS adapter to access this JMS queue! Then click Finish

- Similarly as we did for the DB adapter, rename the deployment plan to jmsPlan.xml – Then click OK and Save.

- Go back to Deployments -> JmsAdapter -> Configuration -> Outbound Connection Pools and expand the IJmsConnectionFactory to locate the JMS connection pool that you just created.

- Click on eis/wls/TestQueue
-
The ConnectionFactoryLocation must point to the JNDI name of the connection factory associated with the JMS queue you will be writing to. In our example, this is the connection factory called TestConnectionFactory, with the JNDI name jms/TestConnectionFactory.
Note: This connection factory is contained in the JMS Module called MySystemModule, under Services > Messaging > JMS Modules > MySystemModule which we create earlier in this document.
- Similarly as you did with the DB adapter, enter jms/TestConnectionFactory into the Property Value field for Connection Factory Location. After entering it, you must press Return/Enter then Save for the value to be accepted.

- Although the changes have been activated, the JmsAdapter needs to be redeployed in order for the changes to become effective. Navigate back to the Deployments screen, either by selecting it in the left-hand navigation tree or by selecting the “Summary of Deployments” link in the breadcrumbs list at the top of the screen. Then select the checkbox next to JmsAdapter and press the Update button and follow the steps (as in the DB) to restart the JMS Adapter.

For more information about these concepts, please refer to Configuring and Managing JMS for WebLogic Server users guide. This guide is recommended: https://blogs.oracle.com/soaproactive/entry/jms_step_4_how_to
Teaching how to use the JMS Adapter to consume messages with a Mediator
In this section we are going to add a JMS Adapter to our previous example, so that we can add and consume messages into the JMS Queue that we created in the previous section.
- In JDeveloper open the “MyEvaluationSOAProject” composite, if not already opened.
- From the Components palette drag and drop a JMS adapter into the “External references” section. Call it “MyJMSUserMessages”. Then click next.
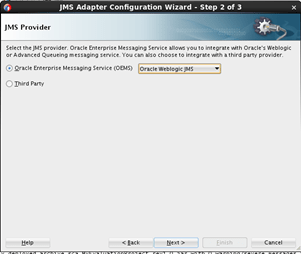
- Select Oracle WebLogic JMS as the oracle Enterprise Messaging Service (OEMS). Then click Next

- Select the Application Server Connection that you used in the previous section to build and deploy the DB Adapter. Then click Next.

- In step 4 of 5, you normally have to specify the interface that you want to use as part of your business logic. In this case, we are going to select “Define from operation and schema (specified later), so that, similarly as with the DB adapter, JDeveloper create a WSDL for the JMS service.”. Then Click Next.

- In the last step, you specify whether you want to writes messages into the queue or read messages from the queue. Since we are building a JMS external reference adapter, in this case we want to produce Message, so let’s select that option. Then specify the operation name, in this case “addUser”. Then click Next

- Then select the destination by filtering by Destination Type: “Queues” and searching for the System module and queue that we created in the previous section. Then click OK

- In the next step you can add extra configuration, such as the message body type, delivery mode, priority, time to live, etc. Leave the default for now but just fix the JNDI name that we specify for our JMS Connection Pool in the previous section (i.e. eis/wls/TestQueue). Then click Next

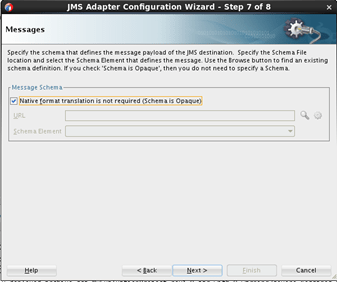
- Now, you need to specify the format of the message that you are going to add into the queue. We can keep it opaque, meaning that we don’t care about the format. However in this case, we want to add users, so we can utilise the schemas created by the DB adapter in the previous section. Search for the project schemas by clicking on magnifier icon and choose the UsersCollection element. Then click OK

- Your windows should now look like this:

- Then click Next until Finish

Connecting the Mediator to the JMS Adapter
Now, we need to make sure to add any new User to the JMS Queue every time that we add it into the database.
- Double click on the mediator and focus on the “merge” operation, which is the one that creates users.

- Within merge, click on the green plus icon to add new routing rule. Select “Existing Service”, then click OK

- Select the “addUser” operation that we just created as part of the JMS adapter in the previous section. Then click OK.

- Now, every time that someone invokes the “merge” operation, there are two rules to follow.

- Now let’s create a simple transformation. SOA Suite supports two different types of transformations, XSLT and XQuery. Let’s use a quick XSLT in this case.
- In the “Transform Using” field, click on the blue icon to set a new Transformation. Since we have not created one so far, let’s press the green plus icon to create one. Give the name that you want and press OK.

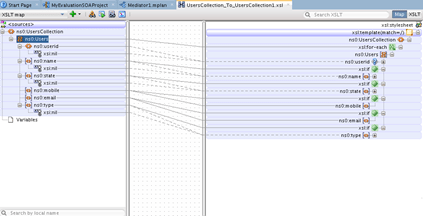
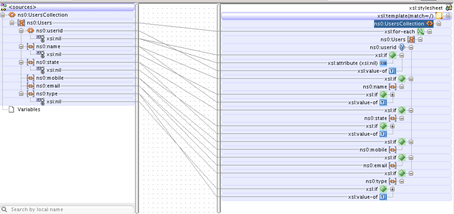
- The XSLT view will open and will show you what you have configured as input and output types. Since the types are coming from the same XSD, you can simply drag and drop a line from Users to Users and the Auto Map reference window will pop up. Since the schemas are the same, simply click OK. That’s it. You built the first XSL transformation. Notice that Auto Map will even create IF statements on each optional field, so that it can be handled properly at runtime. Similarly, it will create for-each loops when a collection might occur at runtime. Feel free to explore what just happened by expanding the node elements or even by clicking on the source tab.
- Save all and make sure you don’t have any errors or warnings in the messages log window

- Now, coming back to the graphical view of the composer, it should look like this:

Let’s test our JMS Adapter
Now let’s test our composite. It should not only create new user into the DB, but it should also add Users into the JMS queue.
- Build and deploy your composite as you did for the DB adapter in the previous chapter.
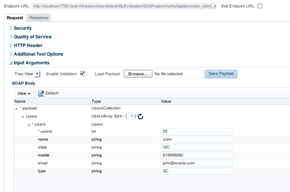
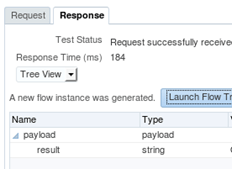
- Create a couple of new users by invoking the operation “merge” and make sure you don’t get errors. Explore the Flow trace on each response to follow the flows.

- Now validate that the new users are in both places. That is, in the database and in the JMS queue. In order to verify this in the JMS queue, you can go back to the WebLogic console and go inside the Monitoring of your queue (Services -> Messaging -> JMS Modules -> My System Module -> RequestQueue -> Monitoring). There has to be one message for each new User
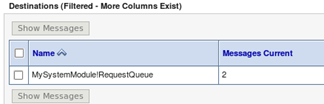
- Check the box on your queue and click on “Show Messages”

- You can review each independent message and even see the actual payload.

-
Make some time to think what we just did:
- What would’ve happened if the rule pointing to the DB is successful, but then the JMS one fails? Would the system be inconsistent/out of sync?
Teaching how to use BPEL and Transformations
Note: This section continuous from the previous one. Please complete last section before attempting to follow this one. Contact the document owner if you have any question.
BPEL is the core of SOA. It is a standards-based component that let you create SOAP/REST web services very easily with complex orchestrations. Let’s build one and consume our JMS adapter again.
- Drag and drop a BPEL component into the central pane (Components)
- In the “Create BPEL Process” configuration window enter the name of the BPEL, such as MyTestBPELProcess, and select “Synchronous BPEL Process” as the template, so that we can return an OK message if everything goes well. Notice that you can also create 1-way or Asynchronous 2-ways processes – Can you tell the difference?
- Since we want to receive the user information, also change the Input schema to be a UserCollection, from the Users.xsd that was created by the DB adapter. Then click OK

- Notice that since we left the option “Expose as a SOAP service” selected, it automatically created an external SOAP based Web Service.
- Then simply connect the BPEL to the JMS adapter. The graphical view of the composer will be auto-arranged.

- Double click on the BPEL service to open the BPEL edit mode.

- Add an Invocation component after receive Input and link it to the “JMS partner link on the right”.
-
Call it whatever you want and click on the green plus icon to create a new input variable. Before you click OK, make a pause and answer the following questions:
- Why do you have only 1 operation? (i.e. addUser)
- Why you cannot create an output variable if it is a synchronous BPEL?

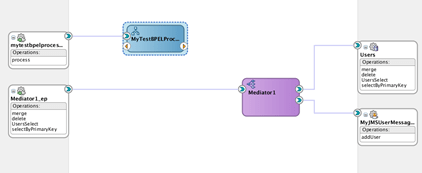
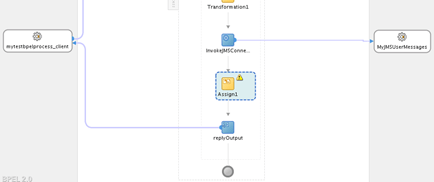
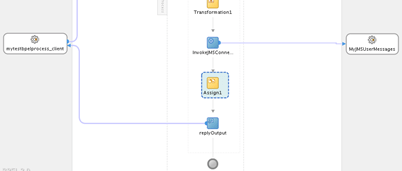
- Now your BPEL should look like this:

- Now create a new transformation to pass through the User being created. For this drag and drop a new XSLT transform before the Invoke action.

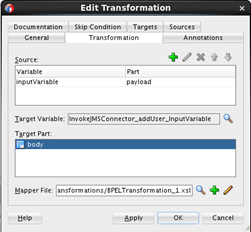
- Double click on the XSLT transformation and select inputVariable as the Source and InvokeJMSConnector_assUser_Inputvariable as the Target. Also rename the transformation to whatever you want. Then click OK
Take a minute or two to analyse what we are doing here:
- Why inputVariable is the source?
- Why the target is not outputVariable?
- Then the XSLT view will open. Similarly as you did for the Mediator, connect both Users elements and let the Auto Map create all the mapping behind the scenes.
- Save All
- Finally add an “Assign” activity between the Invoke and the replyOutput
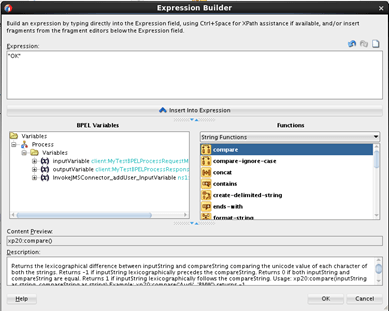
- Double click on it to open it up. Expand the outputVariable and right click on its “result” element and select “Expression”. Then in the Expression builder, enter simply “OK” – Including the quotes. Then click OK.

-
Once again take some time to thin what we just did here:
- Why we didn’t use a Transformation in this case?
- Could we use a Transformation instead of an Assign?
- The warning message on the Assign should have gone away by now
-
That’s it, deploy and test your composite, this time, when you click Test on the composite, you will have to choose across two different endpoints. Choose the BPEL one and through a test.

- Make sure you get a successful response “OK”
- Launch the flow trace and drill down into the BPEL component

- Notice that you have full visibility of the flow that was executed at runtime

Including the payloads exchanged at any step.

-
Make a pause and analyse what we just did:
- How is this different from the Mediator?
- Why can I see all the payloads? What does that imply?
- What would’ve happened if the JMS invocation results successful, but then we have an error later on the BPEL logic? Would things be out of sync?
- Now, go back to your JMS queue and make sure that the message was created successfully.

Teaching how to consume messages from a JMS queue
Note: This section continuous from the previous one. Please complete last section before attempting to follow this one. Contact the document owner if you have any question.
Following the same approach as with the previous JMS adapter used to publish messages, this time create a subscriber service that will poll messages from the JMS queue and process them as they occur. In this example we are going to subscribe to the queue and copy the existing and any new incoming message into a text file using a JCA File adapter.
- In this case we will extend the same JTA transaction, to illustrate that you can decouple services, while still maintaining transactionality. Notice that it is also possible to completely break the transaction or initiate a new transaction. In this case to illustrate more easily the concept, let’s create a new composite, which is the one that will be initiated every time a new message comes into the JMS queue.
- Create a new SOA Project, call it whatever you want, e.g. MyJMSPollingService
- Since now we want to poll, this time drag and drop the JMS adapter into the composite left pane (Partner Links). Call it whatever you want, .e.g. myUsersPollingService.
- Once again, select Oracle WebLogic JMS. Then click Next
- Select your Application server connection. Then click Next

- Select to define from operation and schema (specified later). Then click Next

- Then you need to select the operation “Consume Message”.

- Then browse and select the same queue as before i.e. RequestQueue and specify the correct JNDI name. In this case eis/wls/TestQueue. Then click Next.

Make sure you type the right JNDI name.
- Finally, when asked, select opaque this time (i.e. do not use a WSDL this time) – This is so that we can then play with Java embedding snippets in the next section.
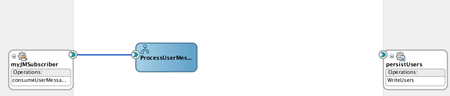
- Your new composite should look like this:

- Then drag and drop a File adapter in the right pane (External references).
- You will notice that since the file adapter is part of the JCA framework, the wizard is almost identical as in the database or JMS.
- Give a name to your file adapter and then select the option to “Define from operation and schema (specify later)”. Then click Next.

- Leave the File Server JNDI name and click Next.

- Select the “Write File” operation and specify an operation name, such as “WriteUsers”. Then click Next.

- Set the directory for the outgoing files to /tmp and the file name convention to cri_%SEQ%.txt – Notice that you can use flags that will be applied at runtime, such as %SEQ%, that basically means keep a sequence number for any new file. Then click next

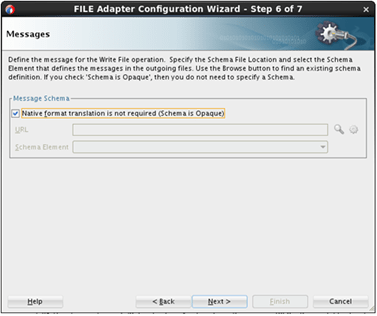
- Similarly, in this case we don’t care about the XML format, we just want to write it down. So select the option “Schema is opaque” and click Next until Finish.
- Your composite should look like this:

- Now drag and drop a BPEL activity into the main components pane.
- Set the name of the BPEL to whatever you like, but set the Template as “Define Service Later” – This basically means that depending on how we wire it, the BPEL service will adapt. This is a very simple way to wire your composites without worrying about the actual interfaces.

- Your composite should look like this:

- Then wire the JMS poller service to the BPEL. It will ask to which Transaction mode, since we want to extend the JTA transaction, select async.persist and click OK

- Then wire the BPEL to the File adapter.

- Open the BPEL activity by double clicking on it. Add a receive activity into the main scope.
- Type whatever name you want, but select the option “Create Instance” – Basically that means that when this activity receives a message, we want to instantiate a new running flow instance. Then select your partnerLink, in this case your JSM poller and create one default variable.

- Drag and drop an Invoke activity after the receive activity. Set a name and create the input variable.
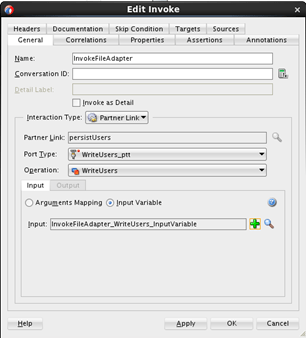
-
Take a moment to think what we are doing here:
- What is the WriteUsers operation?
- When was this operation created?
- Why we don’t have an output variable?
- Drag and drop an Assign activity and map the input variable of the BPEL to the Input variable of the File adapter. Then click OK.

- Save all.
Test your JMS subscriber composite
Now we are going to test our JMS subscriber. There are a couple of things that we need to mention, the first one is that since we chose “Consume Messages”, we are going to automatically consume all the messages of the Queue where it is subscribing to, as well as all the new coming message. For every time that it consumes messages, it is going to create a composite instance, which we can see and drill down in EM. Also it is going to write down the Users into a text file called /tmp/cri_%SEQ%.txt – Let’s follow the steps to verify our example.
- Verify the number of messages that you have in the queue
- Deploy the service
- Come back and verify that the messages are now “current 0”
- Create a new User, by using our original composite.
- Go to the new composite in the EM Fusion Middleware Control and search for all Flow Instances in the last 24 hours.

- There should be a few instances created. Click on the Instance ID of one of them and verify that in the same Flow Trace you can see both composites i.e. the original one where you created the instances and the new one which is subscribing to the JMS queue and which consumed the new message. You can tell by the last column, which specifies the name of the composite:

- Finally open a terminal window and go to /tmp and verify that you have a few files with a name cri_%SEQ%.txt – Open one of them and analyse the content.

Congratulations you have created and successfully tested the Oracle JCA JMA Adapter that comes with OSB/SOA installations.
