
I am using the pre-built virtual image that Oracle provides as a public VM in OTN (http://www.oracle.com/technetwork/middleware/soasuite/learnmore/soa-vm-2870913.html). If you don’t have an existing environment, you can download this VM and use the underlying Oracle DB for the following exercises. The details are as follows:
- Sysdba: sys/welcome1
- Port: 1521
- SID: soadb
Otherwise modify the connection settings accordingly to point to any other database.
For these examples, I am using SQLDeveloper installed on my host machine (Windows 7). Otherwise if you decide to run sqlplus within the Linux VM, you need do the following:
As oracle:
export ORACLE_HOME=/u01/app/oracle/product/12.1.0/dbhome_1
export ORACLE_SID=soadb
Move to the bin directory of the Db installation:
cd /u01/app/oracle/product/12.1.0/dbhome_1/bin
Login as sysdba
./sqlplus / as sysdba
Create the evaluator user
create user evaluator identified by welcome1;
grant dba to evaluator with admin option;
commit;
Create schemas
As EVALUATOR, run the following schemas, so that we can play with them as part of this product evaluation:
|
DROP TABLE “EVALUATOR”.”USERS”; CREATE TABLE “EVALUATOR”.”USERS”( “USERID” NUMBER(6,0) NOT NULL ENABLE, “NAME” VARCHAR2(64 BYTE) NOT NULL ENABLE, “STATE” VARCHAR2(5 BYTE) NOT NULL ENABLE, “MOBILE” VARCHAR2(20 BYTE) NOT NULL ENABLE, “EMAIL” VARCHAR2(84 BYTE) NOT NULL ENABLE, “TYPE” VARCHAR2(3 BYTE) NOT NULL ENABLE); ALTER TABLE “EVALUATOR”.”USERS” ADD ( CONSTRAINT USERS_PK PRIMARY KEY (USERID)); DROP SEQUENCE “EVALUATOR”.”USERS_SEQ”; CREATE SEQUENCE “EVALUATOR”.”USERS_SEQ” START WITH 1000 INCREMENT BY 1 NOCACHE NOCYCLE; DROP TRIGGER “EVALUATOR”.”USERS_TRG”; CREATE OR REPLACE TRIGGER “EVALUATOR”.”USERS_TRG” BEFORE INSERT ON “EVALUATOR”.”USERS” FOR EACH ROW BEGIN SELECT USERS_SEQ.NEXTVAL INTO :NEW.USERID FROM DUAL; END; / ALTER TRIGGER “EVALUATOR”.”USERS_TRG” ENABLE; COMMIT; |
In order to confirm you table selection simply run as Evaluator:
| SELECT TABLE_NAME FROM USER_TABLES; That should bring: SQL> select table_name from user_tables; TABLE_NAME ——————————————————————————– USERS |
Creating Database data sources in WebLogic
In order to use the JCA Database adapter, you need to create a database data source in Oracle WebLogic that is the underlying application server running SOA Suite 12c. You create this using the WebLogic Server console.
As a best practice, first create the data source and then a connection pool for that data source.
- Make sure your server is started using the instructions in Appendix. If it is not already open, open http://:7001>/console to start the WebLogic Server (WLS) console and login using the right credentials. Replace the host and port and username/password to match your own configuration or contact the owner of this document for more information.
- On the left navigation bar, Click Services > Data Sources.
- In the data source table, click New and select the type. If it is not RAC, select Generic option.
- Enter the data source information
Name:
myEvaluationDatabase
JNDI Name: jdbc/myEvaluationDatabase
Database Type:
Oracle
- Click Next.
- Unless this does not apply to your environment, the Database driver defaults to the correct driver: Oracle’s Driver (Thin XA) for Instance connections
- Click Next, click Next again
-
When requested, enter the database information.
Database Name: soadb (update according to your database SID)
Host name: localhost (host where your database is running
Port: 1521 (set according to your configuration)
Database user name: evaluator (created in previous section)
Database user password: welcome1 (update accordingly)
- Click Next
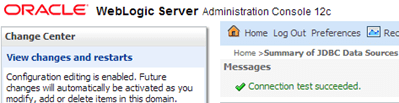
- Click Test Configuration. Confirm success message at top of page.
- Click Next
- Select the Target server where your SOA component is running: AdminServer in
this test case (update accordingly).
- Click Finish
Now create the connection pool
- In the left navigation bar, click Deployments.
- Click the DbAdapter application (click the name, not the checkbox) – Click “Customize this table” and show more rows for simplicity
- Click the Configuration tab, and then click the Outbound Connection Pools tab.
- Click New
- Select the radio button for javax.resource.cci.ConnectionFactory and click Next
- Enter the JNDI Name as follows: eis/DB/myEvaluationDatabase
Note that this is not the same value as in above step. It must match the value you enter in your database connection you create when building your application later in JDeveloper.
- Click Finish
- Save the Deployment Plan if requested, just change the name to dbPlan.xml to avoid future clashing with other JCA resources.

- Click OK
- Confirm a successful outcome

-
Now, edit the connection pool to reference the data source. Click the Configuration tab, expand the connection factory and click your new connection pool (click on the name, not the checkbox)
To change the property value, you must use the ENTER key and then Save. Do not use the TAB key.
- In the Properties table, select the box to the far right of XADataSourceName. The edit box appears. Type in your data source name that you created above: jdbc/myEvaluationDatabase. Press ENTER key to apply the value.
- Select “Save” to make sure the value is stored.

- Go back to the main Deployments page to Update the DbAdapter. Click Deployments in the left navigation bar.
- Select the checkbox next to DbAdapter.

- Click Update.
- Select Redeploy this application and confirm the deployment plan location.

- Click Finish

- Confirm that the connection pool is added by going back to the DbAdapter > Configuration > Outbound Connection Pools and expand the connection factory listed there.
- Confirm the value of the XADataSource property that you entered previously. Look closely! This is the most common place where the configuration is in error.

- Go back to the DbAdapter Outbound Connection Pools tab and review the connection factory property value for the eis/DB/myEvaluationDatabase connection pool that you entered previously. Look closely! This is also the most common place where the configuration is in error.

Start the WebLogic Server and the underlying Database
If using the pre-built VM, follow the next steps:
- Double click on the DB Control icon at the desktop

- Select Restart DB and click OK

- Wait until the window closes.
Then, once the DB is running, start WebLogic server:
- Double click on the WebLogic icon at the desktop and select the start option and OK.
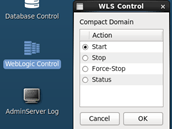
- Wait for the status to be up and running.
Create a Database Adapter (read & write) in JDeveloper
Open JDeveloper that comes with the installation of SOA Suite 12c or if using the pre-built VM, use the JDeveloper inside your VM.

Create a new SOA Application
-
File -> New Application
- Choose General -> Applications -> SOA Application

- Call it my EvaluationApplication and click Next

- For Step 2, enter the project name: MyEvaluationSOAProject, and click Next

- Leave the default Empty composite and click on Finish
- Save all
- Drag and drop a Database adapter from the Components palette into the “External References” pane

- In step 1, call it Users and click Next
- In step 2, since we still have not created a DB Connection, click on the green plus icon to create one.

-
In the “Create Database Connection” enter the following details:
- Connection Name: MyEvaluationDBConnection
- Username: evaluator
- Password: welcome1
- Host name: localhost
- SID: soadb
- JDBC Port: 1521

Test the connection and make sure it is successful. Then press OK.
NOTE: Notice that the previous configuration will be used by JDeveloper at design time, but at runtime, we are going to be using the data source and connection pool that we created previously, for this, once we create the database connection, we will have to enter the JNDI name of the Connection Pool that we created and which is pointing to our data source.
- In step 2, once you create the DB Connection, enter the Connection pool JNDI name: eis/DB/myEvaluationDatabase – then click Next

- In step number 3, select the actions that you want to configure on your database. In this case, we want to read and write, so we will select “Insert or Update (Merge), Delete, Select and Select By Primary Key” – Then click Next

Note: Based on the actions that you select, the wizard will create a WSDL with multiple operations available, so your users can choose which operation to execute on the DB.
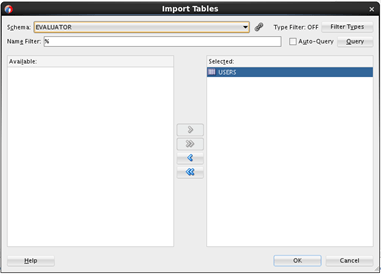
- As part of the “Import Tables” step, click on “Import Tables” -> Query and the select your USERS table and press the “>” button to move it across to the right window. Then click Next.
- In the step “Relationships” we don’t have one, so click Next.
- Leave all the fields selected and click Next

-
Now as part of step 7 of 10, build the SELECT statement that will be available to be invoked as a web service via XSD schemas. For example, if you want to be able to search by NAME (apart from the PK), then:
- Create a “name” parameter.

- Then click on Edit to edit the SQL statement.
- Click on “Add” to include one Expression
- Below, in the “First argument” section, click on Edit and select the Name column
- Leave the operator to “Equal”
- Set the “Second Argument” to “Parameter” and it will by default select the parameter “name” that you created previously. Then click OK.

- The SELECT statement should look like this:

- In the next step, you can configure further options, such as a Sequence, however, since I already created a trigger that will manage my sequence, I can simple click next until Finish. Your composite should look like this:

- Then save all.
That’s it, you have created one DB adapter to your database. Now, let’s expose this DB adapter as a SOAP web service, so that it can be consumed by any web service, for this we are going to use a simple Mediator.
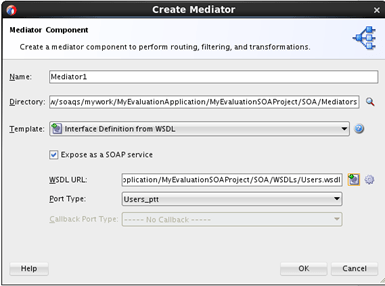
- Drag and drop a Mediator into the centre pane (Components) – Call it whatever you like
- Leave the template as “Interface Definition from WSLD”, in this case we are going to use the Users WSDL that go t created by the DB Adapter Wizard
- Leave “Expose as a SOAP service” checked
- Click on the first small icon on WSDL URL

- Go to [JDEV_HOME]/MyEvaluationApplication/MyEvaluationSOAProject/SOA/WSDLs and select Users.wsdl – Then click OK

- Your Mediator should look like this:
Then click OK
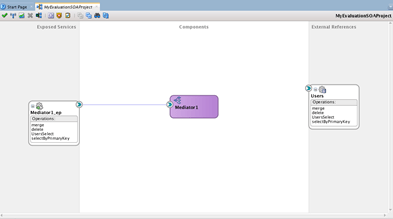
- Connect the Mediator with the Users DB Adapter by dragging a line
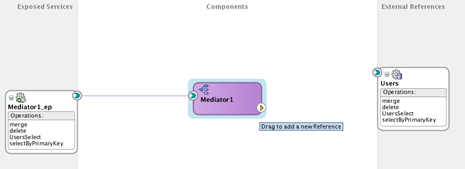
Notice that you have to select which Mediator operation will point to which Target Operation. Since we used the same WSDL, this is going to be pretty simple, as the operation names will be the same and so we don’t need to XML translate any incoming/outgoing message.
- Chose merge and merge and press OK

Your composite should look like this:
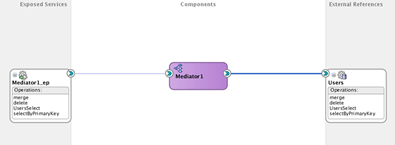
- Then double click on the Mediator and create a new Routing rule for the rest of the operations, by pressing on the green plus icon for the rest of the operations. Let’s start with delete

- Select the option “Existing Service” and select the operation that applies. In this case, References -> Users -> delete

- Repeat the same approach for the other two operations (UsersSelect and selectByPrimaryKey). At the end, there should be one rule for each operation.

We have four potential operations to execute: merge, delete, UsersSelect and selectByPrimaryKey
Let’s test our DB Adapter
In order to test our DB adapter, we need to deploy our composite into the running WebLogic server with SOA Suite.
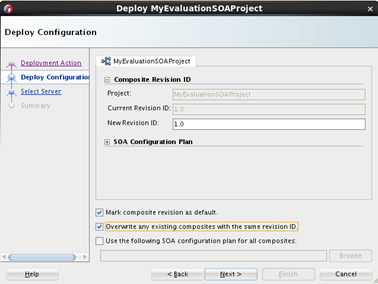
- In the Applications window, right click on your project MyEvaluationSOAProject -> Deploy -> MyEvaluationSOAProject

- Select Deploy to Application Server and click Next

- Select Overwrite any existing composites with the same revision ID and click Next
-
If you don’t currently have a connection to your Application Server, click on the green icon and provide the following details as part of the wizard:
- Connection Name: myWLServer (or whatever you want)
- Connection type: WebLogic 12.x
- Username: weblogic
- Password: welcome1 (adjust accordingly)
- WebLogic Domain: compact_domain

- Then test the connection and make sure you get only successful messages

- Click Next until Finish
- After a few second you should see a log saying that the Deployment finished successfully…

- Go to the EM Fusion Middleware Control at http://IP:7001/em (weblogic/welcome1)
- Expand SOA -> soa-infra -> default -> MyEvaluationSOAProject

- Click on Test button

- Select an operation called “merge”, then enter 1 User to be entered and press the refresh icon. It should open a form to enter details for 1 user.

- Enter the user details as you wish… Notice that you have to enter a userid, although it will be replaced by the DB sequence and trigger. Can you explain why this is the case?

- Once you enter all user details that you want to create press the “Test Web Service” button

- By default the DB Adapter will echo the same details that you entered
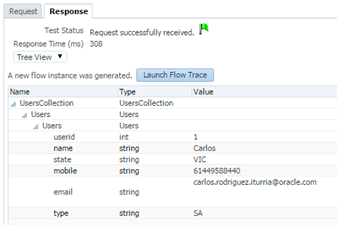
- Click on the “Launch Flow Trace” button and analyse the flow.

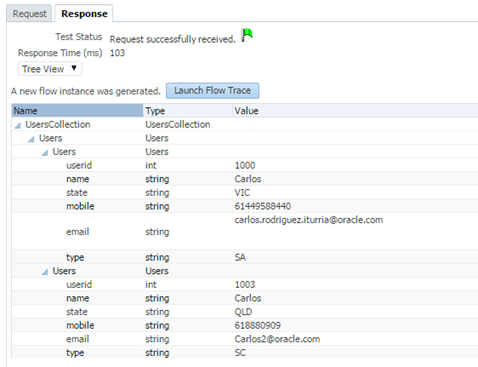
- Now, using your favourite DB program, show all the records in the table and make sure that the record was created.

Notice that the ID is overridden and was selected according to the DB triggered that we created previously.
- Now let’s create other 2 or 3 records with the same name, plus a few others with different names. For example I have this:

- Come back to the testing request page and now select operation “UsersSelect” – Then enter the name that repeats across your records and press “Test Web Service” button. For example:

- It will return all the users that match the name “Carlos” in this case. Here we are testing the custom query that we built with the DB Adapter.
- Play with the other operations, (Delete and selectByPrimaryKey)
Congratulations you have created and successfully tested the Oracle JCA DB Adapter that comes with OSB/SOA installations.
