

Let’s Encrypt made its debut back in late 2015. It is a free Certificate Authority provided by the Internet Security Research Group. The goal was to support the adoption of SSL / TLS to ensure the privacy of information sent over the public Internet. Let’s Encrypt is now serving over 2.5M certificates per day.
If you’re reading this it’s likely you’ve had to deal with SSL certificates before. It’s also likely some of you will have investigated an outage, only to find that an SSL certificate expired somewhere that no one knew about. Certificate discovery, management, and renewal can be time consuming and not much fun.
Cloud providers have made this job easier with the introduction of certificate services that are able to issue public Domain Validation (DV) certificates. Oracle Cloud Infrastructure (OCI) currently allows you to create private Certificate Authorities (CA’s), private Certificates, and private Certificate Authority bundles. Private certificate resources are used to secure communication across a private network, where certificates can be installed and trusted to enable secure communication.
But what about publicly signed certs for users connecting over the Internet? Using a private OCI certificate will result in a “certificate not trusted” error in your web browser; this is where Let’s Encrypt comes in. I’m going to show you how to run a completely automated serverless Let’s Encrypt solution in your OCI tenancy to install and automatically renew certificates that show as trusted in your web browser.
How does it work?
Handling certificates properly is just as important as enabling TLS on your endpoint. Certificates and private keys should always be stored securely and only accessible to authorised users and services. My solution uses OCI native services, Functions, DNS, Certificate Service, and Vault to perform the interactions with Let’s Encrypt and securely store certificate artefacts. All operations are performed in memory ensuring no certificates or keys are persisted to disk storage.
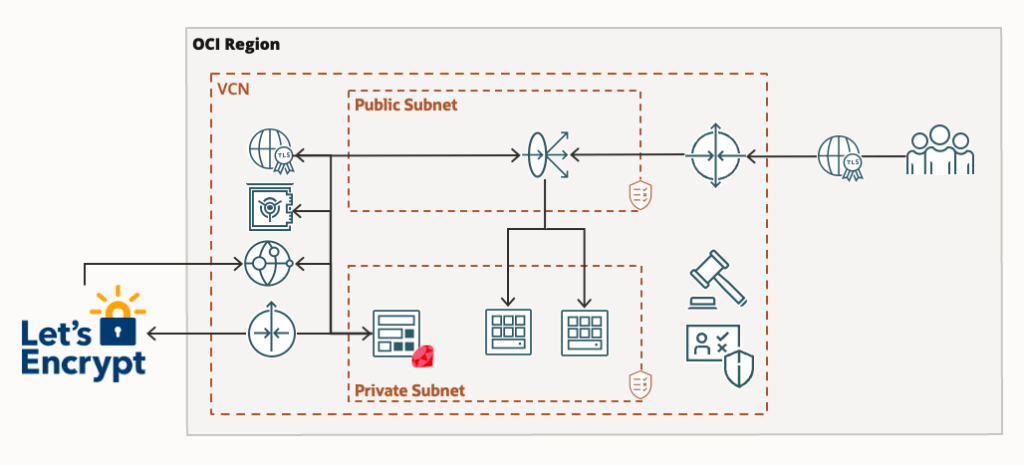
The above image illustrates the architecture of my proposed solution. It comprises of:
- A Virtual Cloud Network, Public and Private subnets, an Internet and NAT gateway
- An Application Load Balancer, with one or more backend web servers.
- A custom Ruby Function I created called lets-encrypt.
- A DNS zone
- A Virtual Vault
- Certificates Service
Project Prerequisites
Before we begin, you will need:
- An OCI tenancy
- A Virtual Cloud Network with Public / Private Subnets, an Internet Gateway, a NAT Gateway
- A DNS domain hosted on OCI DNS. For my example I’m using dflect.me
- An Application Load Balancer with one or more web server back ends.
- Adequate IAM permissions to create resources in your tenancy, or within the compartment where they will reside
If you don’t have an existing web server running in OCI, you can follow these instructions to install NGINX: https://docs.oracle.com/en/learn/oracle-linux-nginx/index.html. You will also need to configure a Load Balancer to front the NGINX service.
Setup & Configuration
Note: There is an update to the below instructions to allow you to provision multiple certificates. The updated instructions can be found here:
https://redthunder.blog/2022/10/14/managing-multiple-lets-encrypt-certificates-with-oracle-cloud-infrastructure/.
You’ll also need to install Docker, and the Fn Project. On OSX installing the Fn Project is easy with Homebrew:
$ brew install fnTo push the function to the OCI container repository you’ll also need an Auth Token which can be generated in OCI Identity by selecting your user, and clicking “Auth Tokens”.
Download the function source code from Github https://github.com/scotti-fletcher/oci-letsencrypt. As always I recommend inspecting any source code that you download from the Internet for security issues before use.
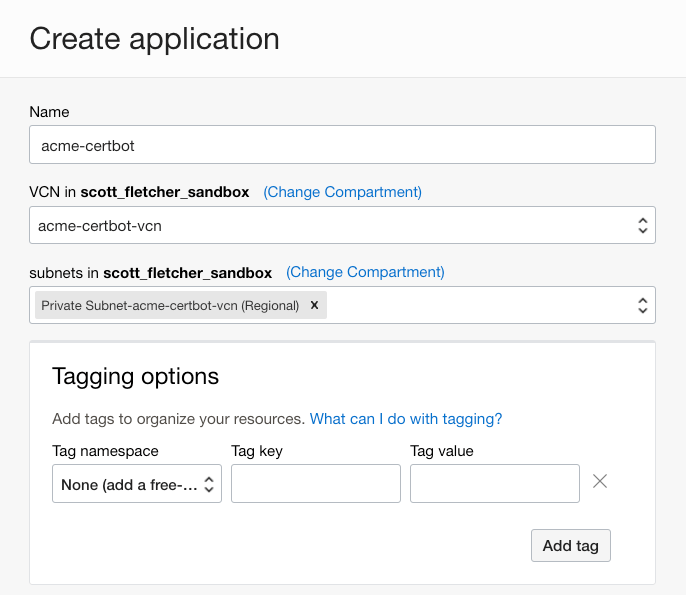
Now we’ll create a Functions application. An application is just a logical grouping of functions, and in this solution I only have one application called “acme-certbot” and one function called “lets-encrypt”.
After creating the application, follow the “Getting Started” instructions for “Local setup”. The instructions displayed will be unique for your OCI environment, however I’ll explain the steps as not all are required for this example.
In terminal, cd into the lets-encrypt directory containing the function files:
scott@scott-mac lets-encrypt % cd ~/Projects/oci-certbot/lets-encrypt
scott@scott-mac lets-encrypt % ls
Gemfile func.rb func.yaml models.rb
Create a context for this compartment and select it for use. My function lives in my sandbox compartment, and the name is shown below:
$ fn create context scott_fletcher_sandbox --provider oracle
$ fn use context scott_fletcher_sandbox
Update the context with the compartment OCID where you created the application and the Oracle Functions API URL.
$ fn update context oracle.compartment-id [your compartment ocid]
$ fn update context api-url https://functions.ap-sydney-1.oraclecloud.com
Create a repository where your function container image will be stored.
$ fn update context registry syd.ocir.io/[your namespace]/acme-certbotLog into the OCI container registry.
$ docker login -u '[your namespace]/oracleidentitycloudservice/scott.fletcher@oracle.com' syd.ocir.ioYou should see a “Login Successful” message. You can now build and deploy your application. The first time you do this it might take a few minutes:
scott@scott-mac lets-encrypt % fn deploy --app acme-certbot
Deploying lets-encrypt to app: acme-certbot
Bumped to version 0.0.19
Using Container engine docker
Building image syd.ocir.io/abcd/acme-certbot/lets-encrypt:0.0.19 ......
Parts:  [syd.ocir.io abcd acme-certbot lets-encrypt:0.0.19]
Using Container engine docker to push
Pushing syd.ocir.io/abcd/acme-certbot/lets-encrypt:0.0.19 to docker registry...The push refers to repository [syd.ocir.io/abcd/acme-certbot/lets-encrypt]
d15aa7ac2cf0: Pushed
f9a15c3fd1e8: Pushed
111ae97432f0: Layer already exists
fb57e582ca84: Layer already exists
d55982f12cfa: Layer already exists
04aab8128d11: Layer already exists
05dc728e5e49: Layer already exists
0.0.19: digest: sha256:d86dcf6889fa8fe3a036da8e17fbb7733c50369a158c1daf2649eaaf7d232c40 size: 1783
Updating function lets-encrypt using image syd.ocir.io/abcd/acme-certbot/lets-encrypt:0.0.19...
Once created, you should be able to see the function in the OCI console under applications and also in the Container Registry.
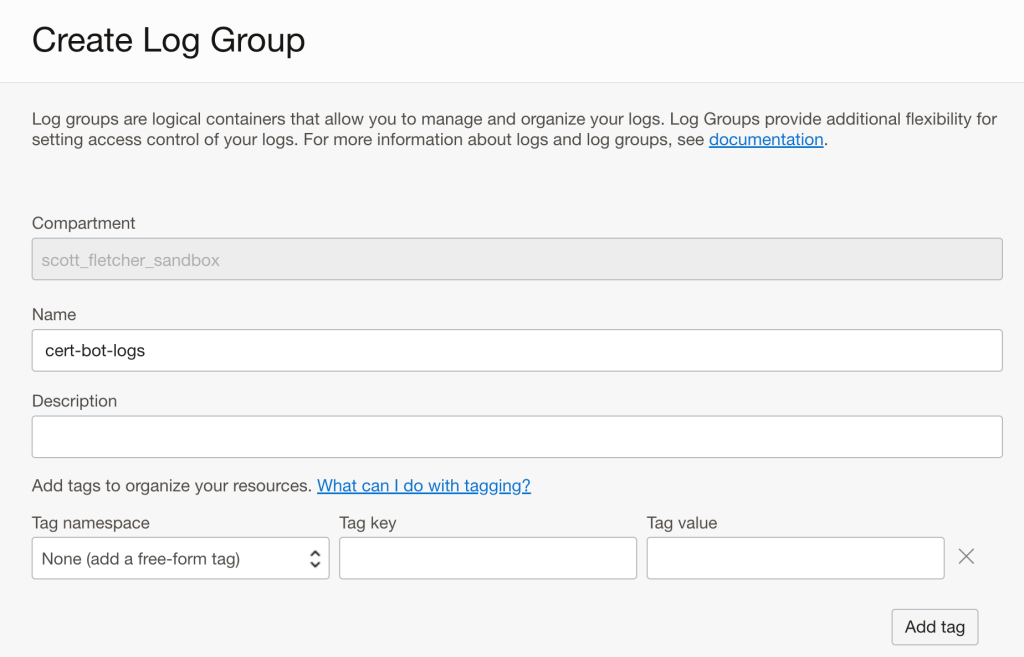
Now we need to create a Log Group to hold our Function specific logs. Create a log group, I’ve named mine “cert-bot-logs”:
In logs, click “Create custom log” and call it “cert-bot-activity”.
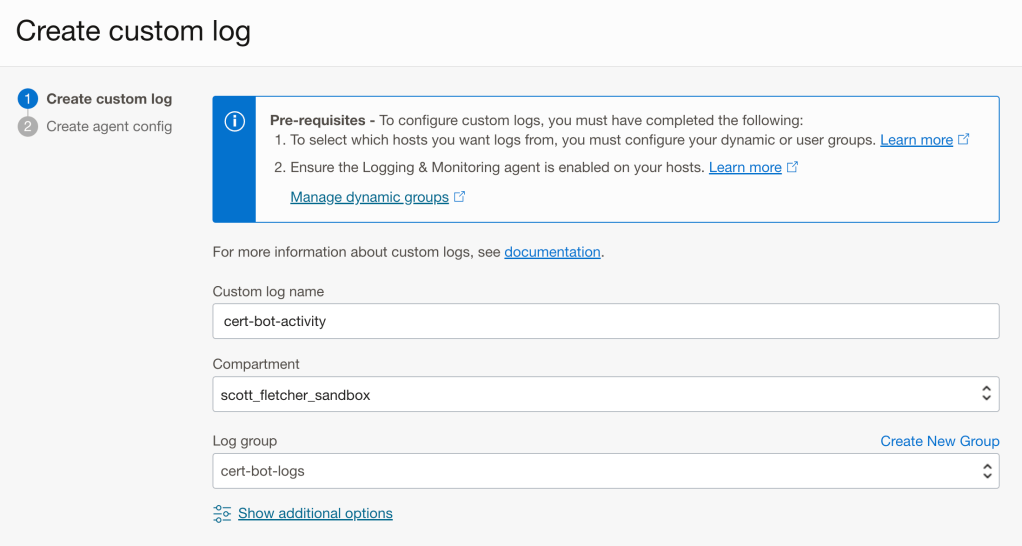
When prompted select “Add configuration later” and click create. You should see the log “cert-bot-activity” in the “cert-bot-logs”. Note down the OCID of the cert-bot-activity log as you will need this later.
If you don’t already have a Master Encryption Key in OCI Vault then you will need to create one:

Note down the OCID of the Master Encryption Key as you will need this later.
Now we’ll go back to our Function, and update the required configuration items. Configuration items are just environment variables that are made accessible to the function:
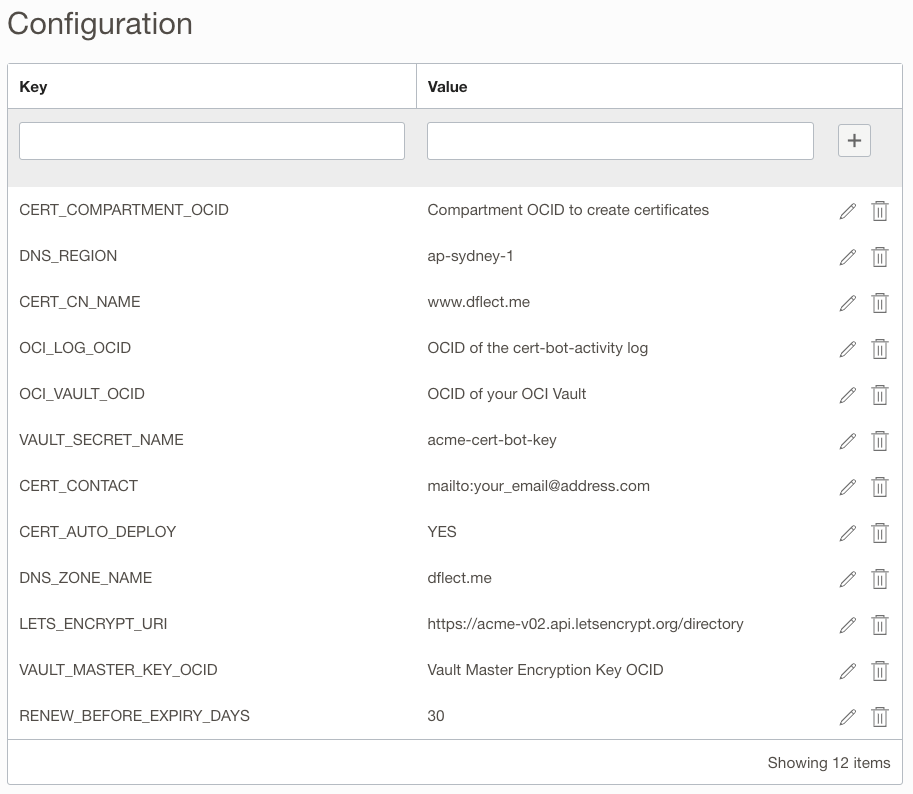
You need to configure the following items:
- CERT_COMPARTMENT_OCID: This is the compartment where certificates will be created.
- DNS_REGION: This is the region where your DNS Zone is configured.
- CN_CERT_NAME: This is the Common Name of the certificate that you want issued by Let’s Encrypt. As above, the cert I want issued is for www.dflect.me.
- OCI_LOG_OCID: This is the OCID of the cert-bot-activity-log you created earlier.
- OCI_VAULT_OCID: This is the OCID of the Vault where your master encryption key is located. It’s also where we will store your Let’s Encrypt account Private Key as a Secret.
- VAULT_SECRET_NAME: This is the name of the secret that will hold your Let’s Encrypt account Private Key. You can use “acme-cert-bot-key”, or change it if you wish.
- CERT_CONTACT: This is the email address associated with the certificate that will be issued.
- CERT_AUTO_DEPLOY: Entering “YES” here will make future renewed certificates the “CURRENT” version in the certificate service, triggering the certificate update on any associated load balancers.
- DNS_ZONE_NAME: This is the name of your DNS Zone. As above mine is called dflect.me.
- LETS_ENCRYPT_URI: This is the Lets Encrypt API endpoint.
- VAULT_MASTER_KEY_OCID: This is the OCID of the Master Encryption Key you want to use, or created earlier.
- RENEW_BEFORE_EXPIRY_DAYS: This defines how many days before the certificate is due to expire that you wish to renew the certificate. I’ve chosen that my cert should be renewed 30 days before expiry.
You will also need to configure the timeout and memory for the function. Memory should be 1024mb and Timeout should be set to 300 seconds:

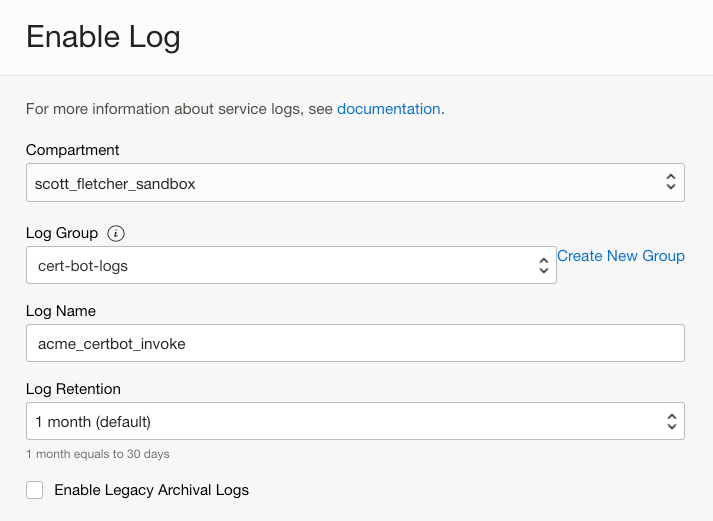
Functions also emit logs, and it’s useful to see them for debugging purposes. To enable these logs, click “Enable Log”:
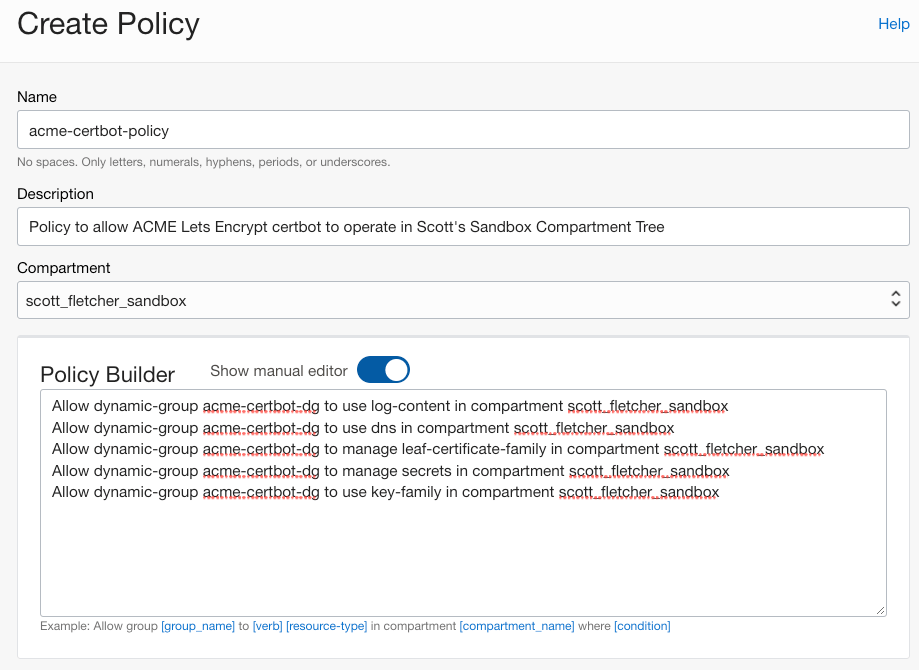
Before we test our function, we need to create a Dynamic Group, and Policies to allow our function to operate in our environment. Depending on your use-case and where your Vault and DNS Zones are you may need to adjust the policies. My examples below are scoped to my sandbox compartment.

Create a new policy, with the following policy statements. If you’ve chosen different Dynamic Group and Compartment names, you will need to update the policy statements accordingly:
Allow dynamic-group acme-certbot-dg to use log-content in compartment scott_fletcher_sandbox
Allow dynamic-group acme-certbot-dg to use dns in compartment scott_fletcher_sandbox
Allow dynamic-group acme-certbot-dg to manage leaf-certificate-family in compartment scott_fletcher_sandbox
Allow dynamic-group acme-certbot-dg to manage secrets in compartment scott_fletcher_sandbox
Allow dynamic-group acme-certbot-dg to manage key-family in compartment scott_fletcher_sandbox
These statements allow my function to:
- Push logs to the cert-bot-activity log
- Update the DNS Zone to respond to the TXT record Let’s Encrypt challenge.
- Import certificates into the Certificate Service
- Create and read your Let’s Encrypt account private key stored as a secret in the Vault
- Use your Master Encryption Key when encrypting your Let’s Encrypt account private key
Now with everything configured, we can invoke the function to create a certificate. This may take 1-2 minutes. You should see a “Completed Successfully” message returned:
scott@scott-mac lets-encrypt % fn invoke acme-certbot lets-encrypt
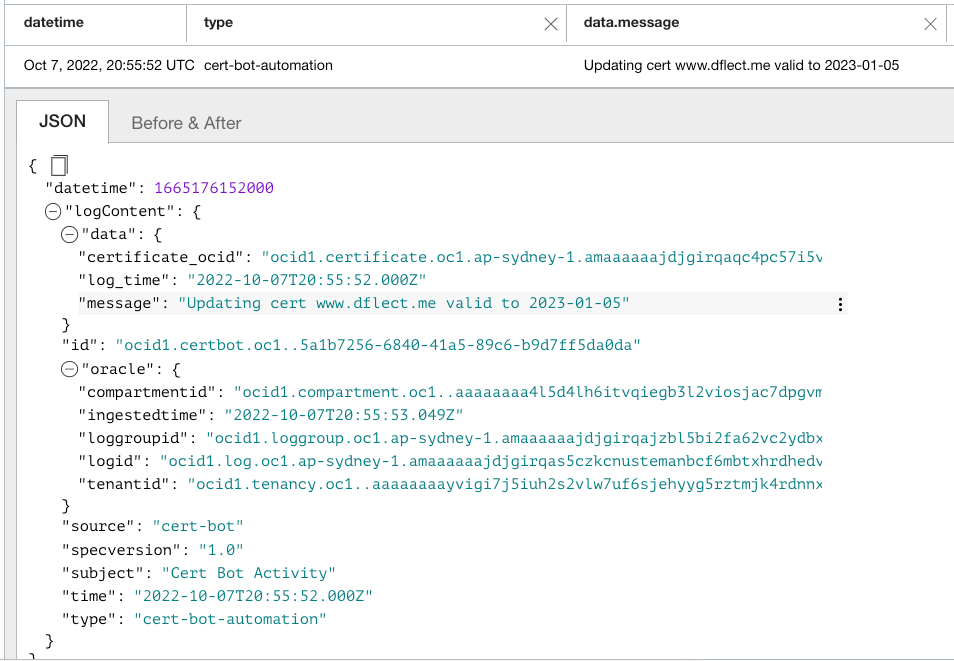
"Completed Successfully"If we take a look at our cert-bot-activity log we can see the certificate was created:
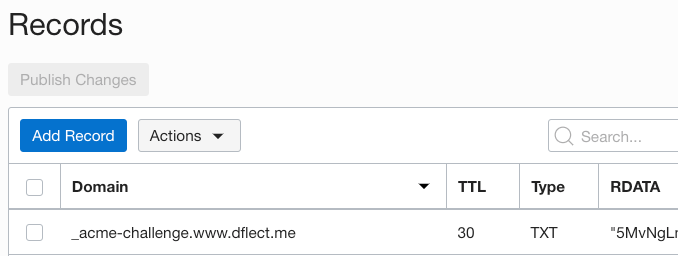
Looking at our DNS Zone records we can see a TXT record was added for _acme-challenge.www.dflect.me:
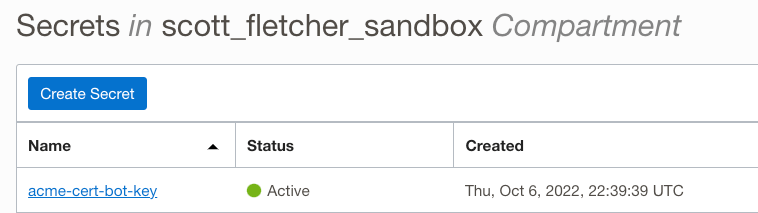
Looking at our Vault, we can see the acme-cert-bot-key secret has also been added:
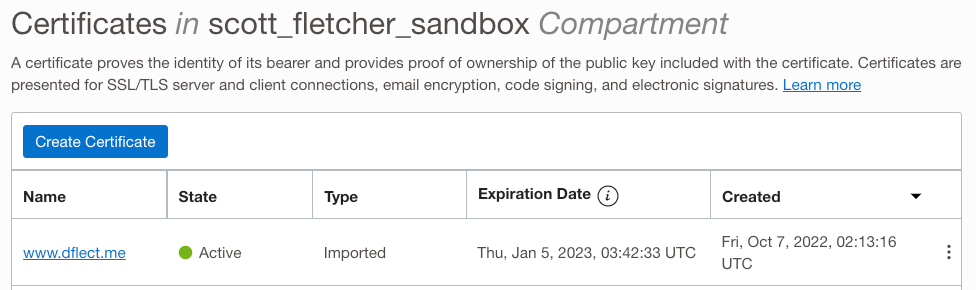
And lastly we can see the certificate is imported into the Certificate Service:
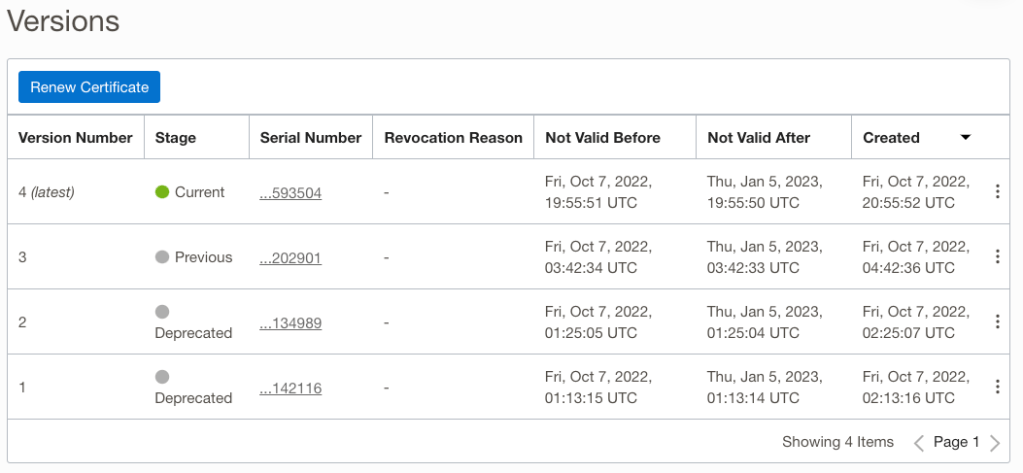
If we invoke the function again, we will see future certificates added to the existing certificate with the most recent promoted to the current version:
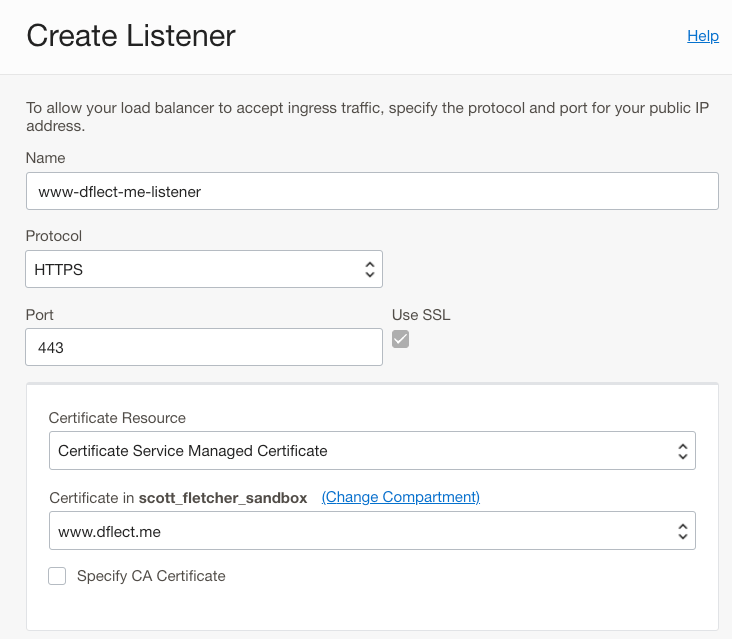
Now we need to associate the certificate with a Load Balancer listener. You can create a HTTPS listener, or edit an existing listener. Select the certificate that has been created:
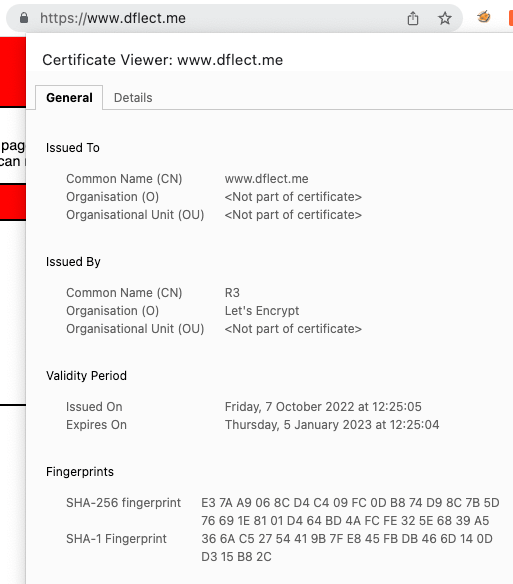
Once the Load balancer work request has completed, you can now browse to your website. In my case it’s https://www.dflect.me/:

I can also view the certificate that was issued by Let’s Encrypt:
The awesome thing now, is that whenever the function is invoked, if a new certificate is required (30 days before expiry in this example) a new certificate will be generated, promoted to current, and automatically pushed to any associated resources. This means my Load Balancer will forever have a valid SSL certificate.
The last thing to do is to configure a mechanism by which to invoke the function in OCI. There are a few ways you could achieve this:
- Run it manually as required via the command line (as shown earlier)
- Run it via a cron job from a compute instance, or other scheduler that you use
- Run it automatically using a method to trigger the function from within OCI.
Because I don’t want to run it manually, and I don’t have a scheduler I’m going to use OCI Alarms to trigger my function once a day. My colleague @callanhp has a great article on how to do this https://redthunder.blog/2022/05/03/a-better-mechanism-for-periodic-functions-invocation/. It’s a good read and dives further into detail of how the approach works.
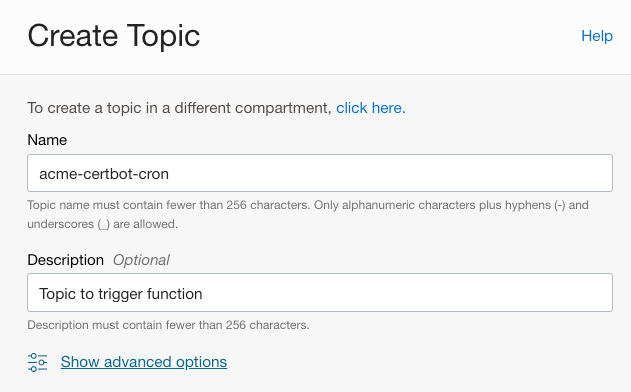
First we need to create a topic:
After creating a topic, create a subscription that will call our lets-encrypt function:

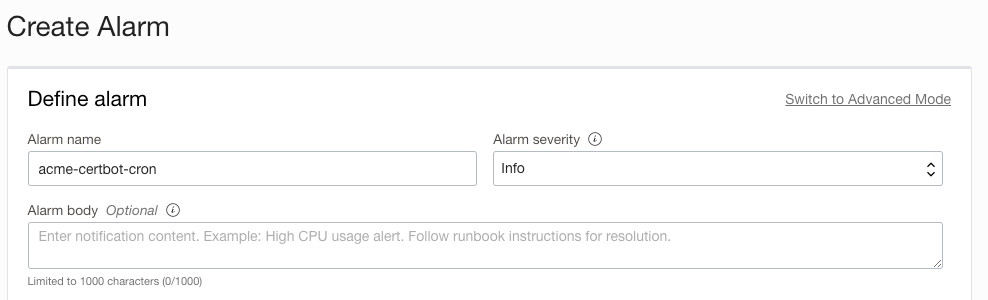
Now we need to create an alarm:
Because I’m running multiple compute instances I’m choosing a metric that will always fire.
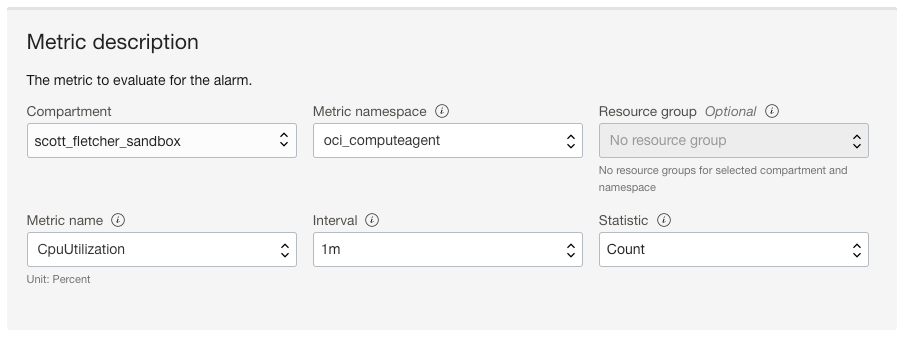
Trigger the rule for when the value is greater than -1, meaning the alarm will always fire. You may need to enter 1, then press the down arrow key to get to the value of -1. You can validate the metric will work by looking at the graph. The blue line indicates the metric will fire the alarm:

Now all we need to do is configure the alarm to send a message to our notification topic. Note I have configured the alarm to repeat the notification every 24 hours. This will ensure our lets-encrypt function runs once a day:

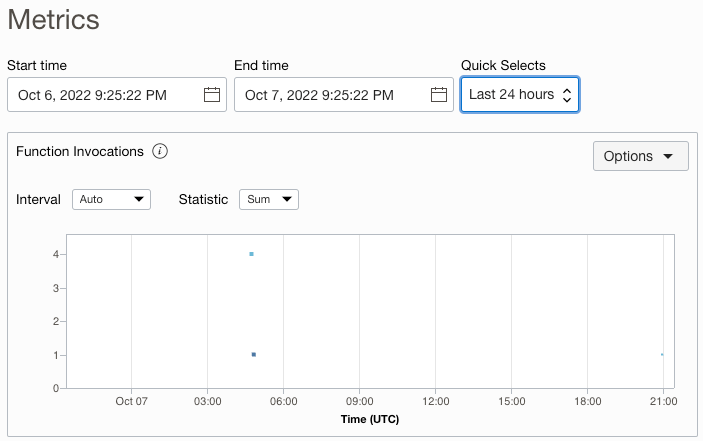
To confirm the lets-encrypt function is running each day, look at the Function metrics:
Awesome, now we have a fully automated solution to allow us to issue and renew Let’s Encrypt certificates, and automatically update Load Balancers.
Other Considerations / Thoughts
- When requesting Let’s Encrypt certificates, the cert chain that is provided doesn’t include all certificates to the trust root. If you’ve tried to manually import Let’s Encrypt certificates into OCI’s Certificate Service you will have likely received a “trust chain error”. I’ve handled this in the function by traversing the CA Issuer tree and building the correct cert chain that is imported. If you look in the source code you will see how it’s done.
- I’d recommend enabling Cloud Guard in your OCI tenancy. It’s free and amongst a range of awesome Cloud Security Posture Management features it has detectors to identify when certificates on Load Balancers are expiring. If you are renewing certificates 30 days before expiry then setting your Cloud Guard detector to identify certificates that are due to expire in 20 days will ensure you are alerted if the function fails to run or execute successfully.
- If you are looking to do end-to-end SSL encryption, then you can leverage OCI’s private certificates on backend sets. You can also use init scripts when provisioning compute instances to retrieve, install, and trust these certificates.
- My IAM policies are scoped to everything in my sandbox compartment. If you wanted further control over what the function has access to, you could scope these to specific resource OCID’s.
- I’ve chosen to set the CERT_AUTO_DEPLOY configuration variable to “YES”, meaning renewed certificates will automatically be the current version, triggering the auto update on associated Load Balancers. If you want to just retrieve the certificate and not have it automatically pushed to Load Balancers then set this to “NO”. If you set it to NO, then you will need to monitor when the certificate is renewed and mark it as “current” manually.
- I’m storing the account private key as a secret in the Vault. This is because if you need to revoke a certificate you will need both the account private key and the certificate.
If you’ve found this useful, please share! If you have any questions you can reach out to me on LinkedIn https://www.linkedin.com/in/scotti-fletcher/

Hi! First, nice job!
I’m trying to implement this solution but I’m getting an error.
Command line gives me “HTTP/1.1 502 Bad Gateway” and Log Groups “Authorization failed or requested resource not found.”
I’ve been working in this setup by a week now and didn’t figure out how to fix, could you point me the way to solve?
LikeLike
Hi,
HTTP 502 bad gateway would indicate that there’s nothing sitting behind your load balancer or you can’t connect to it. Can you check your backend sets and backends? – What is the health status of the Load Balancer. That should be green and “OK” before you try to implement this.
Also, where are you seeing the Log Groups authorisation error? This could be because the object doesn’t exist, or if it does (and you’re using the right OCID) that you don’t have the right permissions to access the it. For the later, what policies are assigned to your user in the compartment (or tenancy) that you’re trying to use?
LikeLike