
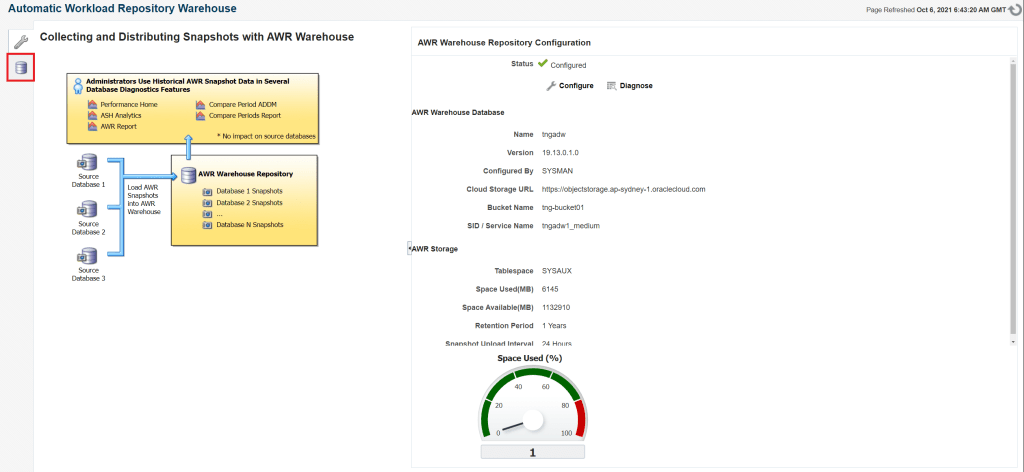
In Oracle Enterprise Manager (OEM) there is the ability to host an AWR Data Warehouse which enables you consolidate all your detailed performance data of all your database and store in a central location.
This enables you to do long-term analysis trend across your AWR data to determine, performance, capacity impact on the databases in your IT estate.
In OEM 13.5, Oracle now supports the AWR Warehouse repository for Autonomous Data Warehouse.
If you don’t have the infrastructure or capacity to store AWR data on-premise, you can now send your data to the Autonomous Data Warehouse (ADW) in Oracle Cloud (OCI).
There are enormous benefits to using Autonomous Data Warehouse (ADW). One of many benefits is that you can scale up/down cpu and storage whilst the database remains online.
Let’s look at how easy this can be set up.
A. PREREQUISITES
- Create an instance of Autonomous Data Warehouse (ADW)
- Discover the Autonomous Data Warehouse (ADW) target in Enterprise Manager (you can following this step here, make sure you discover target for for the ADW database target type)
- Make note of the details associate with your ADW instance
– ADW instance
– ADW username and password for database
– Tenancy OCID
– User OCID
– Public Key Fingerprint
– Private Key - Create an OCI Bucket and make note of the bucket name as well.
B. CREATE THE ADW NAMED CREDENTIAL
1. In Enterprise Manager (EM) navigate to the Named Credential page.
SETUP > SECURITY > NAMED CREDENTIAL

2. Click on Create

3. Enter the details for the ADW Credentials associated with the ADW target as required and Click on Test and Save.
a) Credential Name (eg. ADW_TNGADW_CREDENTIAL)
b) Credential Description
c) Authenticating Target Type = Autonomous Data Warehouse
d) Credential Type = Database Credentials
e) Scope = Target
f) Target Type = Autonomous Data Warehouse
g) Target Name (eg. tngadw)
h) Database Username (eg. admin)
j) Database Password (eg. xxxxx)
k) Role = Normal
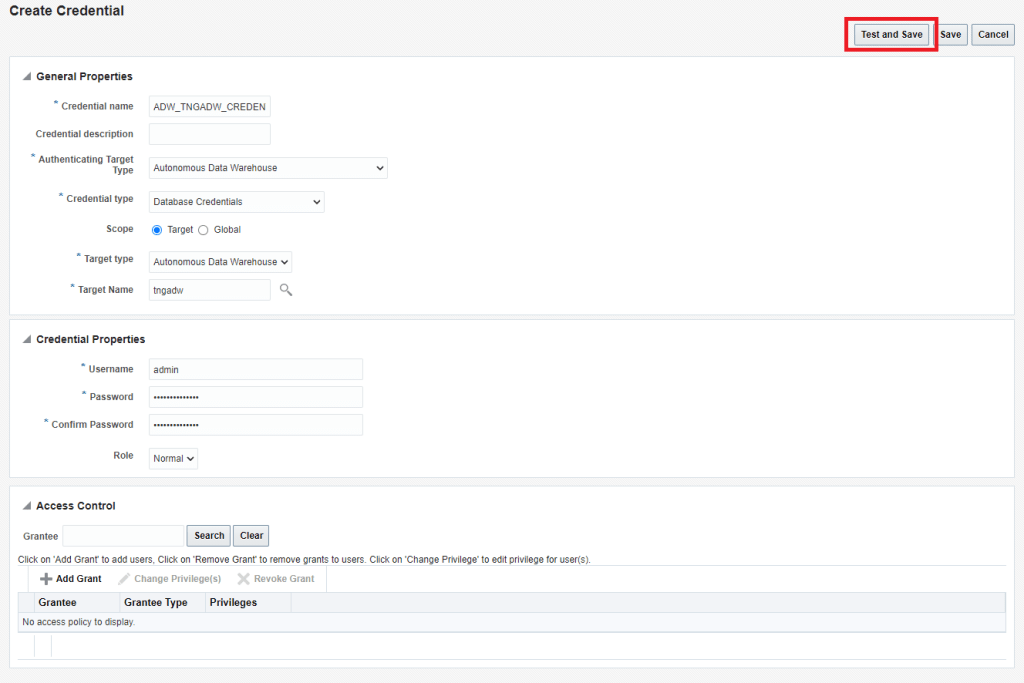
NOTE: Make sure test connection return successful
C. CREATE THE OCI NAMED CREDENTIAL
1. In Enterprise Manager (EM) navigate to the Named Credential page.
SETUP > SECURITY > NAMED CREDENTIAL
2. Click on Create
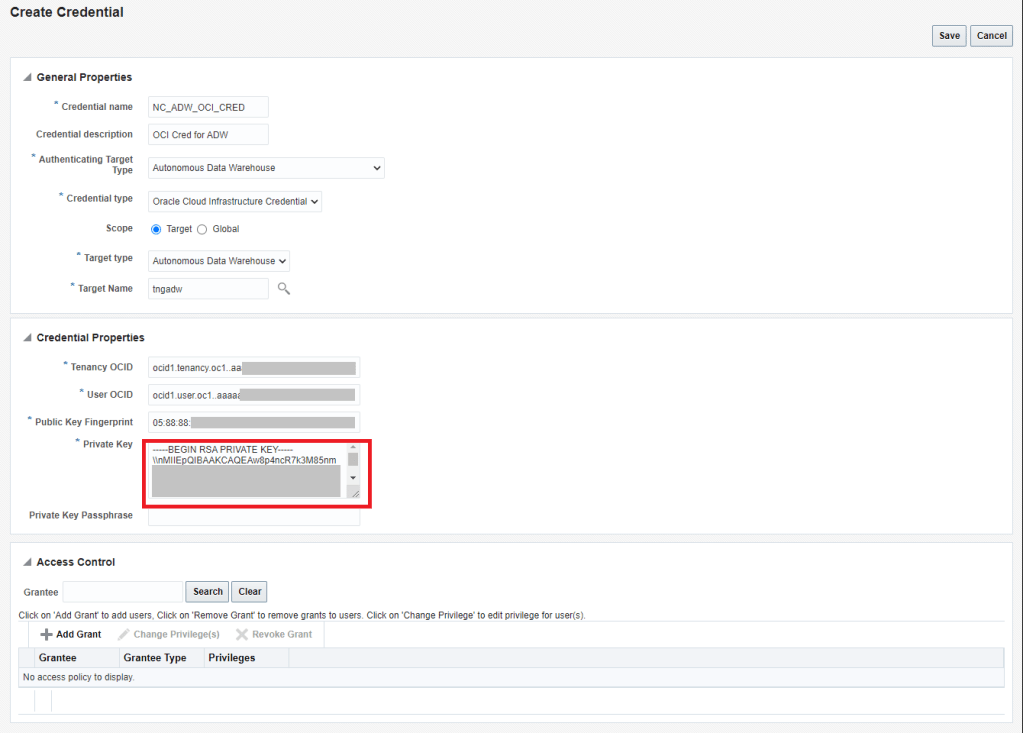
3. Enter the details for the OCI Credentials associated with the ADW target as required and Click on Save.
a) Credential Name (eg. NC_ADW_OCI_CREDENTIAL)
b) Credential Description
c) Authenticating Target Type = Autonomous Data Warehouse
d) Credential Type = Oracle Cloud Infrastructure Credential
e) Scope = Target
f) Target Type = Autonomous Data Warehouse
g) Target Name (eg. tngadw)
h) Tenancy OCID
i) User OCID
j) Public Key Fingerprint
k) Private Key
| Format the Private Key is required before specifying for Named Credential. Copy the private key into Notepad++ and make the following changes: Replace occurrence of “\n” with “” Click on Replace All Then edit file: Add “\\n” after —–BEGIN RSA PRIVATE KEY HEADER—– Add “\\n” before —–END RSA PRIVATE KEY—– Here is an example of what the sample output which needs to be copied to Private Key field —–BEGIN RSA PRIVATE KEY—–\\nMIIEpQIBAAKCAQEAw8p4ncR7k3MXXXXXXXXXXXXXXXXXXXXXXXXXXXXXXXXXXXXXXXXXXWSbe4+nJx01vakcC0=\\n—–END RSA PRIVATE KEY—– |
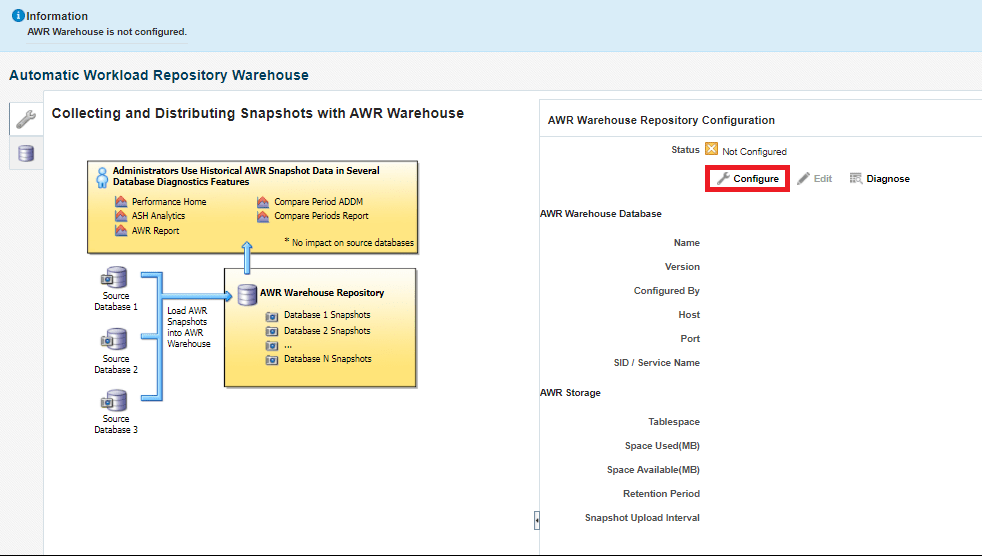
D. CONFIGURE AWR DATA WAREHOUSE
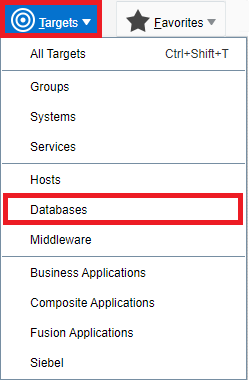
1. In EM, navigate to:
TARGETS > DATABASES
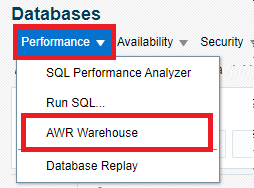
2. Navigate to:
PERFORMANCE > AWR WAREHOUSE
3. Click on CONFIGURE
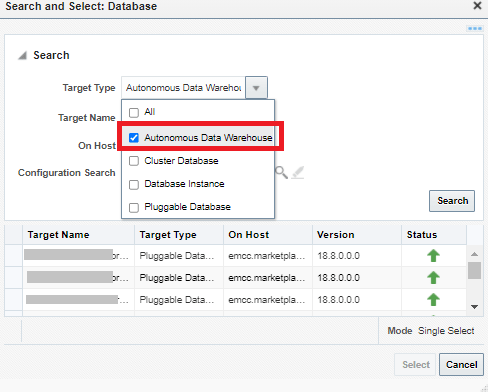
4. Select Target Type > Autonomous Data Warehouse
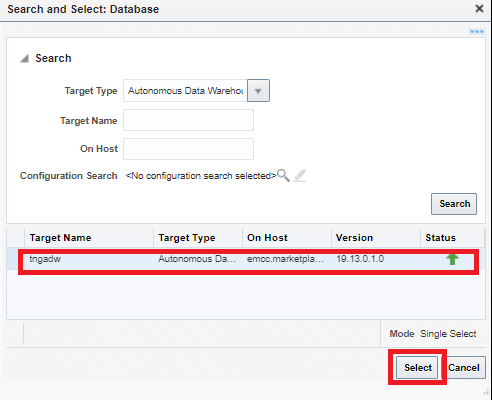
5. Select the Autonomous Data Warehouse target (eg. tngadw) to be configured for the AWR repository.
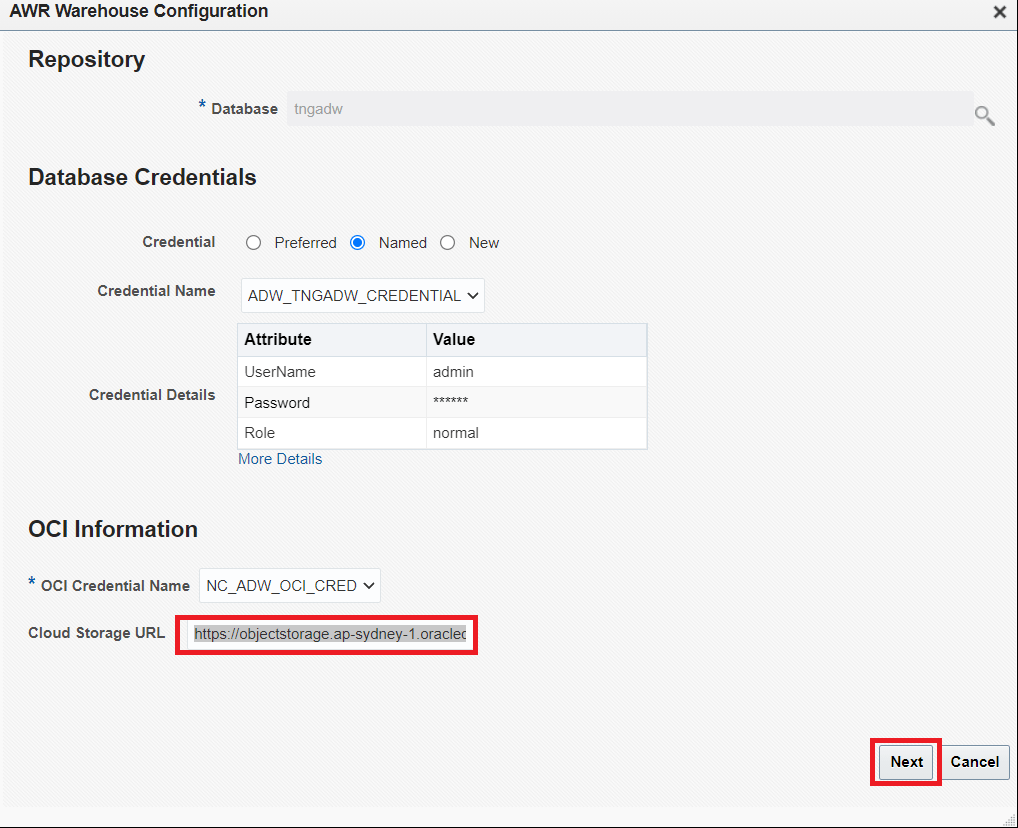
6. Enter the details for AWR Warehouse Repository Configuration and click on Next
a) Set Database Named Credential for ADW
b) Set the OCI Credential Name
c) Specify Cloud Storage URL (Check this link to use specific for your OCI region)
NOTE – The Sydney region was used in this example: https://objectstorage.ap-sydney-1.oraclecloud.com
7. Specify the details for AWR Warehouse Snapshot Management and click on Submit
a) Snapshot Retention Period
b) Snapshot Upload Interval
c) OCI Bucket Name
d) Staging Schema Password
e) Tablespace

8. Review AWR Warehouse Repository Configuration and then click on the icon:

9. Click on the Add to register the database to upload AWR snapshots to the AWR Warehouse repository.

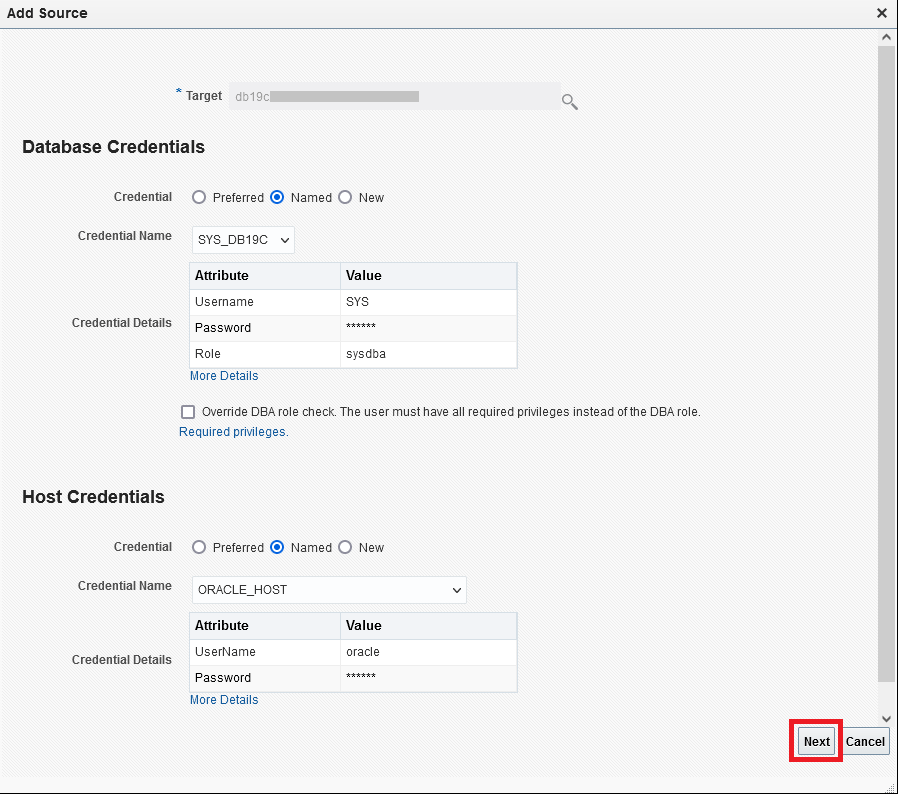
10. Enter the details for the Database Source and click on Next
a) Database Target
b) Named Credential for Database Target
c) Name Credential for Database Host Target
11. In the Database Source, grant the appropriate privileges:
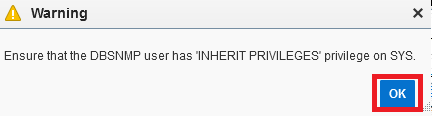
SQL> GRANT INHERIT PRIVILEGES ON USER SYS TO DBSNMP;
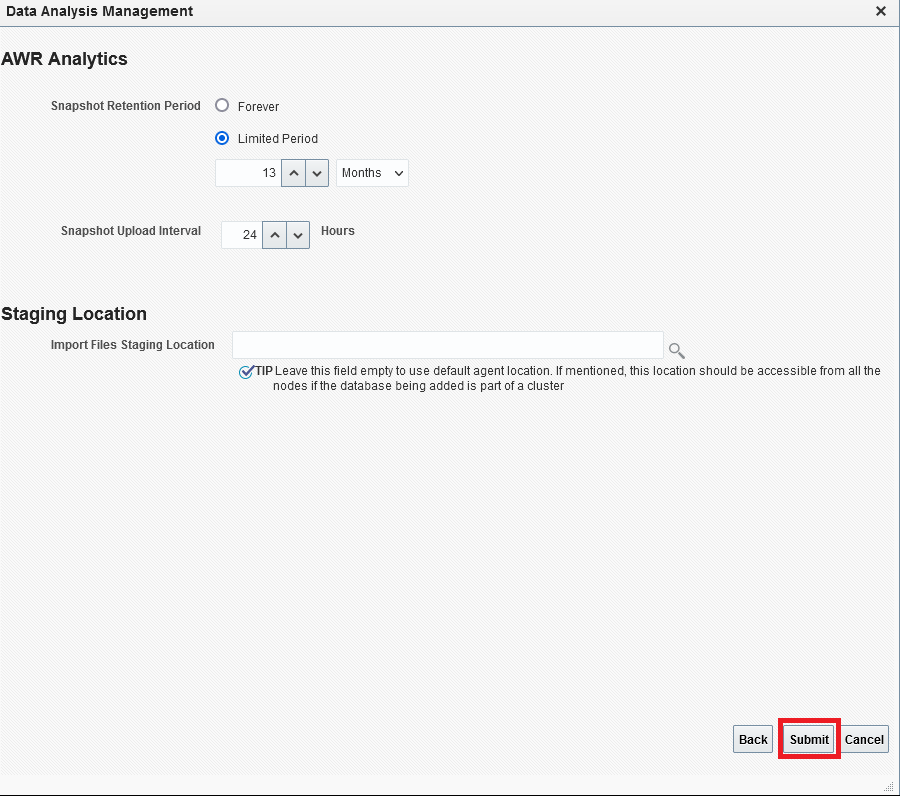
12. Specify the details for Data Source Config Policy and then click on Submit
a) Snapshot Retention Period
b) Snapshot Interval
c) Staging Location (can be left default)
13. Review that the following database is now registered to be uploaded to AWR Warehouse repository.
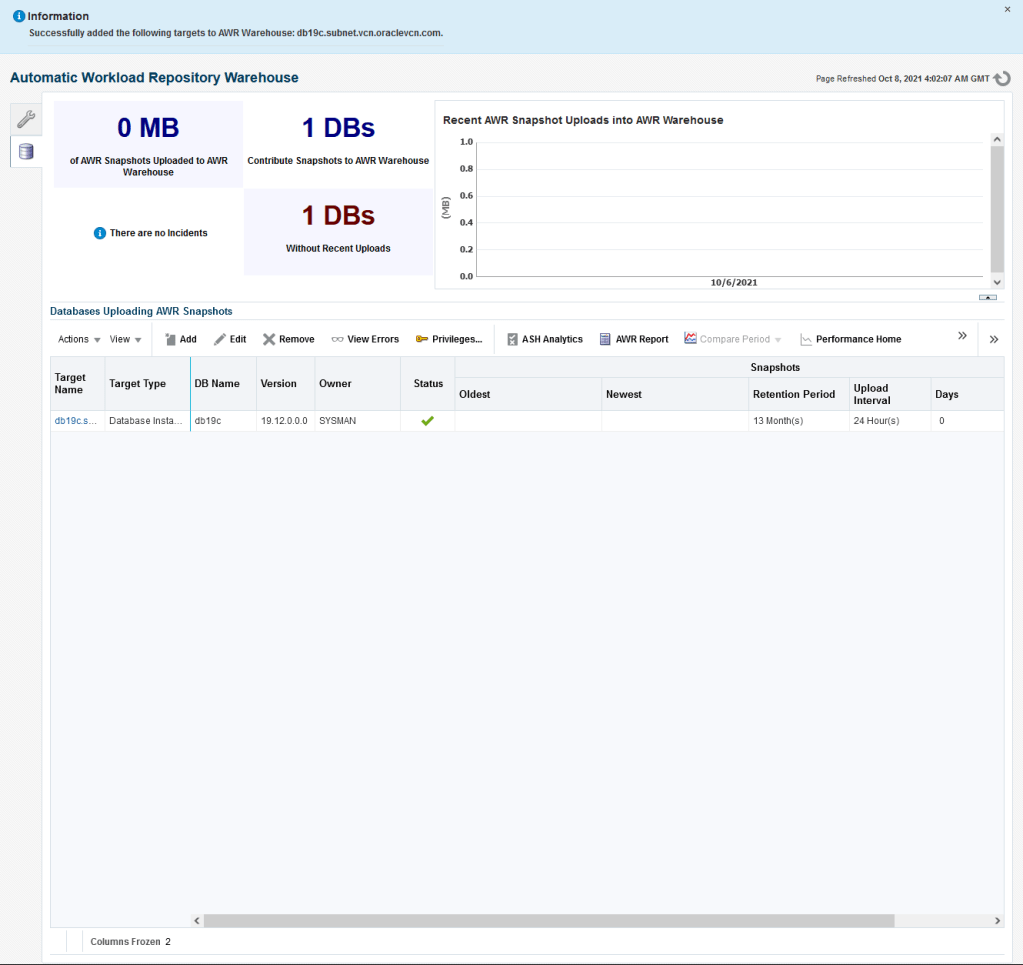
This completes the setup for AWR Warehouse in Enterprise Manager.
