
Recently, Oracle rolled out the OCI Bastions service, which is designed to simplify the process of accessing instances which do not have a public IP address. They are really easy to use, with simple commands to allow access to these internal hosts… if you are using a Unix shell. Unfortunately I suffer from being quite wedded to various tools, and as a Windows user, I tend to use PuTTY to access hosts via SSH, so this blog post will detail both the OCI Bastion service in a little more detail, as well as how I continued to resist changing my old habits, and set up connections using the OCI Bastion service using a number of components of the PuTTY suite of tools.
The concept of ‘bastion-hosts’ or ‘jump-hosts’ is a fairly common one – a machine designed to facilitate access to servers in a different subnet, or different network zone, which can’t otherwise be accessed directly. These hosts are so ubiquitous across architectures, that it is easy to overlook the fact that they are something of a necessary evil, and introduce a number of weaknesses to the network architecture which need to be mitigated by rigid application of operational security controls.
Always open port 22 – Typically your bastions are used for SSH access, which means you have an open port 22, often exposed over the internet. If you haven’t checked the access logs on your bastion-hosts in a while, you might be surprised by just how often a connection is attempted. You can mitigate this via IP allowlisting, and VPN access for admins.
Weaker firewall rules – In order to access internal hosts, you need an open port 22 on the firewall between your accessible bastion subnet and your private instance subnet.
Inflexible SSH keys – I hope you aren’t still using passwords to log into your hosts – but even if you have shifted to using SSH keys everywhere, you still have to maintain those, and you need very strong operational controls to avoid SSH keys being shared between admins, and rotated appropriately.
Access Auditing is problematic – Sending access events off to a SIEM is best practice, but still requires you to setup agents on each Bastion host you configure.
Cost of maintaining an instance – Self-explanatory, a bastion-host requires a host, and while virtualisation lets you put this on minimal infrastructure, it still requires config, patching, etc.
Takes up precious IP-addresses – Especially true if your Bastion host is internet-facing, your Bastion takes up address space. Until IPv6 becomes more universal, these few numbers are scarse.
Needs an Internet Gateway – This is more of a specific Oracle Cloud Infrastructure issue – but if you want access to a set of internal hosts via a bastion over the internet, you need to add an Internet Gateway to your Virtual Cloud Network, which makes your locked down network just a little less locked down.
OCI Bastions somewhat trivially shore up these weaknesses, by providing a service which removes the ‘host’ from ‘bastion-host’. Rather than having a persistent instance which is used to facilitate access to instances in private subnets, OCI Bastions allows for the creation of time-bound sessions for access. These sessions are provided through the creation of an SSH tunnel which can be used to access services via SSH, or used to forward ports on internal servers to allow for alternative administrative tasks to be performed. It is also tightly bound into existing OCI service, such that session creation is recorded in OCI Audit, and access can be managed at a fine-grained level by Identity and Access Management Policies.
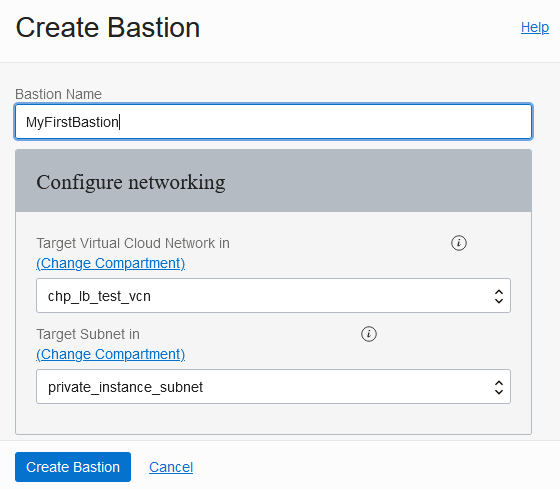
Setting up the OCI Bastion service is simple and straightforward, you provide a name, and point it at a subnet, as well as providing one or more CIDR ranges of allowed ingress addresses.
While it looks like this binds a single Bastion to a single subnet, this actually just represents the subnet in which the Bastion places a virtual NIC, so can be used to route to any subnet with ingress rules which permit access from that VNIC. In more complex VCN configurations, this will commonly lead to a network architectures which closely resemble a classic ‘bastion-host’ deployment though notably the Bastion subnet is private. i.e.

Once your bastion has been created, it provides a private IP address within the chosen subnet which can be used to set up ingress rules for the other subnets. For instance, for my Bastion which reports a Private Endpoint IP Address of 10.113.2.55, I added the following ingress rule:
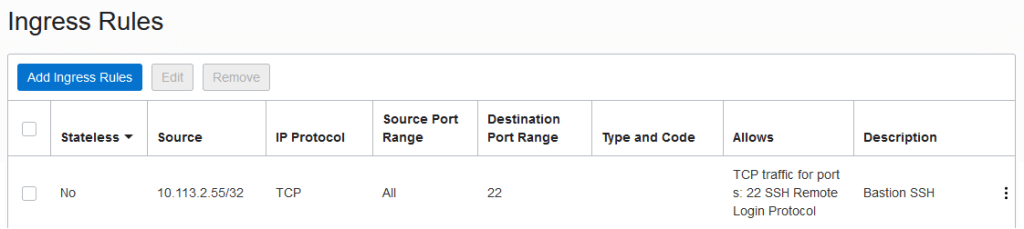
If you need to use Port Forwarding, make sure you allow ingress from the Bastion on those ports as well.
A session can then be created – which requires an SSH key to be added for the session. This is where we first touch the suite of PuTTY tools, specifically PuTTYgen. PuTTYGen provides the ability to generate SSH keys and save them as .ppk (PuTTY Private Key) files, which we can load into another useful PuTTY tool, Pageant, for use in future.
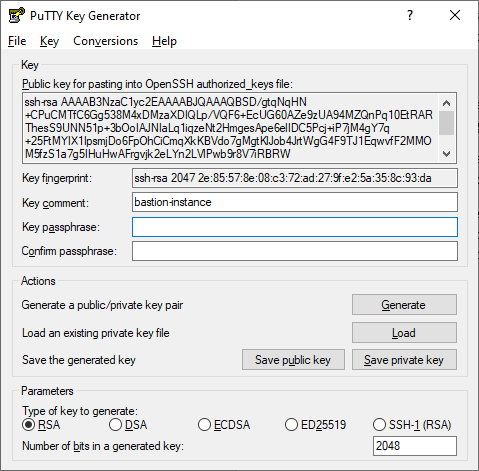
For now, generate an RSA key for the session, then copy the public key shown into the ‘Paste SSH Key’ section of the session creation dialog. Make sure you save the private key somewhere for later. Then we can load the key in to Pageant – which provides SSH Agent Forwarding to simplify SSH key authentication. To do this, you can usually select the .ppk file and take the ‘Load into Pageant’ action, or start Pageant and select ‘Add Key’.
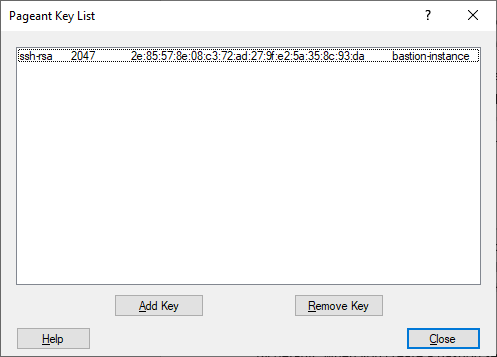
I typically use Pageant because it makes it easier to leverage different keys for different systems and purposes, without having to specifically load them anywhere. This is true when using Bastions as well, as it avoids having to point to specific key paths when setting up saved sessions. By default PuTTY is configured to look to Pageant for keys, but if you run into issues you can confirm this is set by checking the SSH Auth settings in PuTTY to ensure that ‘Attempt agent authentication using Pageant’ and ‘Allow agent forwarding’ are enabled.
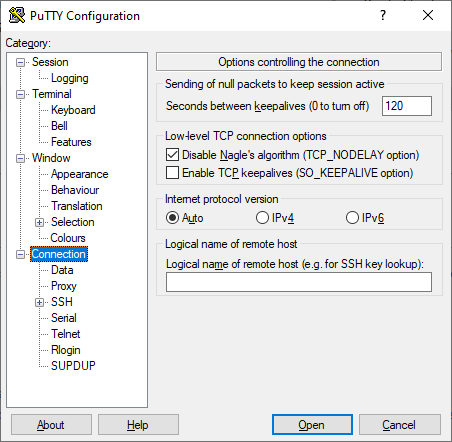
By default, the SSH service terminates idle connections after 5 minutes of inactivity. As a convenience mechanism to prevent this connection termination, you can configure PuTTY to send null packets every few minutes in the Connection settings.
By default, when you create a Bastion session, the Bastions service provides you with an SSH command that can be executed to facilitate either an SSH connection or SSH tunnel for port-forwarding. If you want to use PuTTY however, you will need to adapt your mechanism for connecting – with different configurations depending upon the type of session.
Connecting a Managed SSH Session using PuTTY
Managed SSH sessions use an SSH connection to the Bastion as a proxy, which can be achieved in PuTTY through the use of the PuTTY ‘plink’ utility. Plink can be invoked as a command line utility to facilitate a ‘PuTTY link’, and can be configured as part of the PuTTY session from the Proxy Configuration UI within PuTTY. A colleague of mine, who is clearly far more adept with PuTTY than I am pointed out that I could use a parametised plink command to make it easy to update the PuTTY connection from session to session. As such, the final proxy configuration looks like this: proxy of type ‘Local’; bastion hostname as the proxy hostname; port 22 for the proxy; session OCID as the username; and a parametised plink command as a local proxy command.
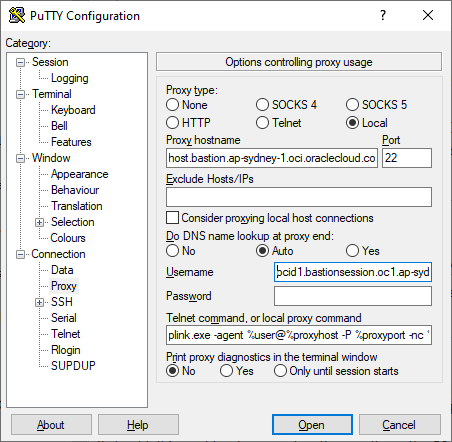
The full proxy command, for ease of copy and pasting is as follows:
plink.exe -agent %user@%proxyhost -P %proxyport -nc %host:%port
The values which are needed can be easily extracted from the Bastion Console. You may initially need to obtain the bastion host name to use as the proxy hostname from the ‘View SSH Command’ on an existing session. The host is of the form:
host.bastion.<region>.oci.oraclecloud.com
The host is constant for a region, so future connections simply require you to update the session OCID in the proxy username field. The use of ‘-agent’ tells plink to look for the key in Pageant, which simplifies the overall key management. With that proxy command in place, you can simply connect directly to your private instance’s IP address from the main PuTTY session management page.
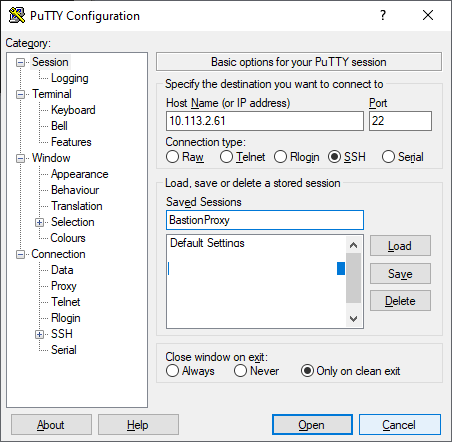
A proxy connection is established with the bastion, then a connection to the private instance is made, both of which are authenticated using keys from Pageant, as per the below (proxy diagnostics enabled in the screenshot):
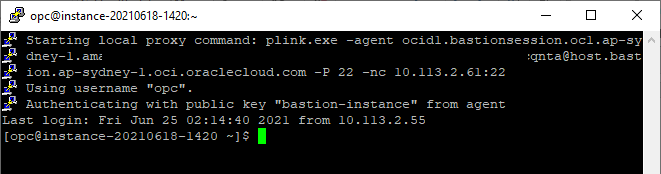
If you have issues on initial connection, it will help to enable proxy diagnostics and you may need to make sure you aren’t having issues with host key caching or similar. Running plink externally, or piping a ‘y’ character into the command may be needed for that initial configuration.
Connecting a Port Forwarding Session using PuTTY
Port Forwarding makes use of an SSH tunnel, which allows connections to a remote server to be facilitated by binding to a local port. PuTTY has support for Tunnels easily available through the UI, no need to mess around with plink here.
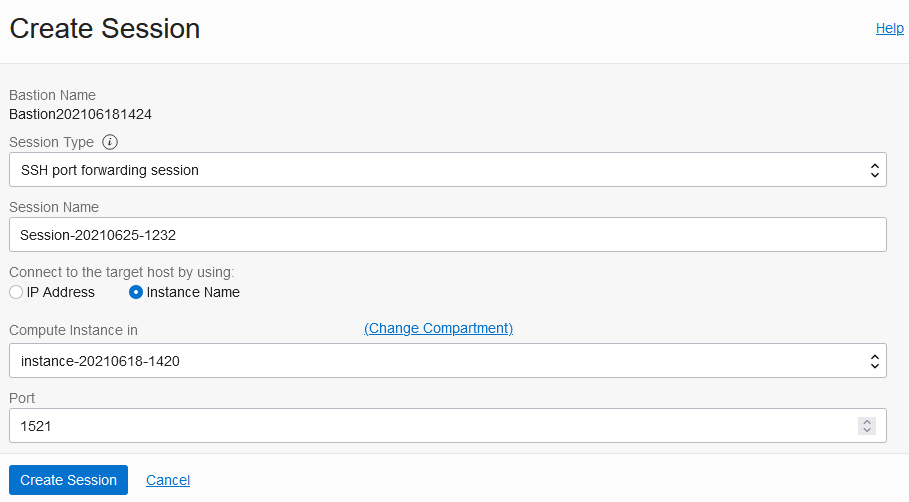
When you configure your port forwarding session in OCI Bastion, you simply select which port you want to forward. Normally this would be a VNC or RDP port for admin operations using the UI, or a Database listen port as below.
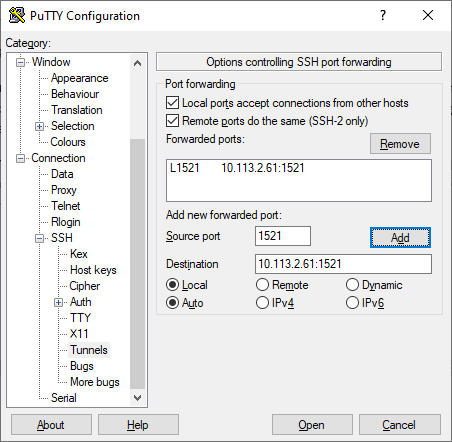
Configuring PuTTY to facilitate the port forwarding is handled from the SSH Tunnels section of the UI, in which you can specify the local port, as well as the IP and port of the remote server – making sure you click ‘Add’ to put it in the forwarded ports list, i.e.
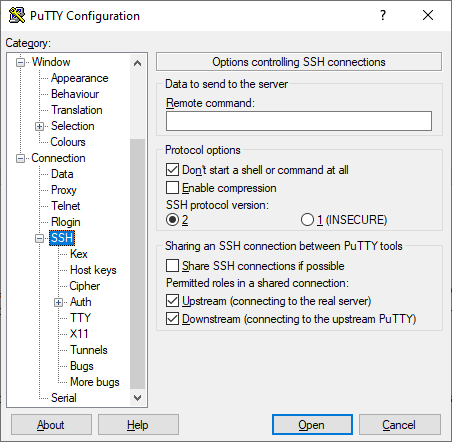
The other piece of configuration required is to prevent the creation of a shell on the OCI Bastion server, as it is disabled as a security control and attempting to do so will result in the connection failing. This is set on the top level SSH configuration page, by selecting the ‘Don’t start a shell or command at all’ option.
Once those two pieces of configuration have been performed, you can simply connect to the bastion session itself, i.e.
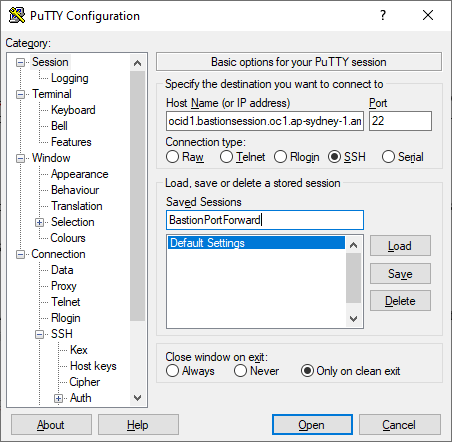
The connection hostname in full is:
<session_ocid>@<bastion_host>
As for Managed SSH, these values can be extracted from the Bastion Console. You may initially need to obtain the bastion host from the ‘View SSH Command’ on an existing session. The host is of the form:
host.bastion.<region>.oci.oraclecloud.com
The host is constant, so future connections simply require you to update the session OCID.
Once this connection has been established, you can simply connect to whatever service you are forwarding over the port you have bound to localhost.
OCI Bastions provides a powerful capability to access private instances without needing to run an instance to act as a bastion-host. This has a wide range of benefits, both in terms of security as well as operationally. Also, as these services are provided using SSH, it is easy to leverage them using existing tools and technologies, such as PuTTY. An option which wasn’t explored here is to leverage the PuTTY command line, which would enable you to bundle the configuration up into a simple script, rather than clicking through the PuTTY UI updating values all over the place.

many thx .. very helpful
LikeLike