
In this blog, I am going to show you how to get started with the Loopback framework to easily auto-build REST APIs in NodeJS and persistence layer in a variety of options, including relational and non-relational databases e.g. In-memory DB, MongoDB, MySQL, Cassandra, Oracle, etc.
In terms of API design and development, Loopback allows you to work “top-down” or “bottom-up”. I am going to cover both approaches in this blog.
First, we are going to create an API model definition in place, as we are building the REST APIs, this exercise will give us a Swagger-based API definition. Alternatively, we are going to start from an existing Swagger definition and use it to implement NodeJS REST APIs pointing to a persistence layer of choice (in-memory DB, MongoDB, MySQL, DB2, Oracle, etc.). I personally prefer the “API First/Top Down” approach, as it gives me the option to properly design and test my APIs first and then, simply move to implementation phase, but this ultimately depends on situations, preferences and requirements.
Installing Loopback
The first step is to install the Loopback framework (http://loopback.io/getting-started/).
For this, make sure that you install NodeJS first, check this link if you haven’t done it.
-
From a command line execute the following command:
sudo npm install -g loopback-cli
Generating my first Loopback Application
First, we are going to create our first Loopback application. This is going to allow us to create our model from scratch and attach a data-source bridge to a relational or non-relational database, e.g. MongoDB in our case.
-
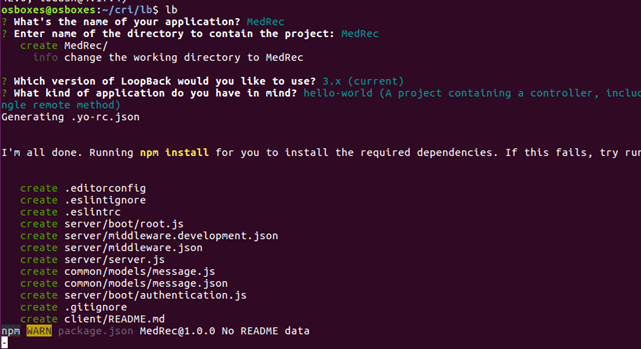
Type lb to enter an interactive console-based menu to create and configure your Application.
In my case, I chose the following values:
- Application name: MedRec
- Directory (MedRec): Enter
- Version: 3.x (current)
- Application Type: hello-world
-
Once it completes change directory into MedRec application folder.
cd MedRec

-
Now, let’s create a Model into the Application. Type lb model to enter into another interactive console-based menu.
My details are as follows:
- Model Name: Patient
- Data-source type: db (memory)
- Base class: PersistanceModel
- Expose as REST API: Y
- Custom Plural: patients
- Common model or Server only: server
-
Properties:
-
Name: Name
- Type: string
- Required: y
- Default Value: Carlos
- Type: string
-
Name: Age
- Type: number
- Required: y
- Default Value: 21
- Type: number
-
Name: Mobile
- Type: string
- Required: y
- Default Value: +61445566778
- Type: string
-
Once you complete, your Model will be under MedRec/server/model
- Model Name: Patient
-
Now, under MedRec, simply run your application with
node .

- Go to a browser and go to http://localhost:3000/explorer – Validate your REST API aligned with your defined Model.

- POST and GET a few records to validate it all works as expected.

Generating the APIs from Swagger definition
Now, it is time to do the opposite, that is generate your API implementations from your existing Swagger definition. I am assuming that you have already created the Swagger definition, which is nothing else than a yaml or json document file, describing your REST APIs. if you are old school like me, think of it like a WSDL for SOAP services. If you have not created the Swagger definition first, I encourage you to use the Swagger or Apiary Online editors. It’s quite easy and there are lots of pre-existing templates you can use to create your own REST API definition.
-
Save your Swagger definition locally in yaml (yml) format.
Note: If you have your Swagger definition in json format, you can easily convert it to yml here.
-
Move to a clean folder and start building your NodeJS Application by typing:
lb
These are my values:
- Application name: MedRec2
- Loopback version: 3.x (current)
- Application Type: empty-server

- Move to your new Application folder: cd MedRec2
-
Create a data-source to the persistence:
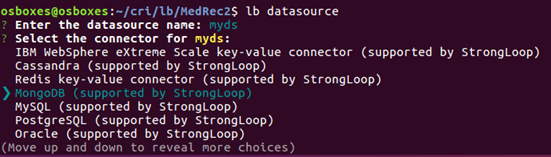
lb datasource
These are my details:
- Datasource name: myds
-
Connector: MongoDB
Notice that there are plenty of options, starting from in-memory db to strong Oracle relational DBs or NoSQL DBs like MongoDB.
-
Connection String: mongodb://[MONGODB_USER:MONGODB_PASSWD][MONGODB_SERVER]:[MONGODB_PORT]/[DBNAME]
Note: It is expected that you have MongoDB already running somewhere. If that is not the case, please refer to this link that shows you how.
- Install Loopback connector: Y

- Copy your yaml-based Swagger definition file within this folder.
-
Now, initiate the Swagger Definition to REST implementation by typing:
lb swagger
- Enter the name of the swagger file, e.g. mySwaggerDef.yml
- Select all models (green means selected and big black circle means non-selected).

- Select your just create datasource:

- Notice that all Model definitions as per your Swagger document are created under [Application_Name]/common/models

-
Now, it is time to run your application:
node .
Make sure that it starts without a problem:

- Go to a local browser and open http://localhost:3000/explorer

- Once again, POST and GET a few records to validate it all works as expected.

-
Confirm that a record that you enter (POST) can then be retrieved (GET). The difference now compared to our previous example is that:
- You can follow an API first approach, by defining the API definitions first
- The data is being persisted in MongoDB
- You can at any time create new data-sources and move across databases, e.g. MongoDB for Dev and Test, but Oracle DB for Production.
That’s it, now you can package and deploy your NodeJS application anywhere, in my case I used Oracle Container Cloud Service, which is a Docker based Orchestration cloud offering that allows me to easily provision a NodeJS Docker container and deploy my application. Then when/if needed, I can scale/up/down/out/in. For more information refer to this blog.
I hope you found this blog useful. If you have any question, please let me know.
Thanks, and see you next time.
