
This is a 3-part series blog that teaches with plenty of detail how to automate building, assembling, deploying and testing SOA workloads into SOA Cloud Service either using a Local Development Environment or Oracle Developer Cloud Service, which is part of Oracle Public Cloud. The reason I decided to write this as a series of consecutive blogs is to allow a cohesive series of steps to ensure a completely brand new development environment could be fully configured to automate building and deployment of SOA Application.
To see the landing page for the three series go to: https://solutionsanz.blog/2016/12/22/teaching-how-devops-automate-your-soa-workload-using-oracle-public-cloud/
For example, in a previous blogs, we learned how to test our SOA Projects using JDeveloper (https://solutionsanz.blog/2016/11/22/teaching-how-to-configure-jdveloper-to-deploy-into-soacs/), which is very handy during the design and development and Unit Testing phases. However this is not enough.
In real implementations, the SOA Application and Project is part of a wider spectrum of components that all together form a project solution. It is necessary to have an automated provisioning and deployment frameworks that can be in charge of the provisioning and health check of environments, as well as to ensure that all components and their dependencies are deployed, unit tested and integration tested. Furthermore, the deployment framework need to ensure that unit testing and integration testing occurs across all components, as soon as there is a change in the version repository. This is normally called Continuous Integration Testing. That way if someone (unintentionally) breaks other components of the wider solution by checking in code, this can be detected and resolved as soon as the code is checked into the version repository.
There are multiple frameworks that we can use to build, deploy and automated unit test our SOA Application and Projects, for example Ant, Gradle and Maven. The Oracle Developer Cloud Service supports all of them. Oracle is fully compliant with either of these build and automation frameworks, but specially Maven, which automatically for any SOA Application and Project built in JDeveloper, it automatically creates a pom.xml (Maven artefact) that can be used in order to follow the full SOA Application lifecycle (clean, package, deploy, test and undeploy). In blog https://solutionsanz.blog/2016/12/22/teaching-how-devops-can-locally-automate-your-soa-workloads-deploying-into-soa-cloud-service/ I teach you how to locally use these frameworks to automate the provisioning of SOA workloads into SOA Cloud Service.
Teaching How to Automate the Local lifecycle of the SOA Project with Maven using Oracle Developer Cloud Service and SOA Cloud Service
Now, it is time to teach you how to use Oracle Developer Cloud Service, which sits in Oracle Public Cloud to achieve a fully automated DevOps methodology to build, package, deploy and test SOA workloads, but first, let’s recap on how to use Maven locally to achieve these steps locally and then we will move to the Oracle Public Cloud.
If you have been following these series of blogs from the beginning, at this point you already have installed and configured Maven with the SOA sync plugin as well as fully synchronised the local Maven repository with the SOA artefacts. So the reality is that you have to do very little to use Maven to build, deploy and test your SOA Project (in particular to run the test case that you just produced).
- Once you have installed Maven, ensure that you can invoke it from command line.
mvn –version
-
If you can’t, but you have installed Maven, then perhaps all you need to do is to set some system variables. Alter the commands if using Windows vs Linux (i.e. change set by export if running on Windows and adjust the folder locations as well)
set JAVA_HOME=C:\Progra~1\Java\jdk1.7.0_55
set MW_HOME=C:\Oracle\Middleware\WL12c\wls12130
set MVN_HOME=D:\cri\Ops\Instalations\Apache\Maven\apache-maven-3.3.3
set PATH=%MVN_HOME%\bin;%PATH%
-
Make sure you can run Maven (mvn) commands now.
mvn –version
-
As mentioned in previous notes, Maven expects the version in the form “x-SNAPSHOT“, however JDeveloper sets the composite version without the word “-SNAPSHOT” – This will create a problem at the moment of building the composites, for this reason either update the composite or the pom.xml – I always prefer to change the pom.xml
- Open your SOA Project pom.xml (make sure it is the project and not the application one)
-
Change
1.0-SNAPSHOT
To
1.0
-
That’s it, do a quick clean and package to make sure you can compile and build your SOA Project
mvn clean package
Note: This is assuming that you have installed the SOA sync plugin and synchronised your local Maven repository ($HOME/.m2/repository)
-
If you already built and simply want to deploy to a local or remote SOA server (not SOACS yet – refer to the next section to understand how)
mvn com.oracle.soa.plugin:oracle-soa-plugin:deploy -DoracleServerUrl=http://IP:PORT/soa-infra/ -DoracleUsername=weblogic -DoraclePassword=welcome1
Update the IP, PORT, username
and password
accordingly.
-
If you want to run the full cycle (package, upload and including test), you can simply call “install” – For this, you also need to specify a jndi.properties file as an argument that will contain the information about the server where Maven has to deploy and test the SOA composites (i.e. similarly as how we provide this information in JDeveloper)
The structure of the jndi.properties file is simple:
| java.naming.factory.initial=weblogic.jndi.WLInitialContextFactory java.naming.provider.url=t3://IP:PORT/soa-infra/ java.naming.security.principal=weblogic java.naming.security.credentials=welcome1 dedicated.connection=true dedicated/rmicontext=true |
Update the IP, PORT, username
and password
accordingly.
-
Save this file at the root of your SOA Project and use it as follows:
-Djndi.properties.input=jndi.properties
-
Alternatively go to your pom.xml and uncomment the
element and set it to:
${project.basedir}/jndi.properties
Also notice the location for your test results:
=> It will something like: YOUR_SOA_PROJECT/target
-
When invoking the mvn command, simply call the jndi.properties at root:
The following command compiles the composite, packages the composite into a SAR file, deploys the SAR file to the server, and tests the composite:
mvn verify
-DoracleServerUrl=http://localhost:7101/soa-infra/ -DoracleUsername=weblogic -DoraclePassword=welcome1 -Djndi.properties.input=jndi.properties
- If you invoke install, the complete list of sub-tasks that are invoked with install include:
com.oracle.soa.plugin:oracle-soa-plugin:compile
com.oracle.soa.plugin:oracle-soa-plugin:sar
com.oracle.soa.plugin:oracle-soa-plugin:deploy
com.oracle.soa.plugin:oracle-soa-plugin:test
Note that there is another one that you can also invoke to undeploy SOA Projects:
com.oracle.soa.plugin:oracle-soa-plugin:undeploy
mvn clean install
-DoracleServerUrl=http://localhost:7101/soa-infra/ -DoracleUsername=weblogic -DoraclePassword=welcome1 -Djndi.properties.input=jndi.properties -Dmaven.test.failure.ignore=false -fae -Dresult=reports -Dformat=junit
Update the IP, PORT, username, password
and the location of your jndi.properties file
accordingly.

Notice how it ran the Test case assertions and they all were successful.
- If you want to get online help for any of the Oracle SOA Maven goals try:
mvn help:describe -Ddetail=true -Dplugin=com.oracle.soa.plugin:oracle-soa-plugin:12.1.3-0-0 -Dgoal=test
Where test is the goal you want to get information about.
After downloading missing dependencies, it will bring something like:

Automated Continuous Integration – DevCS
This section explains how to create a brand new project in Developer Cloud Service and configure it to make use of Git repositories, Maven Repositories, Hudson Build jobs. It is assumed that you already have a local environment fully configured with a SOA Application, local Maven repository synchronised with all SOA Artefacts, your test framework. If you still have not covered these requirements, refer to this section of the document.
The sub-sections that we are going to cover in this section are:
- Create a new DevCS Project to be used as part of your Maven deployment
- Synchronise your remote DevCS Maven repository
- Configure SOA project to use the remote Maven repository
- Configure your Developer Cloud Service version control engine (Git)
- Clone your Git repository from JDeveloper
- Git Push your configured SOA Project from JDeveloper into DevCS
- Configure Hudson to build and install your SOA Project in DevCS
Create a new DevCS Project to be used as part of your Maven deployment
At this point we have been able to use Maven to deploy into SOACS from within your local environment. In this section we are going to show the steps that are required in order to automate such building and deployment using the remote Maven as part of the Developer Cloud Service Continuous Integration approach.
- The first thing you need is to go into your DevCS and create a new project.

- Give it a name, then click on Next.

- Select an Empty Project and click Next
- Select your preferred Wiki Markup language – In this case “Confluence”. Then click Finish
- After a minute or two you will get a brand new Project
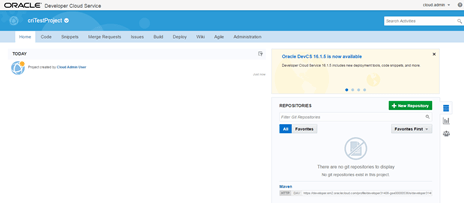
-
In the Home page, note the Maven repository HTTP link – You will need it to locally point to your Remote Maven repository.

Don’t worry about your GIT repository, we will create it in later sections.
Synchronise your remote DevCS Maven repository
- If you are within a Proxy network, you can configure the proxy in the .m2/settings.xml – For example:
|
80 www-proxy.au.oracle.comlocalhost|localhost.localdomain|127.0.0.1|::1
|
-
Install Plugin into remote Maven repository. For this create a serverID in .m2/settings.xml with remote Maven repo URL:
cloud.admin
[password]
MyDevCloud
-
Locally, cd to the location where you have your Maven sync plugin for SOA.
cd $MW_HOME/oracle_common/plugins/maven/com/oracle/maven/oracle-maven-sync/12.1.3
- Deploy the plugin to the remote Maven repository in DevCS
mvn deploy:deploy-file -DpomFile=oracle-maven-sync-12.1.3.pom -Dfile=oracle-maven-sync-12.1.3.jar -Durl=[Maven_Remote] -DrepositoryId=[server id]
Where [Maven_Remote] – is your Maven Remote HTTP environment URI taken from then DevCS (see section above)
Also Make sure the repositoryId matches with the “server id” that you created previously.
For example:
mvn deploy:deploy-file -DpomFile=oracle-maven-sync-12.1.3.pom -Dfile=oracle-maven-sync-12.1.3.jar -Durl=https://developer.em2.oraclecloud.com/profile/developer31408-gse00000536/s/developer31408-gse00000536_critestproject/maven/ -DrepositoryId=MyDevCloud
This process uploads the plugin required to synchronise the SOA artefacts to DevCS. Make sure you get a successful build.

Now that you installed the Maven plugin into your remote Maven repository, we can use it to use the “push” goal in order to synchronise the SOA artefacts locally into the remote repository.
You can put repository information into the .m2/settings.xml or into Project POM files. In this case we are using the Maven settings, so that we don’t have to change the pre-configured pom.xml files that are included as part of the SOA installation.
- Create a new profile in your .m2/settings.xml – For example I added the following one:
|
MyDevCloudProfileForCRITestProject
MyDevCloud MyDevCloud Repository for criTestProject
|
Make sure that:
- Repository “id” matches the “server id” that you set previously – This is because this is used as the credential to access the server
- Repository “url” points to the remote Maven repository that you used previously
- Push the local repository into the remote Maven repository via a push command:
mvn com.oracle.maven:oracle-maven-sync:push -Doracle-maven-sync.oracleHome=$MW_HOME -Doracle-maven-sync.serverId=MyDevCloud -P MyDevCloudProfileForCRITestProject
Make sure that:
- The sync.serverId matches with you original “server id“
- Set your -P flag matches with the “profile id” that you created previously.
Depending in your location and the location of the remote Maven repository, this task might take a while to finish uploading all the SOA artefacts into your remote repository server.
| Note: An alternative way to reduce the time that it takes to populate the remote Maven repository is to move your local development environment closer to the remote Maven repository. For example, you can follow the steps in this guide (install Maven and synchronise your local and remote Maven repositories) from within your actual OPC SOACS VMs. i.e. this time the local repository will be your OPC SOACS VM.
For this:
Given your SOACS VM is in the same DC as in your remote Maven Repository (DevCS), this will be almost as quick as a local synchronisation. |
Make sure to get a successful build:

Configure SOA project to use the remote Maven repository
At this point you have synchronised your local Maven repository with your remote Maven repository for SOA artefacts. When we build from DevCS, we want the project to reference the DevCS Maven repository, so we can explicitly specify it in the project pom.xml – Otherwise, as DevCS build servers are assigned as required, when invoking mvn commands it will not be able to find the SOA artefacts locally.
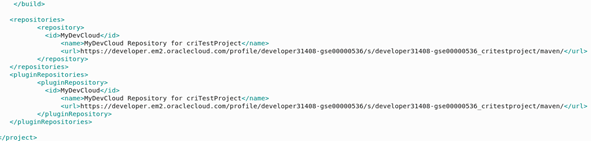
- Open the pom.xml of your SOA project and add the repository details at the end (after build and before the project closes). For example:
|
MyDevCloud MyDevCloud Repository for criTestProject
MyDevCloud MyDevCloud Repository for criTestProject
|
The id should match the server id that we configured previously in the local .m2/settings.xml – Remotely speaking, Hudson running within DevCS has a pre-established trust with the Maven repository. All that is necessary for Hudson is to point it to the Maven repository, i.e. the id does not matter if building from DevCS, but we keep it matching to the local server id, so that you can also deploy locally if needed.
Note: You have to set the Maven repository location “for each” of the SOA Project’s pom.xml – Another option if you want to avoid this is to set it in the remote settings.xml and pass it on as a parameter in Hudson “-s path/to/settings.xml”. See this blog for more information.
Configure your Developer Cloud Service version control engine (Git)
If you have been following this guide, at this point you have created a new project with a new Maven repository, but still we have not created a Git repository. Follow the steps in this guide to create one and configure it in JDeveloper to push your SOA Project into DevCS, so that it can use the new Maven Repository artefacts to build, package and deploy your SOA Project into your SOA CS environment.
- Go back to your Developer Cloud Service project
At this point there are no Git repositories, so you have to create one:
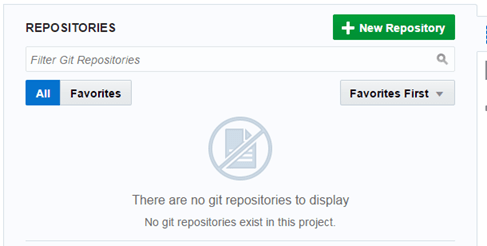
- Click on the green “+ New repository” button to create one – Give it a name and description. Choose the option to Initialize repository with a README file

Then click Create
- At this point you have a new Git repository with a new file in it (README.md)

- Go back to Home and copy the HTTP location of your repository – Notice that you also have the option to copy an SSH location, this is up to you, how you want to use it, for now we will use the HTTP one.

With this Git repo location, you can straightaway clone it to wherever you want and start adding, committing and pushing your source code into your remote Git repository. However in this guide we are going to show you a way in which you can use this repository from within your JDeveloper environment
-
Clone your Git repository from JDeveloper
The very first thing that you have to do is to initialise your local Git repository. You can do it manually using commands (git init) or via JDeveloper. A simple approach to ensure your local repository gets configured is to clone your brand new Git repository using JDeveloper. This will ensure that the repository will be fully configured. This could also be the case when the Git repository is not new anymore. For example, if other people want to get a copy of an existing SOA Application in your remote Git repository and perhaps work separately using via Dev branch.
- Go back to your JDeveloper SOA Project.
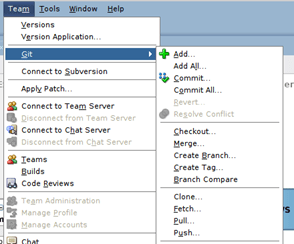
- On the toolbar go to Team > “Connect to Git”

- Click Next on the Welcome page

- Paste the HTTP Git repo location that you copied from DevCS into the Repository URL.
- Select the Password based authentication, instead of the Private Key File option. Type in your DevCS username and password (i.e. OPC username/password)

- Click Next. Then click Next again in step 3 – Remote branch

- For step 4 – Destination, Leave the Destination pointing to your JDeveloper mywork and for the Clone Name enter a name where you want to have the initial cloning (empty) from your Git repo.

- At the end click on Finish. Notice that it will identify files (README.md) Normally this is going to be your actual SOA Application, but given this is empty for now, simply select “Do Not Open Files” – and click OK

- Finally click on Finish

- Now, simply copy your existing JDeveloper SOA Application within this new folder (together with the README.md)

-
Now if you ls -l, you should have your JDev SOA Application together with your original README.md
Git Push your configured SOA Project from JDeveloper into DevCS
If you have been following this guide, at this point you have synchronised your remote Maven repository with all the SOA dependant artefacts to build, package and compile SOA Applications. Also you have created a SOA Application configured with a pom.xml that contains a repository pointing to your remote Maven repository. Notice that the absence of such repository in your pom.xml would result in your remote Maven in DevCS to not being able to find the SOA artefacts locally (locally to DevCS).
Now we are going to use JDeveloper to push the SOA Application that we just copied within the cloned Git repository into the remote DevCS Git repository.
- Go back to JDeveloper and open your SOA project within the cloned Git repository location.


- Notice that all the SOA Project folders now have yellow circles. At this point your SOA Project is properly Git initialised

- While keeping the SOA Project selected, click on the toolbar Team > Git > Add All, to make sure all files are added to local Git repository


- While keeping the SOA Project selected, click on the toolbar Team > Git > Commit All, to make sure all files are committed to local Git repository


Notice how the Message Log window in JDeveloper is running the same commands that you could run manually if you wanted…

-
Finally, similarly as you did before, click on the toolbar Team > Git > Push, to make sure all files are pushed this time to the remote Git repository (DevCS)
- Accept the Welcome page and say Next.

-
For step 2, must of the configuration should already be set:
- The HTTP Git repo location should be already populated.
- The username should already be populated
- Simply type in your DevCS password (i.e. OPC password)

- Click Next. Then click Next again in step 3 – Local Branch

- Click on Finish.
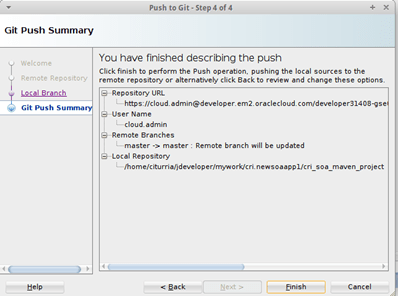
- Go back to your DevCS Project and in Home you should see the new Commit coming through

- Click on the id or go to Code to see the files that were committed.

Optional – Further updates or new file additions synchronisations
- If you change or add any file, you can right click on the SOA Project or via Team > Git again and select:
- Add All or just Add if you select a specific file to be added.

- Commit all

- Push. Notice that subsequent push attempts don’t need to configure the Maven repository, but only to set the password.
Configure Hudson to build and install your SOA Project in DevCS
At this point of the guide you have synchronised your remote Maven repository with the required SOA artefacts to build, package and deploy SOA Applications. Also you have created a simple SOA Application with a SOA Project and configured its pom.xml to point to the remote Maven location (locally on this datacentre though).
The next step is to configure a Hudson build to use Maven to build, package and deploy the SOA Project.
If you followed the steps on this guide, you might recall that when you configured your local Maven environment to deploy into SOACS, you had to satisfy to things: grant access through the firewall (we use the default SSL port 443 for this) and secondly since we are using SSL, we need to also retrieve and use the SOACS Load Balancer’s SSL certificate. For this, we used a Java utility to download such certificate and create a jssecerts keystore, which we passed as a parameter with Maven. Refer to this section for more information.
-
We will need this certificate again in Hudson, for this:
Note: In this section I will use git commands, if you don’t have git installed you can simply: sudo apt-get install git (or yum it if using OEL/RH) – Alternatively you can copy this file into your JDev SOA Project and do it from there as we showed earlier, just be mindful of its location by the time you refer to it in Hudson.
- Copy it into your Git cloned repository

- Git Add it

- Git commit it

- Git push it into DevCS.

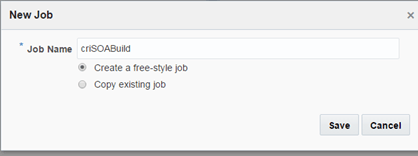
- Go to DevCS, and click on the Build tab of your project.
- Click on “+ New Job”

- Enter the build name
- As part of your Build configuration, select the Main sub-tab if not already selected and choose JDK 8 – Also enter a meaningful description.

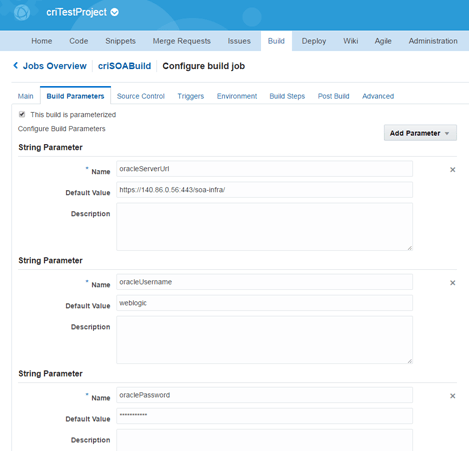
- For simplicity purposes, parameterise some of the Maven build variables, such as oracleServerUrl, oracleUsername and oraclePassword – For this, click on Build Parameters and add 3 String parameters and configure them as shown below:
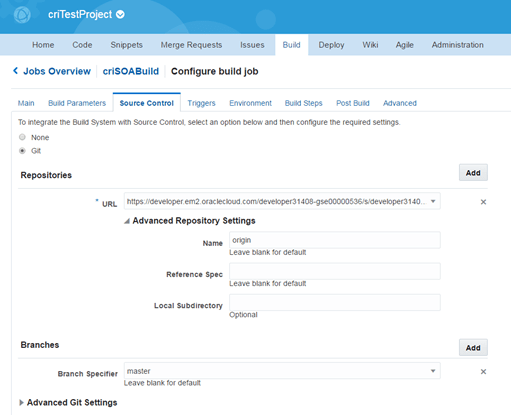
- Click on the “Source Control” sub-tab. Drop down the URL and select the Git repository that contains your SOA Project. Expand the “Advanced Repository Settings” and enter “origin“. Then click “Add” on Branches and click the drop down menu to select the branch where your SOA Project was checked in, in this case it is on the “master” branch. The final configuration will look like this:
- Click on the “Environment” sub-tab and tick the “Abort the build if it’s stuck” option and increase the Timeout to something a bit larger. Although the first build takes a bit longer, subsequent attempts should not take longer than just a few minutes.

-
Click on the “Build Steps” sub-tab and click on the “Add Build Step” button and select “Execute Shell”, as we are going to add a few scripts at the beginning:
- This next step should not be required either if you already synchronised your remote repository, but given we have a local Middleware Home in DevCS, we can also populate our local Maven repository and with that gain performance throughput. Once again, this step should not be necessary but I leave it here as it is another very simple option to get your Hudson job fully synchronised to build, package and deploy SOA Projects. For this, we are going to follow the same steps that we followed when we populated our local Maven repository back at the beginning of this section. For this, we are going to install the SOA plugin and do a local synchronisation and archetype crawl using the default SOA Middleware Home, which is located at “MIDDLEWARE_HOME_SOA=/opt/Oracle/MiddlewareSOA_12.1.3” – See reference guide for more info.

Here is the script if you want to copy & paste it:
| mvn install:install-file -DpomFile=$MIDDLEWARE_HOME_12C3/oracle_common/plugins/maven/com/oracle/maven/oracle-maven-sync/12.1.3/oracle-maven-sync-12.1.3.pom -Dfile=$MIDDLEWARE_HOME_12C3/oracle_common/plugins/maven/com/oracle/maven/oracle-maven-sync/12.1.3/oracle-maven-sync-12.1.3.jar mvn com.oracle.maven:oracle-maven-sync:push -Doracle-maven-sync.oracleHome=$MIDDLEWARE_HOME_12C3 mvn archetype:crawl -Dcatalog=$HOME/.m2/archetype-catalog.xml |
- Finally, click on the “Add Build Step” button, select “Invoke Maven 3”

-
Set the following properties:
Note: Update the location of where you uploaded the JSSECACERT certificate. In my case I added into the SOA Project, so that’s where I am referring to. Your local directory is the SOA Application folder directory, together with the README.md, so you have to adjust appropriately. Also you have to adjust the location of your pom.xml – Check the “Code” tab to see the levels of directories that you have to through.
| http.proxyPort=$HTTP_PROXY_PORT http.proxyHost=$HTTP_PROXY_HOST https.proxyPort=$HTTP_PROXY_PORT https.proxyHost=$HTTP_PROXY_HOST javax.net.ssl.trustStore=./cri.newsoaapp1/cri_soa_maven_project/jssecacerts javax.net.ssl.trustStorePassword=changeit jndi.properties.input=jndi.properties format=junit |
Note: The format=junit will change the test result output to make it junit compliant, so that you can scan them with another Maven plugin and take further actions. If you have questions about the jndi.properties file go back to this section.
Also notice that some plugins (remote-resources comes to mind) use a really old library that only accepts proxy configuration through MAVEN_OPTS;
i.e.
-Dhttp.proxyHost= -Dhttp.proxyPort= -Dhttps.proxyHost= -Dhttps.proxyPort=
This is why even if you have the proxy in your $HOME/.m2/settings.xml, it is still required to use such proxies in the Maven Properties section (MAVEN_OPTS).

Also increase the Verbosity to DEBUG – If needed
- Click Save and then force a Build by clicking on “Build Now”

It will prompt you to confirm the build parameters, simply say “Build”.
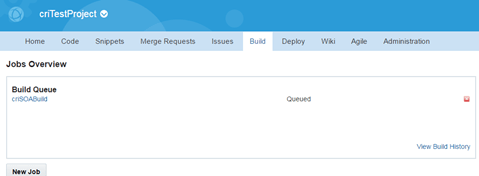
- You can see the status of the build by clicking back on the Build tab –The Build will go into the Queue
- Furthermore you can click on the “Console” option to see in real time the status of your build.

- Ensure into you get a successful build.
If you have any questions, please feel free to contact any of the authors of SolutionsANZ.blog
Thanks for your time.

Thanks Carlos. Used this blog to base what I did for a Developer Cloud Service sample. I’ve extended it to include the test results into the build output. So you can see the success, failures of your tests as part of the build. I’ll blog that soon.
LikeLike