
We just covered in previous blogs how to provision environments with components such as: Database Cloud Service, Java Cloud Service, SOA Cloud Service (SOA, OSB, SOA & OSB, API Manager), etc. via the various Cloud Services Console web pages.
In this section I am going to demonstrate how to provision the same type of environments, this time a Java CS environment using REST APIs. REST APIs are very well documented for the vast portfolio of Oracle Cloud Services. For more information refer to http://docs.oracle.com/cloud
Notice that being able to script, version and test the creation of environments via REST APIs, can facilitate the life cycle of not only software, but also environments, which is a crucial aspect in devops.
For more information specifically about the provisioning of Java CS environment via a REST API, refer to: http://docs.oracle.com/cloud/latest/jcs_gs/JSRMR/index.html
What you need to know:
- The Provisioning of Java CS environment is via a POST on /jcs/api/v1.1/instances/{identityDomain} – Where identityDomain is the name of the identity domain where you are willing to provision your environment.
- The REST API will be accompanied with a JSON payload, which will be referenced from within the API at the moment of invoking the API.
-
Using CURL, this is the structure of the REST API to create a JCS instance:
| curl –include –request POST \ –cacert ~/[cacert.pem] \ –user [DBAAS_ADMIN_GOES_HERE]:[PASSWORD_GOES_HERE] \ –header “X-ID-TENANT-NAME:[IDENTITY_DOMAIN_GOES_HERE]” \ –header “Content-Type:application/vnd.com.oracle.oracloud.provisioning.Service+json” \ –data @[REQUEST_BODY.json] \ https://[REGION_PREFIX].oraclecloud.com/paas/service/jcs/api/v1.1/instances/[IDENTITY_DOMAIN] |
Where
[OPC_USERNAME] = Your OPC account username
[OPC_PASSWORD] = Your OPC account password
[IDENTITY_DOMAIN] = Your OPC identity domain where you want to provision the JCS environment.
[REQUEST_BODY.json] = This is the JSON file that contains the configurations for your new JCS Instance.
[REGION_PREFIX] = jaas for United States region, jcs.emea for EMEA region.
For example, in my case, this was the ending result (update the fields in blue
accordingly):
| curl –include –request POST \ –cacert /home/citurria/cri/jcs/cacert.pem \ –user cloud.admin:Welcome1# \ –header “X-ID-TENANT-NAME:gse00000536” \ –header “Content-Type:application/json” \ –data @devJCSInstanceBody.json \ https://jcs.emea.oraclecloud.com/paas/service/jcs/api/v1.1/instances/gse00000536 |
- Notice that there is a mention for a “devJCSInstanceBody.json” file. This is the Payload that you need to invoke as part of the REST API call payload which configures the environment depending on your needs. Make sure to modify the values depending on your needs.
Mind in blue
the attributes that you will have to update based on your environment configuration…
| {
“serviceName” : “devWebLogicEnv“, “level” : “PAAS“, “subscriptionType” : “HOURLY”, “enableAdminConsole” : true, “description” : “Example, Inc product distribution center”, “provisionOTD” : true, “cloudStorageContainer” : “Storage-gse00000536/jcsbackups“, “cloudStorageUser” : “cloud.admin“, “cloudStoragePassword” : “Welcome1#“, “createStorageContainerIfMissing” : true, “sampleAppDeploymentRequested” : true, “parameters” : [ { “type” : “weblogic”, “version” : “12.1.3”, “edition” : “EE“, “domainMode” : “PRODUCTION”, “managedServerCount” : “2“, “msInitialHeapMB” : “513”, “msMaxHeapMB” : “2039”, “msPermMB” : “257”, “msMaxPermMB” : “769”, “msJvmArgs” : “-Djust.a.sample=1 -Djust.another.sample=2”, “overwriteMsJvmArgs” : false, “adminPort” : “7001”, “deploymentChannelPort” : “9001”, “securedAdminPort” : “7002”, “contentPort” : “8001”, “securedContentPort” : “8002”, “domainName” : “devWLDomain“, “clusterName” : “devWLCluster“, “adminUserName” : “weblogic”, “adminPassword” : “Welcome1#“, “nodeManagerPort” : “5556”, “nodeManagerUserName” : “nodeMangerAdmin”, “nodeManagerPassword” : “Welcome1#“, “dbServiceName” : “my-db12c-xp-si“, “dbaName” : “SYS”, “dbaPassword” : “Welcome1#“, “appDBs”: [ { “dbServiceName” : “my-db12c-xp-si“, “dbaName” : “SYS”, “dbaPassword” : “Welcome1#“ } ], “shape” : “oc3“, “domainVolumeSize” : “10G”, “backupVolumeSize” : “20G”, “VMsPublicKey” : “ssh-rsa AAAAB3N… “ }, { “type” : “otd”, “adminUserName” : “otdAdmin”, “adminPassword” : “Welcome1#“, “listenerPortsEnabled” : true, “listenerPort” : “8080”, “listenerType” : “http”, “loadBalancingPolicy” : “least_connection_count”, “securedListenerPort” : “8081”, “adminPort” : “8989”, “shape” : “oc3“, “VMsPublicKey” : “ssh-rsa AAAAB3Nz…” } ] } |
Things that you need to be aware from this JSON file:
- Make sure it is located on the same directory from which you are running the curl command. Otherwise modify the path in the curl command.
- If you don’t specify the VMPublicKey for the OTD, by default it will take the same one as for the WebLogic cluster.
-
Level:
- PAAS– Production-level service. This is the default. Supports Oracle Java Cloud Service instance creation and monitoring, backup and restoration, patching, and scaling. To enable domain partitions using WebLogic Server 12.2.1, you must specify the PAAS service level.
- BASIC– Development-level service. Supports Oracle Java Cloud Service instance creation and monitoring but does not support backup and restoration, patching, or scaling.
-
cloudStorageContainer: Set your own JCS Storage container in the form of: Storage-[IDENTITY_DOMAIN]/[JCS_STORAGE_NAME]
In my case I followed the next Oracle Cloud Storage configuration in CloudBerry:

If you still have not created one or require more information, please refer to this other blog:
-
edition: WebLogic software edition
- SE – Standard edition. See Oracle WebLogic Server Standard Edition. To enable domain partitions using WebLogic Server 12.2.1, do not use the Standard edition.
- EE – Enterprise Edition. This is the default for both PAAS and BASIC service levels. See Oracle WebLogic Server Enterprise Edition.
- SUITE – Suite edition. See Oracle WebLogic Suite.
-
dbServiceName: Make sure to point to your already create DB Cloud Service. If you still have not created a DB, refer to this other blog:
-
shape: Desired compute shape. A shape defines the number of Oracle Compute Units (OCPUs) and amount of memory (RAM). Valid shapes include:
- oc3: 1 OCPU, 7.5 GB memory
- oc4: 2 OCPUs, 15 GB memory
- oc5: 4 OCPUs, 30 GB memory
- oc6: 8 OCPUs, 15 GB memory
- oc1m: 1 OCPU, 15 GB memory
- oc2m: 2 OCPUs, 30 GB memory
- oc3m: 4 OCPUs, 60 GB memory
- oc4m: 8 OCPUs, 120 GB memory
- There are more parameters available to tune things further at the WebLogic level. Refer to the JCS API reference here.
Load Balancer
At the moment of provisioning a multi-node environment via the web console, only the load balancer “policy” and load balancer “compute shape” can be configured. However at the REST API level the following configurations are available for a Load Balancer:
- Admin User Name – If not specified it defaults to the WebLogic Server admin username
- Admin Password – If not specified it defaults to the WebLogic Server admin password
- Listener Ports Enabled – If not specified it defaults to true
- Listener Port – If not specified it defaults to 8080
- Listener Type – If not specified it defaults to http
-
Load Balancing Policy
- Least Connection count
- Least Response time
- Round Robin
- Secured Listener Port – If not specified it defaults to 8081
- Admin Port – If not specified it defaults to 8989
-
Compute shape
- oc3: 1 OCPU, 7.5 GB memory
- oc4: 2 OCPUs, 15 GB memory
- oc5: 4 OCPUs, 30 GB memory
- oc6: 8 OCPUs, 15 GB memory
- VM Public Key – If not specified it defaults to the one used for WebLogic Managed Servers
Notice that not all fields were used in this example. In order to see the full and up-to-date list, refer to the JCS/SOACS REST API documentation.
At the moment of provisioning any JCS/SOACS environment with a Load Balancer, Oracle Cloud Compute will fully configure all the network rules required to allow the Load Balancer to be publicly available on the “listener port” indicated during provisioning (8080 by default), as well as all the network rules required to allow access to the Load Balancer to all the Managed Servers in the WebLogic Cluster, so that it can starting balancing the load.
Invoking the REST API to create your new JCS Instance
When running the curl command. If you get an error, you can add a –v
flag to make it verbose.
| In my case, on my first attempt I got the following message: Compute site associated with selected Database Service [my-db12c-xp-si] does not have enough available capacity for this service. Please select another Database Service location with sufficient capacity and retry provisioning. This means that the storage for backups associated with my database is not enough to hold my JCS instance configuration backups. You might not have this situation, but just in case you created a DBCS with low storage (like in my case). Simply add more storage to your DB Backup storage container, see here for more information. For this:
|


-
Validate that you get a successful “202 Accepted” response
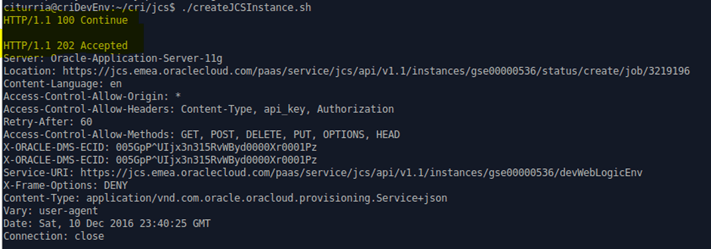
- Now go to the JCS CS Console and validate that the Java Cloud Service Environment is being provisioned.
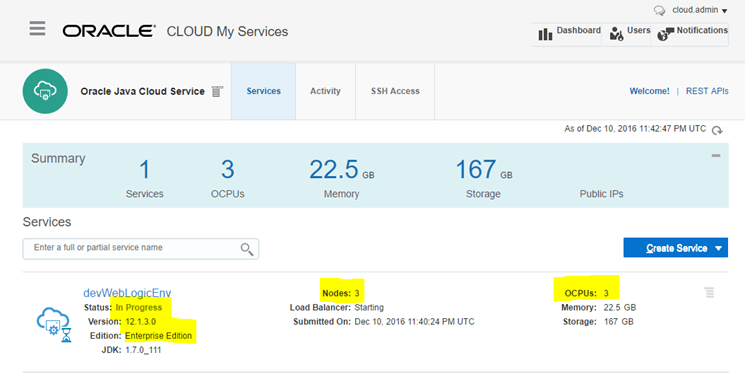
You might notice that the managedServerCount in our JSON configuration payload was set to 2, but the instance being created has 3 Nodes, i.e. 3 OCPUs. Why is that?
Well, as you can imagine, behind the scenes by default, any JCS or SOACS environment will be a WebLogic cluster, even if there is only one node, in which case it is optional to use a Load Balancer (OTD). However at the moment the cluster contains multiple nodes, automatically the option to use Load Balancer will become mandatory. We provided this configuration under the section “otd” at the last of the JSON payload.
After a couple of minutes, your JCS environment will be fully provisioned and ready to go tunned for PRODUCTION!!!! How awesome is that!!!
If you have any question or comment, please feel free to contact any of the authors in Solutionsanz.blog
Thanks for your time.
