
Enterprise Scheduler Service (ESS) is a scheduler that is part of SOA Suite 12c. ESS has an EM component to manage job requests, define metadata and schedule jobs, and APIs to define metadata and schedule jobs. ESS can also be used to send notification alerts. In this section we are going to use it to demonstrate how simple it is to trigger a job, which can be invoking a composite using a scheduler.
I am using the pre-built virtual image that Oracle provides as a public VM in OTN (http://www.oracle.com/technetwork/middleware/soasuite/learnmore/soa-vm-2870913.html). If you don’t have an existing environment, you can download this VM and use it as part of the following exercises.
Trigger a Composite Using a Scheduler
In this example we are going to build a new very simple composite that doesn’t do anything apart from echoing the message that receives. Then we are going to create a job in ESS pointing to this composite and sending a simple input string. Finally, we are going to create a scheduling configuration to run the job every 2 minutes. As a result we should see a new composite being created in the console every 2 minutes.
- Create a new SOA Project as we have done in the previous sections.
- Either use a predefined template with a composite with one BPEL or create an empty composite and drag and drop a BPEL service. Make the BPEL synchronous and leave the default input/output variable types of the BPEL.

- Open the BPEL and simply assign the input to the output using an Assign activity.

- At the end your BPEL and composite should look like this:


- Save All and deploy your composite.
- Test you composite by sending any input message and make sure that it replies back with the same message.

Let’s create a Job definition
Oracle Scheduler (ESS) is not part of your development activities. It is more considered a runtime configuration. This basically means that at runtime you can decide to create new jobs and apply scheduling configuration without having to re-deploy your services. This is convenient as you don’t have to re-open development and testing cycles just because you want to schedule jobs.
- Log in into EM Fusion Middleware Control if you are not already there.
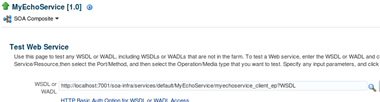
- Click on the Echo service that we did in the past exercise and grab its WSDL location. We are going to need it later on, when configuring our job. You can grab the WSDL form the same page that you used to test it in the previous section.
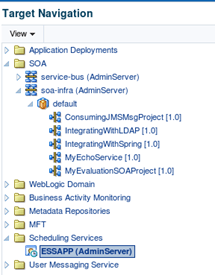
- In the left pane, click on your ESS for your Admin server
-
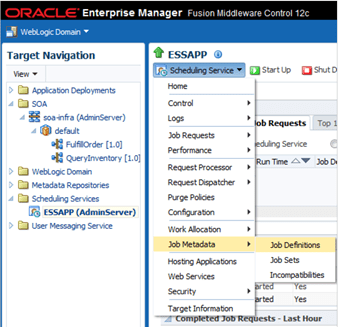
In the right panel, click on the Scheduling Service and click on Job metadata -> Job definitions
- Select create

-
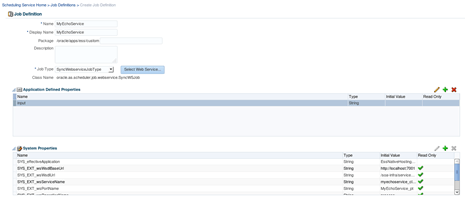
In the create job definition screen, set the following fields, leaving the others with their default values:
- Name: MyEchoService
- Display Name: MyEchoService
- Package: soa
- Job Type: syncWebserviceJobType
- Name: MyEchoService

-
Click the Plus sign on the application defined properties and add an application defined property
- Type : String
- Name : input (note, this is the name of the parameter that we want to send)
- Initial Value: Leave it empty
- Then click OK
- Type : String
-
Now click on the Select Web Service button.
- Paste the WSDL URL and click Go
- Select Web Service Type as SOA
- Select the available Service
- Port Type : MyEchoService_pt
- Operation : process
- Modify the sample xml by setting the value of the input xml element and add any string you want.
- Paste the WSDL URL and click Go

- Click the OK button. All the WSDL and payload related information is added as a set of properties to the job definition automatically

- The Job configuration should look this:
-
Important: Now click the OK button to create the job definition. Otherwise you will lose all configurations made.
-
At the end the result should be a made Job definition like this

Schedule the Job
So far we have created a job that points to our Echo service. Now we need to submit the job with a scheduling configuration.
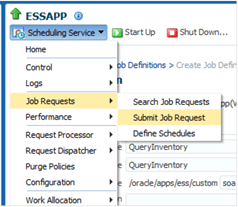
- Once again, click on the Scheduling Service -> Job requests -> Submit Job Request
- Click the magnifying glass on job definition, click on go to do a search, and select MyEchoService job definition and click OK

-
Enter a value for input, define a schedule as shown (startTime must be a future time) and click OK to submit the job. Make sure to specify end time.
- input – Hello World
- Schedule – Tick on: Specify Schedule
- Frequency – Hourly/Minute
- Every – 0 Hours 2 Minutes
- Start Date – Enter todays date with a future time
- End Date – Future Date/Time, for example tomorrow
- input – Hello World

- Click on Ok to create and submit the job

Look at job output
Now, let’s analyse our Scheduled job.
- In the Schedule Services dropdown, select job requests/search job requests.

-
Then hit the search button. This will list all the job requests. Look for a completed request for MyEchoService.

-
Click on the request ID hyperlink for the Succeeded instance. This brings up the request detail page.

-
Notice at the end of the page that you can see the output of the service

- Open it up and see what the output was. It should be the echo to whatever you set as input

- Wait a few minutes and come back to search for your job again, you should see a few more that have succeeded, as well as the parent one and the one that is still pending to run.

- Now go to MyEchoService composite and search for all Flow instances in the past few hours, you should see one completed composite instance for each of the completed jobs.

Cancel the job request
Finally, before you realise that you inundated your stack with thousands of new instances, let’s cancel the job.
- In the Schedule Services dropdown, select job requests/search job requests. Then hit the search button.
-
This will list all the job requests. Locate the parent job request for MyEchoService (will have N/A for scheduled time and a WAIT state).

- Click on the request ID hyperlink. This brings up the request detail page. In the dropdown, select cancel and confirm cancel to cancel the recurring job.
- Go back to the running jobs and make sure that there is no new one still to be provisioned. Even the pending job gets cancelled.

Congratulations, you built your first Scheduled job. It is a very simple, but yet a very powerful way to automate jobs in SOA.
