
This section shows you how to use Oracle IaaS in order to create a new OEL environment. For this, it is assumed that you already have access to Oracle IaaS, if not, either go to cloud.oracle.com and request a trial account or contact your local Oracle representative directly.
Oracle VirtualBox allows running a machine image on a virtualisation layer. Given Oracle IaaS is itself a virtualisation layer (Xen based) you cannot simply install VirtualBox on an Oracle IaaS VM and upload your VirtualBox VMs. That won’t work, as you cannot run VirtualBox on top of a Xen based virtualisation.
There are multiple ways to do it though. In this tutorial I am going to show you how you can extract your VM Disk out of your VB appliance, convert it into a raw disk, upload to your IaaS account and simply use it as yet another image when provisioning an environment.
Before we extract the VM disk out of your VirtualBox OVA appliance, let’s configure your VM.
Note: It is assumed that you already have a Linux OVA that you wish to convert into an Oracle IaaS image. If you still have not created your OVA appliance in the first place, feel free to create one yourself or refer to this tutorial that teaches you how to build one: http://www.oracle.com/webfolder/technetwork/tutorials/obe/cloud/compute-iaas/creating_a_custom_ol_machine_image/creating_a_custom_ol_machine_image.html
Installing opc-init
The opc-init package contains scripts provided by Oracle that allow you to perform specified instance initialization tasks automatically every time an instance is created. For example, you can create users, install additional packages, add SSH keys, run prebootstrap scripts, and so on. You specify the required instance initialization tasks in the form of user data when you create an instance. The opc-init scripts query the metadata service on the instance for this user data. The specified user data is then used by the opc-init scripts to perform the required prebootstrap tasks.
Start the VirtualBox VM that you want to export into Oracle IaaS and follow the next instructions on it:
Note: In VirtualBox, make sure you configure your VM to use NAT:

- Determine the version of Python on the VM:
python --version

-
To download the opc-init package, start a web browser and go to: http://www.oracle.com/technetwork/topics/cloud/downloads/opc-init-3096035.html.
-
Accept the terms and conditions and click All Supported Platforms to download the package. Make a note of the download location.
-
Go to the download location and extract the opc-init files. The opc-init package contains the following files:
-
opc-init-py2.6-RELEASE.noarch.rpm — for Linux with Python 2.6
-
opc-init-py2.7-RELEASE.noarch.rpm — for Linux with Python 2.7
-
README
-
-
Use yum to install the appropriate version of the opc-init utility:
yum install ./opc-init-py2.6-RELEASE.noarch.rpm
like in my case or 2.7 in case you have this version:
yum install ./opc-init-py2.7-RELEASE.noarch.rpm
opc-init helps for instance initialization tasks that you want to perform on all instances that use this machine image, add the required scripts and user data attributes in the machine image. For instance initialization tasks that must be performed only on a specific instance, not on all instances created using this machine image, provide the user data attributes while creating the instance, not in the machine image.
For information about user data attributes used by opc-init, see Automating Instance Initialization Using opc-init in Using Oracle Compute Cloud Service.
-
To set up opc-init to run automatically every time the instance boots, open the file /etc/rc.local.
vi /etc/rc.local
Add the line /usr/bin/opc-linux-init at the end of the file and save and close the file.
Adding a user, configuring key-based SSH Access and enabling sudo Privileges
In Oracle Cloud, opc is normally the user that exists out of the box. I recommend that you create this user, so that other people can easily ssh using it.
-
Create the required users.
For example, the following command creates the user, opc.
useradd opc
Note: If you’ve installed opc-init, you must create the opc user. If you’ve installed opc-init, you must also specify a password for the opc user, by using the–password option of the useradd command or by typing passwd opc.
While creating an instance, you can specify one or more SSH public keys. The keys that you specify are stored as metadata on the instance. This metadata can be accessed from within the instance at http://192.0.0.192/latest/meta-data/public-keys/{index}/openssh-key, where {index} is a number starting from 0.
For these keys to be added to the authorized_keys file of users, you can write a script that runs automatically when the instance boots, retrieves the keys from http://192.0.0.192/latest/meta-data/public-keys/{index}/openssh-key within the instance, and adds the keys to the authorized_keys file of the appropriate users.
If you’ve installed opc-init, the opc-init scripts do this for you for the opc user.
-
To enable sudo privileges for a user, edit the /etc/sudoers file by using the visudo command:
visudo -f /etc/sudoers
In /etc/sudoers, look for the following lines:
## Same thing without a password
# %wheel ALL=(ALL) NOPASSWD: ALL
Add the following line right after the preceding lines:
%opc ALL=(ALL) NOPASSWD: ALL
Here, opc is the autocreated group to which the new opc user belongs.
Cleaning Up the Network Settings of the VM
Log in to the VM as the root user and complete the following tasks:
-
Disable SELinux:
-
Open /etc/selinux/config in a text editor:
vi /etc/selinux/config -
Look for the following line:
SELINUX=enforcing -
Change this line to the following:
SELINUX=disabledNote: Running SELinux in the permissive mode can clutter logs and consoles.
-
Save and close the file.
-
-
Stop the iptables service:
Note: You can use security lists and security rules in Oracle Compute Cloud Service to implement firewall rules for the instance.
-
Enter the following command:
service iptables stopWait till you see the following output:
-
Enter the following command:
chkconfig iptables off
-
-
Ensure that there are no hard-coded MAC addresses:
-
Replace /etc/udev/rules.d/70-persistent-net.rules with an empty file, by entering the following command:
>| /etc/udev/rules.d/70-persistent-net.rules -
Replace /lib/udev/rules.d/75-persistent-net-generator.rules with an empty file, by entering the following command:
>| /lib/udev/rules.d/75-persistent-net-generator.rules
-
-
Open /etc/sysconfig/network-scripts/ifcfg-eth0 in a text editor, and remove all the lines in it except the following:
DEVICE=eth0BOOTPROTO=dhcpONBOOT=yesAfter this change, verify that the content in /etc/sysconfig/network-scripts/ifcfg-eth0 is exactly as shown above.
-
Open /etc/sysconfig/network in a text editor, and edit it to contain only the following lines:
NETWORKING=yesHOSTNAME=localhost.localdomainIPV6_AUTOCONF=noNOZEROCONF=yesAfter this change, verify that the content in /etc/sysconfig/network is exactly as shown above.

Converting your VirtualBox VM into a Machine Image (raw image)
-
Power off the VM.
shutdown -P now-
Go to your Oracle VM VirtualBox installation directory (i.e. where VirtualBox is installed e.g. C:\Program Files\Oracle\VirtualBox), and enter the following command if using VDI or go to step 3 if using VMDK:
VBoxManage internalcommands converttoraw /path/to/myVM.vdi /path/to/myImage.img-
/path/to/myImage.img is the full path and name of the resulting .img file.
-
/path/to/myVM.vdi is the full path and name of the virtual disk file of your VM.
If you don’t know the path and name of the .vdi file, select the VM in the Oracle VM VirtualBox Manager window and click Settings. In the resulting dialog box, select Storage from the navigation pane on the left, and select your .vdi file in the Storage Tree pane. Note the value of the Location field, as shown in the following example:

The process of converting the VDI image to the raw format may take several minutes, particularly for large images. After the conversion, a .img file is created. The size of this file matches the disk size that you specified while creating the VM.
While creating the VM in Oracle VM VirtualBox, if you opted for a VMDK hard drive type, then to convert the VMDK disk to the raw format, enter the following command:
VBoxManage clonehd /path/to/myVM.vmdk /path/to/myImage.img --format raw -
Note: An OVA is nothing else than a TAR archive containing .OVF and either .VMDK or .VDI files, so if you want to convert the disk of one OVA that is not yet imported into VirtualBox you can simply untar it, e.g. tar -xvf myOVA.ova
Note: Alternatively, you can use the qemu-img utility to convert the VMDK disk to the raw format.
qemu-img convert -f vmdk -O raw /path/to/myVM.vmdk /path/to/myImage.img
In my case, I tested this in Windows 10 as follows:
C:\Program Files\qemu>qemu-img convert -f vmdk -O raw "C:\Users\ccitu\VirtualBox VMs\ICS16.3.5_OP\ICS16.3.5_OP-disk1.vmdk" D:\ICS16.3.5_OP-disk1.img
To install qemu-img:
This utility is available by default in most Linux distributions. For Windows, you should download and install it.
On Windows:
Download the QEMU installer from http://qemu.weilnetz.de/
Double-click the downloaded exe file and follow the instructions in the installation wizard.
On Linux:
Check whether the qemu-img package is installed:
rpm -qa | grep qemu-img
If qemu-img is installed, you'll see the following output:
qemu-img-0.12.1.2-2.295.el6.x86_64
If qemu-img is not installed, no output is displayed.
To install qemu-img, enter the following command:
sudo yum install -y qemu-img
In Debian OS (e.g. Ubuntu) use:
sudo apt-get install qemu-utils
-
Convert the image file to the sparse format so that it uses less disk space and can be uploaded faster to Oracle Storage Cloud Service.
cp --sparse=always /path/to/myImage.img /path/to/myImage_sparse.imgIn my case, I tested this using an XUbuntu VM on a Windows 10 host configured with shared folders:
cp --sparse=always /media/sf_D_DRIVE/ICS16.3.5_OP-disk1.img /media/sf_C_DRIVE/temp/ICS16.3.5_OP-disk1_sparse.img -
tar and gzip the .img file.
Remember to specify the -S option to ensure that the tar utility stores the sparse file appropriately.
tar -czSf /path/to/myImage.tar.gz /path/to/myImage_sparse.imgNote: Choose a tar.gz file name that you can use later to easily identify the essential characteristics of the image, such as the OS name, OS version, and the disk size. For example, you could use the name OL66_12GB_RE.tar.gz for a root-enabled (RE), Oracle Linux (OL) version 6 update 6 (6u6) image with a 12-GB disk.
To use the machine image that you just created to provision instances in Oracle Compute Cloud Service, you must first upload the tar.gz image file to Oracle Storage Cloud Service. See Uploading a Machine Image File to Oracle Storage Cloud Service.
Create an Oracle IaaS Environment
In this example, we are going to use one of the existing OEL 6.4 images that Oracle offers. Alternatively you can upload and use your own image.
- Go to Oracle Compute Cloud Service and click on “”

-
Select an image from the list. In this case we are using OL-6.420GB… Then click on the > button

- Select the shape that you need. In my case I am going to choose a oc5 shape that comes with 4 OCPUs and 30GB of RAM. Then click Next (>)

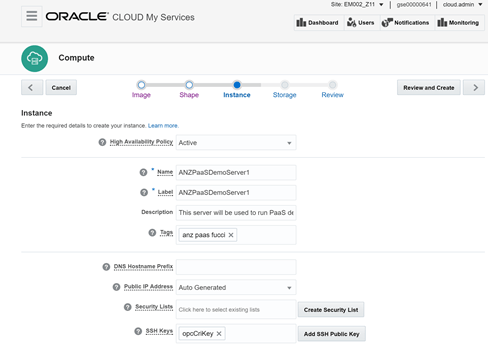
- In the “Instance” step, enter a meaningful Name, Label, Description, Tag. Also add a valid Public SSH Key. Once you are done, click on the Next (>) button.
- At the Storage step you need to create a new disk that will host your VBox VM(s). For this click on “Add New Volume”

- Enter a meaningful name, size and description. Then click on Add

- Your Storage configuration should look like this:

Click on the Next (>) button.
- Review all your configuration and if you are comfortable, click on “Create”

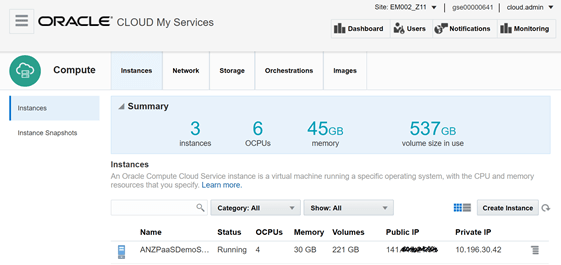
- Depending on the shape of your environment it will take a few minutes to come up and running. Once it is available, you will be able to see it as a new Instance in the main dashboard.
- Let’s SSH into it to ensure that it is up and running. For this you need to grab the Public IP Address

It is a good practice to use a passphrase as a second factor authentication. You never know!
-
Make sure you use your Private Key (ppk) if using Putty like in this case or the actual private ssh key if using some sort of Unix. If you have questions about this, please contact the owners of this document.
-
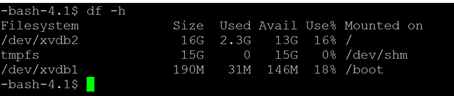
Congratulation, your IaaS environment is ready to use. However, you will realise that although you created the secondary disk (200GB in this case) it is still not mounted.
Run df -h to see the disks you have currently mounted to validate this:
- In order to mount this second disk, go to the next section in this document or feel free to refer to the official Oracle documentation (http://docs.oracle.com/cloud/latest/stcomputecs/STCSG/GUID-7393768A-A147-444D-9D91-A56550604EE5.htm#OCSUG196)
Mount your secondary disk as part of your IaaS Environment
In this example, we are going to mount the secondary disk that was created in the previous section. At this point this disk is created and attached to the instance, as you can see if you navigate to the Storage tab of your Compute Cloud Service console, however it is not yet formatted and mounted.

Follow the next instructions to format and mount this disk properly. Alternatively refer to the official Oracle documentation to do the same plus many more options (http://docs.oracle.com/cloud/latest/stcomputecs/STCSG/GUID-7393768A-A147-444D-9D91-A56550604EE5.htm#OCSUG196).
-
SSH into your IaaS VM if not already there.
-
First, list the devices available on your instance:
ls /dev/xvd*

In a nutshell, all “xvdb*” devices are those primary ones at index 1 – A secondary disk will be referred as a “xvdc“. If you had created and attached a third disk, it would appear as “xvdd” and so on.
In this case we just have a secondary disk attached to my instance, which is referenced as “xvdc” – This is the volume that we need to format with a file system and mount. At this point it is just raw block storage.
-
Create a file system on this device. A commonly used file system type in Linux is ext3 or ext4, it’s up to you really. In this case we are going to use ext3.
sudo mkfs -t ext3 /dev/xvdc
You don’t have to enter anything after you run this command, wait for it to complete and come back.

-
Create a mount point in your instance. Following Oracle’s convention, let do it under /u01
sudo mkdir /u01
-
Mount the storage volume on the mount point that you created on your instance.
sudo mount /dev/xvdc /u01
-
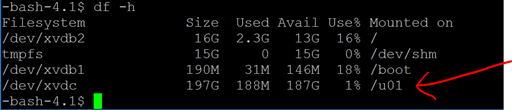
Ensure the disk was mounted properly
df -h
-
We are almost there. If you try to write on this new mounted point as the default user (opc), you won’t be able to do it, as this is under root. Change the owner and group.
sudo chown opc:opc /u01

- Try writing into this new mounted disk
cd /u01 && touch test && ls -l

Congratulations! Your IaaS instance is ready to go!
-
The last bit that I do recommend doing is ensuring to auto mount this disk after a restart, otherwise you will have to mount it manually. The easiest way to do this is by adding your device using /etc/fstab
-
For this, add your folder in /etc/fstab in order to make sure this gets mounted automatically. For this enter something like this:
/dev/xvdc /u01 ext3 defaults 0 0
Alternatively, instead of /dev/sdb you can use blkid to name the UUID of your device – This is a much better way to refer to it.

I.e.
UUID=
bb8e9833-45d0-45ed-bbf4-770bf7c6edbd /u01 ext3 defaults 0 0
- Your /etc/fstab file should look something like this:

-
Save it and that’s it! Your instance is ready to go!
