
In this blog I am going to show you how to interact with ICS system APIs, in order to simplify the deployment of ICS Integrations being stored and retrieved out of version control repositories (e.g. Git). This can be applied as a Continuous Integration or Continuous Delivery task, removing with this, manual interventions to export, import, configure connectors, activate integrations, run tests, etc.
I am going to be running these APIs via CURL commands and JSON objects, so that these commands can be easily ported into shell scripts, perhaps part of a CI/CD step using Hudson or Jenkins, for example.
Common Path Parameters
The following table describes common path parameter. The path parameters are supported with some API operations.
We are going to be using these values in the coming APIs.
|
Name |
Description |
| code | The ID, also called the identifier, is derived from the connection or integration name. It’s uppercase and may be changed in other ways: spaces are replaced by underscores and it may be shortened. Additionally, the generated identifier can be overridden with a user specified value.
ID (identifier) path parameter is often referred to as code in Request and Response bodies. |
| version | Version numbers are in the format xx.yy.zzzz, where xx is the major version and yy.zzzz is the minor version.
If you don’t know the version number, you can try the default version number, which is 01.00.0000. Integrations having the same code, but a different major version, can be active at the same time. ID (identifier) path parameter is often referred to as code in Request and Response bodies. |
For more information refer to: http://docs.oracle.com/cloud/latest/intcs_gs/ICSRA/SendRequests.html
1. Running a simple API ICS to request the list of integrations
This API will help you to gather details about the ICS integration(s) that you want to handle for export/import.
curl -u username:password -H “Content-Type:application/json” -H “Accept:application/json” -X GET https://server%5B:port%5D/icsapis/v1/integrations
For example:
curl -u weblogic:welcome1 -H “Content-Type:application/json” -H “Accept:application/json” -X GET https://ics-icsIdDomain.integration.us2.oraclecloud.com/icsapis/v1/integrations –insecure

Notice in yellow the Integration {code}, for each of the ICS Applications. These code and version will be used in the subsequent API calls to download/upload the Integration archives.
2. Exporting a particular ICS Integration
The next API will export a given ICS Integration and save it as a local IAR.
curl -u username:password -H “Content-Type:application/json” -H “Accept:application/json” -X GET https://server[:port]/icsapis/v1/integrations/{code}/{version}/export
Substitute {code} and {version} depending on the Integration and version that you want to download.
For example, below I want to export the Integration archive (IAR) for S2VIIA_SC_GETCONTA_INT:
curl -u weblogic:welcome1 -X GET -o ./S2VIIA_SC_GETCONTA_INT.iar https://ics-icsIdDomain.integration.us2.oraclecloud.com/icsapis/v1/integrations/S2VIIA_SC_GETCONTA_INT/01.00.0000/export –insecure
This will download the S2VIIA_SC_GETCONTA_INT integration archive (IAR) and will call it S2VIIA_SC_GETCONTA_INT.iar

3. Importing a particular ICS Integration
- The next API will take the local IAR and it will be imported into a new ICS Identity Domain.
curl -u username:password -H “Accept: application/json” -X POST -F “file=@TheProject.iar;type=application/octet-stream” https://server[:port]example.com/icsapis/v1/integrations/import
E.g.
curl -u weblogic:welcome1 -H “Accept: application/json” -X POST -F “file=@S2VIIA_SC_GETCONTA_INT.iar;type=application/octet-stream” https://ics-newICSIdDomain.integration.us2.oraclecloud.com/icsapis/v1/integrations/import
- Go to the target ICS instance and you will notice that your Integration was created.

-
However, it is still not Activated yet. That’s because the Connections have not been Activated either.

Think about it, the reason for this is that if you want to move from one environment to another, let’s say Test to Production, you don’t want to point to the same Test environments by default. That would just cause so much trouble along the way.
-
At this point you need to complete each connection, especially to provide the right service endpoints, username and passwords. Then once all the involved connections are active and ready to use, then you can simply activate your Integration and off you go.
For this, you have 2 options:
- Configure them manually or,
- Programmatically – Assuming that you know what environment you are deploying into and have full knowledge of Connection configurations.
Based on your requirements, this is up to you. If you are not deploying many ICS Integrations or very frequently, perhaps it is easy enough to do it manually once in a while.
However, if you need to deploy multiple Integrations frequently, perhaps as part of a Continuous Integration Test-driven automation or Continuous Delivery, then it makes sense to do it programmatically.
In the next section I explain how to do it.
4. Automatically Configure your Connections and Activate your Integration
First let me show you how to configure each of your connectors. For this, I am going to use ICS System APIs again.
4. 1 – Configuring our Connectors
The next API will update the properties of a connector. Based on the type of connector you might need to do different things, such as: providing service endpoints, adding security or simply just activating it, like in the case of most trigger-based REST Connectors.
In my case I have 2 Connectors as part of the Integration that I need to configure:
- REST connector: It doesn’t need much, just to activate it
-
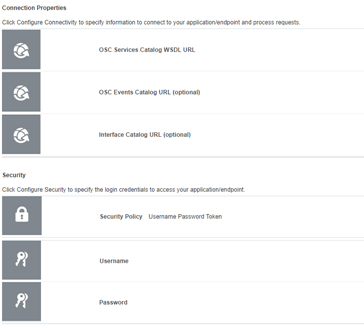
Sales Cloud Connector: It needs to provide:
- OSC Services Catalog WSDL URL
- OSC Events Catalog URL
- Username
- Password
- OSC Services Catalog WSDL URL
- First, let’s configure the Sales Cloud Connector.

-
In order to know its attribute names, you can either look into the documentation or use a simple trick and get it first, so that you can see all its content.
In order to get the current connector’s configuration, use this API:
curl -u username:password -H “Content-Type:application/json” -X GET https://server[:port].integration.us2.oraclecloud.com/icsapis/v1/connections/CONNECTOR_NAME
Where CONNECTOR_NAME goes in UPPER CASE..
For example:
curl -u weblogic:welcome1 -H “Content-Type:application/json” -X GET https://ics-icsIdDomain.integration.us2.oraclecloud.com/icsapis/v1/connections/S2VIIA_SALESCLOUD_CONN1
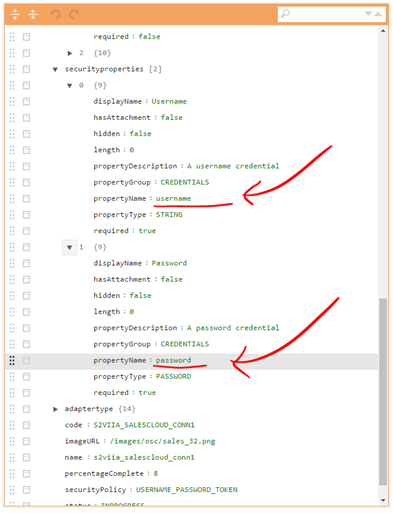
This will return a big JSON document. I use http://www.jsoneditoronline.org/ to easily format it and I easily see the connection property names that I need to set, in this case:
- targetWSDLURL
- eventCataloURL

Also, I need to set the Security attributes:
- username
- password
-
Great, now I have all I need to update my Connector, I can easily do it using the following API:
curl -u username:password -H “Content-Type:application/json” -X PUT -d @myConnProp.json https://server[:port].integration.us2.oraclecloud.com/icsapis/v1/connections/CONNECTOR _NAME
Where CONNECTOR_NAME goes in UPPER CASE and myConnProp.json is a file in my current directory that contains the configuration that I want to set (Note: Only the fields that I want to set)
For example:
curl -u weblogic:welcome1 -H “Content-Type:application/json” -X PUT -d @S2VIIA_SALESCLOUD_CONN1.json https://ics-icsIdDomain.integration.us2.oraclecloud.com/icsapis/v1/connections/S2VIIA_SALESCLOUD_CONN1
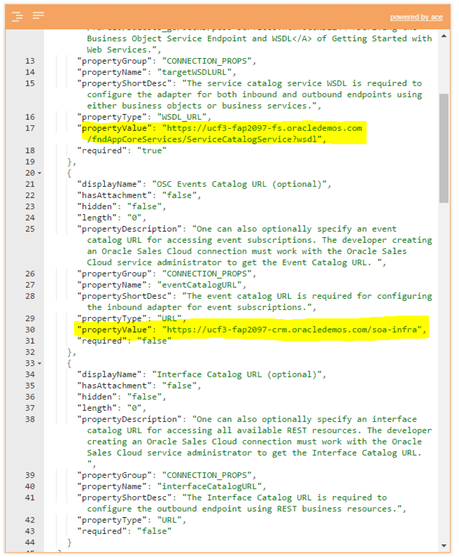
Where S2VIIA_SALESCLOUD_CONN1.json is the same connection properties that you exported in the previous step plus the Property Value (“propertyValue”: “xxxx”) that is required in each of the Attributes that we have identified:
For example:
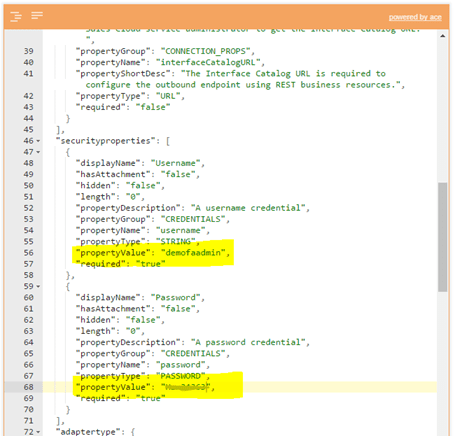
Same for Security:
- Great, if you go back to ICS console you will notice that your connector has a beautiful green 100% completion:

This basically means that as part of your last API request, the Connector also gets Tested, which in this case, it got 100% completed…
- If you enter your connector, you will notice that all the configurations are set properly:

Way to go! So now let’s complete our REST Connector and we are ready to Activate our Integration.
-
Since there is really nothing to configure as part of the REST connector, all we have to do is to “Test” it, so that it gets 100% complete. This can be achieved very easily by simply repeating the steps above, i.e.
- GET the REST connector properties,
- PUT the same configuration back – This is going to force a test and so, it will 100% complete the Connection
Note: Maybe there is a better way to test a connector, but I couldn’t find it in the API catalogue. If I find a better way to do it, I will come back and amend this section.
Go back to ICS Console and validate within Connections that your REST connector moved from:

To:

Well, that was easy. Now it’s time to Activate our Integration.
4.2 – Activating the Integration
- Make sure that the connections that are used by our Integration are 100% complete:

-
Now, it is time to Activate our Integration. Once again you can do this Manually or Programmatically. Perhaps this is part of a Continuous Integration or Delivery program, so there are reasons why this needs to be done programmatically.
-
You can achieve this, by calling the following API:
curl -u username:password -H “Accept: application/json” -X POST https://server[:port].integration.us2.oraclecloud.com/icsapis/v1/integrations/{id}/{version}/activate
For example:
curl -u weblogic:welcome1 -H “Accept: application/json” -X POST https://ics-icsIdDomain.integration.us2.oraclecloud.com/icsapis/v1/integrations/S2VIIA_SC_GETCONTA_INT/01.00.0000/activate
- Go back to ICS Console within Integrations and make sure your Integration moved from Draft:

Into fully Activated:

Now your Integration is up and running! How cool is that?
The best part is that you can use these REST APIs for example as part of your Continuous Integration tasks, so that:
- At the moment someone pushes into a Version Control repository, a new ICS Integration (expanded IAR)
- Your CI build kicks off,
- It Jars the Integration build into an IAR
- It deploys your IAR into an ICS dev/test environment,
- It configures the Connectors to point to the right systems (dev/test)
- Activates your Integration
- Run tests and build reports
Oracle Developer Cloud Service can be an excellent candidate to run these tasks… I can sense another blog coming soon!
I hope you found this blog useful.
If you have any question or comment, do not hesitate to contact any of the authors of www.solutionsanz.blog – We are here to help you!

One thought on “Teaching how to run ICS APIs from a DevOps perspective”