
The OCI Application Performance Monitoring (APM) service enables administrators to monitor and observe the PeopleSoft web applications.
It provides deep visibility into the application performance from end-user experience down through to the application server requests.
For many customers, the PeopleSoft (PSFT) Application is critical to business operations. With OCI Application Performance Monitoring (APM) service, administrators can:
- Analyze all end user experience with accessing PeopleSoft web pages.
- Trace transactions across various components and isolate problems to the impacting application or infrastructure tier.
- Has ability to drill into application code.
- Generally, APM tools cannot drill into the SQL code for the PeopleSoft application. This inability occurs is because, the SQL call is performed in the Tuxedo layer. However, OCI APM service offers a unique feature to overcome this limitation. It can perform instrumentation of outbound JOLT calls from WebLogic to Tuxedo. This helps at least understand how much time is spent in this layer.
- Easily Capture End Username for user sessions without modifying application code
- Search in context based on PeopleSoft attributes including:
– Portal Name
– Portal Object Name
– and more
Considerations
Please consider the following when deploying the APM service to a target PeopleSoft environment.
APM JAVA AGENT
- The APM Java Agent Supports instrumentation at the WebLogic layer (deployed for PeopleSoft PIA Web hosts)
- Application Code is captured and not SQL code as these calls are made from within the Tuxedo Layer.
- APM Java Agent can be installed on shared and non-shared filesystem.
PEOPLESOFT CONFIGURATION WITH NON-SHARED FILESYSTEM
- APM Java Agent needs to be provisioned on each PeopleSoft PIA host
- For each Managed Server instance on a PeopleSoft PIA host, set the java arguments. Point them to the APM Java Agent JAR file located on the local filesystem. It is recommended to configure this setting using the psadmin tool.
PEOPLESOFT CONFIGURATION WITH SHARED FILESYSTEM
- Managed Servers can share the same agent.
- For each Managed Server instance on a PeopleSoft PIA host, set the java arguments. Point them to the APM Java Agent JAR file located on the shared filesystem. It is recommended to configure this setting using the psadmin tool.
- APM Java Agent can be provisioned and deployed once, which can then be used by other PeopleSoft PIA hosts.
SYNTHETIC MONITORING FOR PEOPLESOFT APPLICATIONS WITH INTERNET ACCESS
- Public Vantage Points monitors the PeopleSoft Application Endpoints. These endpoints are accessible via the internet (or public network) by end users.
- There are multiple Public Vantage Points readily available globally which can be used without any additional effort.
SYNTHETIC MONITORING FOR PEOPLESOFT APPLICATIONS WITH PRIVATE NETWORK ACCESS
- Private or Dedicated Vantage Points help monitor PeopleSoft Application Endpoint. This endpoint is accessible via a private network by end users.
- A Private or Dedicated Vantage Point instance will need to be deployed as a prerequisite.
- Please refer to documentation for further details:
Prerequisites
Please complete the prerequisites.
IAM SETUP
The IAM group and policies are required to be setup in order to configure the Application Performance Monitoring service.
1. Create Admin Group (eg. om_admins)
IDENTITY & SECURITY > DOMAINS > [Select Domain eg. DEFAULT] > GROUPS CREATE GROUP
NOTE: Then add users or members to this group including yourself
2. Create Policy Name (eg. om_apm_policy)
IDENTITY & SECURITY > POLICIES > CREATE POLICY
ALLOW GROUP om_admins TO MANAGE apm-domains IN COMPARTMENT <PSFT_COMPARTMENT>
ALLOW GROUP om_admins TO MANAGE alarms IN COMPARTMENT <PSFT_COMPARTMENT>
ALLOW GROUP om_admins TO READ metrics IN COMPARTMENT <PSFT_COMPARTMENT>
ALLOW GROUP om_admins TO USE ons-topics IN COMPARTMENT <PSFT_COMPARTMENT>
NOTE: Replace <PSFT_COMPARTMENT> with your target Compartment.
APM DOMAIN AND SOFTWARE DOWNLOAD
1. To create the APM Domain, navigate to:
OBSERVABILITY & MANAGEMENT > APPLICATION PERFORMANCE MONITORING > ADMINISTRATION
COMPARTMENT: <PSFT_COMPARTMENT>
Click on Create APM Domain
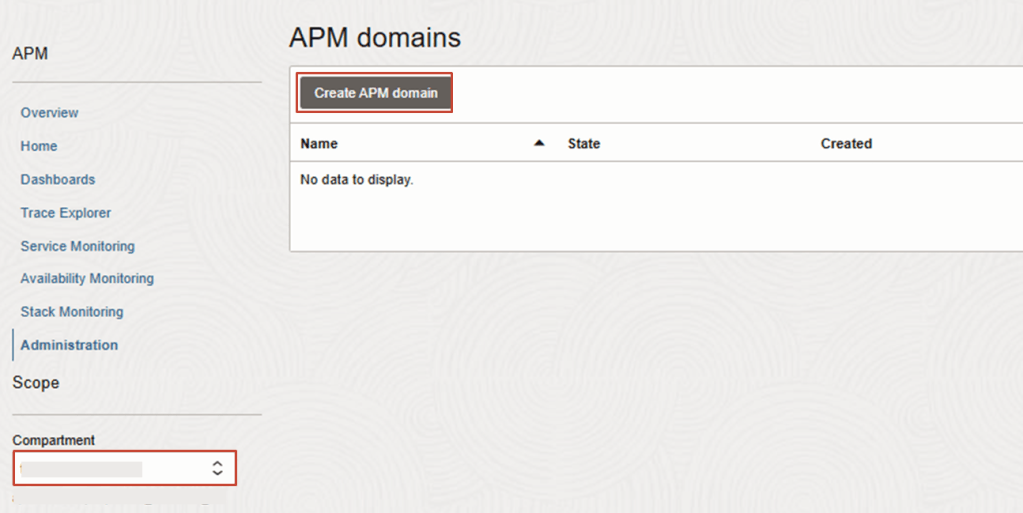
NAME: (eg. psft_app)
COMPARTMENT: <PSFT_COMPARTMENT>
DESCRIPTION: PSFT APM Domain
Click Create
The APM domain name psft_app is something I used for this demo, however you can use any other name that is meaningful. Just remember to replace it in other steps where I have referenced this as psft_app for the APM domain name.
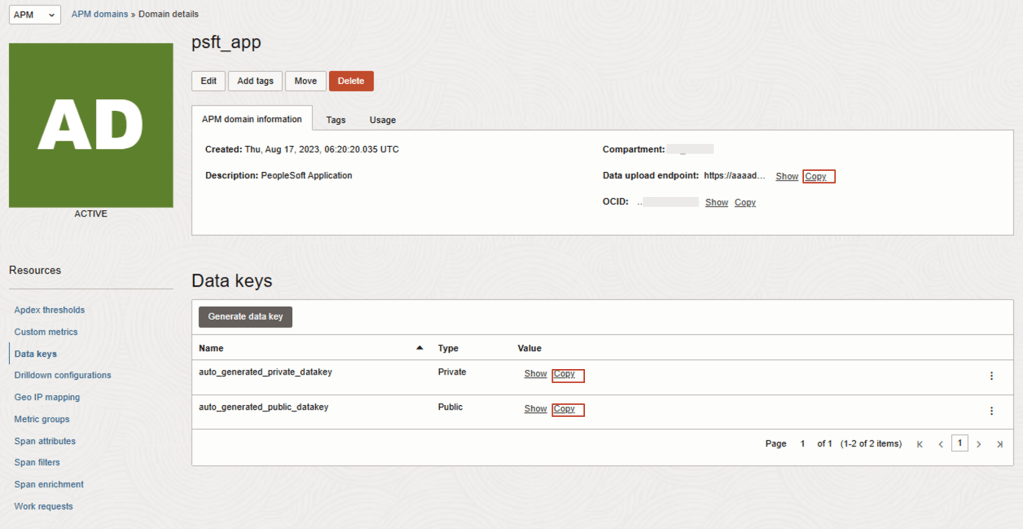
2. After APM Domain has been created, review the configuration details.
OBSERVABILITY & MANAGEMENT > APPLICATION PERFORMANCE MONITORING > ADMINISTRATION > APM DOMAINS > [Select APM Domain eg. psft_app ] > DATA KEYS
Make a note or copy of the following configuration for your target environment. This will be different for each APM domain that is created.
– APM Data Endpoint URL : https://aaaa??????????????????????.apm-agt.ap-sydney-1.oci.oraclecloud.com
– Private Key: XXXXXXXXXXXXXXXXXXXXXXXXXXXX
– Public Key: ZZZZZZZZZZZZZZZZZZZZZZZZZZZZZ
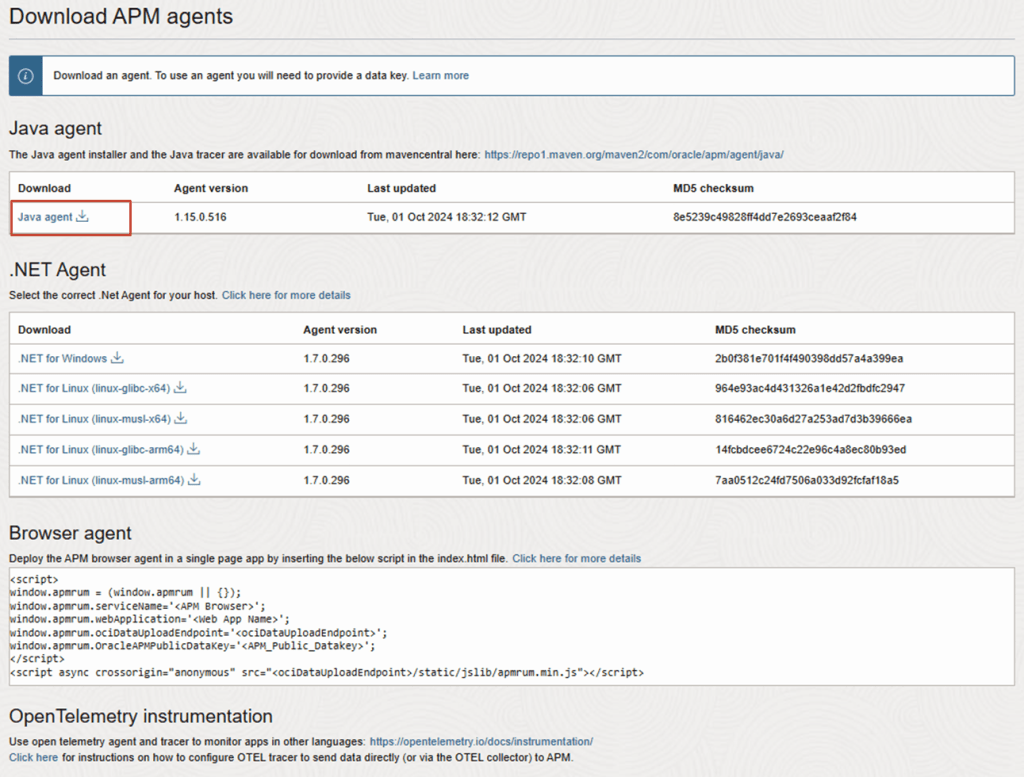
3. Download the APM Java Agent software
OBSERVABILITY & MANAGEMENT > APPLICATION PERFORMANCE MONITORING > ADMINISTRATION > DOWNLOAD APM AGENT > JAVA AGENT
Create A Monitor Configuration
Any endpoint URL can be configured in Availability Monitoring (synthetic monitoring). In this example, we will create the Monitor configuration for the PeopleSoft home page.
The following endpoint URL is accessible by users on the internet or public network. This accessibility allows us to connect and simulate the traffic by using the predefined public Vantage points.
If your endpoint URL is only accessible within a private network, then you must first set up the Dedicated Vantage Points. Do this before performing the steps below.
The Monitor configuration can be also configured for scripted actions including Recorded transactions such as Selenium (.side) or REST (.js) based files. For further details please see documentation.
1. Create the Monitor configuration
OBSERVABILITY & MANAGEMENT > APPLICATION PERFORMANCE MONITORING > AVAILABILITY MONITORING > RESOURCES
Set Scope to:
COMPARTMENT: <PSFT_COMPARTMENT>
APM DOMAIN: (eg. psft_app)
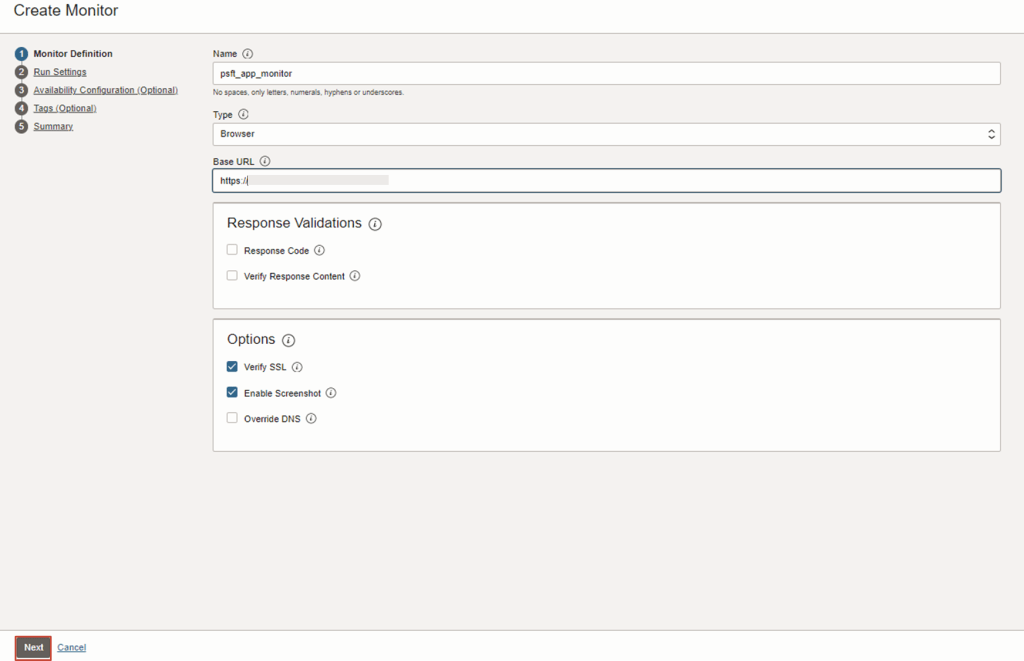
2. Click on Create Monitor
3. Specify the inputs for the Monitor:
APM_DOMAIN: psft_app
Monitor Name: psft_home_page
Type: Browser
Base URL: https://https://<PSFT_APP_URL>/ (eg. https://psftportal.apps.com)
Verify Response Content: None
Verify SSL: Yes
Override DNS: None
Click Next
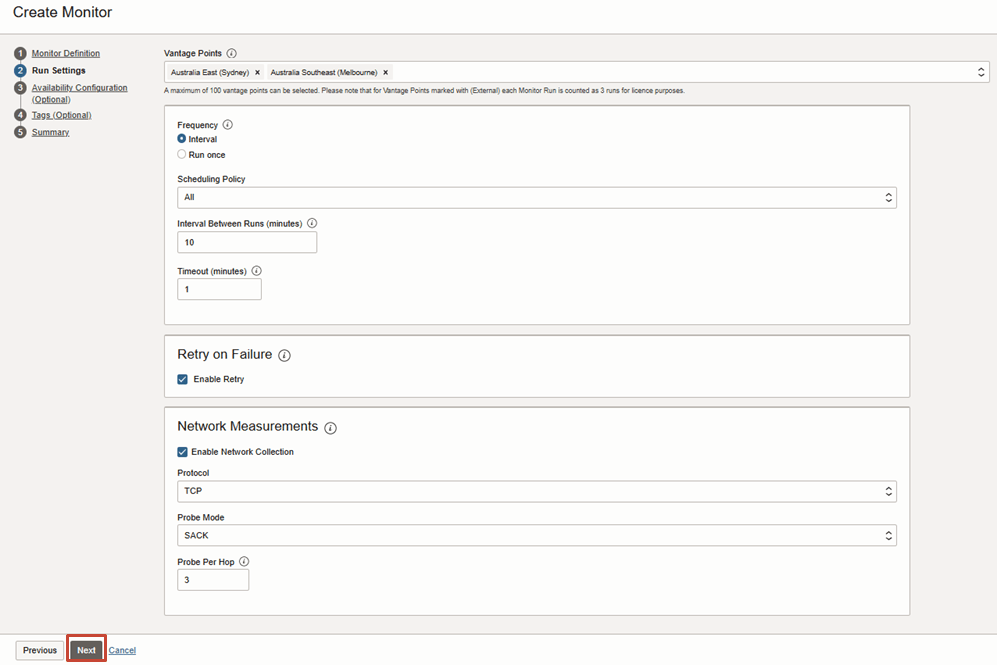
Vantage Points = Sydney, Melbourne
Frequency = Interval
Scheduling Policy = All
Interval Time between Runs = 10
Timeout = <DEFAULT>
Retry on Failure – Enable Retry: Yes
Network Measurements: Enable Network Collection: Yes
Protocol = <DEFAULT>
Probe mode = <DEFAULT>
Probe Per Hop = <DEFAULT>
Click Next
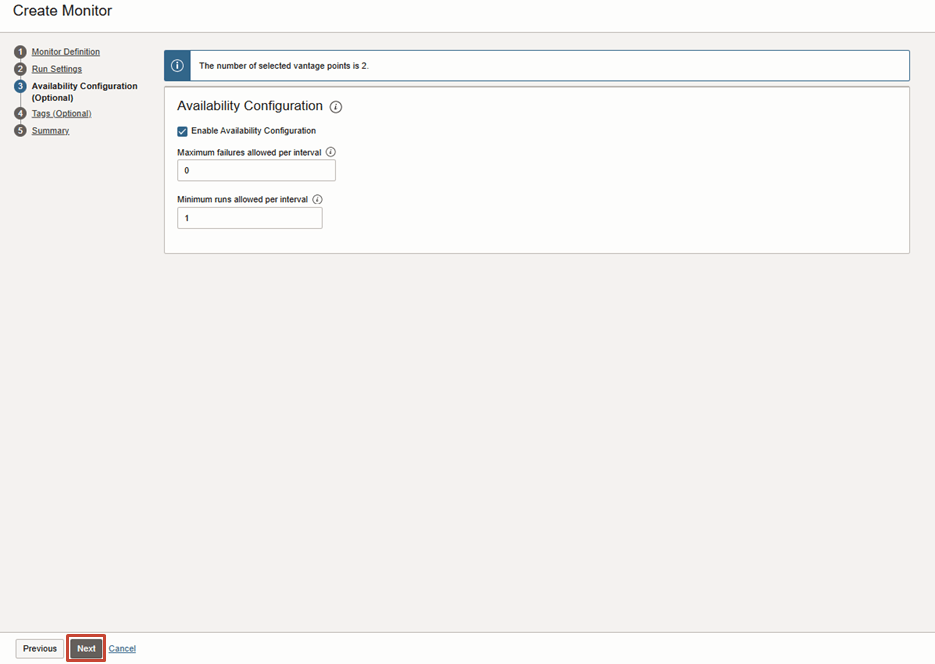
Enable Availability Collection: Yes
Maximum failures allowed per interval = 0
Minimium runs allowed per interval = 1
Click Next
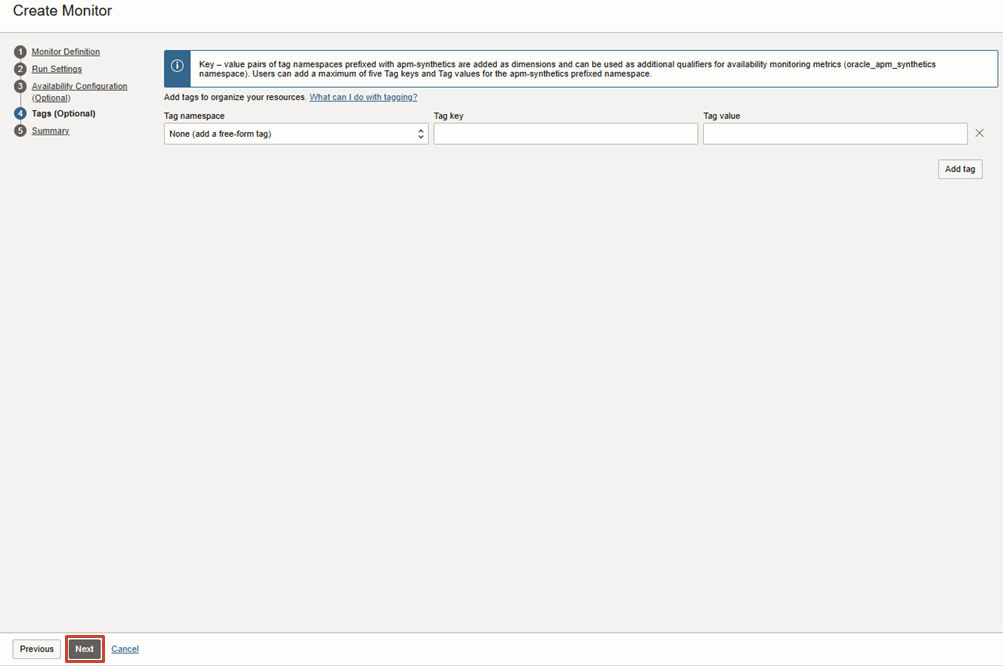
Specify Tags is optional otherwise you can skip.
Click Next
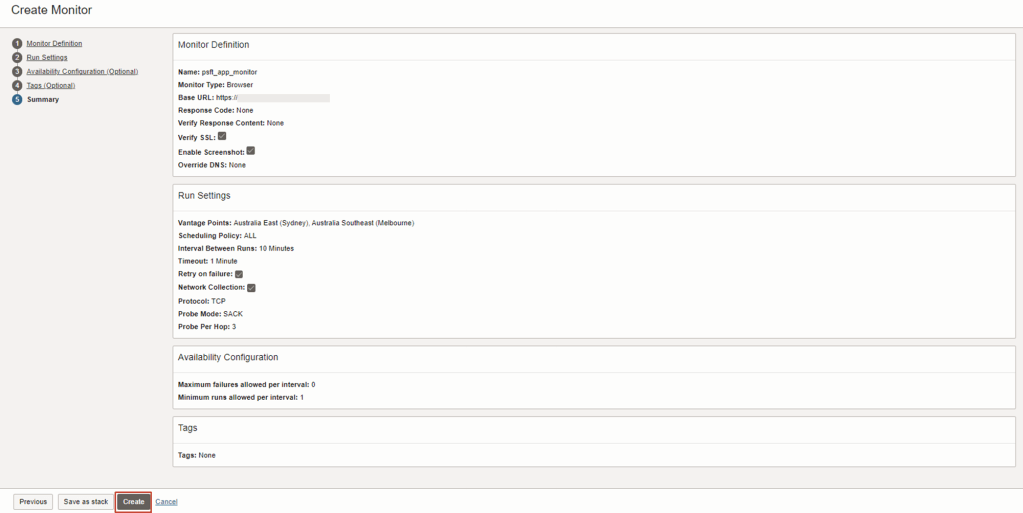
Review Configuration
Click Create
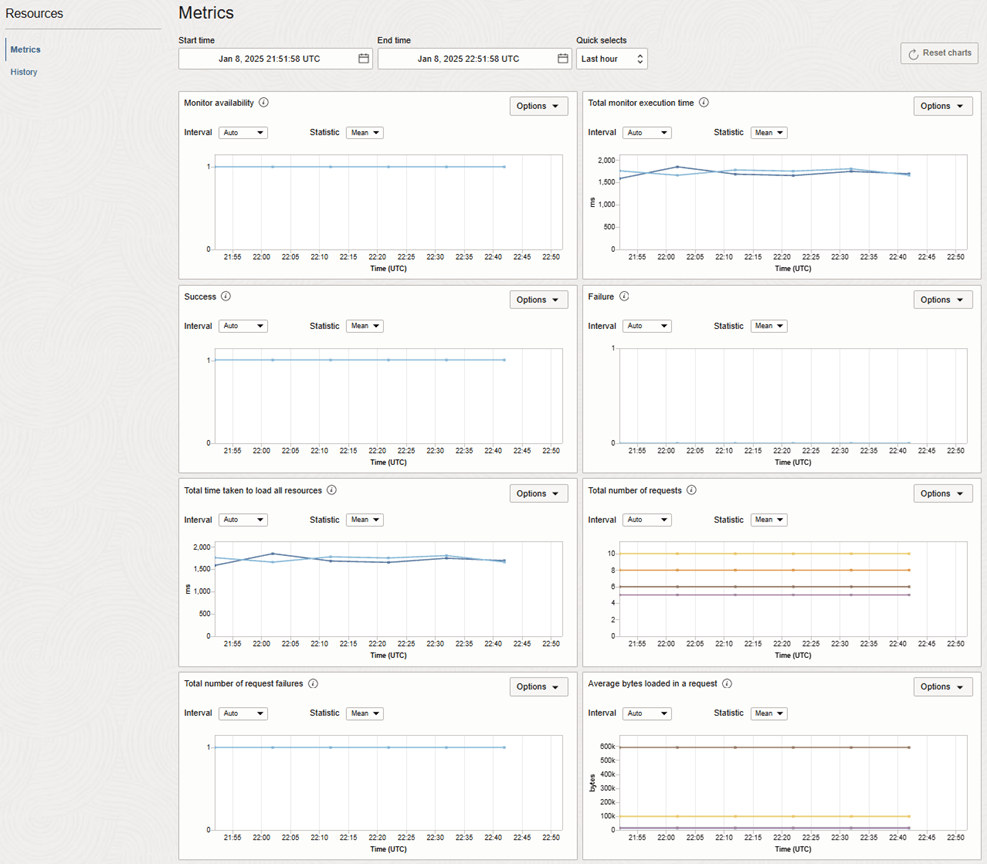
To review, navigate to
OBSERVABILITY & MANAGEMENT > APPLICATION PERFORMANCE MONITORING > AVAILABILITY MONITORING > RESOURCES > [Select Monitor eg. psft_app_monitor]

Provision the APM Java Agent
In this section, the oracle-apm-agent software directory will be created and installed on the PeopleSoft PIA Web host(s).
For non-shared filesystem, the following steps will need to repeated on each EBS Application host.
For shared filesystem, the following steps will need to be completed once on only one of the EBS Application host.
1. Copy the APM Java Agent Software to the target EBS Application Host
scp -i oci.ppk apm-java-agent-installer-<version>.jar opc@192.x.x.x:/tmp/.NOTE: The name of the downloaded file version will be different for more recent version. Replace apm-java-agent-installer-<version>.jar with the APM java agent version you downloaded eg. apm-java-agent-installer-1.15.0.516.jar
2. On target host, run the following to validate the checksum and run as the Application Software owner (eg. oracle)
md5sum apm-java-agent-installer-<version>.jarSample Output
8e5239c49828ff4dd7e2693ceaaf2f84 apm-java-agent-installer-1.15.0.516.jar
NOTE: Should match same MD5 checksum value for software download in OCI Console
3. On the PeopleSoft Web Host, verify Network Connectivity and APM Domain Data Endpoint is accessible
NOTE – Replace the following Fully Qualified Domain Name (FQDN) Data Endpoint with the target Endpoint. The Endpoint was captured for the newly created APM domain. For example, aaaa??????????????????????.apm-agt.<oci_region>.oci.oraclecloud.com
a) Verify connectivity from EBS PIA web host using NC utility:
nc -zv <DATA_ENDPOINT_FQDN>443
Example command:
nc -zv aaaa??????????????????????.apm-agt.ap-sydney-1.oci.oraclecloud.com 443Sample Output should report if successful
Ncat: Version 7.70 ( https://nmap.org/ncat )
Ncat: Connected to 192.X.X.X:443.
Ncat: 0 bytes sent, 0 bytes received in 0.01 seconds.
b) Verify using CURL command using syntax:
$ curl -v -X POST “https://<DATA_ENDPOINT_URL>/20200101/observations/public-span?dataFormat=apm&dataFormatVersion=1&dataKey=<PUBLIC_KEY>“
Run the command:
curl -v -X POST "https://aaaa??????????????????????.apm-agt.ap-sydney-1.oci.oraclecloud.com/20200101/observations/public-span?dataFormat=apm&dataFormatVersion=1&dataKey=ZZZZZZZZZZZZZZZZZZZZZZZZZZ"Sample Output should report if successful:
< HTTP/1.1 200 OK
4. Login or Switch to the OS user who is running the PeopleSoft PIA service
sudo su - psadm25. Identify the location where you want to provision the APM Java Agent Software and make sure the base directory exists eg. /opt/oracle/psft/tools
ls -ld /opt/oracle/psft/toolsSample Output to confirm directory exists
drwxr-xr-x. 2 psadm2 oinstall 4096 Jan 22 04:42 /opt/oracle/psft/tools
6. The following can be set as the target APM_BASE_DIR
APM_BASE_DIR=/opt/oracle/psft/tools7. Set the additional variables:
DATA_UPLOAD_ENDPOINT_URL=https://aaaa??????????????????????.apm-agt.ap-sydney-1.oci.oraclecloud.com

PRIVATE_KEY=XXXXXXXXXXXXXXXXXXXXXXXXXXXX
APM_JAR_FILE=apm-java-agent-installer-<version>.jar
APM_SERVICE_NAME=psft-xxx-service
NOTE: Set the DATA_UPLOAD_ENDPOINT_URL and PRIVATE_KEY to the values collected from the OCI console. These values were collected when creating the APM Domain.
OBSERVABILITY & MANAGEMENT > APPLICATION PERFORMANCE MONITORING > ADMINISTRATION > APM DOMAINS > eg. psft_app > DATA KEYS
Specify the APM_JAR_FILE to the APM java agent software that was downloaded. The more recent version downloaded may be different to the one shown here eg. APM_JAR_FILE=apm-java-agent-installer-1.15.0.516.jarAPM_SERVICE_NAME can be a name you choose to identify the target PeopleSoft service. The APM Java agent collects the traces and tag this with the APM Service Name.
8. Now run the command to create the oracle-apm-agent subfolder and install software in that target location set for APM_BASE_DIR
java -jar ./${APM_JAR_FILE} provision-agent -service-name=${APM_SERVICE_NAME} -destination=${APM_BASE_DIR} -private-data-key=${PRIVATE_KEY} -data-upload-endpoint=${DATA_UPLOAD_ENDPOINT_URL}The output should report something similar
Action [provision-agent] completed successfully
********************************************
APM Agent has been provisioned successfully. To complete the setup, you need to
modify your destination's appserver startup script so that the APM Agent you
have just deployed can be started. Here is the general information on the
changes.

1. Make a backup copy of your appserver startup script.
2. Edit appserver startup script to add -javaagent argument of APM Agent
bootstrap library to java executable. For example:
    java -javaagent:<destination>/oracle-apm-agent/bootstrap/ApmAgent.jar ${JAVA_OPTIONS} -cp <class_path> ... ...
3. Stop and restart your appserver.

Additional configuration such as proxy settings, can be set by editing
<destination>/oracle-apm-agent/config/<version>/AgentConfig.properties

For more information, see
    https://docs.oracle.com/iaas/application-performance-monitoring/doc/deploy-apm-java-agent.html
9. Verify the oracle-apm-agent directory and APMAgent jar file has been installed.
ls ${APM_BASE_DIR}/oracle-apm-agent/bootstrap/ApmAgent.jarVerify the Output
/opt/oracle/psft/tools/oracle-apm-agent/bootstrap/ApmAgent.jar
NOTE: Reminder if using non-shared filesystem, please ensure these steps are performed on each PeopleSoft PIA Web Host before proceeding.
Deploy APM Java Agent
1. Locate the setEnv.sh file
locate setEnvSample Output
/home/psadm2/psft/pt/8.60/webserv/peoplesoft/bin/setEnv.sh
2. Backup the setEnv.sh file.
cd /home/psadm2/psft/pt/8.60/webserv/peoplesoft/bin
cp -p setEnv.sh setEnv.sh.bkp
3. Set Java argument for APM agent for instrumentation via psadmin tool:
psadminEdit Configuration file by navigating to:
3) Web (PIA) Server -> 1) Administer a domain -> 1) peoplesoft ->
5) Edit configuration files -> 1) setEnv
4. Search for the corresponding JAVA_OPTIONS_<Operating System> variable eg. JAVA_OPTIONS_LINUX and add the following option after:
# Add for APM Agent
JAVA_OPTIONS_LINUX="${JAVA_OPTIONS_LINUX} -javaagent:/opt/oracle/psft/tools/oracle-apm-agent/bootstrap/ApmAgent.jar"
For example in the setEnv.sh config file is should look like this:

NOTE: The new Java Argument setting was added after the existing JAVA_OPTIONS_LINUX entry.
After PeopleSoft upgrade or patch update, ensure that setEnv.sh file argument is re-added or restored for the APM agent java argument setting. It suggested you backup the setEnv.sh config file with this setting and restore it after PeopelSoft upgrade or patch update.
5. Save the changes made to the setEnv.sh config file
<ESC>:wq! to save and exit the file. This returns to the PIA Administration menu.
6. Reboot the PIA domain
q) Quit -> 2) Shutdown this domain -> Y -> 1) Boot this domain -> q) Quit -> q) Quit -> q) QuitNOTE: It may not always be possible to do an immediate restart of PIA domain. This can be schedule this during the maintenance window as it requires an outage. The change will not get applied until a restart of this service.
7. To validate configuration has been saved in the setEnv.sh
cat setEnv.sh|grep ApmAgent.jarOutput should show something similar:
JAVA_OPTIONS_LINUX="${JAVA_OPTIONS_LINUX} -javaagent:/opt/oracle/psft/tools/oracle-apm-agent/bootstrap/ApmAgent.jar"
8. Repeat all the above steps in this section for all PIA domain services on each PIA web hosts
Verify APM Server Traces for PeopleSoft
Confirm the APM Server Traces for PeopleSoft is now collecting and is visible in APM Trace Explorer
1. Generate some workload by logging into the target PeopleSoft application

Navigate around in the PeopleSoft application.
2. In OCI Console, navigate to:
OBSERVABILITY & MANAGEMENT > APPLICATION PERFORMANCE MONITORING : TRACE EXPLORER
Set Context to:
COMPARTMENT: <PSFT_COMPARTMENT>
APM DOMAIN: (eg. psft_app)
2. Confirm the APM server traces are now collected
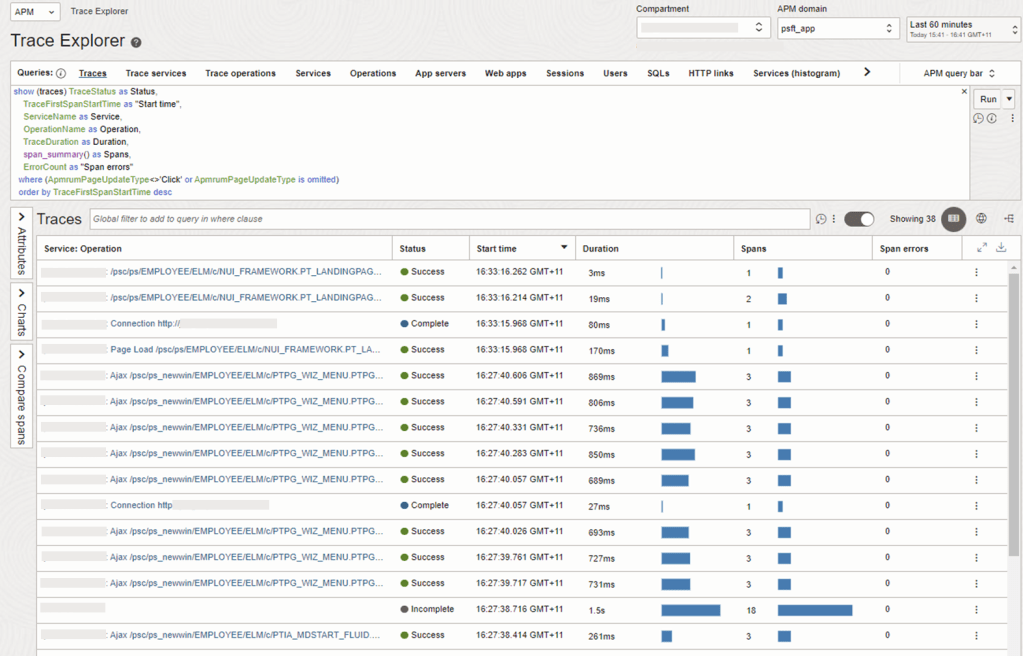
3. Confirm the PeopleSoft Service is displaying as expected.
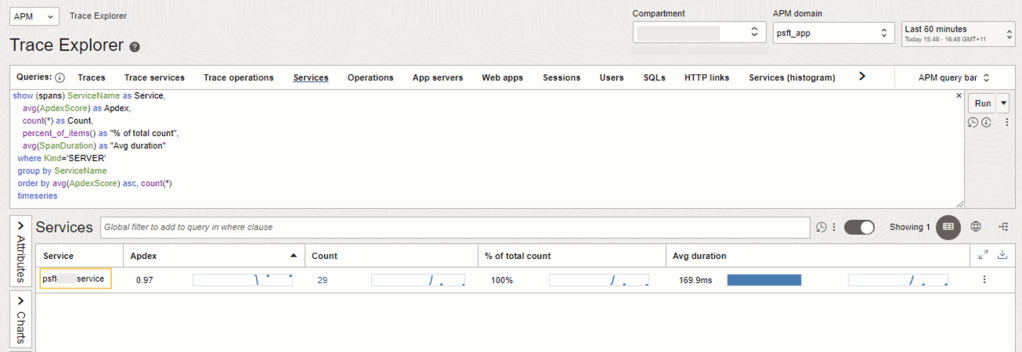
When the APM Java Agent was provisioned earlier, the APM_SERVICE_NAME eg. psft-xxx-service that was set will appear here.
Configure Real User Monitoring
This section will enable trace collection for PeopleSoft user sessions.
For non-shared filesystem, the following steps will need to repeated on each PeopleSoft PIA Web host.
For shared filesystem, the following steps will need to be completed once on only one of the PeopleSoft PIA Web host.
1. On the PeopleSoft PIA Web host, update ${APM_BASE_DIR}/oracle-apm-agent/config/<LATEST_VERSION>/AgentConfig.properties
com.oracle.apm.agent.public.data.key=<PUBLIC_DATA_KEY>
com.oracle.apm.agent.rum.enable.injection=true
com.oracle.apm.agent.rum.web.application=<WEB_APPLICATION_NAME>
com.oracle.apm.agent.rum.service.name=<RUM_SERVICE_NAME>
Example – /opt/oracle/psft/tools/oracle-apm-agent/config/1.15.0.516/AgentConfig.properties
com.oracle.apm.agent.public.data.key=ZZZZZZZZZZZZZZZZZZZZZZZZZZ
com.oracle.apm.agent.rum.enable.injection=true
com.oracle.apm.agent.rum.web.application=PSFT_XXX_WEBAPP
NOTE: Set the PUBLIC_KEY to the values collected from the OCI console when the APM Domain was created:
OBSERVABILITY & MANAGEMENT > APPLICATION PERFORMANCE MONITORING > ADMINISTRATION > APM DOMAINS > ebs_xxx_apm > DATA KEYS
The com.oracle.apm.agent.rum.web.application parameter can be set to a name to identify the target EBS Web Application traces for end users that are being collected by the APM Browser Agent.
2. Verify that the following parameters has been configured to capture the PeopleSoft username for end user sessions in the ${APM_BASE_DIR}/oracle-apm-agent/config/<version>/ProbeConfig.acml :
- WLS_USERNAME_INFO: true
- capture_username: true
- track_plain_username: true
Example Command to run:
cd /opt/oracle/psft/tools/oracle-apm-agent/config/1.15.0.516
egrep -i "WLS_USERNAME|capture_username|track_plain_username" ProbeConfig.acml
This should be the expected output
  WLS_USERNAME_INFO: true
  capture_username: true
  track_plain_username: true
NOTE: If the parameters are not set with the above values, then edit the file ProbeConfig.acml and update. Make sure there are indented spaces at the beginning of the line for each parameter as similarly to above otherwise the parameter settings will not get applied.
Verify APM End User Session Traces for PeopleSoft
Confirm the APM End User Session along with Username captured for PeopleSoft is now collecting and is visible in APM Trace Explorer.
1. Generate some workload by logging into the target PeopleSoft application
Navigate around in the PeopleSoft application.
2. In OCI Console, navigate to:
OBSERVABILITY & MANAGEMENT > APPLICATION PERFORMANCE MONITORING : TRACE EXPLORER
Set Context to:
COMPARTMENT: <PSFT_COMPARTMENT>
APM DOMAIN: (eg. psft_app)
3. Go to the Web Apps tab. Confirm the EBS Web Application is displaying as expected
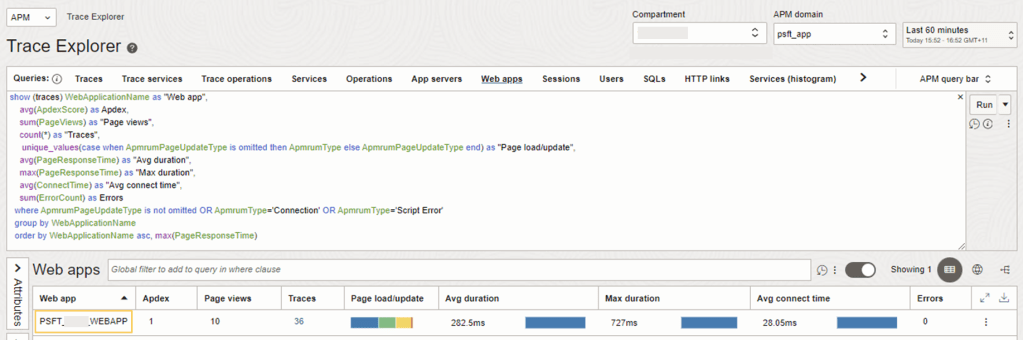
When the parameter com.oracle.apm.agent.rum.web.application was set previously, the following Web Application Name eg. EBSAppXXX will appear here.
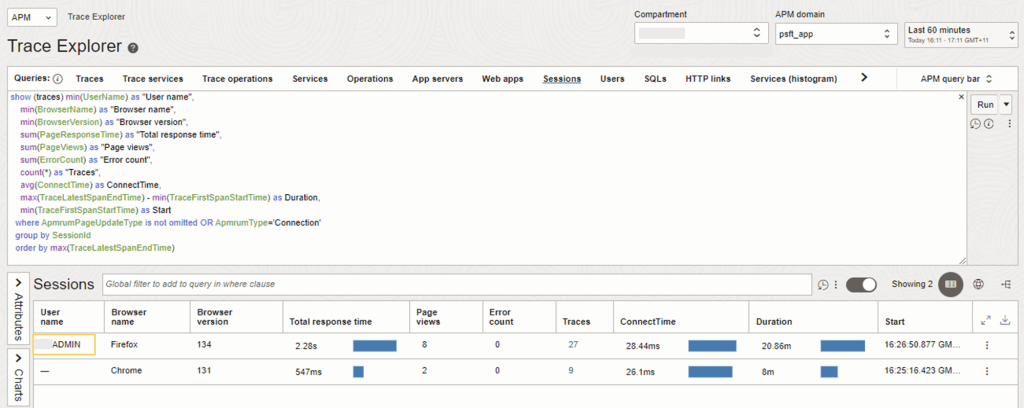
4. Verify Sessions tab
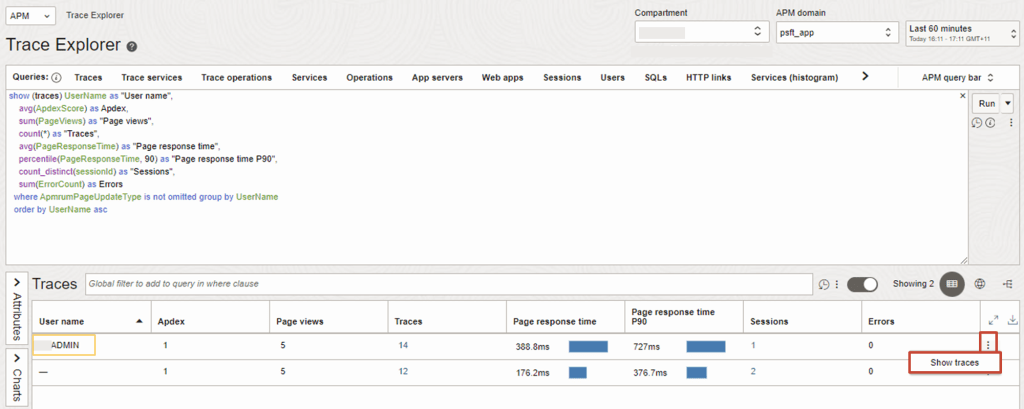
5. Verify Users tab, and then drilldown to Show Traces
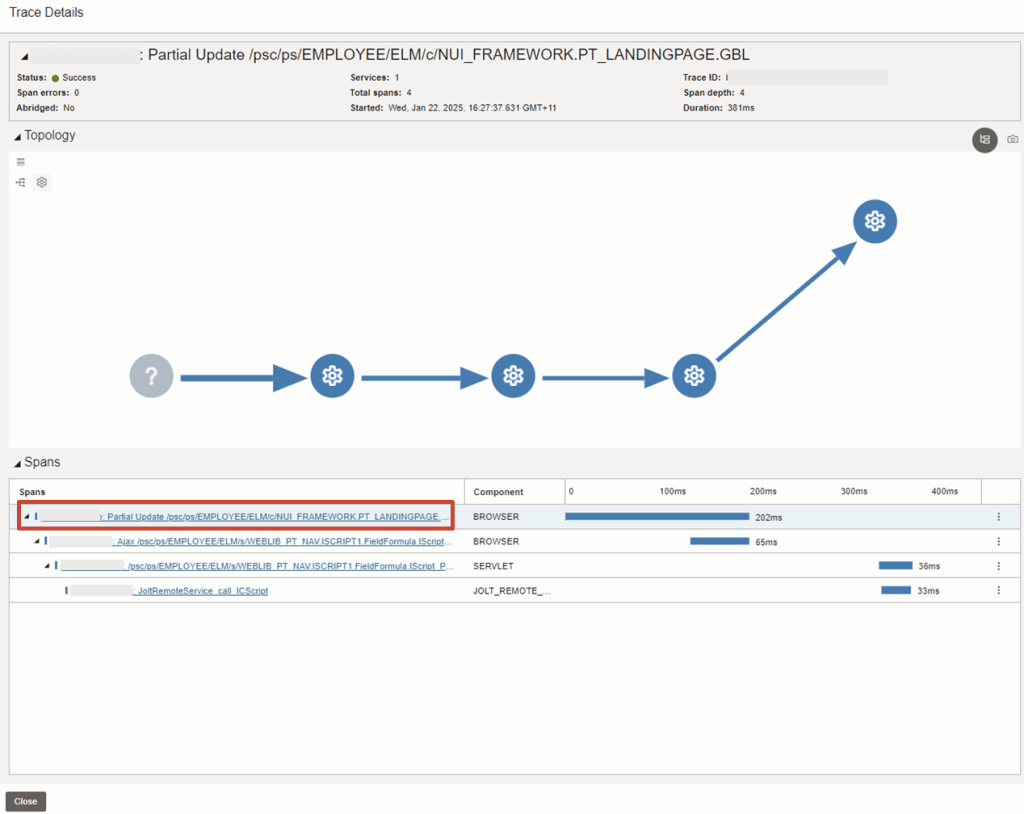
6. Choose the Trace with the longest running duration and Drilldown into Show trace details
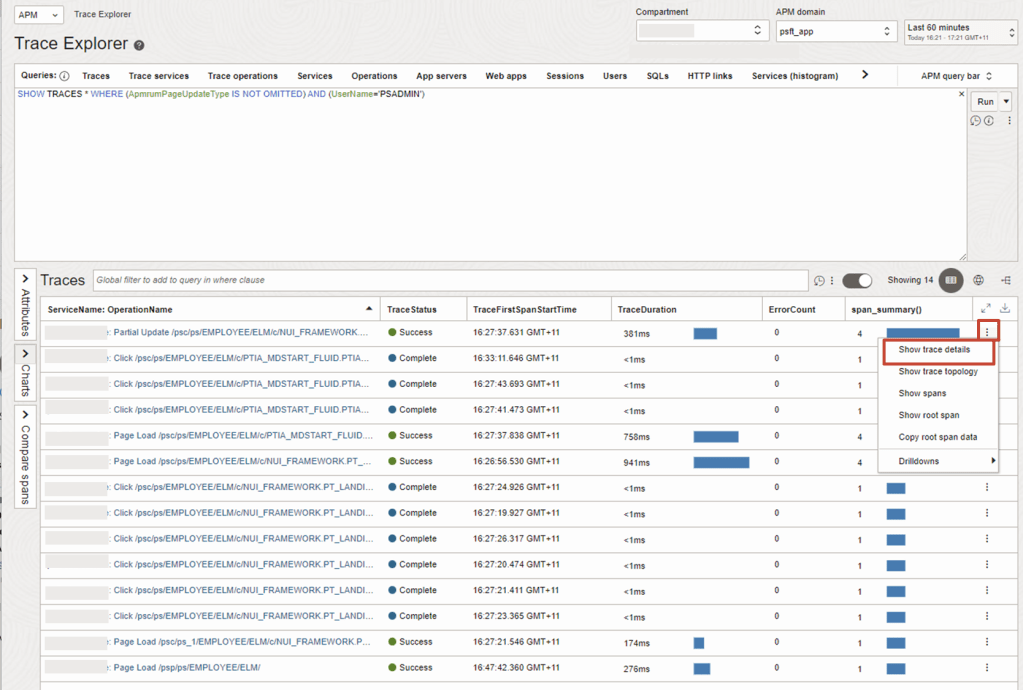
7. Drill into the top span
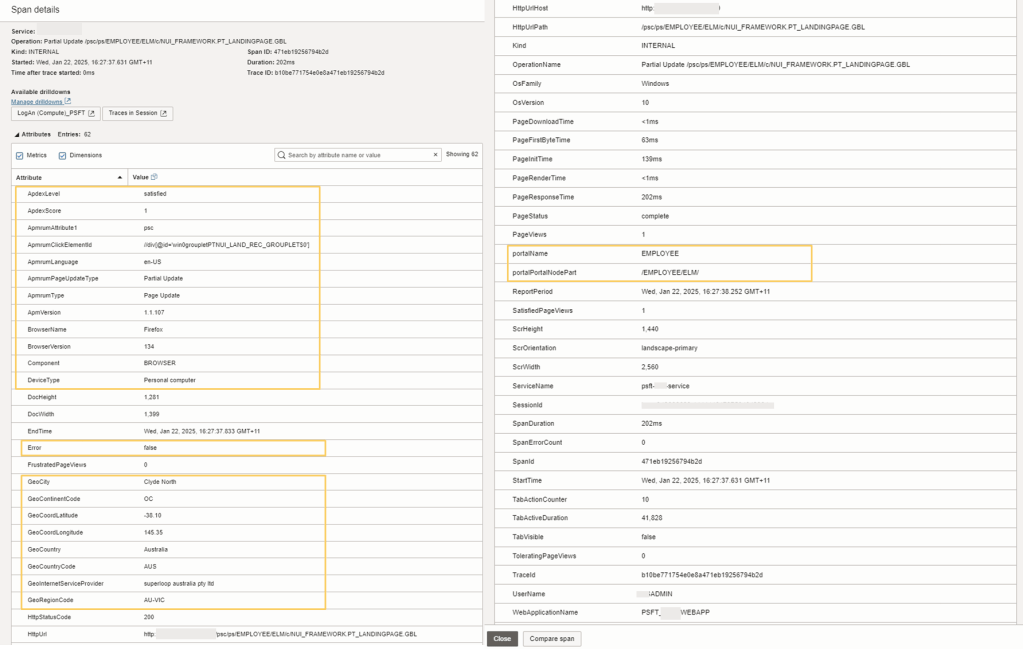
8. You can review the attributes that were collected for the span details.
The following information:
- Apdex details will help determine the end user is satisfied, tolerated or fustrated with their current session.
- Browser details help understand if they are using an compatible browser for optimal user experience. For some applications using the recommended browser type and version may impact user performance and experience.
- The Device they are accessing the application from whether from their Personal Computer, or Mobile Device
- Specific PeopleSoft Application attributes eg. PortalName, PortalPortalNodePart to help identify the Application Portal the end user is trying to access. There are many other EBS attributes collected by default which are unique to OCI APM service. For further information of these EBS attributes that are collected, please refer to Oracle E-Business Suite Dimensions in the documentation.
- Error Details – if any is reported, Additional error attributes will be be provided with further details.
- Geolocation is collected to help determine if there are potential issues relating to where an end user is accessing the application from.
- Client IP can also be collected if enabled. Please see section on Optional APM Configuration for EBS
Optional APM Configuration for PeopleSoft
Depending on the requirements, some additional configuration are available to enable in APM to further enhance the operational and observability experience. If so, please refer to the additional configurations steps below:
- Additional OCI Services providing comprehensive observability and monitoring capabilities for PeopleSoft.
- Capture Client IP Address for End User Sessions for Real User Monitoring (RUM) – see how to blog post
- General APM Configuration for Apex Thresholds, Custom Metrics, Drilldowns and Spans – see documentation
- Dashboards – View Out of Box Dashboards or Build Custom Dashboards
