
Kubernetes is a great platform to run microservices, there is no question about it. It has great features like Horizontal Pod Autoscaler and Cluster Autoscaler that make it very easy to scale whole applications depending on current or forecasted load. However with auto-scaling there are a few considerations that we need to keep in mind and one of the most important ones is that containers are ephemeral, which implies that we need to design our applications in such a way that they can scale, without compromising data persistency. There are multiple techniques available to make this possible. A common way to achieve this, is by using Persistent Volumes (PV) and Persistent Volumes Claims (PVC), that hook via the CSI (Container Storage Interface) into external disk volumes. This helps maintain state outside containers, allowing them to scale without compromising the data.
Also, with the constant embrace of Cloud providers to kubernetes, these solutions are quickly also evolving and becoming more sophisticated and easier to use. For example, now days we can extend the use of PVC with Storage Classes, implemented by the different Cloud vendors. This make the whole PV/PVC experience so enjoyable, as these storage classes become responsible to interface into the Cloud vendor IaaS land and create resources that we simply declared, while we keep reading and writing data in persistent disks.
Now, with this constant multi-cloud endorsement with kubernetes, it was a matter of time, until Cloud vendors decided to differentiate themselves by allowing the use of foreign cloud services, as first-class citizens in kubernetes. Just imagine, having the ability to use a PaaS service from “Cloud Vendor A”, seamlessly from within my kubernetes cluster that is running on “Cloud Vendor B”. The piece of magic that makes this possible is called, Open Service Broker (OSB), which is really not magic, but just a bunch of APIs that allow the control plane in kubernetes to interact with Cloud services.
In this blog, I am going to show you how to consume Oracle Cloud Infrastructure (OCI) resources from within kubernetes using the Open Service Broker. Specifically, I am going to let my kubernetes control plane to fully manage an OCI Autonomous Transaction Processing DB (ATP), as if it was a native kubernetes resource… And by the way, I am going to use OKE (Oracle managed Kubernetes), but you could very well use Google/AWS/Azure Kubernetes elsewhere and still consume OCI resources. How cool is that?
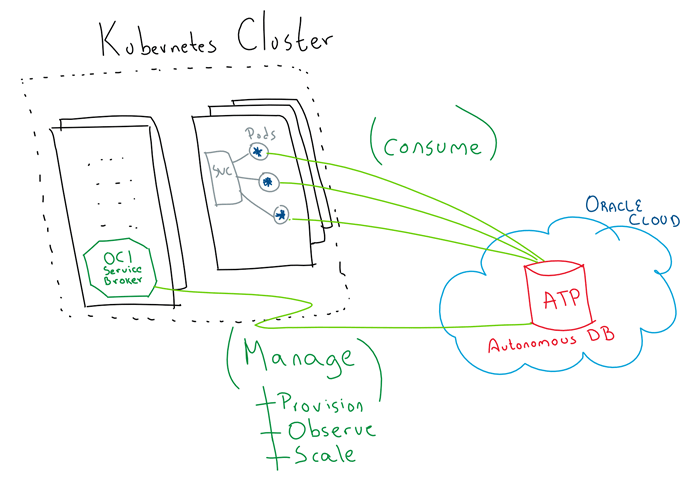
In a nutshell, this is what I am going to do:
- Install and configure OCI Service Broker in the Kubernetes cluster.
- Provision an Autonomous DB via Kubernetes (Service Broker).
-
Scale my ATP instance from my kubernetes cluster.
Easy, huh? Ok, let’s have fun!!!
Before we start
In this blog I assume the following:
- You have an Oracle Cloud account. If you don’t have an Oracle account yet, request a free account here: https://cloud.oracle.com/tryit
- In this blog, I assume that you have a Kubernetes cluster (whether it is OKE or elsewhere) and you are familiar with basic Kubernetes concepts. If you are not, refer to one of our previous blogs.
-
I will try to cover and summarise all the important bits and pieces to achieve our goal, but if you wish more information, refer to this official site.
Installing and Configuring OSB in OKE
First, we need to install the Kubernetes Service Catalogue client, so that our microservices running in the kubernetes cluster can use external managed services, like in this case ATP.
-
First, make sure that Helm and Tiller are installed. Think of Helm like a client, similar to “apt-get/yum/homebrew” for installing components in Kubernetes. Tiller is an extension of Helm that lives in the kubernetes cluster and talks directly to the API Server to install/delete/upgrade/query resources in Kubernetes.
If you are using Mac, simple do:
brew install kubernetes-helm
If you are not using Mac or simply want to use the script mode:
curl -L https://git.io/get_helm.sh | bash
- Now, let’s initialise helm and install Tiller:
helm init --history-max 200
Note: OKE provisions Tiller by default in clusters, so it might already be installed, but depending when you installed the cluster, it might be an old version.
If you need to upgrade Tiller, simply add – -upgrade at the end of your helm init command.
helm init --history-max 200 --upgrade
-
Now add the Kubernetes Service Catalogue repository and chart.
helm repo add svc-cat https://svc-catalog-charts.storage.googleapis.com


helm install svc-cat/catalog --timeout 300 --name catalog
Note: For the purpose of this blog, we are going to use the default embedded etcd. This is not recommended to run the Service Catalog using an embedded etcd instance for production, but a separate etcd cluster should be used.
-
Next, let’s install svcat, that is the Service Catalog CLIT tool.
If using Mac:
brew update && brew install kubernetes-service-catalog-client
Otherwise:
curl -sLO https://download.svcat.sh/cli/latest/linux/amd64/svcat


chmod +x ./svcat


sudo mv ./svcat /usr/local/bin/


svcat version --client

-
Once Helm, Tiller and svcat are in place, let’s proceed to deploy the OCI Service Broker. In order for the OCI Service Broker to connect into the OCI tenancy, we need to setup a few settings in the form a kubernetes secret.
kubectl create secret generic ocicredentials \


--from-literal=tenancy=<CUSTOMER_TENANCY_OCID> \


--from-literal=user=<USER_OCID> \


--from-literal=fingerprint=<USER_PUBLIC_API_KEY_FINGERPRINT> \


--from-literal=region=<USER_OCI_REGION> \


--from-literal=passphrase=<PASSPHRASE_STRING> \


--from-file=privatekey=<PATH_OF_USER_PRIVATE_API_KEY>
Note: Substitute each of the values with the corresponding one for your environment.

- Then, install OCI Service Broker using Helm
helm install https://github.com/oracle/oci-service-broker/releases/download/v1.3.1/oci-service-broker-1.3.1.tgz --name oci-service-broker \


 --set ociCredentials.secretName=ocicredentials \


 --set storage.etcd.useEmbedded=true \


 --set tls.enabled=false
Note: For the purpose of this blog I am leaving TLS disabled and I am using the embedded etcd container. For a production installation, please refer to these guidelines.
- Now we need to register the OCI Service Broker. Let’s download a sample file here.
- Substitute the namespace of the OCI Service Broker, in this case: default
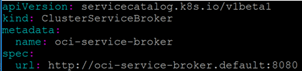
-
Now, apply/create the file using kubectl
kubectl create -f oci-service-broker.yaml

- Query the status of the broker using svcat:
svcat get brokers

- Get the registered services:
svcat get plans
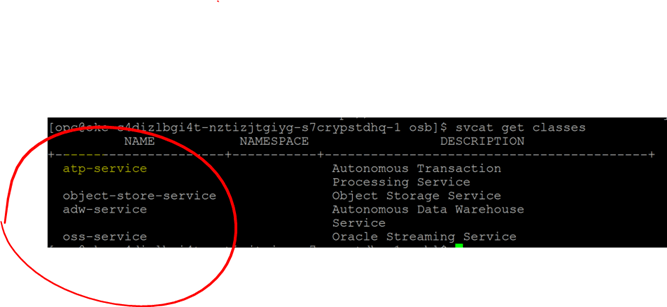
In the next section we are going to use the “atp-service” plan, which allows to provision and manage instances passing configuration details such as CPU and storage size.
Great, ATP is there, together with ADW, Object storage and Streaming Service! Now we can start interacting with OCI cloud services as if they were native kubernetes services.
Create an ATP instance via Service Broker
In this section we are going to use the existing ATP Plan that, as mentioned earlier, it allows the user to specify CPU and storage size.
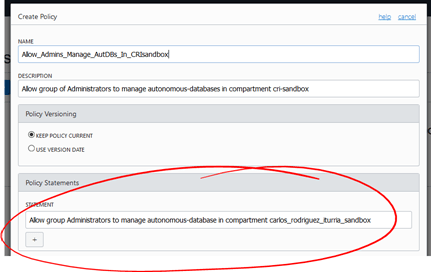
The first thing to ensure is that the OCI user for OCI Service Broker have “manage autonomous-database” permission in the target compartment.
- Create a Policy in OCI console that grants this permission if not allowed already.
Allow group <SERVICE_BROKER_GROUP> to manage autonomous-database in compartment <COMPARTMENT_NAME>
- Great, now moving back to happy kubernetes land, simply create a YAML file with the information of the ATP instance that you want to provision. You can gran YAML samples here.
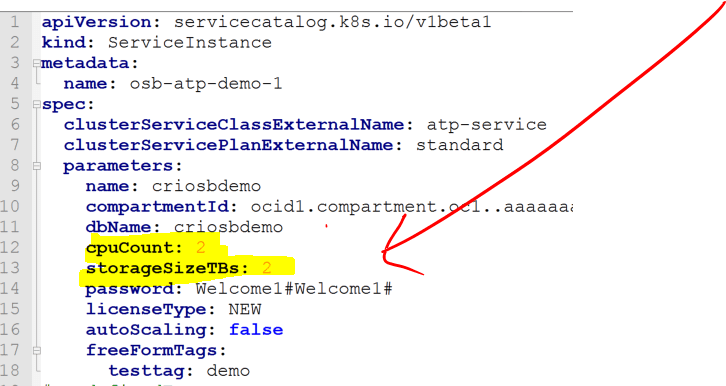
- For example, using atp_instance-plain.yaml, edit the values to match your requirements.
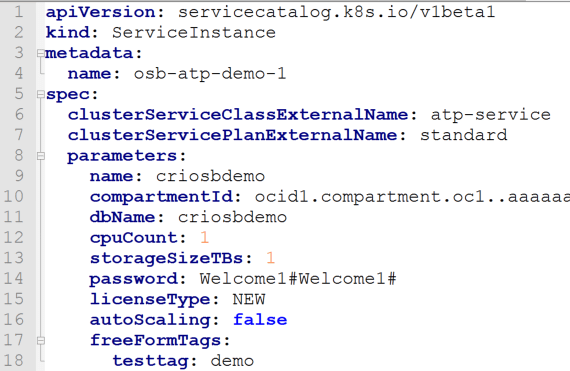
Note: Make sure to substitute the values, based on your requirements, especially:
- Line 11: DB Name
- Line 14: DB password (Use a min 12 characters strong password. Don’t use Welcome1# of course!) – I am using a clear text password for simplicity purposes, please try using KMS or secrets instead for production workloads.
- Line 12: Original CPU count
- Line 13: Original Storage count in TB
- Line 15: License Type: If you are BYOL for spinning the ATP DB, say it so, it will super cheap. Otherwise choose new license
- Once you are happy with your YAML file, apply/create it using kubectl
kubectl create -f oci-service-broker.yaml

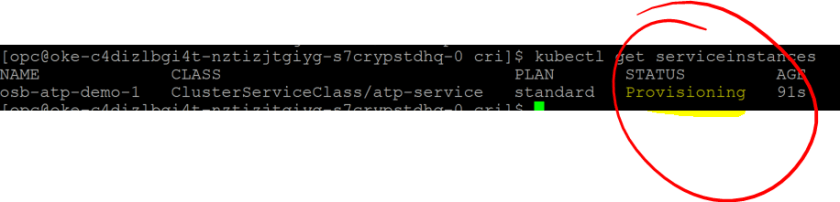
- That’s it, make sure it succeeded, by querying it:
kubectl get serviceinstances
If you are fast enough, it should say “Provisioning”
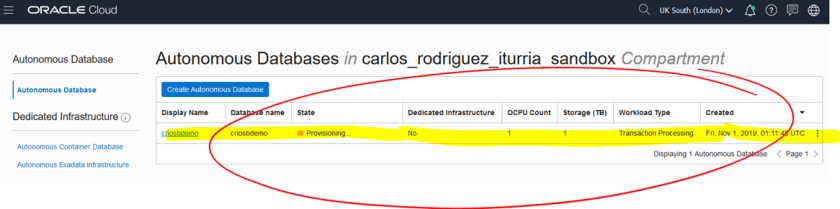
- Great, it means that the ATP instance is being provisioned. Go to the OCI console to ensure that is the case:
- Great, within a minute or 2 your ATP instance is ready to be used
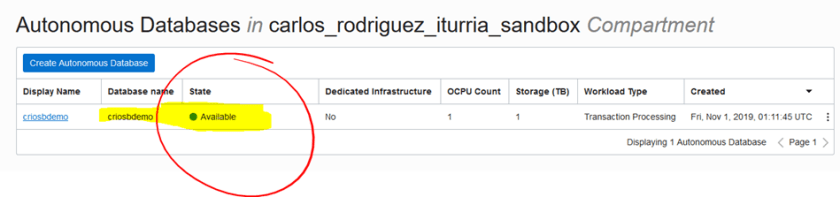
- You can also check this by querying your service instance in Kubernetes
kubectl get serviceinstances

- Great!!! We are almost done. Last thing to try is to see how simple we could scale up our ATP instance. Since we are in Kubernetes land, we can simply re-apply our descriptor with a new configuration. For example, let’s add more CPU and Storage:
- Simply re-applying the YAML file:
kubectl apply -f oci-service-broker.yaml
- Then, query again the service broker instance:
kubectl get serviceinstances
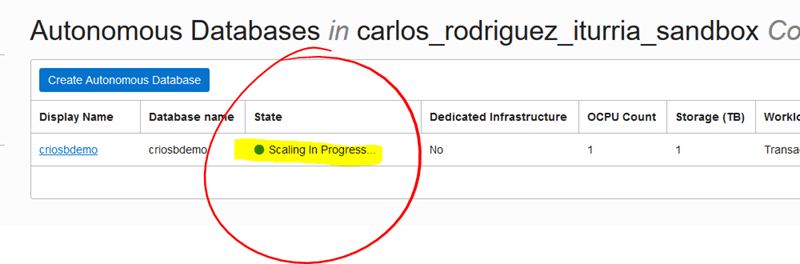
- You will see that the actual ATP instance is being updated

- Quickly have a look at the OCI console, you will notice that the ATP instance is being scaled
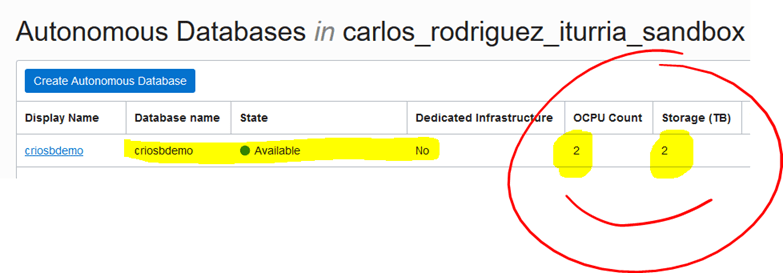
- After a few seconds, you should have an ATP instance with 2 CPUs and 2 TBs of storage.
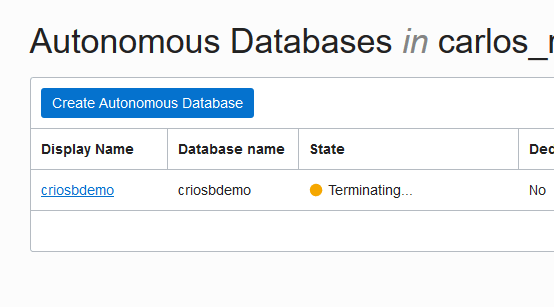
- Obviously, deleting the service broker instance in kubernetes (kubectl delete serviceinstance XXXX) will also delete the ATP instance:
Now, if you are like me, you MUST be jumping on the chair with so much joy and excitement!!! But chances are I am simply just weird. I get that a lot!
Congratulations, on getting the OCI Service Broker installed into your Kubernetes cluster and configured to manage an Autonomous DB, as if it was a native Kubernetes resource inside the cluster.
Trust me, this is just the beginning of a totally new multi-cloud world. Soon, we will see hybrid Kubernetes clusters, consuming cloud resources from different Cloud vendors, and that my friends, is my not too distant prediction.
If you have any question or comment, feel free to contact me directly at https://www.linkedin.com/in/citurria/
Thanks for your time.

Gold. Well done
LikeLike