
Now we’re ready to create connections and integration from OIC. If you missed part 1, please go for Part 1 now. Also my colleague Carlos already wrote excellent blog, Teaching how to integrate Salesforce and Sale Cloud with Oracle Integration Cloud Service so you can look at how to configure outbound message from Salesforce.com and Salesforce Connection with Trigger from OIC.
We know OIC is capable of hybrid integration so you actually can use OIC for SaaS integration scenarios such as SaaS and SaaS or SaaS and on-premises. You may need to set up VPN between your data centre and OIC using VPNaaS (VPN as a Service from Oracle) or just install OIC connectivity agent inside your organisation network. It’s really depending on the network / security policy of your organisation.
For PeopleSoft, it’s normally located behind corporate firewall so make sure you’ve got VPN is working or connectivity agent installed. So make sure that you’ve got successful web service call from public internet using the SOAP / REAT API test client such as Soap UI / Postman. That would save lots of your time to debug connectivity issue later. Don’t forget to enable web service request logging as well. PeopleSoft provides excellent internal tools to monitor web service request which I will explain next section.
Enable request message logging from PeopleSoft
Visit again to NavBar from top right-hand side from PeopleSoft, then go to Navigator, PeopleTools, Integration Broker, Integration Setup, Services. Now search by service name CI_CONTACT_INFO. After that, select operation CI_CONTACT_INFO_F.V1. Finally select Routings tab and set *Log detail to Header and Detail as below. This will enable web service request message logging which helps you to debug.

Go to Navigator, PeopleTools, Integration Broker, Service Operation Monitor, Monitoring, Synchronous Services from PeopleSoft, and search request message for I_CONTACT_INFO_F.V1 operation as below. 
Select Details link and again View XML from details page. Then it will show XML content of request message.
Good to draw something simple before jumping in!
Actually it’s a good idea to have simple integration flow first and get it grow with some more details as necessary later. So here is my simple flowchart what I want to achieve;
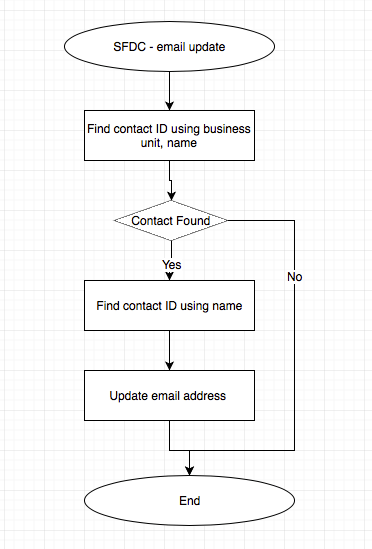
It’s just mimicking email address update from PeopleSoft Contact Information page. In PeopleSoft, contact information is searched by business unit and name, etc. Then user selects actual contact information and takes action to do for that.
To make things easy, I’m just going to use fixed business unit and name to search contact information and to skip contact creation upon not-found scenario. Also I assume there is no name duplicates in contact information – In real world scenarios, we have to cater duplicates! From next section, I’ll show some of hands on step by step from next section.
Now let’s do OIC and run it
- Define SOAP Connectionwith Invoke role for PeopleSoft SOAP web service. Log onto OIC and go to Connections. Then create SOAP Connection with Invoke
 You may have following error upon using runtime WSDL URL from PeopleSoft.
 In that case, please zip downloaded WSDL and schema files before from runtime WSDL URL as one file and upload it from Connection Properties. Continue to configure Security and Agent. Assume that you’ve got Salesforce.com adapter ready too. So we have all adapters ready to go.
- Now create connection from App Driven Orchestration.

- Put integration name SFDC_PSFT_SYNC and others. Having meaningful package hierarchy is another simple best practice to manage integration later (e.g. import / export integration).

- Define trigger for this integration from SFDC_CONTCT_INFO, which is Salesforce.com adapter name .

- Then name the endpoint and select outbound WSDL as well. Select Next.

- Uncheck “Send a Response” and do Next.
- Last step for this adapter. Select Done.
 So integration has trigger configured from Salesforce.adapter.
- Now configure Invoke with SOAP connection for PeopleSoft. Enter some name meaningful and select Next.

- Choose find operation CI_CONTACT_INFO_F. And select Next.

- Select No for Configure Header and select Next. Then it will show Summary page. Select Done.
 Now we’ve got find contact operation configured.
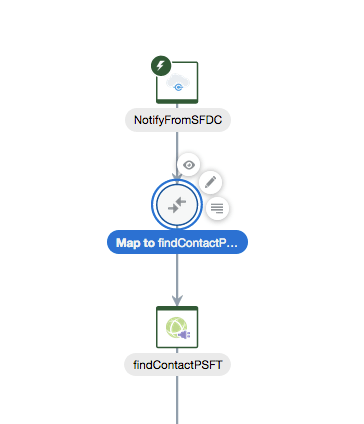
- Configure mapping – SetID with “SHARE” and NAME1 with concat(FirstName + ” ” + LastName). We can define SetID with Assign action to be reused later from flow, I’ll explain a but later.

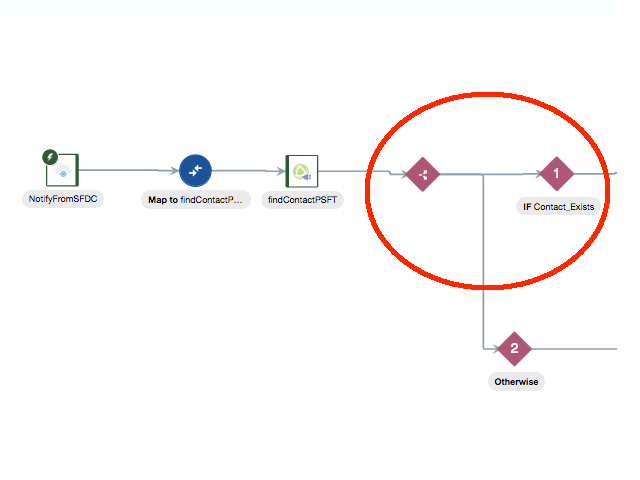
- Now add Switch Action after find contact operation and put condition with count( CONTACT_ID) > 0.0 which means When contact information exists – one or more.
- It’s obvious that I need to use CONTACT_ID from search result from later flow. I can use Assign action to define variable once and refer it or reassign value later.
 So CONTCT_ID, SETID will be mapped later as $CONTCT_ID, $SETID.
 - Finally add get operation (1st red circle below, CI_CONTACT_INFO_G) and update (2nd red circle, CI_CONTACT_INFO_UD) operation into flow and completed required mapping. Use Assign action (1st red rectangle) to hold some values from get operation results which would be used from update operation.

Again using Assign action is highly recommended for reusability and reducing unnecessary mapping so define it for most of values from get operation results.
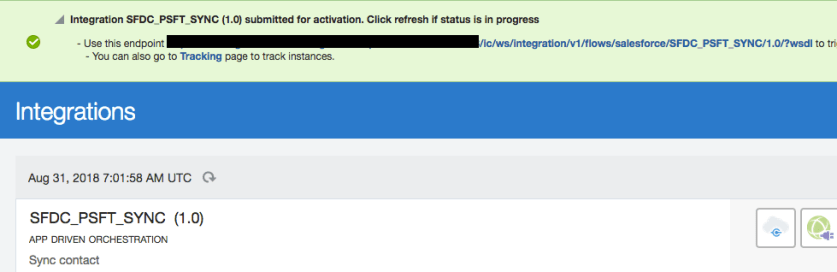
- Complete mapping and publish it. While OIC publishes it, it will show endpoint to be used. For this integration, Salesforce.com will invoke this integration using this endpoint upon contact information update.
- Before changing email address, let’s get contact information for Bruce from PeopleSoft.
 I’m not using real email address so please don’t try given email address! you’ll notice email address is the one of movie starred by Bruce Lee.
 - Jump to Salesfor.com and go to Contact and search for Bruce. Select Edit for Bruce.

- Change email address of Bruce (another movie done by Bruce) and save it.
 So the moment update is done successfully, is shows changed email address from contact list as below. At the same time, Salesforce.com invokes web service from OIC to notify changed email address.
- Back to PeopleSoft and search Bruce again. It is showing updated email address!

- Now let’s check it from OIC too. Go Monitoring, Integrations to see last message as below. In case of something wrong, there will be more than zero for Errors. Click Success under number or go to Tracking.

- Track Instance shows status of integration instance. Click First Name.

- The full flow of this integration instance is shown visually as below.

I’m sure we can apply the same pattern for realtime sync between PeopleSoft HCM and Oracle HCM (or any HCM SaaS application). Well for PeopleSoft, we have typical another use cases with import / export files for sync with other applications so I hope that will be my next blog for PeopleSoft integration with OIC.
Let’s do OIC and see you soon.

This post is so helpful! Thank you so much!
LikeLike
Really enjoyed your article as its highly informative
LikeLike
Hi,
Thanks for sharing, it was informative. We play a small role in upskilling people providing the latest tech courses.
Join us to upgrade on peoplesoft-admin Online Training
LikeLike