
Building Enterprise integrations in the Cloud with iPaaS brings many benefits, including among others: simplicity, agility and scalability. However, these benefits should not be taxed by having a weak core, not able to properly manage common enterprise requirements, such as error management. I’ve been a bit disappointed with how most iPaaS vendors handle runtime exceptions of integration flows. A typical example of this, is not being able to support dehydration for asynchronous flows (i.e. dehydration is crucial to supporting long-running instances by saving their memory state into a database, until a correlation invocation, a.k.a call-back, wakes it up to continue with the flow). This causes that when an error occurs, recovery has to start from the beginning of the integration flow that failed.
In these situations, we would have to either design an integration to be fully idempotent and stateless across all its partner links (service invocations), which is not always possible. Another way to do it is by manually handling the recovery of errored scenarios, this is to avoid state inconsistency across the previous service invocations in the orchestration, prior to the error… But then if we have to manually handle compensation, what about iPaaS being easier?
Luckily, Oracle Integration Cloud maintains simplicity at the front end and a mature and strong integration core at the backend. It acknowledges when an orchestration is asynchronous, so that dehydration points (a.k.a. break points) are enforced along the way across service invocations or long-term actions (e.g. waits), enabling with this long-term running instances avoiding to timeout, but to stay in memory (and DB back store) until all activities and external call-backs in the orchestration flow complete.
In this blog, I am going to show you how to recover errored instanced with Oracle Integration Cloud. For this, I am going to build a flow that demonstrates how errored instances recovery occurs from the latest dehydration point, allowing you to simplify complex orchestrations without having to compensate manually.
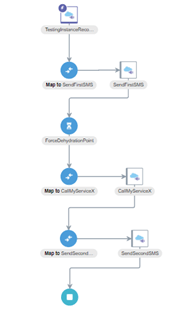
I am going to do this by creating a simple asynchronous orchestration that has the following flow:
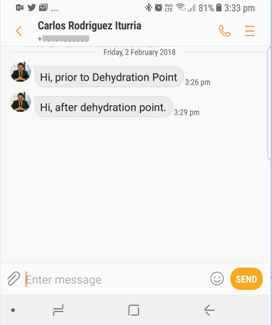
- Sends first SMS with a message saying something like: “Hi, prior to dehydration point.”
- Forces a dehydration point by using a Wait activity (say wait for 3 mins).
- Invokes service “X” to force an error (we need to be able to easily shut it down or bring it back up).
- Sends a second SMS with a different message, saying something like: “Hi, after dehydration point.”
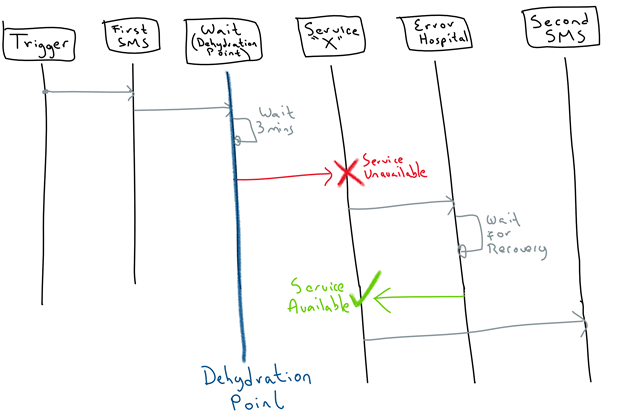
The expected result is that:
- We receive the first SMS, saying: “Hi, prior to the dehydration point.”
- Wait for 3 mins.
- Before the wait activity expires, we shutdown service “X” (so that we force the orchestration to fail after the wait activity).
- We should see an error in the Oracle Integration Cloud – Error Hospital for this instance.
- Start service “X”
- In the Error Hospital, we select the errored instance and click to recover
- We should get ONLY the second SMS, saying: “Hi, after dehydration point.”
As you can see, we don’t get the first SMS, but ONLY the second one, it means that the recovery of the instance happened from the last dehydration point and not from the beginning of the Orchestration flow.
Pretty interesting, right? Let’s get to it…
Pre-requisites
- We are going to be using Oracle Integration Cloud. If you still don’t have access to it, you can request a free trial at https://cloud.oracle.com/tryit
- We are using an existing service that sends SMS via Twilio, if you don’t have a similar one, feel free to replace the SMS call with a simply log activity. At the end of the day what you want to validate is that recovery of an errored instance will happened from the last dehydration point and not from the beginning of the integration flow.
Creating Service X Integration to force runtime error
The first thing we want to do is to create a simple Service X, that will help us as s switch to force an error when the service is down and we can then easily bring it back up to recover and complete an instance. Let’s create a simple 1-way REST service that receives POST requests and just logs the request.
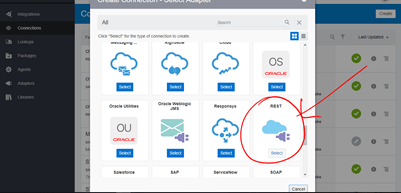
- Login to your OIC Integration console and create a new REST connector.
- Call it something like myTrigger_rest_conn of type Trigger. Also feel free to add some description.
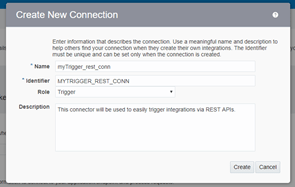
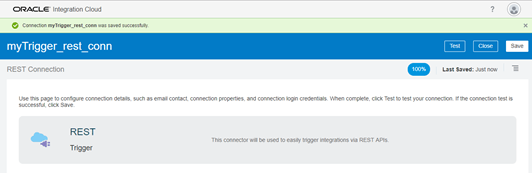
- There’s really nothing else to configure here. Just test, save and close. Make sure the connector is marked 100% complete.
- Now on the left menu go to Integrations and create a new one of type Orchestration.
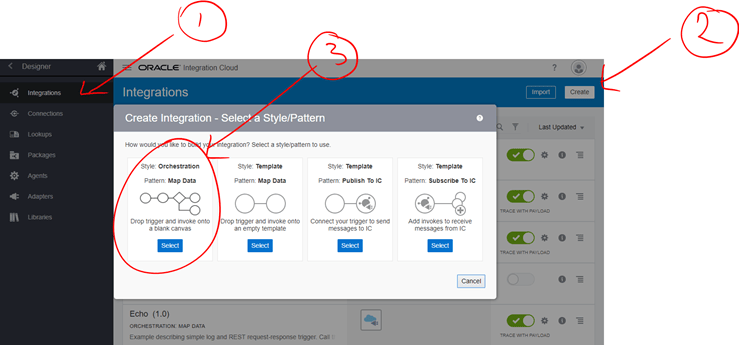
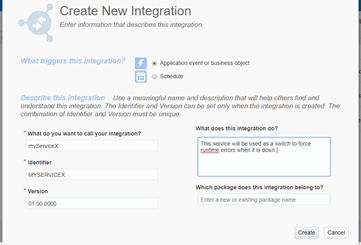
- Call it something like, myServiceX. This is going to be the service that we are going to use like a switch, so that we can bring it down and force with that a runtime error.
- On the right menu, expand REST and select your just created Trigger REST connector. Then drag it into the beginning of the orchestration flow at the top.
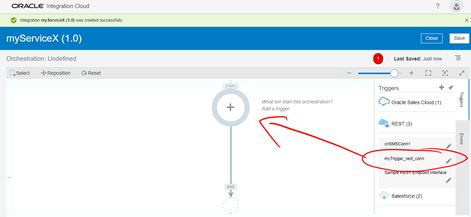
-
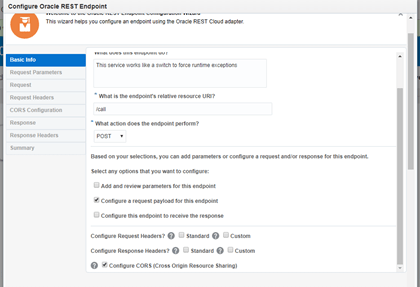
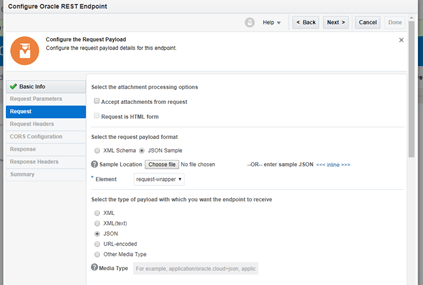
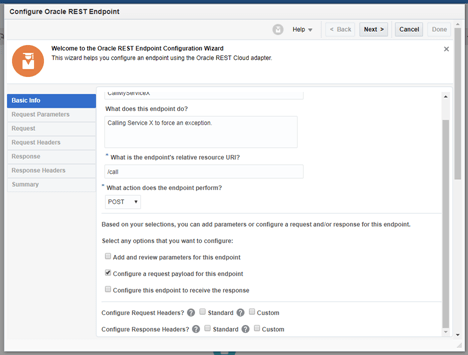
Try to fill it as following the next guideline:
- URI: /call
- Action: POST
- Tick, “configure a request payload for this endpoint” only
- Tick CORS at the end.
- Select JSON Sample option and enter a simple JSON, something like: {“msg”:”msg”} – Validate no errors are present and then click OK. Then click NEXT.
- Enter * for allowing all Origins. Next and finally Done.
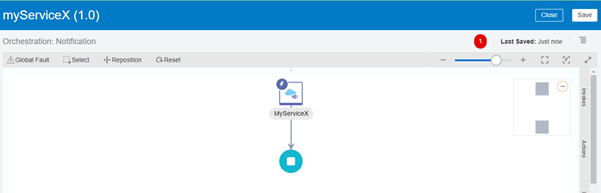
- We really don’t want to do much here, just click on the burger menu at the top right and click tracking, so that your orchestration completes.
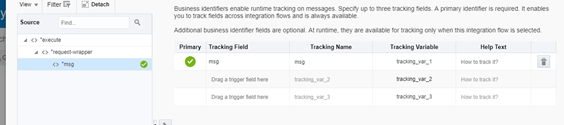
- Then save it and close it.
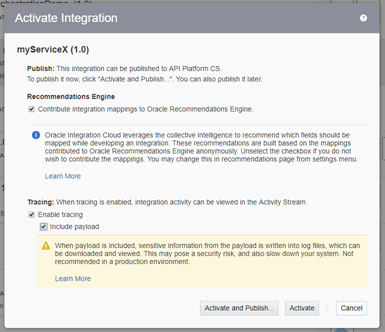
- Notice that your integration has not been deployed. For this click on the grey switch to the right. Tick the boxes to add tracing if you want and then click Deploy.
- Your Integration should be green. That means that it is up and running.

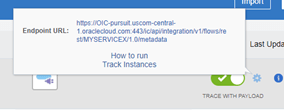
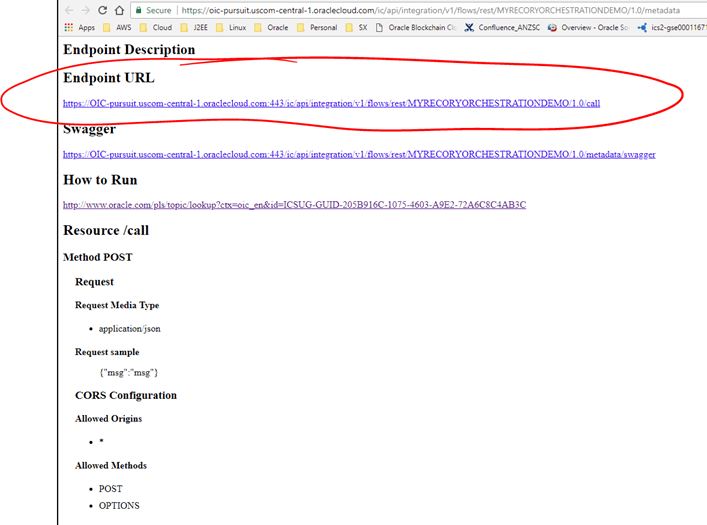
- Click on the mini-cog icon next to the green switch. It will tell you the URL to get to the Metadata of your REST API.
-
You can click on this link. It will ask you to enter your OIC credentials and then it will show you the metadata related to your REST API. If you remove the word “metadata” at the end of your Endpoint URL, that is your REST API base URL. In our case it is:
-
Based URL: https://oic-pursuit.uscom-central-1.oraclecloud.com/ic/api/integration/v1/flows/rest/MYSERVICEX/1.0
Note: The actual REST API endpoint that we configured (if you followed the instructions) is: [BASED_URL]/call
-
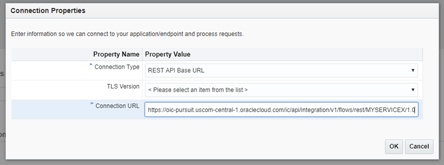
- Now, go back to Connections and create another REST Connector, but this time select type: “Invoke“.
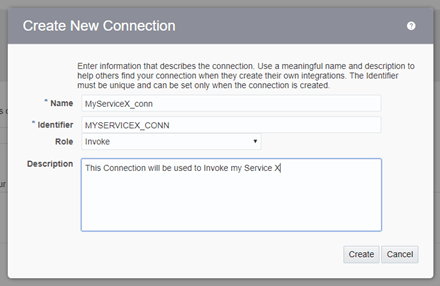
- Point to your Service X that you just deployed. Use the Based URL to point to it.
- Configure Security with your OIC username and password.
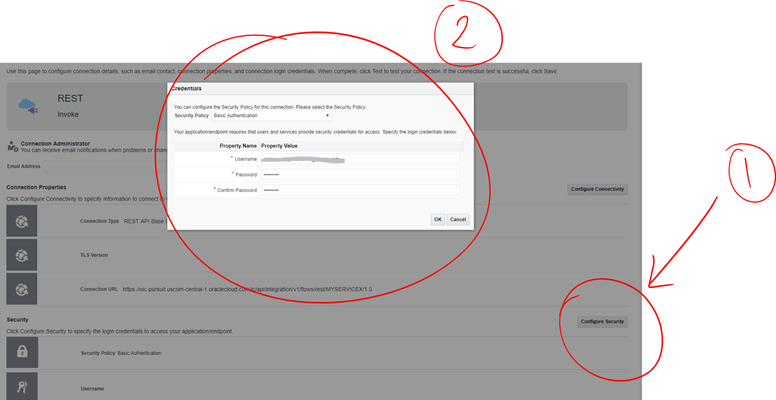
- Make sure you test, save and get a successful message at the end.

Ok, we have now completed all work necessary. Now in the next section we are going to build the main Orchestration that we are going to use to force a runtime error and recovery.
Building Main Orchestration to be Recovered
In the previous section, we built a simple REST based service that will help us switch at runtime to force an error. In this section we are going to create a new Orchestration that consumes the previous one, so that it fails at runtime when the “switch” is down.
-
The first thing I want to do is to create a new REST Connector, but this time I want it to “Invoke” another service I had built before, that sends SMS messages via Twilio APIs. I blogged how to build this service some time ago. If you want to build a similar services that sends SMS messages, go here. Otherwise don’t worry, instead of the SMS call, use anything that can tell you if that part of the orchestration flow was executed or not, for example, a simple Logging activity would do.
-
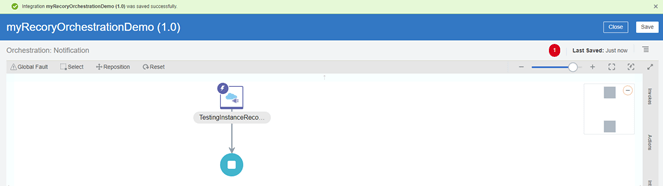
Then, the next step is to build the main Orchestration that will force an error at runtime. Similarly, as you did earlier, create a new Orchestration and drag and drop the REST trigger connector at the beginning of the flow.
-
As for the REST trigger connector, the following are suggestions:
- URI: /call
- Action: POST
- Tick, “configure a request payload for this endpoint” only
- Tick CORS at the end.
- Also, select JSON Sample option and enter a simple JSON, something like: {“msg”:”msg”} – Validate no errors are present and then click OK. Then click NEXT.
- Save it.
-
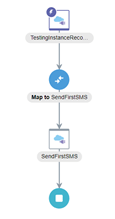
Now, I am going to use the other “SMS Invoke” REST connector that I built earlier, after the first REST connector. I am going to configure it to send a hardcoded message to my mobile saying: “Hi, prior to Dehydration Point“
Note: If you don’t have access to a service that sends SMS messages, adjust the instructions below with a simple Logger activity and then simply validate the logs at the end.
- My Orchestration currently looks like this:
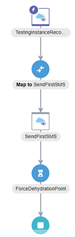
- Now, after sending the first SMS (or writing the first Logger), we are going to add a Wait Activity that will force our integration to dehydrate at runtime. Let’s say wait for 3 minutes.
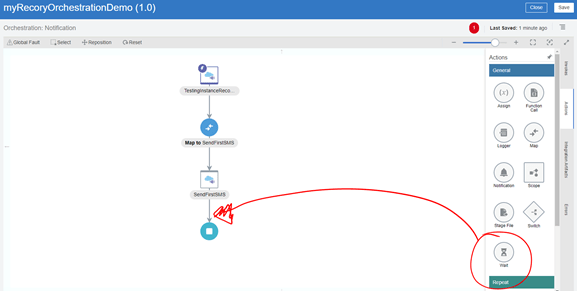
- My Integration looks like this:
- Now, next we need to add an invocation to our “Service X”.
- Using the last connector that you built in the last section, add it below the Wait operation.
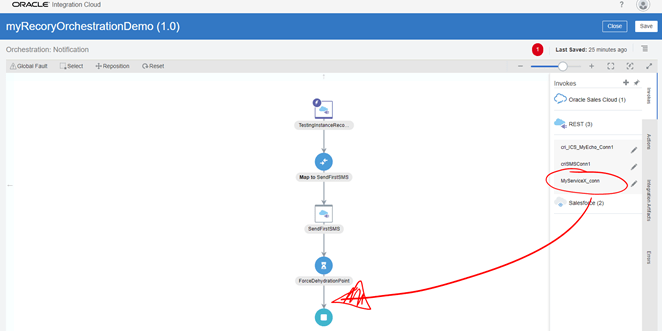
-
Configure the ServiceX Invoke REST connector with the details that you chose when building the first orchestration, if you followed the instructions, it should be something like the following (otherwise adjust accordingly):
- URI: /call
- Method: POST
- JSON Sample: {“msg”:”msg”}
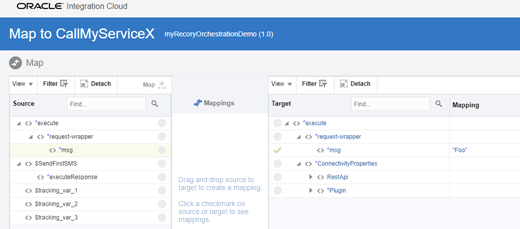
- Complete the new mapping for ServiceX. Set a hardcoded value or drag the left msg to right msg – It doesn’t matter what you set, we are not reading the variables anyway.
- Your integration should look like this:
- Finally, add a second Invoke activity to the SMS service (or Logger), but this time say something like: “Hi, after dehydration point”.
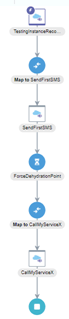
- Your integration should look like this:

- You can re-arrange the icons to make it look more readable, for example:
- Now, add tracing to complete the integration, save and close.
- Deploy the integration. Add tracing and audit logs to have more visibility on what is happening. Make sure it goes green:

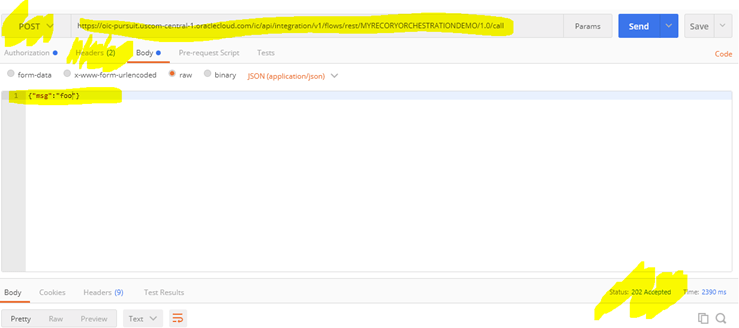
- Before we shutdown ServiceX and try to recover, let’s test that everything works. For this I am going to use Postman, but you can use your favourite REST test client. First, we need to get the REST API Endpoint URL, for this, click on the cog-icon closed to the green switch (or at the top of the page just after deploying your integration) and go to the Metadata for your REST API.
-
Copy that into Postman and configure the following details:
- Credentials with your OIC username and password.
- Method as POST
- Headers: Content-Type -> application/json
- Body: {“msg”:”foo”}
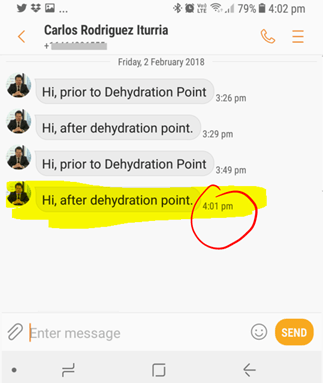
- The first SMS comes straightaway saying: “Hi, prior to Dehydration Point”
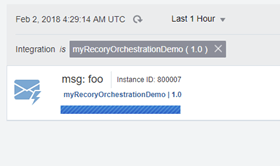
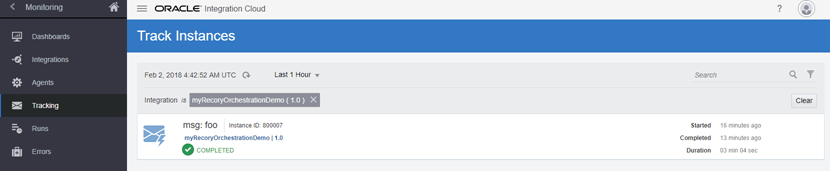
- In the Monitoring page we’ll see how our instance will be waiting for 3 mins after it sends the first SMS.
- Then after that time, the second SMS arrives.
- The instance is marked as completed in the Monitoring page.
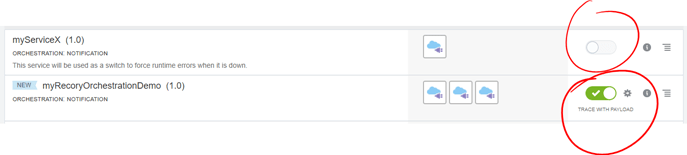
- Now, let’s test the actual recovery of errored instances from latest dehydration point. For this, go back to the ServiceX integration and deactivate it, by clicking on its green bar.
- Make sure your ServiceX integration is not active, but only the main Orchestration.
- Now, use Postman (or whatever tool you used previously) to test it again.
- Once again you should get the first SMS, but this time after 3 minutes your instance is going to fail, and it is going to be marked as Errored.

- Before anything else, go back to ServiceX integration and re-activate it. Both orchestrations should now be green.

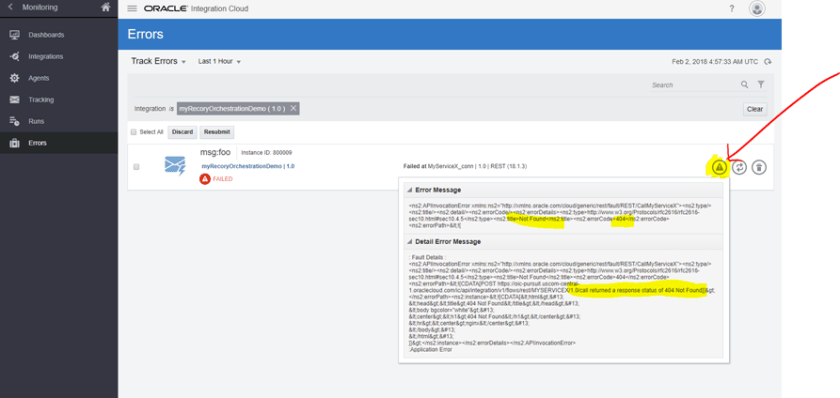
- Now, go back to your Monitoring page and click on the errored instance. Click on the “View Error” icon. As expected it failed because ServiceX was not running.
- Now, let’s try to recover this instance, for this you can either click on the middle icon on the right (the one with 2 mini curved arrows) or select the instance on the left and click the “Resubmit” button. Basically, this means that you can either recover 1 instance or multiple in bulk.
- Confirm the recovery.
-
Now, you should get the second SMS almost straightaway
- This is because, as expected the recovery occurred from the latest dehydration point that in this case we forced using a “wait” operation. However, in a real situation, this could have been previous invocations to other services.
- Also, validate that now the status of this instance appears as “Success”, no more errors to report.

This is very important because that means that any previous successful activity don’t have to be rolled-back or retried, but after a successful recovery, the orchestration will continue from the last point when it failed.
I hope you found this blog useful, if you have any question or comment, feel free to contact me directly via LinkedIn at: https://www.linkedin.com/in/citurria/
Thanks for your time.

4 thoughts on “Teaching How to Recover Errored Instances with Oracle Integration Cloud”