In my previous post in this series I provided an Introduction describing the high level steps I planned to take.
In this post I will walk through the detailed steps to Dockerise the MedRec application.
Dockerise the MedRec APIs
Git clone the project repository
I used my Windows Surface Pro-4 with Oracle VM Virtual Box installed to host my development VM. I managed to source a VBox image that already had Ubuntu 16.04 and Docker installed so that helped get me started. In my development environment on my laptop, I created a directory under my home directory named gitprojects.
I cd into that directory.
cd gitprojects
I then executed the following command.
git clone https://github.com/barackd222/ankimedrec-apis.git

The git clone creates a directory under gitprojects called ankimedrec-apis and contains the projects files and directories cloned down from github.com/barackd222.

With my source code now downloaded and in synch, my next step was to find a suitable base image for my Dockerfile.
Source a suitable Docker base image
As my app ran fine on Ubuntu 16.04, I initially planned to use a docker image that used the same operating system version as my Ubuntu ((https://hub.docker.com/ubuntu/ubuntu:16.04). However when I explored this option I quickly realised that the size of the Ubuntu image was bigger than what I wanted (184 MB), compared to the Alpine Linux 3.4 image (36.5 MB) . I did do some of my early Docker builds using Ubuntu image (hence there may be some inconsistency in my screenshots) but eventually changed to use an Alpine image for efficiency.
Initially I considered using a base Alpine image and then in my Dockerfile add the necessary steps to install Node.js. However finding an Alpine image with Node already installed was a bonus and saved me a little time.
Add a Dockerfile
cd ankimedrec-apis
touch Dockerfile

Using my editor of choice I then edited the Dockerfile as per screenshot below – also refer my Dockerfile on GitHub

Note: In my Dockerfile I copy the contents of my project directory gitprojects/ankimedrec-apis into the image as I build it. I have seen others use git clone as part of the Dockerfile to pull down the latest git repository into the image.
Now I am ready to see if my Dockerfile will work.
Build and Run to prove the Dockerfile
Docker Build
I proved the Dockerfile would successfully build and run by doing the following;
First I used the following command in a terminal window from within the project root directory (where my Dockerfile is).
docker build -t ankimedrec-apis:2.0 .
Note: As the docker daemon runs as the root user, you may want to add your user to the docker group in order to execute docker commands without having to use the sudo command each time.
For more please refer Manage Docker as a non-root user.


Assuming the image built successfully you can view the list of available images in the local docker environment by using;
docker images

Docker Run
In order to create a docker container I run the docker image using the following command;
docker run ankimedrec-apis:2.0
or
docker run b603db4e6802
You should see in the console that the Express Server is running on port 3000 and MongoDB is listening for requests on 27017.

I can get details about the running container using;
docker ps

I can create an interactive terminal session to the running docker container by using the following;
docker exec -it 7be202a1ecc1 /bin/bash

Note: You only have access to a subset of Linux commands from within the container.
The following command provides useful details about the container;
docker inspect 7be202a1ecc1
Amongst other things the docker inspect command gives me information about the IP address of the container.
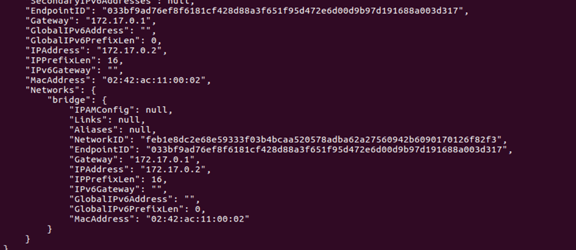
As my node application has a web (express) component, I can prove that the SwaggerUI app runs up by pointing my browser to the 172.17.0.2:3000 .
In my target environment when my application runs on the Oracle Container Cloud Service I will need to expose an external IP address in order to access the app.

Bear in mind that so far I have only dealt with the application layer, I still need to address the Persistence tier – MongoDB.
So if I try to do a GET or PUTI will get an error displayed in the SwaggerUI app.
Look for the next episode in this series of posts – Add MongoDB layer using Docker-Compose .

2 thoughts on “Exploring GitHub Docker Hub and OCCS Part 1”