
The Integration Analytics Service Type (Insight) includes Real-Time Integration Business Insight and Business Activity Monitoring. Insight allows a user to easily define business milestones, map data from existing Oracle SOA and Service Bus projects. Insight also provides an OOTB Dashboard to surface milestone status as well as providing a capability for a user to build a custom dashboard. It also exposes an Event REST API which allows a developer to POST a JSON payload to the API in order to update the Milestone Dashboard.
In my previous blog on Integration Analytics I walked through the steps required to provision the Integration Analytics Cloud Service. In this blog I want to show how easy it is to invoke the service using the exposed REST API, and create milestones that are visible in the Out of the Box Dashboard. My manager is always telling me to take an MVP ( Minimum Viable Product) approach to things I am learning so I am deliberately attempting to be as (smart) lazy as possible. If there is an existing capability that helps me to rapidly reach my end goa, then I plan to use it. Bottom line, with Integration Analytics there is a lot more I could mention but I am focussed on just getting a REST call to work against the service that I just provisioned.
My approach was as follows;
-
Login to the provisioned service
-
Establish a Milestone Model
-
Interact with the Model via the Insight Event REST API
Login to the provisioned Insight Service
From http://cloud.oracle.com, select Sign-In, Choose the data Centre (eg US2), and then click the MyServices button.
Login to MyServices – enter your Identity Domain eg audrconsul, press Next then enter your cloud credentials.
From the Dashboard, choose SOA. You should now see the Integration Analytics service that you created previously as per my blog xxx

Click on the instance name eg dmrIntegAnalytics

Click the hamburger menu (upper right)

Click Open Insight Composer
You will get the not secure message – accept the risks and move on ..

Login using the credentials you specified when you provisioned the service, for example
cloud.admin / yourpassword .

Notice when I clicked the Guided Tour icon on the Insight Home page, I was directed some really information video tutorials ( http://www.oracle.com/technetwork/middleware/insight/learnmore/insight-videos-2885081.html ). These tutorials would take me to the next level of detailed understanding on how to build models, design dashboards etc.
For my purposes and as I am being ruthless, it was close but no cigar. So my next step was to see what was within the reach of a google search — https://www.google.com.au/search?q=Oracle+Integration+Analytics+tutorial ..and Bingo!!! I found the following URL which pointed me to something that at least looked promising.
I clicked on the link – Oracle Integration Analytics Cloud: Publish Metrics With the Insight Event REST API and I found myself on an Oracle Learning Library page and ultimately at a tutorial which based on the following description, it seems like it covered exactly what I needed.
“This tutorial shows you how to use the Oracle Real-Time Integration Business Insight Event REST API to publish business metrics. The Event REST API is available with the Oracle Integration Analytics Cloud component of Oracle SOA Cloud Service. “
For your reference, the direct link to the tutorial is – http://www.oracle.com/webfolder/technetwork/tutorials/obe/fmw/soa/cloud/restapi/insight-restapi.html
which is also linked from within a catalogue of SOA Cloud Service / SOA Suite related tutorials found at http://docs.oracle.com/cloud/latest/soacs_gs/soacs_tutorials.htm
. This page also has some guided Insight related tutorials covering Designing Models, Mapping Models, Developing Dashboards and the Insight Event REST API .
When you access the tutorial you will see a I could choose to walk through each of the tutorials (and I do plan to) on a rainy day, but right now the REST API tutorial shows how I can use a pre-defined model and helps me get to my end goal quicker. So instead of creating a milestone model using the Insight Designer, I now plan to simply import a pre-built model as a head start.
The model is built around a Sales Order scenario. In this tutorial, you download and import a simple Order Processing model into your Integration Analytics environment provisioned under your Oracle SOA Cloud Service. After you import the Insight model, check the API connection, activate the model, and use the cURL command-line tool (or sample scripts provided) to publish business events by using the Insight Event REST API.
In this scenario, a Sales Order would be received (presumably because the online store isn’t directly integrated with the Sales Order system – hmm maybe there is an integration opportunity there). Secondly, the Sales Order would be created in the system, and finally once the Order processed the Sales Order is considered Finalised. The milestones in the model I am going to import are;
-
Order Received
-
Order Created
-
Order Finalised.
The tutorial contains links to where you can download the Model ( http://www.oracle.com/webfolder/technetwork/tutorials/obe/fmw/soa/cloud/restapi/files/Order%20Processing%20Model.zip ) and a number of sample JSON files for Windows ( http://www.oracle.com/webfolder/technetwork/tutorials/obe/fmw/soa/cloud/restapi/files/restapi_scripts.zip ) and Linux ( http://www.oracle.com/webfolder/technetwork/tutorials/obe/fmw/soa/cloud/restapi/files/restapi_scripts.tar ).
Establish a Milestone Model
From the Insight Home page, click Designer.

Under the Designer Tab – click Import Model
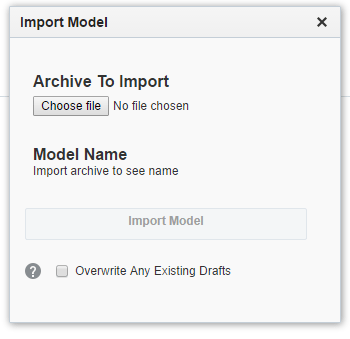
Under Archive To Import, Click Choose File.

Navigate to where you saved the Order Processing Model from the tutorial links.
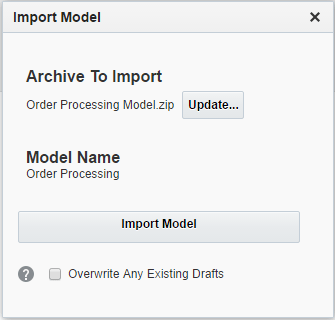
Click Import Model
If successful you should see the following;
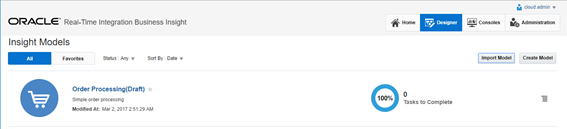
The Model must be Activated to support data collection and the creation of the Out of the Box Dashboard(s).
So click the Hamburger menu and Click Activate.

Confirm you want to Activate the model by clicking Continue,

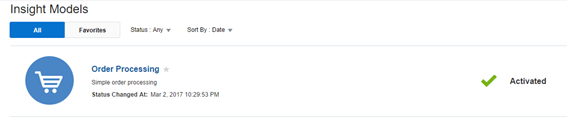
During model activation you will see the progress reported.

Once complete you will see a green tick, assuming all went well.
Interact with the Model via the Insight Event REST API
Now to interact with the imported model via REST. Click on the Order Processing model adjacent the shopping cart.

Note the Milestone definitions that have been imported.

Click the hamburger menu (top right).

Click API Invocation Manifest, you will see that a file is downloaded – Order Processing.txt

When you open the Order Processing.txt file you will see that the file will contain (amongst other things) the REST endpoint URL and the modelId.
If you open this file using a tool such as Visual Studio Code or Notepad++ you will see the formatted JSON displayed, as per the following screenshots;
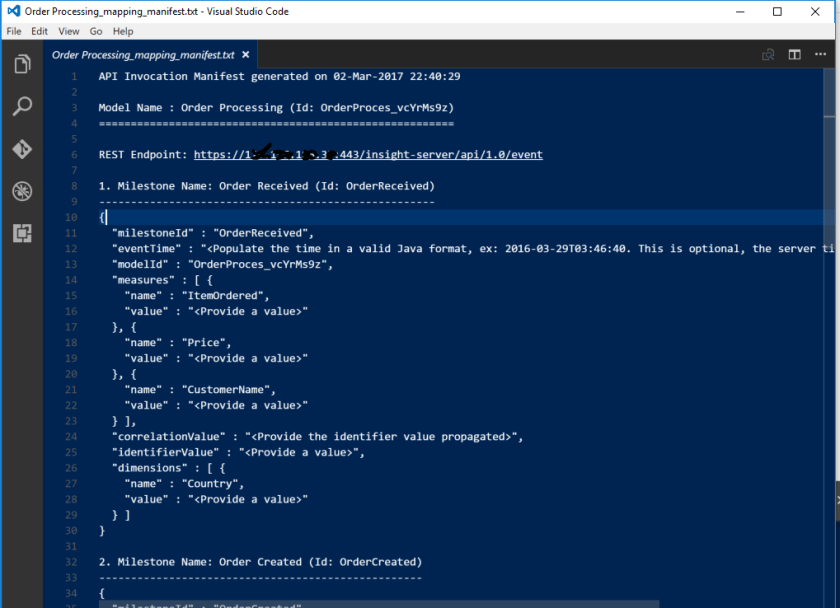
Note the REST End point for the Insight Event API and the data format expected for each of the defined Milestones.
Scroll through this file to see how the required data varies for the various Milestones in the Model.
For instance the Order Received Milestone has an identifierValue (a UniqueID containing our OrderID) and correlationValue (containing the same OrderId value). The OrderCreated and OrderFinalised has only the correlationValue.

You will need these values to target the correct Integration Analytics server and model. So be prepared to Copy and Paste the REST EndPoint URL and the ModeIId so that they handy for when we test the service later using Postman or a similar REST client such as Advanced REST Client (ARC).
REST Endpoint: https://yourServiceIPAddress:443/insight-server/api/1.0/event
“modelId” : “OrderProces_vcYrMs9z”
Note: I ended up using http://yourServiceIPAddress/insight-server/api/1.0/event
Navigate back to the Insight home page.
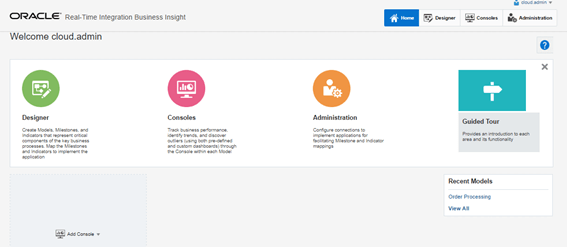
In the bottom left you should see a grey box with an Add Console link.
Click Add Console.
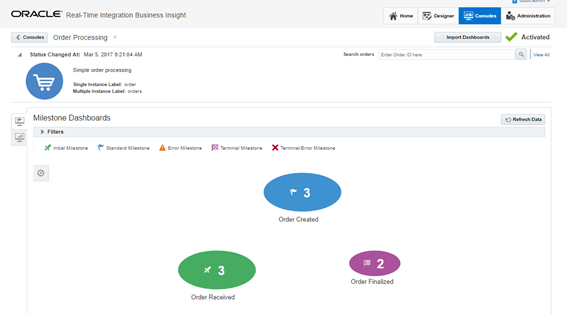
You will see something like below once you have POSTed to the Event API.
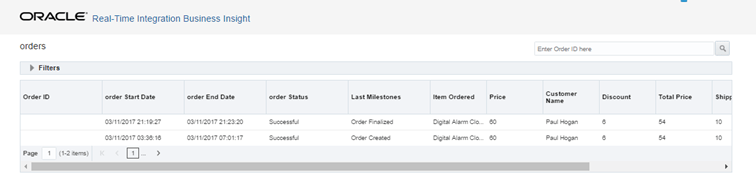
As you can see in the following screenshot I had already POSTed two messages to my Insight Event API.

Click on Order Processing in the Milestone Summary view above in order to see the actual Milestone Dashboard.
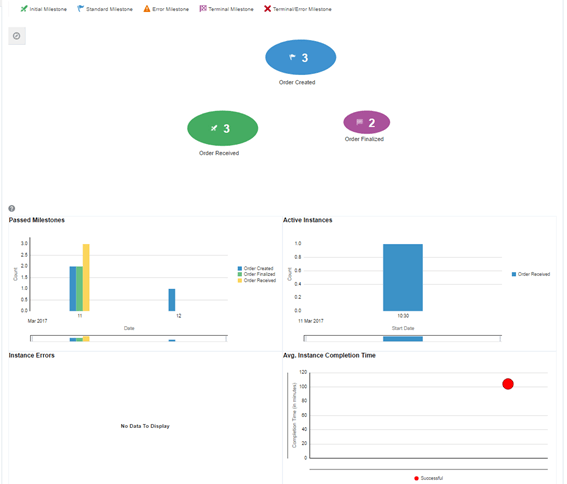
Right click on the bar in Active Instances to see more detail.


Right Click the Red Dot in the Average Instance Completion Time Chart and then select Instance List.

Additional information about the Instances is displayed. Note I am pretty sure I created the same Order a couple of times hence my data below didn’t seem to make much sense…
Now that I can see the Order Processing Milestones, I can now interact with the Integration Analytics server using Postman to send JSON formatted messages to it in order to drive the Out of the Box Insight Analytics Dashboard. Remember this is what I wanted to do all along…
Interacting with REST API using CURL
As per the tutorial the format is
curl -v -k -X POST -u “yourusername” -H “Content-Type:application/json” http://yourIsnightServerIP:port/insight-server/api/1.0/event -data @filename.json
In my environment my command looked like the following;
C:\Users\david\Downloads\curl-7.53.1\src\curl.exe -v -k -X POST -u cloud.admin -H “Content-Type:application/json” http://myipaddress/insight-server/api/1.0/event –data @wel10001_01or.json
When you run the above you will be prompted for your password.
Note: I used the default post as I just used HTTP and not HTTPS.
You should see an HTTP-202 Accepted and an “ok” (HTTP-200 message echoed to the command window.

Interacting with REST API using ARC
Using a REST Client such as ARC. The steps are pretty similar to Postman.
Enter the target endpoint eg https://yourServerIpaddress:443/insight-server/api/1.0/event (see note below)
Choose Content-Type = application/json
Choose POST as the HTTP Verb
You will need to specify an Authorization header and specify your username and password.

Once you have defined an Authorization header, you can click the pencil on the far right to edit it, and enter your credentials as per the following;

Next, copy the text from the sample files provided in the download for the tutorial under restapi_scripts, and paste it into the message body.
For example the content for OrderReceived for OrderId 10001 can be found in 10001_01or.json .

Your ARC environment should look like the following;
Notes:
- Ensure you use a UniqueId for the Order when you exercise the HTTP POST to the event api endpoint.
- The logical sequence is Order Received, Created, Finalised.
-
I used http and not https due to lack of trust / Demo Certificates …

Click SEND
You should see a 200 – OK message if all goes well.
Similar to Postman, the ARC tool allows you to save your endpoint tests under a Project for convenience. Just remember to edit your payloads for uniqueness if you targeting the same Model.
Interacting with REST API using POSTMAN
As per the ARC instructions.

Additional Information
When I initially tried to access the API, I got an error – error ““No Object found with JNDI Name \”jms/insight/InsightServerConnectionFactory\””“.
This issue occurred because the connection factory within the newly created JMS module doesn’t have “Default targeting” enabled.
This was because the post-provisioning steps were missing an instruction as per my blog – First Experience Provisioning SOACS – Integration Analytics .
