
Modern Integrations require touching lots of different APIs coming from multiple “systems”. These “systems” can be big enterprise backend applications, such as: E-Business Suite, SAP, JDE, Siebel, etc. As well as modern SaaS Applications, such as: Service Cloud, ERP Cloud, Salesforce, Netsuite, Workday, etc. These “systems” can also be other smaller or custom applications running either on premise or in the cloud exposing either SOAP or REST services.
Rarely any of these “systems” can provide solid abilities to remotely expose APIs in a way that are tailored for a specific business case. Commonly, to achieve this, we need a separate integration layer that orchestrates APIs from multiple “systems” and easily obtain the desired business outcome, in a way that they are also reusable APIs to be utilise in other business scenarios. Furthermore, in order to properly apply security measures and effectively protect these APIs and safely expose them to external consumers (potentially in the public Internet), normally we need to use an API Gateway (see this blog to learn how).
Also, in previous blogs, John Graves showed us how to automate the creation and deployment of existing “internal Integration APIs” and expose them as secured external APIs using Oracle API Platform. (See ICS to API Platform and Oracle Service Bus to API Platform).
If we take the same automation concept, we can then apply it in a DevOps scenario, where we want to achieve the following:
- Version Control the security policies to be applied to external APIs
- Automate the creation and configuration of external APIs “for any” type of internal system API, whether it is coming from ICS, Service Bus or a custom application built in NodeJS, Java, .NET, etc.
- Reduce human intervention to create and configure these external APIs, which can be error prone and also unnecessarily consumes development and testing cycles.
In this blog, I am going to show you how to treat your external APIs as source code that can be versioned, provisioned-automated and tested. For this we are going to use Oracle Developer Cloud Service.
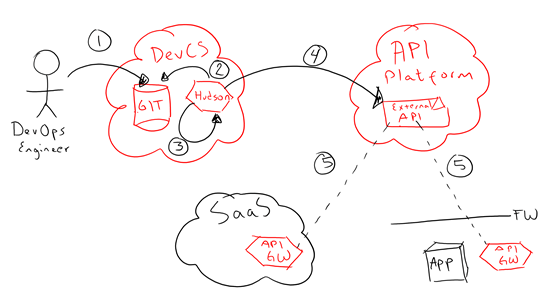
1. DevOps engineer pushes into the corporate Git repository the policy configuration of a “new external API” to be created and deployed (which wraps a system or internal API),
2. A build task is triggered manually or based on a Git code change being detected. Hudson triggers a new build task,
3. Hudson locally packages the new external API to be created, based on the set of security policies pulled from Git.
4. Hudson interacts with API Platform (via its internal system APIs) to create, release and publish the API to the API Developers Portal.
5. Hudson deploys the new external API it into the API Gateway(s) of choice,
That’s it! At this point, the external API is fully functional complying with the correct set of policies. Now, API Developers can subscribe and use this API, as part of their applications/use cases.
Pre-requisites
This blog assumes that you are already familiar with DevCS (Oracle Developer Cloud Service). If that is not the case and you need a quick tour, I encourage you to review this other blog, where I take you step by step on how to start working with Oracle Developer Cloud Service to create a project, setup a Git repository, Git clone-add-commit-push code into it, as well as how to automate builds and deployments.
In this blog, I am going to use a few basic Linux commands, which I trust should not take you by surprise, as they are common in a DevOps context. If you need further explanation on any of the steps mentioned in this blog, do not hesitate to drop me a comment or contact me via LinkedIn.
Also, I remind you that this is just one of the many ways you can solve the issues above. I invite you to find other ways and share them with us.
The various scripts and snippets used in this blog can be found here. Fork and clone it locally.
Let’s create our build task
If you haven’t done already, read “pre-requisites” above to download the required files, as well as the various links that point to other blogs in case to need to close some knowledge gaps.
Make sure that you have an existing DevCS project and Git Repository. Then, fork and clone the Github repo that contains the required files (as mentioned in the pre-requisites) and point to the DevCS Git remote repo that you intend to use as part of this setup.
-
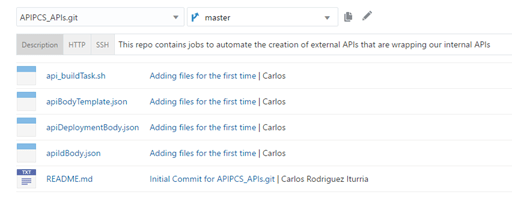
These are the files that you need to git push to DevCS repo:
-
api_buildTask.sh – This file contains the script that you need to run as a Shell step inside a new Build Job in DevCS. It is parameterised to work properly and follow the API creation lifecycle for the API Platform. Read it to get familiar to what it does and update when necessary to meet your needs. It has the following steps:
-
- Create the API
- Release the API
- Setup the API (version and vanity name)
- Publish the API to the Developers portal (this is required as I am setting a key-validation policy)
- Deploy the API to the API Gateway(s) of choice
Before you git push this file to your DevCS Git repo, you have to open it locally and set the properties at the top. You can decide what properties you want to keep in this script file and which ones to move as parameterized Build Properties in DevCS. The advantage to keep it in this script file is that you can then version control them, which can be handy. However, the advantage of moving them into DevCS Build Properties, is that they can be dynamically set in the DevCS web console, without requiring a git push. This is up to you! For example, in my case I preferred to move to DevCS the API name, version, URIs and description. This way I can easily reuse the same build task and create different APIs later.
-
apiBodyTemplate.json – This file contains a template with the policies that I want to setup on new APIs. At the moment, this file contains Head and Key validation in accordance to the work done in this other blog. If you want to apply other policies, such as throttling, OAUTH2.0, routing, etc. You need to do it inside this file. A trick that I did to know how to modify this file properly, is to create in the API Platform Cloud Portal a dummy API with the policies that I wanted to enforce to all my future APIs. Then once this dummy API was published and deployed, I retrieved its body calling an API to the API Platform itself – Then I simply used that body as the default template for future APIs.
To get the body of an existing API in the API Platform you can call the following API (substitute variables accordingly):
curl -i -X GET -u “${APIPCS_USERNAME}:${APIPCS_PASSWD}” “${APIPCS_LOCATION}/apiplatform/management/v1/apis/${API_ID}” -v
-
apiIdBody.json – This file contains the parameterised json body, used when setting the API vanity name and version, as part of the API configuration life cycle.
- apiDeploymentBody.json – This file contains the parameterised json body used when deploying the API to the API Gateway(s) of choice.
- Make sure that all these files have been git pushed to your DevCS git repo.
Let’s create a new DevCS Build job
Follow the next few steps to configure your build and deployment jobs:
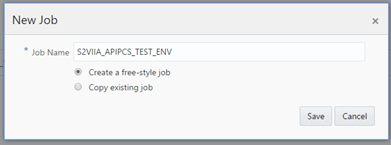
- Go to the Build tab in DevCS and create a new Job.

- Give it a sensible name and Save it.
- In the Main tab, enter a good Description to help others understand its purpose.
-
In the Build Parameters tab, tick “This build is parameterized”
NOTE: We are going to create some Parameters that we chose not to keep in our “api_buildTask.sh” file that lives in our Git repo. For example, in my case I preferred to move to DevCS the API name, version, URIs and description.
- Add a new Parameter of type “String Parameter” or “Password Parameter” in case you want to mask its value.

- Depending on what Properties you decide to create (if any), it should look like this:

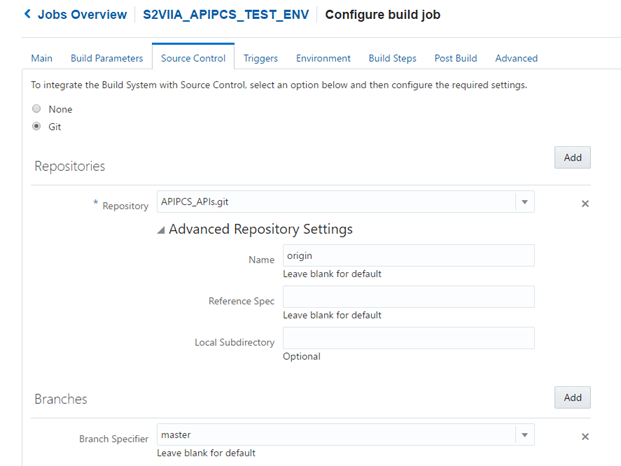
- Now Click on the “Source Control” sub-tab. Drop down the URL and select your Git repository.
- Expand the “Advanced Repository Settings” and set Name to origin.
- Then click “Add” on Branches and click the drop down menu to select your branch, in this case it is on the “master” branch.
- The final configuration will look like this:
- Click on the “Environment” sub-tab and tick the “Abort the build if it’s stuck” option and increase the Timeout to something a bit larger and tick to fail the build otherwise. Although the build should not take that long, when having multiple APIs to be deployed, this can take a few minutes…

-
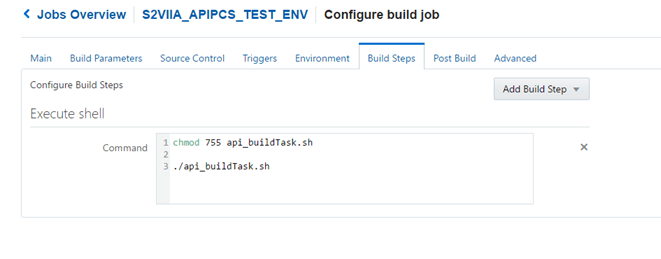
Click on the “Build Steps” sub-tab. This is where we are going to invoke the api_bodyTask.sh script. to create and deploy the APIs.
- Add a new Shell step by clicking on Build Step > Execute Shell.

-
Before running the script, we are going to make sure it has execution privileges
chmod 755 api_buildTask.sh
-
Then just execute the script:
./api_buildTask.sh
Note: While you test your script, to get it working, you copy paste the whole content of the script into this text area. This will make it easier to modify if needed.
- Now execute the job. Make sure you get a nice green tick at the end. Otherwise check the console log to see what went wrong:

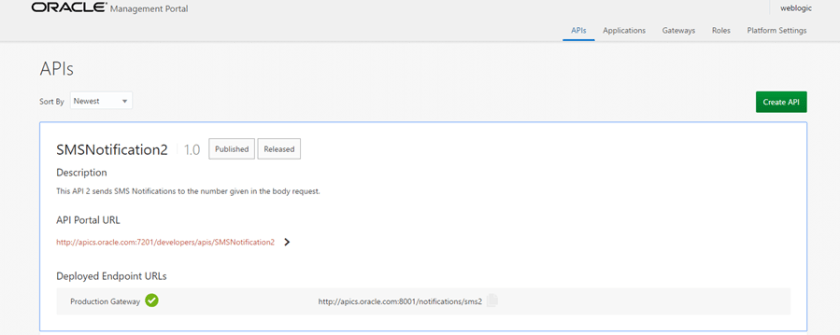
- Great, now in just a few seconds we get a new API properly configured, published and deployed, which complies with the Policies that we require:
- Validate that the API was built with all the required policies:
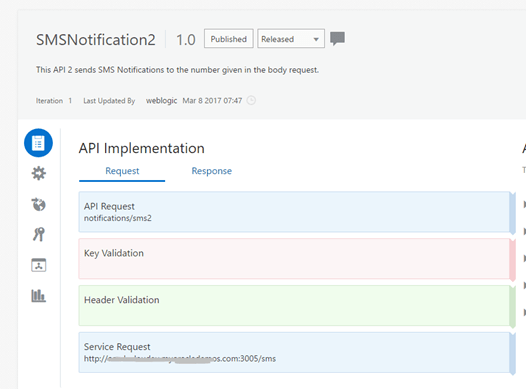
Congratulations, at this point, you can invite your API Developers to start registering and using your API, with the peace of mind that it complies with the required policies!!!
I hope you found this blog useful. If you have any comment or question , do not hesitate to drop me a comment or contact me via LinkedIn or any of the authors in solutionsanz.blog – We are here to help you!
Thanks for your time.

Hi Carlos,
This was a great step-by-step approach for using Oracle Developer Cloud Service. API testing in the current digital scenario is critical and absolutely business critical. Reference to DevOps Automation you might like to check out this post on Top 6 DevOps Metrics that Enterprise Dashboards Should Capture …here’s the link…. http://www.cigniti.com/blog/6-devops-metrics-for-enterprise-dashboards/
Thank you!
Regards,
Michael
LikeLike