
This is a 3-part series blog that teaches with plenty of detail how to automate building, assembling, deploying and testing SOA workloads into SOA Cloud Service either using a Local Development Environment or Oracle Developer Cloud Service, which is part of Oracle Public Cloud. The reason I decided to write this as a series of consecutive blogs is to allow a cohesive series of steps to ensure a completely brand new development environment could be fully configured to automate building and deployment of SOA Application.
To see the landing page for the three series go to: https://solutionsanz.blog/2016/12/22/teaching-how-devops-automate-your-soa-workload-using-oracle-public-cloud/
In this blog we are going to locally build, package, deploy and test SOA workloads into SOA Cloud Service.
Local Automated Continuous Integration Framework
The sub-sections that you are going to find in this section are:
-
Maven pre-requisites – Installing and local SOA 12.1.3 Home
- Configuring an embedded WebLogic domain
- Configuring a Standalone Domain with Java Database (Derby)
-
Installing and setting up Maven to builds and deploy SOA Projects
-
Deploying Locally with Maven to SOACS
- Assessing connectivity to SOACS SOA-INFRA
-
Retrieve and configuring SOA CS Certificate
-
Local Automating Testing using the SOA Test Framework and Maven
- Build a Testing SOA Application
- Build a Test Suite and Test Case
- Automating the Local lifecycle of the SOA Project with Maven
Maven pre-requisites – Installing and local SOA 12.1.3 Home
Maven can be used to build, package and even deploy SOA projects. In order to configure Maven to be able to build, package and deploy SOA projects, it will be handy to have a local Oracle Home to reference to. For this reason, in this section we are going to installing a quick local SOA 12.1.3 home.
- First you will need to download the fmw_12.1.3.0.0_soa_quickstart distribution – For this you can go to OTN.
-
Once you get the distribution, make sure that you have a Java SDK installed and run
java -jar fmw_12.1.3.0.0_soa_quickstart.jar
- After some health check up, you should see a pop up window
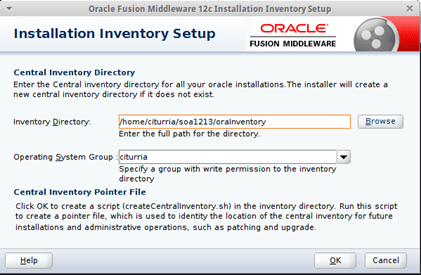
- Enter the location where you want to save the Inventory directory and click OK
- Click Next on the Welcome page
-
Enter the Oracle Home, in my case I chose /u01 – which is a new volume that I just added into my VM – If you want to know more information about this refer to this section in the document.
-
Follow the next screens until the installation completes.
Configuring an embedded WebLogic domain
In SOA 12c, you can run a JDeveloper embedded WebLogic domain which contains SOA Suite. This can be very useful when developing SOA Services. Follow the next steps to enable it:
-
Open JDeveloper 12.1.3 if not already opened.
-
In JDeveloper click Run -> Start Server Instance (IntegratedWebLogicServer). Wait while it creates a full SOA WebLogic development domain. Once it shows “SOA Platform is running and accepting requests“, open a browser and refer to the WebLogic and SOA EM consoles:
The location of the domain will be under $ORACLE_HOME/jdev_work/system12.1.3.x.x.x.xxxx/DefaultDomain. Otherwise you will have to set the JDEV_USER_DIR environment variable pointing to a different path.
Configuring a Standalone Domain with Java Database (Derby)
-
Navigate to $MW_HOME/soa/common/bin. In this case:
-
Set the QS_TEMPLATES environment variable se to the SOA domain template
export QS_TEMPLATES=/u01/Oracle/Middleware/Oracle_Home/soa/common/templates/wls/oracle.soa_template_12.1.3.jar
-
Run the Quick Start Configuration Wizard:
./qs_config.sh
-
In the Page 1 of 3:
- Enter and re-enter the password of the domain, in this case welcome1
- Edit the Domain and Application Location as required. In this case I set it to: /oracle/soa/user_projects/domains/my_soa_domain and /oracle/soa/user_projects/applications/my_soa_domain respectively.
- Review the ports and update if necessary. In this case I set the default port 7001
-
Click Create
-
In step 2 wait while it configure the domain. Click Next when it shows that the Domain was created successfully.
-
Finally in step 3, if necessary, take notes of the domain details, such as Domain Name, locations, status and Admin Server URL. Check the “Start Domain” box if you want to start your domain straightaway. Then click Finish.
-
Wait until you see in the Admin Server Diagnostic los file the legend that says “SOA Platform is running and accepting requests“. This standalone domain is already configured with Oracle Business Process Management Suite and Oracle SOA Suite runtime components. However for the database is still using a developer Derby instance. In order to create an Oracle DB, refer to section Extending SOA Domain with Oracle Database in this document.
-
Login to the different consoles to test your domain:
Alternatively, if you plan to develop projects using the Oracle Service Bus console, you can check to see if Oracle Service Bus is running. The Oracle Service Bus console is located at an URL with the following format:
http://localhost:7001/servicebus
Log in using the username and password that you specified when creating your standalone domain. For more information on using the Oracle Service Bus console, see “Getting Started
with the Oracle Service Bus Console” in Developing Services with Oracle Service Bus.
Installing and setting up Maven to builds and deploy SOA Projects
Follow the next steps to install Maven. The platform is Ubuntu:
-
Run: sudo apt-get install maven
-
Setup JAVA_HOME: export JAVA_HOME=/usr/lib/jvm/java-8-oracle
- Now we have to download and install MVN SOA12c plugins and dependencies. First install the sync plugin:
Note: If running from within the Oracle network, you have to set the Oracle Proxy
export MW_HOME=/u01/Oracle/Middleware/Oracle_Home
mvn install:install-file -DpomFile=$MW_HOME/oracle_common/plugins/maven/com/oracle/maven/oracle-maven-sync/12.1.3/oracle-maven-sync-12.1.3.pom -Dfile=$MW_HOME/oracle_common/plugins/maven/com/oracle/maven/oracle-maven-sync/12.1.3/oracle-maven-sync-12.1.3.jar
- Now that we installed the mvn sync plugin for SOA that allows us to synchronise the SOA installation with our Local or Remote Maven repositories. Let’s do the Local synchronisation first:
mvn com.oracle.maven:oracle-maven-sync:push -Doracle-maven-sync.oracleHome=$MW_HOME
Wait until you get a satisfactory response:

-
We have populated our local Maven repository with the required SOA artefacts for building SOA Composites locally. The next step is to generate Maven archetypes for SOA, such that we can generate skeletal SOA projects with all of the SOA dependencies already in the Maven POM.
Let’s crawl the archetype catalog in order to install dependencies
mvn archetype:crawl -Dcatalog=$HOME/.m2/archetype-catalog.xml
Similarly wait to see a successful message

-
That’s it, we have a working local Maven configuration able to build and deploy SOA Projects. In order to test it, let’s create a SOA project using the Maven Archetypes.
mvn archetype:generate
This should give us the full list of different archetypes to be generated. In this case we chose ID 1586 that corresponds to an oracle-soa-application

- Then we enter the project details, for example in this case:

- Finally enter Y and enter to complete.

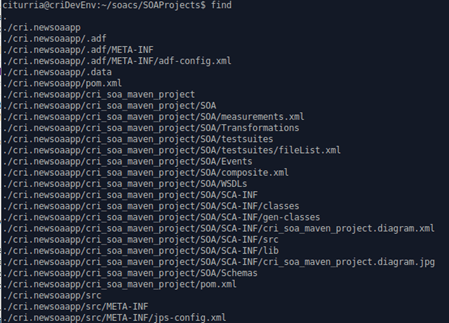
- At this point, maven generated a SOA Application and Project with an empty composite.
- Import the generated application into JDeveloper and add a simple Echo service just for testing purposes. The easiest way to do it is to import a project based on the generated POM file

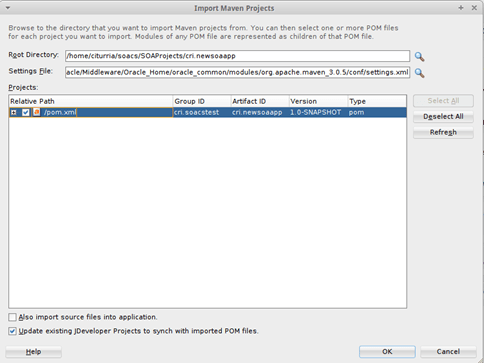
-
Make sure to select “Also import source files into application”

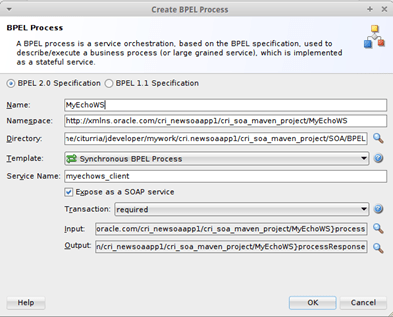
- Expand the SOA Project and create your Echo WS in the composite.

- Now to prove that we can use mvn command line to compile and package this composite, get back to the command line and go to the folder containing your pom.xml and type:
mvn clean package
The first time it will download all the missing Oracle plugins required for the compilation of the SOA Project. Subsequent runs should be much faster.
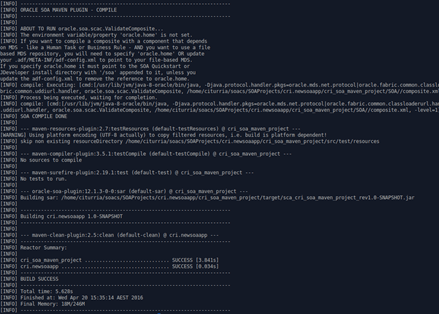
|
Note: There is a known situation when building the SOA project from JDeveloper, in which case, JDeveloper defaults the revision to “1.0”, where Maven expects by default “1.0-SNAPSHOT”. To work seamlessly across both, for each project, you should change the “revision” in the composite.xml as follows:
and the “composite.revision” in pom.xml: ${project.version} If you encounter this situation, you might want to reflect these changes. For more information refer to the following URL: https://blogs.oracle.com/integration/entry/soa_plus_odcs_chapter_08 |
-
Now let’s deploy our SOA composite into a local SOA server. For this start the integrated WebLogic server that comes with JDeveloper. Once it is started, it will be running on port 7101
In order to indicate the location of the SOA environment, we are going to pass on serverUrl, user and password properties when invoking maven.
- Move to the Project directory where you saved the project from JDev (note it might be different from where you originally created it with Maven).
- Once you are at the Project level, make sure to re-run mvn clan package – just to make sure the SAR is built and then run the following command to deploy your composite into a local SOA domain:
mvn com.oracle.soa.plugin:oracle-soa-plugin:deploy -DoracleServerUrl=http://IP:Port/soa-infra/ -DoracleUsername=weblogic -DoraclePassword=welcome1
Update IP:Port with the correct ones from the environment where you want to deploy into.
- Ensure you get a satisfactory message:

Deploying Locally with Maven to SOACS
At this point we have configured Maven to locally build, package and deploy SOA Applications. We can even deploy to remote SOA servers. However in order to successfully deploy to a SOACS environment from your local environment, you need to ensure two things:
- You have access to any of the managed server’s “soa-infra” application via HTTP (8001) or HTTPS (8002/443) – Or whatever other ports you configured as part of custom channels. See here for more information.
- SOACS enforces a certificate to be exchanged in order to communicate with it, for this you need to obtain the SOACS environment and use it as part of the mvn command.
Let’s follow the next steps to ensure we satisfy these two points.
Assessing connectivity to SOACS SOA-INFRA
The very first thing to observe is what protocols are opened as part of the Security Rules from Compute Cloud Service – Network configuration.
- Using your cloud account, log in to “My Services” console
- Click on Service console for the “Oracle Compute Cloud Service”. This will bring you to the Compute Cloud Service main console:
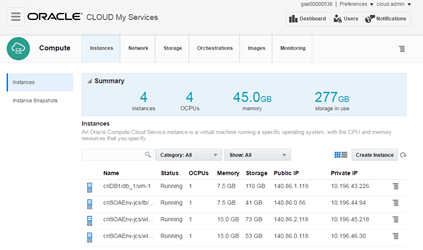
- Under “Instances” tab, select the “List view”

-
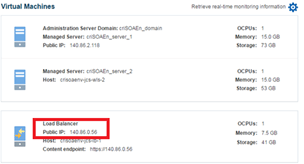
Based on the topology chosen at the moment of the SOACS provisioning, you will have one or multiple Managed Servers. In the following image, we have two Managed Servers:

- Given the name of the Managed Servers, try identifying the name of the “Security List” that encapsulates the group of Managed Servers. For this, first go to the Network section:

At the moment of SOACS provisioning Compute Cloud Service creates a default grouping to apply general permission for both “Inbound” and “Outbound”. Then as part of “Security Rules”, you can add fine-grained permissions on such resources.
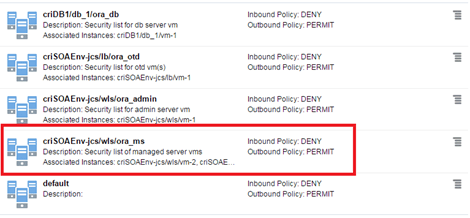
- Click on “Security Lists” and click on “List View” to simplify the view. Notice the grouping that ends with “ora_ms” – That is the name of the Security List that refers to the Managed Servers in our WebLogic cluster, where SOACS is running on. If we scale out/in the WebLogic cluster with more or less Managed Servers, this “Security List” will be automatically updated, which results pretty handy as we just need to apply “Security Rules” on the overall “Security List” regardless of the number of instances that exist within the grouping or whether this number changes as we elastically scale out/in.
-
Now click on “Security Rules” to identify the fine-grained rules that are applying to our list of Managed Servers. Also apply the “Lis View” to simplify the list of rules.

- To simplify finding the “Security Rules” that apply to our “Security List” on the browser, search for “ora_ms” – This should highlight the rules where this list is being used, whether as a source or target.
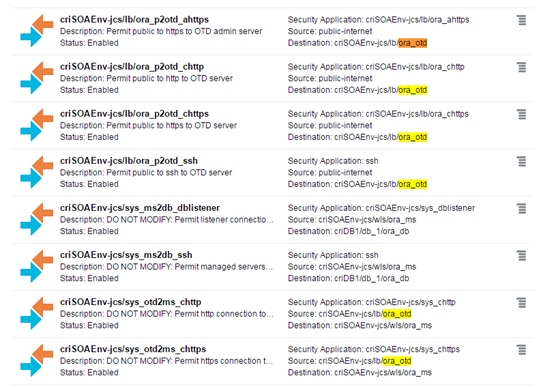
In case no other Security Rules were created, we are going to see a similar configuration as the one below:

Let’s analyse what the previous image is telling us.
-
The first rule: “…/ms2db_dblistener“, is basically saying that it is allowing “…/sys_dblistener” to be used from the list of Managed Servers (…/ora_ms) to destination “…/ora_db“
If you go to “Security Applications”, you will see that “…/sys_dblistener” refers to port 1521

So, in short, this rule is allowing access from any Managed Server into the Oracle DB via port 1521.
- The second rule: …/sys_ms2db_ssh“, is basically saying that it is allowing “ssh” to be used from the list of Managed Servers (…/ora_ms) to destination “…/ora_db“
If you go to “Security Applications”, you will see that “ssh” refers to port 22

So, in short, this rule is allowing access from any Managed Server into the Oracle DB via port 22
-
The third rule: “…/sys_otd2ms_chttp“, is basically saying that it is allowing “…/sys_chttp” to be used from the (…/ora_otd) to destination “…/ora_ms“
If you go to “Security Applications”, you will see that “…/sys_chttp” refers to port 8001

So, in short, this rule is allowing access from the Load Balancer (OTD) into any of the Managed Servers via port 8001.
-
The fourth rule: “…/sys_otd2ms_chttps“, is basically saying that it is allowing “…/sys_chttps” to be used from the (…/ora_otd) to destination “…/ora_ms“
If you go to “Security Applications”, you will see that “”…/sys_chttps” refers to port 8002

So, in short, this rule is allowing access from the Load Balancer (OTD) into any of the Managed Servers via port 8002.
So far, we learned that there are two rules that allow access into the Managed Servers through ports 8001 and 8002 via the Load Balancer (OTD). By default there is no rules to hit any of the Managed Servers directly without using the Load Balancer, which sounds reasonable. However given that in order to deploy from Maven we need to point to the “soa-infra” application from any of the Managed Servers, it becomes evident that we need to do it via the Load Balancer (OTD).
-
Go back to “Security Rules” If not already there and this time using the Browser, search for “ora_otd” in order to find all the rules associated with the Load Balancer (OTD) – By default you will find around 6 rules:
By default, four of them will have the Load Balancer (OTD) as the destination using the following “Security Applications”:
- …/lb/ora_ahttps – i.e. Port 8989
- …/lb/ora_chttp – i.e. Port 8080
- …/lb/ora_chttps – i.e. Port 443
-
ssh – i.e. Port 22
Given that by default WebLogic maps port 443 (SSL) with the default secured channel’s port, in this case 8002 and this port is opened as an allowed communication from the Load Balancer into the underlying Managed Servers, then we can use this port (443) to get access from the public internet into the underlying Managed Servers via the Load Balancer without having to modify any security rule. However, if for whatever reason there is a particular port that needs to be used, you can always create new channels in WebLogic for the underlying Managed Servers and then open such ports as part of new “Security Rules” and either hit them directly or via the Load Balancer, in which case you might also need to create such mappings. For more information about how to do this refer to this guide.
Retrieve and configuring SOA CS Certificate
As it was mentioned before, at the time of writing this guide, SOACS requires to acknowledge connecting machines via the exchange of a certificate. This section will explain how to retrieve the certificate and use it with Maven when attempting to deploy SOA Projects into SOACS, either via a local environment or via the Developer Cloud Service.
- First, let’s retrieve the SOACS certificate:
Go to https://github.com/escline/InstallCert and download the utility that helps you pull the SOA CS certificate – Alternatively you can do it yourself by exporting the SSL certificate from the browser while connected to the SOA CS server.
For the purpose of this guide, I am assuming a completely brand new Linux environment, which is aligned with the Dev environment described in Building your Local Development Environment
-
Install Java in brand new Linux (Debian) environment. If you don’t have Java installed, run:
sudo add-apt-repository ppa:webupd8team/java
sudo apt-get update
sudo apt-get install oracle-java8-installer
| Note: If you need to use multiple JDK versions, you can list them and choose among them: //list available jdk update-java-alternatives –list //use jdk7 sudo update-java-alternatives –set java-7-oracle //use jdk8 sudo update-java-alternatives –set java-8-oracle |
Confirm it is installed at the end running java -version

-
Download InstallCert.java, as indicated in the github link above (https://github.com/escline/InstallCert/blob/master/InstallCert.java)
-
Compile the class: javac InstallCert.java

-
Access server, and retrieve certificate (accept default certificate 1)
java InstallCert [host]:[port]
e.g. java InstallCert IP:443
Where IP is the IP address of the Load Balancer (OTD) – This is because we are going to use the Load Balancer (OTD) as the main mechanism to talk to the underlying Managed Servers.
It will ask you to select the certificate to download – 1 in this case
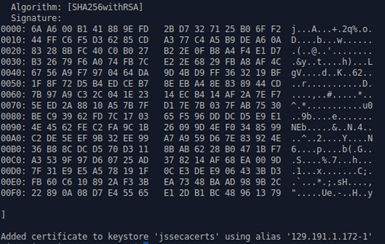
At this point, you have a keystore with name jssecerts with password changeit – This file will be used later on as part of Maven.
Once you have this certificate, let’s try to use it while invoking a Maven command to deploy a SOA Project into a SOA CS environment.
- Get the IP Address of your load balancer associated with your SOA CS environment where you want to install your SOA Project.

In this case: 140.86.0.56
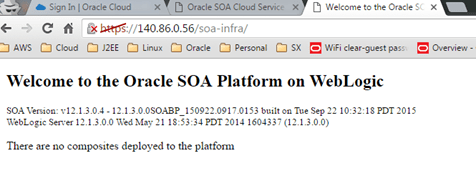
- Test the network connectivity to the SOA-INFRA application via the Load Balancer. For this open a browser and browse: https://140.86.0.56:443/soa-infra/ – After confirming the certificate, it should prompt for a username/password, which if entered correctly e.g. weblogic/[password] it will show you the “Welcome to the Oracle SOA Platform on WebLogic” landing page.
Notice that since 443 is the default SSL port, you can omit it in the URL, but not when using it in the next mvn command.
- Now open a terminal window and cd to the location of your SOA Project that you want to deploy.

-
Run the maven command that you tried before against your local environment, but this time against the SOACS environment (via Load Balancer – OTD). Also add the certificate that you just downloaded. Make sure to point to the correct location of the certificate, in this case I just copied it into the SOA Project location.
For example:
mvn com.oracle.soa.plugin:oracle-soa-plugin:deploy -DoracleServerUrl=https://140.86.0.56:443/soa-infra/ -Djavax.net.ssl.trustStore=./jssecacerts -Djavax.net.ssl.trustStorePassword=changeit -DoracleUsername=weblogic -DoraclePassword=[password]

Confirm you get a successful build outcome.
- Log in to EM and confirm the SOA Project was properly deployed

Nice huh?
If you have any question or comment, please feel free to contact any of the authors of SolutionsANZ.blog
Thanks for your time.

Wow. That is so elegant and logical and clearly explained. Keep it up! I follow up your blog for future post.
LikeLike