
This section shows you how to use the Facebook ICS Connector that comes out of the box.
Configure your Facebook Connector in ICS
First of all, in order to create a Facebook Connector we are going to use OAUTH2 to authenticate. This will require you to create an Application within your Facebook account and use the “Application ID” and “Application Secret”. Follow the next steps to do this:
- Login to the Facebook Developer portal at http://developer.facebook.com/
-
Once logged in, on the top right corner, click on “My Apps” drop down menu and select “Add a New App”

- Select the platform where you will connect from , in this case “Website (www)”

-
Enter a new Application name, in this case: “s2v-iia-social-ics-apis” – Then click on Create New Facebook App ID.
Note: For legal trademark reasons, you cannot enter the word “facebook”, “fb”, etc…

- Leave “No” for the “Is this a test version of another app?” option.
- Enter your email
- Select the Category that applies to your application
- Then, click on “Create App ID”

- Complete the security test and click Submit

- Since we chose a website template, you will see examples of JS SDK to connect to Facebook. Feel free to explore the different options. For now we will click on “Skip Quick Start”

- Click “Dashboard” from the left menu
-
Record in a safe place the Application ID and Secret. Click on “Show” and enter your FB password to display your secret in plain text – Be careful this is confidential information!

Create a Facebook connector in ICS
Now, let’s create a connection in ICS using the OOTB Facebook adapter.
- Log into ICS, in this case I am logging is as user weblogic

- Click on Connections18button “Create New Connection“

- Scroll and see all the adapters that are supported. Oracle is releasing new adapters constantly. Select the Facebook adapter.

- Enter a name, in this case: s2v-iia-fb-connector
- Leave the Connection Role as Invoke
- Enter a description if you want and click on Create

- Enter an email if you want.
- Click on Configure Security

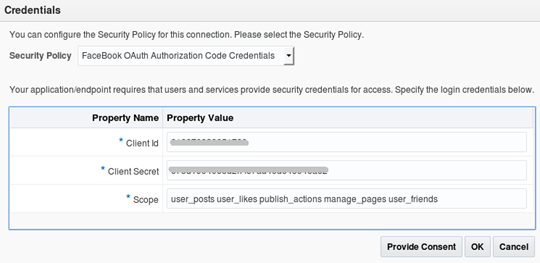
- Here, you will have to enter the Application ID and secret that you retrieved previously.
-
Also you will have to enter the scope allowed as part of this connection, in this case: user_posts user_likes publish_actions manage_pages user_friends

- Then click on “Provide Consent” – This is where you will authorisation the connector to access Facebook on your behalf using the OAUTH2 protocol.
- It will ask you to enter your ICS admin credentials.
-
Then… What happened? You would ask! It looks like something fail…

- The reason why this failed is because we have not configured our Facebook Application with the OAUTH2 Callback URL – This is just a simple hack I like doing to determine the exact OAUTH2 callback url that is expected, in this case by ICS… Otherwise you have to look into the ICS documentation (http://docs.oracle.com/cloud/latest/intcs_gs/ICSFB/GUID-8D1EBDCF-A63A-43C3-85F6-B42C021AD2C0.htm#ICSFB-GUID-8D1EBDCF-A63A-43C3-85F6-B42C021AD2C0). Following this simple trick, check in the browser’s URL of this error, you will find almost at the end something like this:
redirect_uri=https://soa12c.vbox.oracle.com:7002/icsapis/agent/oauth/callback

- Copy that URI in red
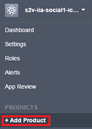
- Still logged in in your developers Facebook account, in the “PRODUCTS” menu on the left, click “+ Add Product”
- Click on the Facebook Login “Get started” button

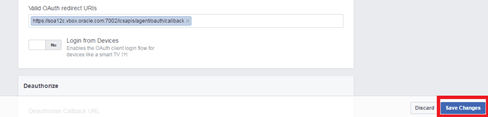
- Now, make sure the “Facebook Login” Product is selected within PRODUCTS and find the attribute “Valid OAuth redirect URIs” and enter the callback uri that you copied from the last section, then click enter.

- Make sure to click Save Changes to save your callback uri.
- Welcome1
- Go back to the ICS console within the adapter you were configuring before. Click again on the “Configure Security” button
- This time the Client ID, Client Secret and Scope should already be entered. Click again on “Provide consent“
- This time, it will work! It will ask you to login to Facebook as your user. This is a once off task.

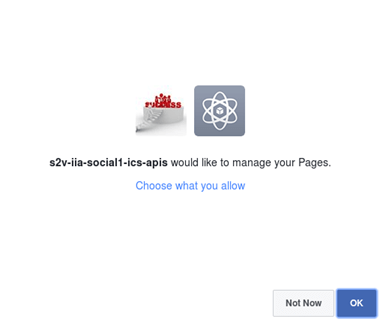
- It will ask you to confirm that you are authorising the Facebook application, in this case “s2v-iia-social1-ics-apis” to access your Facebook account for the specified scope on your behalf. Say OK

- Then it will ask you to give permission to post into Facebook. Leave Friends and click OK.

- Same with “Managing your pages“. Click OK.
- Congratulations, you will receive an ICS confirmation page like the following:

- Go back to ICS console. It should be opened in another tab.
- Click Save and Test. You will get a green 100% status. Save again and “Exit Connection“

- We are ready to use our ICS Facebook connector. In the next section you are going to create another connector, this time a REST connector that will integrate into our Facebook connector and allow positing messages to Facebook seamlessly.
Create a REST connection in ICS
In this section we are going to create a very simple REST connector that will allow us to integrate into Facebook via the Facebook connector that we created earlier.
- Log into ICS and go to Connections.
- Click on “Create New Connection” – This time select REST adapter.

- Enter a name for your REST adapter. In my case, I’m calling it “s2v-iia-rest-msg-connector”
- In this case, I just want it to trigger my post, so I select just Trigger.
- Enter a description if you want. Then click on Create

- Enter an email if you want.
- We are not setting any security for now.
- Click Save and then Test. Ensure you get a green 100% status. Click save again and “Exit Connection“

- Congratulations, you have created two connectors! One Facebook connector and one REST connector. In the next section we are going to build an integration between them.

Create an Integration in ICS using both Connectors
In this section we are going to create an integration to allow access to the Facebook connector via a simple REST API.
- Go back to the ICS console if not already there.
- Go to Integrations this time.

- Click on “Create New Integration”

- For now, let’s just create a simple mapping. Select “Basic Map Data“

- Enter a name for your Integration. In my case, I call it “s2v-iia-rest2fb-integration“
- Enter a description if you want and then click “Create“
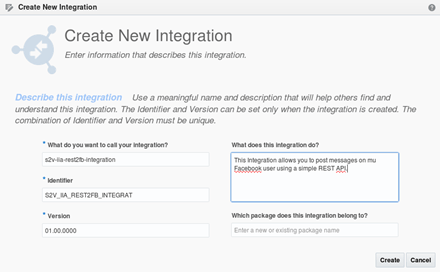
- You will get a clean integration.
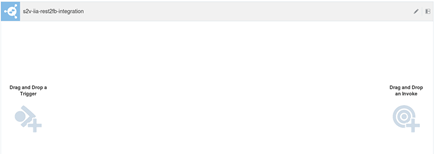
- On the right, find the REST connector that you built earlier. If you have many, you can enter part of the name at the top and the list will be filtered.

- Once you have your REST adapter on the list of connections, drag and drop it to the “Drag and Drop a Trigger” section
- It will open the REST connector configuration wizard.

-
Enter the following information:
- What do you want to call your endpoint: SocialFacebookAPI
- What does this endpoint do? This endpoint will receive a message and send it to a Facebook adapter, so that it posts that message on the user’s wall.
- What is the endpoint’s relative resource URI? /social/facebook/message
- What action does the endpoint perform? POST
- Configure a request payload for this endpoint: Ticked
- Configure CORS (Cross Origin Resource Sharing): Ticked
- What do you want to call your endpoint: SocialFacebookAPI

- Click Next.
- Select the Request Payload Type: JSON
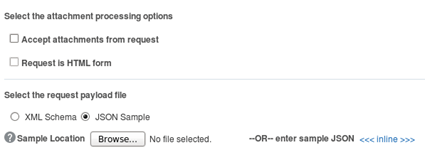
-
Click on the <> link and enter a JSON format as you wish to send your POST body payload. Something like:
{“message”:”msg”}

- Then, click OK.
- Leave the Media Type to JSON, and click Next.

- CORS Configuration – Allowed Origins: *

- Click Next. For the summary, review all and click Done.

- That’s it, we have configured the a REST Trigger, as part of this integration.
- Now, search for your Facebook connection and drag and drop it into the “Drag and Drop an Invoke” droppable area.
- It will show you the Facebook connection wizard. Enter a name and description.

- Click Next. Select the Operation that you want, in this case, “Post status update of the user“
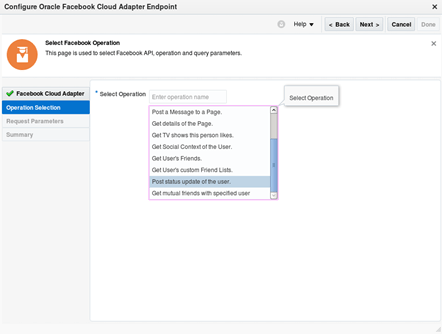
- Click Next. Review the Summary and click “Done“.

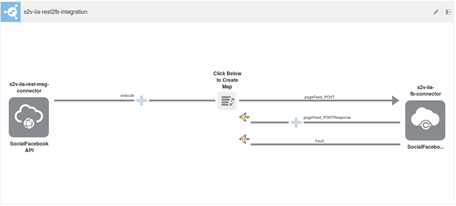
- The integration should look like this:
- Click on the Map in the middle and then click +

- In the mapper drag the source message under “request-wrapper” into the target message

- Click Save.

- Exit the mapper. The integration should look like this:
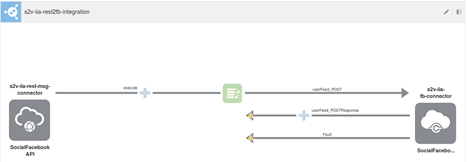
-
Click on “Tracking”

- Drag and drop the message element under “request-wrapper” into the Tracking Field

- Save your integration.

Notice that it shows a warning because we don’t have any response and fault. In a real scenario we would configure those, but we didn’t select it in this example for simplicity purposes.
- Exit the Integration. Notice that your integration is still to be “Activated”
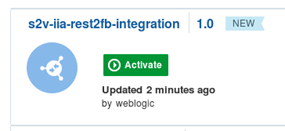
- Click on the green “Activate” label on your adapter.
- Select to Enable tracing and click Yes.

- Congratulations! Your integration is complete.
- Click the “information” icon for your integration and copy the Endpoint URL
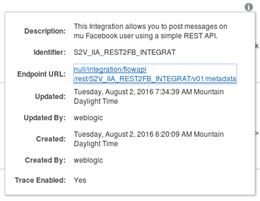
It will be something like:
- Try it in a browser and make sure you get the expected metadata:

- Use POSTMAN, SOAPUI or any other REST Test client to send a REST POST command. In this case I am using SOAPUI.
- The REST API will be something like this:
The last bit in Yellow represents the actual URI of your API created in ICS.

- Make sure to change the method to POST and in the body enter the POST body payload in the structure that you created as part of the ICS integration. I used a layout like this:
{“message”:”msg”}
So I am sending this payload:
{“message”:”Hello Barack from SOAPUI”}

- Leave the Media Type as application/json and click the green icon to send the request.
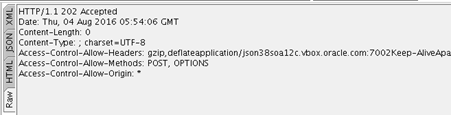
- You will receive a 202 Accepted response – See that as Raw
- Finally, go to your Facebook user and make sure the message is there:
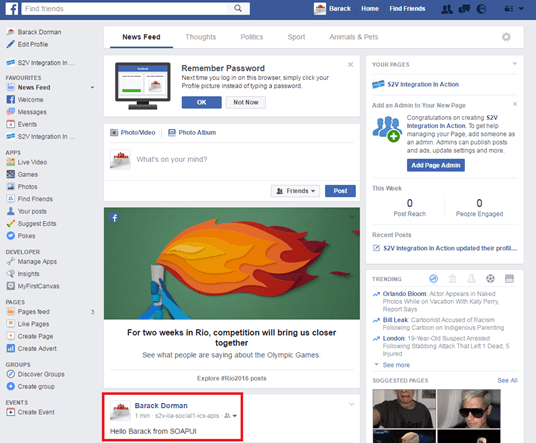
- Congratulations! You just integrated to Facebook via Oracle Integration Cloud Service.

Hi Carlos – Thank you for the detailed steps. Your blogs are Amazing. I tried doing the facebook integration, but I keep getting the below error. Any clues regarding this Token renewal Request error from facebook? I did an Integration with Linkedin, everything is working perfect. Just stuck with this Facebook Integration. Please suggest.
Invoke JCA outbound service failed with application error, exception: com.bea.wli.sb.transports.jca.JCATransportException: oracle.tip.adapter.sa.api.JCABindingException: oracle.tip.adapter.sa.impl.fw.ext.org.collaxa.thirdparty.apache.wsif.WSIFException: servicebus:/ORACLE_ICS_FACEBO_INTEGR_V3_01/Resources/resources/application_44/inbound_45/resourcegroup_46/SocialFacebookPostMessage_REQUEST.wsdl [ SocialFacebookPostMessage_REQUESTPortType::userFeed_POST(parameters,parameters) ] – WSIF JCA Execute of operation ‘userFeed_POST’ failed due to: Error creating Cloud Operation: oracle.cloud.connector.api.CloudInvocationException: Invalid Response from application for access token renewal request.
; nested exception is:
Error creating Cloud Operation: oracle.cloud.connector.api.CloudInvocationException: Invalid Response from application for access token renewal request.
oracle.cloud.connector.api.CloudInvocationException: Invalid Response from application for access token renewal request.
com.bea.wli.sb.transports.jca.JCATransportException: oracle.tip.adapter.sa.api.JCABindingException: oracle.tip.adapter.sa.impl.fw.ext.org.collaxa.thirdparty.apache.wsif.WSIFException: servicebus:/ORACLE_ICS_FACEBO_INTEGR_V3_01/Resources/resources/application_44/inbound_45/resourcegroup_46/SocialFacebookPostMessage_REQUEST.wsdl [ SocialFacebookPostMessage_REQUESTPortType::userFeed_POST(parameters,parameters) ] – WSIF JCA Execute of operation ‘userFeed_POST’ failed due to: Error creating Cloud Operation: oracle.cloud.connector.api.CloudInvocationException: Invalid Response from application for access token renewal request.
; nested exception is:
Error creating Cloud Operation: oracle.cloud.connector.api.CloudInvocationException: Invalid Response from application for access token renewal request.
oracle.cloud.connector.api.CloudInvocationException: Invalid Response from application for access token renewal request.
at com.bea.wli.sb.transports.jca.binding.JCATransportOutboundOperationBindingServiceImpl.invoke(JCATransportOutboundOperationBindingServiceImpl.java:191)
at com.bea.wli.sb.transports.jca.JCATransportEndpoint.sendRequestResponse(JCATransportEndpoint.java:280)
at com.bea.wli.sb.transports.jca.JCATransportEndpoint.send(JCATransportEndpoint.java:241)
at com.bea.wli.sb.transports.jca.JCATransportProvider.sendMessageAsync(JCATransportProvider.java:612)
at sun.reflect.NativeMethodAccessorImpl.invoke0(Native Method)
at sun.reflect.NativeMethodAccessorImpl.invoke(NativeMethodAccessorImpl.java:57)
at sun.reflect.DelegatingMethodAccessorImpl.invoke(DelegatingMethodAccessorImpl.java:43)
at java.lang.reflect.Method.invoke(Method.java:606)
at com.bea.wli.sb.transports.Util$1.invoke(Util.java:79)
at com.sun.proxy.$Proxy166.sendMessageAsync(Unknown Source)
at com.bea.wli.sb.transports.TransportManagerImpl.sendMessageToService(TransportManagerImpl.java:516)
at com.bea.wli.sb.transports.TransportManagerImpl.sendMessageAsync(TransportManagerImpl.java:404)
at com.bea.wli.sb.service.handlerchain.handlers.TransportProviderInvoker.dispatch(TransportProviderInvoker.java:83)
at com.bea.wli.sb.service.handlerchain.handlers.AbstractHandler.dispatch(AbstractHandler.java:131)
at com.bea.wli.sb.service.handlerchain.handlers.EndpointManagementHandler.dispatch(EndpointManagementHandler.java:47)
at com.bea.wli.sb.service.handlerchain.handlers.AbstractHandler.dispatch(AbstractHandler.java:131)
at com.bea.wli.sb.service.handlerchain.handlers.UpdateOutboundStatistics.dispatch(UpdateOutboundStatistics.java:66)
at com.bea.wli.sb.service.handlerchain.handlers.LoadBalanceFailover$LoadBalanceFailoverHelper.sendMessageAsync(LoadBalanceFailover.java:408)
at com.bea.wli.sb.service.handlerchain.handlers.LoadBalanceFailover$LoadBalanceFailoverHelper.sendMessageToServiceAsync(LoadBalanceFailover.java:333)
at com.bea.wli.sb.service.handlerchain.handlers.LoadBalanceFailover$LoadBalanceFailoverHelper.sendMessageToService(LoadBalanceFailover.java:280)
at com.bea.wli.sb.service.handlerchain.handlers.LoadBalanceFailover.dispatch(LoadBalanceFailover.java:162)
at com.bea.wli.sb.service.handlerchain.handlers.AbstractHandler.dispatch(AbstractHandler.java:131)
at com.bea.wli.sb.service.handlerchain.handlers.OutboundMessageContentHandler.dispatch(OutboundMessageContentHandler.java:69)
at com.bea.wli.sb.service.handlerchain.handlers.AbstractHandler.dispatch(AbstractHandler.java:131)
at com.bea.wli.sb.service.handlerchain.handlers.CheckTxDeadlock.dispatch(CheckTxDeadlock.java:59)
at com.bea.wli.sb.service.handlerchain.handlers.AbstractHandler.dispatch(AbstractHandler.java:131)
at com.bea.wli.sb.service.handlerchain.handlers.ResultCachingHandler.dispatch(ResultCachingHandler.java:111)
at com.bea.wli.sb.service.handlerchain.handlers.AbstractHandler.dispatch(AbstractHandler.java:131)
at com.bea.wli.sb.service.handlerchain.handlers.SetSoapAction.dispatch(SetSoapAction.java:157)
at com.bea.wli.sb.service.handlerchain.handlers.AbstractHandler.dispatch(AbstractHandler.java:131)
at com.bea.wli.sb.service.handlerchain.handlers.OutboundMessagePatternHandler.dispatch(Outboun
LikeLike
Hi Kesava, my apologies I lost track of your message. I would really like to help you, in case you still need assistance and in order to reduce my response time, please contact me directly via message at https://www.linkedin.com/in/citurria/ – My apologies for my late response again. Carlos
LikeLike
{
“type”: “http://www.w3.org/Protocols/rfc2616/rfc2616-sec10.html#sec10.5.1”,
“title”: “Internal Server Error”,
“detail”: “Internal server error. Please contact oracle support for details.”,
“o:errorCode”: “500”,
“o:errorDetails”: [ {
“type”: “UnMappedFault:execute”,
“instance”: “<![CDATA[Please inspect the logs for more details. Initiating Request: \n \n \n \n INDIA\n \n \n \n \n\n]]>”,
“title”: “Error creating Cloud Operation: oracle.cloud.connector.api.CloudInvocationException: Invalid Response from application for access token renewal request.\n:Application Error”,
“o:errorPath”: “<![CDATA[\n RouteNode1\n response-pipeline\n\n]]>”,
“o:errorCode”: “OSB-380001”
}]
}
LikeLike
Hi Manoz, to help you get moving quickly, please contact me directly by message via LinkedIn here: https://www.linkedin.com/in/citurria/
LikeLike
HI im getting below error while testing the service , followed above blog.
{
“type”: “http://www.w3.org/Protocols/rfc2616/rfc2616-sec10.html#sec10.5.1”,
“title”: “Internal Server Error”,
“detail”: “Internal server error. Please contact oracle support for details.”,
“o:errorCode”: “500”,
“o:errorDetails”: [ {
“type”: “UnMappedFault:execute”,
“instance”: “”,
“title”: “Error creating Cloud Operation: oracle.cloud.connector.api.CloudInvocationException: Invalid Response from application for access token renewal request.\n:Application Error”,
“o:errorPath”: “”,
“o:errorCode”: “OSB-380001”
}]
}
LikeLiked by 1 person
Hi Manoz, this error looks very similar to the one reported by Rao before… Were you able to configure the OAUTH callback successfully? I’d like to help you. In order to reduce my response time, please contact me directly by message via LinkedIn here: https://www.linkedin.com/in/citurria/
LikeLike
Thanks for sharing such a realtime example. I have tried to replicate the same. But, my integration ended with an error while invoking. When I have checked the error log, I found the below error.
I have trimmed middle portion of this error as it is very lengthy.
+————————————————–+
Response:soap-env:ServerApplication Errororacle.cloud.connector.api.CloudInvocationException: Invalid Response from application for access token renewal request.oracle.tip.adapter.sa.api.JCABindingException: Error creating Cloud Operation: oracle.cloud.connector.api.CloudInvocationException: Invalid Response from application for access token renewal request.; nested exception is: Error creating Cloud Operation: oracle.cloud.connector.api.CloudInvocationException: Invalid Response from application for access token renewal request. at oracle.tip.adapter.sa.impl.JCABindingReferenceImpl.request(JCABindingReferenceImpl.java:344) at com.bea.wli.sb.transports.jca.binding.JCATransportOutboundOperationBindingServiceImpl.invoke(JCATransportOutboundOperationBindingServiceImpl.java:218) at com.bea.wli.sb.transports.jca.JCATransportEndpoint.sendRequestResponse(JCATransportEndpoint.java:320) at com.bea.wli.sb.transports.jca.JCATransportEndpoint.access$100(JCATransportEndpoint.java:39) at com.bea.wli.sb.transports.jca.JCATransportEndpoint$1.run(JCATransportEndpoint.java:477) at weblogic.security.acl.internal.AuthenticatedSubject.doAs(AuthenticatedSubject.java:363) at weblogic.security.service.SecurityManager.runAs(SecurityManager.java:146) at weblogic.security.Security.runAs(Security.java:61) at com.bea.wli.sb.util.security.SecurityUtils.executeAs(SecurityUtils.java:70) at com.bea.wli.sb.transports.jca.JCATransportEndpoint.send(JCATransportEndpoint.java:269) at (PipelineDispatcher.java:130) at oracle.cloud.connector.facebook.FaceBookSessionManager.establishSession(FaceBookSessionManager.java:80) at oracle.tip.adapter.cloud.CloudAdapterInteraction.createCloudOperation(CloudAdapterInteraction.java:276) … 148 moreCaused by: oracle.cloud.connector.api.CloudInvocationException: Invalid Response from application for access token renewal request. at oracle.cloud.connector.facebook.FaceBookSessionManager.getAccessToken(FaceBookSessionManager.java:197) … 151 more
+———————————————–+
LikeLiked by 1 person
Hi Rao, were you able to get the OAUTH configuration successfully. It appears as if there was a security error somewhere. Is this problem happening at the end, once you are testing, but all the previous steps worked well? I’d like to get you moving… Please, to reduce my response time, contact me directly by message via LinkedIn here: https://www.linkedin.com/in/citurria/
LikeLike
Hello Carlos. I was trying to follow your blog. But I got stucked in the Oauth part. I can’t get my callback address as you did. If I follow the documentation as you suggested then, I see a reference to get a Facebook certificate and import it ICS. How did you manage to solve this Authentication part!?? Thank you very much
LikeLiked by 1 person
Hi Fer, are you getting trouble to get the OAUTH callback URL? If so, have you followed my little hack by forcing the unauthorised error, but the looking at the url? You should be able to find a variable called redirect_uri with the expected value… It should be something like this: redirect_uri=https://[SERVER]/icsapis/agent/oauth/callback – If this doesn’t work or it doesn’t make sense, let me know exactly where is that you are stuck, happy to help you get moving. Contact me directly by message via LinkedIn here: https://www.linkedin.com/in/citurria/
LikeLike
hi sir, how can we get callback url .
LikeLike