
This section shows you how to use ICS to create an orchestration across multiple service-endpoints. For this, we are going to existing REST APIs for:
- Post a message to Facebook
- Post a message update to LinkedIn
- Updates a Campaign description in Salesforce
- Creates an event in Google Calendar
The entry point will be yet another REST API that will accept generic entries that then ICS will fan out into each of the SaaS applications mentioned above.
- ID
- Name
- Description
- When
This is how the mappings will go:
- Description will be sent to Facebook (message to be posted)
- Description will be sent to LinkedIn (message to be posted as an update)
- ID and Description will be send to Salesforce (Campaign Id and description respectively)
- Name, Description and When will be sent to Google Calendar (Event’s name, description and date respectively)
Ok, let’s do it!
Create a REST connection in ICS
In this section we are going to create a very simple REST connector that will allow us to integrate into LinkedIn via the LinkedIn connector that we just created earlier.
Note: This is a generic REST connector. If you have already completed the other blogs around how to build an integration to either Facebook, LinkedIn, Google Calendar, etc. Then potentially you can simply reuse that REST connector or any other REST connector. If not, feel free to create one and enter a different name.
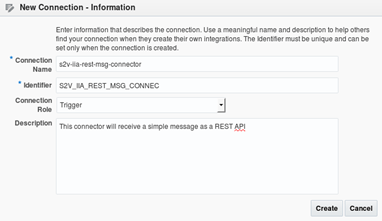
- Log into ICS and go to Connections.
- Click on “Create New Connection” – This time select REST adapter.

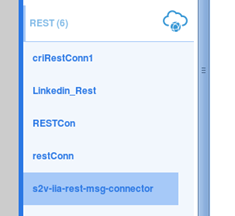
- Enter a name for your REST adapter. In my case, I’m calling it “s2v-iia-rest-msg-connector”
- In this case, I just want it to trigger my post, so I select just Trigger.
- Enter a description if you want. Then click on Create
- Enter an email if you want.
- We are not setting any security for now.
- Click Save and then Test. Ensure you get a green 100% status. Click save again and “Exit Connection“

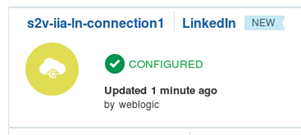
- Congratulations, you have created two connectors! One Google Calendar connector and one REST connector. In the next section we are going to build an integration between them.
Create an orchestration in ICS
In order to create an orchestration in ICS to fan out to our SaaS Applciations (Facebook, LinkedIn, Google Calendar and Salesforce), follow the next steps:
- Login to ICS and go to Integrations (if not already there)
- Click on Create New Integration
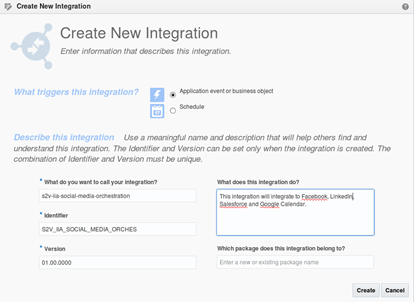
- Select the Orchestration template

- Leave “Application event or business object” and enter the name and description to your integration.
- An empty orchestration will be displayed
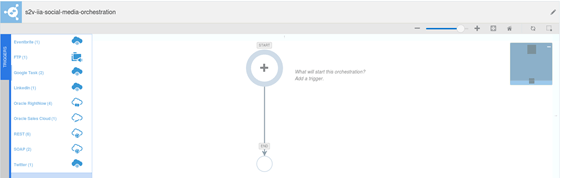
- First you need to add what will trigger the orchestration, in this case a REST API…
- Click on REST from the left menu and find the REST connector that you wish to use as the entry point.
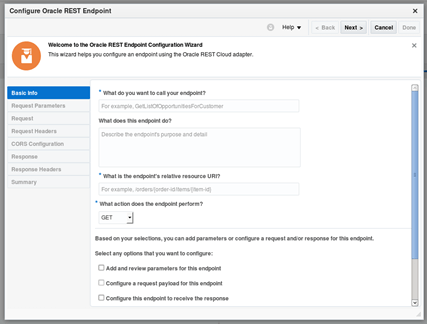
- Drag this connector into the top start of the orchestration. That will open the REST endpoint configuration wizard.
-
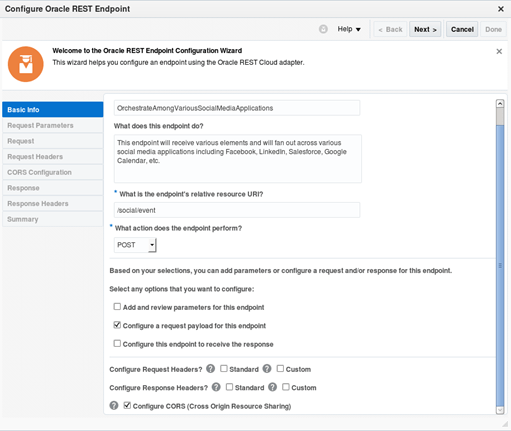
Enter the following information:
- What do you want to call your endpoint: OrchestrateAmongVariousSocialMediaApplications
- What does this endpoint do? This endpoint will receive various elements and will fan out across various social media applications including Facebook, LinkedIn, Salesforce, Google Calendar, etc.
- What is the endpoint’s relative resource URI? /social/event
- What action does the endpoint perform? POST
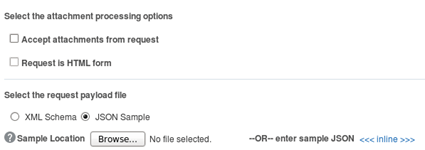
- Configure a request payload for this endpoint: Ticked
- Configure CORS (Cross Origin Resource Sharing): Ticked
- What do you want to call your endpoint: OrchestrateAmongVariousSocialMediaApplications
- Click Next.
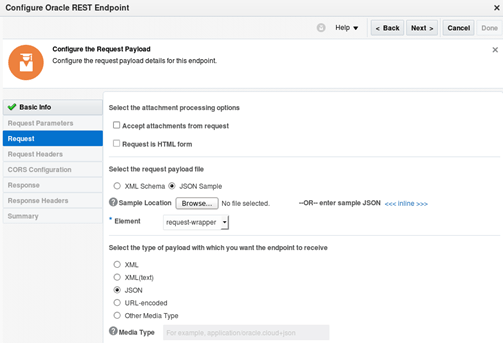
- Select the Request Payload Type: JSON
- Click on the <> link and enter a JSON format as you wish to send your POST body payload. Something like:
{“id”:”Id”, “name”:”name”, “description”:”description”, “when”:”when”}
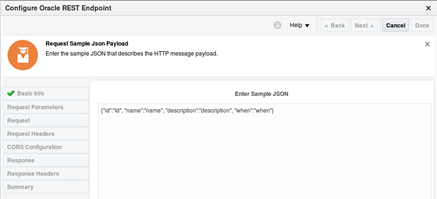
- Then, click OK.
- Leave the Media Type to JSON, and click Next.
- CORS Configuration – Allowed Origins: *
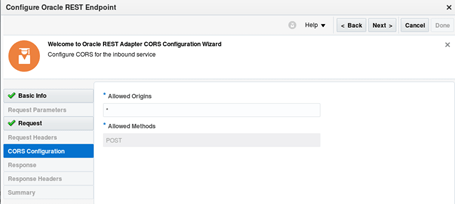
- Click Next. For the summary, review all and click Done.
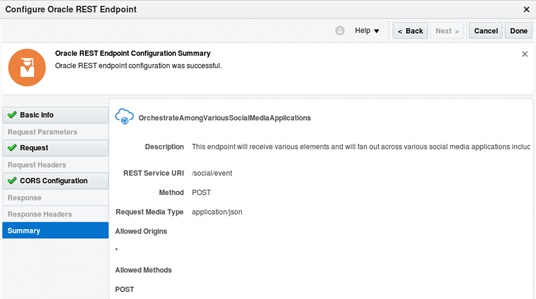
- That’s it, we have configured a REST Trigger, as part of this integration.
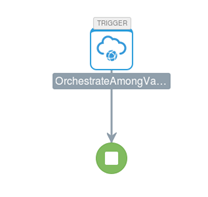
-
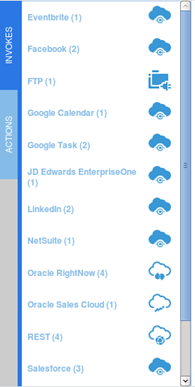
Now, we are going to continue building the orchestration. Notice in the left that you have 2 menus. Actions and Invokers. If you have experience in BPEL this will result very familiar.
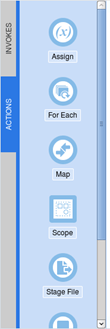
- Think of Invokes as Partner Links, which are normally adapters accessing other services.
- Actions on the other hand, are operations that you can do, mainly to manipulate input and output data.
Easy, huh?
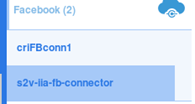
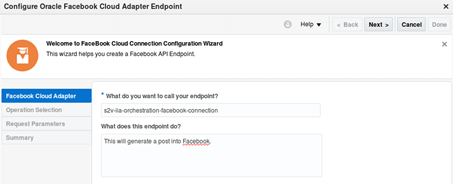
- Click on Invokes and search for Facebook connections. Find yours and drag and drop it under the trigger where you see a + icon.
- It will open the Facebook configuration wizard. Enter a name and description
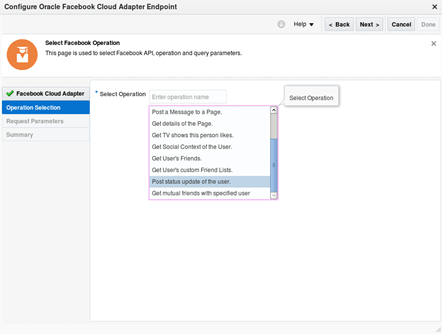
- Click Next. Select the Operation that you want, in this case, “Post status update of the user“
- Click Next. Review the Summary and click “Done“.

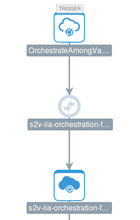
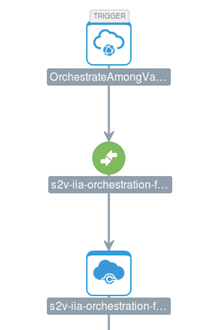
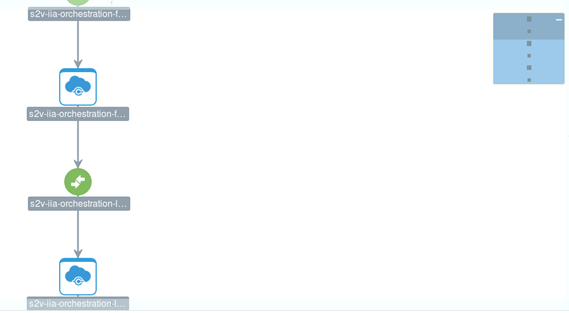
- The integration should look like this at this point:
- Click on the Map in between to configure it. This will be the output from the original REST Adapter a the input to the Facebook Adapter.
- Connect your description into your message.
- Save and Exit Mapper
- Your orchestration should look like this:
- Save your work so far.

- A good practice is to test your integration as you go. Let’s do it now.
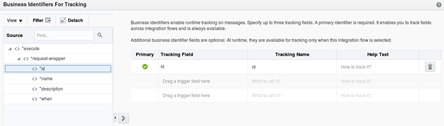
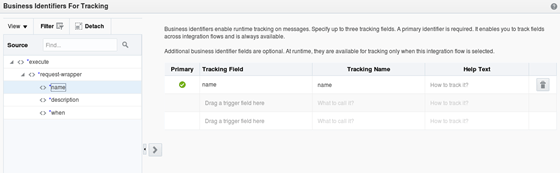
- Click on Tracking

- Add Id into the Traceable field. Then click Done
- Save again and Exit your Integration.
- Notice that your integration is not yet “Activated”.

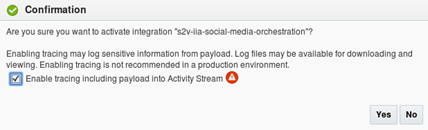
- Click on Activate and tick the box to enabling tracing.

- Click the “information” icon for your integration and copy the Endpoint URL
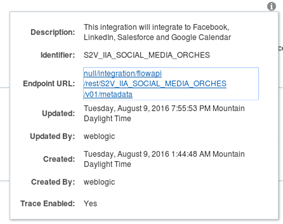
Since I am using a test environment, the Endpoint is not connected to the Public Cloud, if you click on it will open up a broken link. If you are using your own ICS account, you will not experience this situation. However, let me tell you how I fixed mine… I just removed the “ics/faces/null/” bit from the URI.
I will end up to something like this:
- Try it in a browser and make sure you get the expected metadata:

Notice that it will show you the Metadata descriptor of your REST API endpoint, for example, the Accepted Media Type, A JSON request sample, Allowed methods, CORS configuration, etc.
-
Use POSTMAN, SOAPUI or any other REST Test client to send a REST POST command. In this case I am using SOAPUI.
-
In order to get the Endpoint URL, copy the link below and remove the last bit from “metadata”. Then just copy the API that you designed, you can copy it from the metadata page. In this case: “/social/event“
The REST API will be something like this:
https://%5Bserver_endpoint%5D/integration/flowapi/rest/S2V_IIA_SOCIAL_MEDIA_ORCHES/v01/social/event
The last bit in red represents the actual URI of your API created in ICS.

- Make sure to change the method to POST and in the body enter the POST body payload in the structure that you created as part of the ICS integration. You can also copy the entered JSON sample from the metadata page:

- In my case I entered this:
{“id”: “70190000000Xf4w”, “name”:”Speed 2 Value – Integration in Action Workshop”,
“description”:”Welcome to the S2V – Integration in Action Workshop. Now in your own city”,
“when”:”2016-08-10″}
- Leave the Media Type as application/json
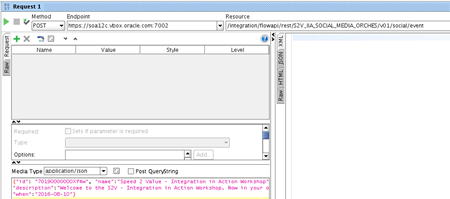
- Click the green icon to send the request. You will receive a 202 Accepted response – See that as Raw
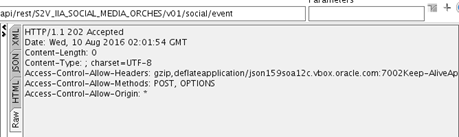
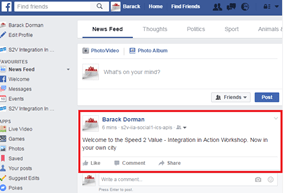
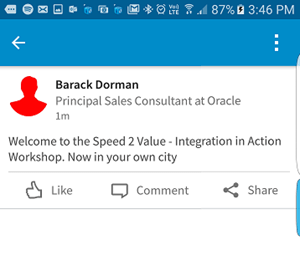
- Finally, confirm that you see the update went through. Login to Facebook and make sure you see the message being posted.

- Now let’s add another “Invoke”, this time click on LinkedIn and select your LinkedIn connection.
- Drag and drop it underneath the Facebook Invoke.
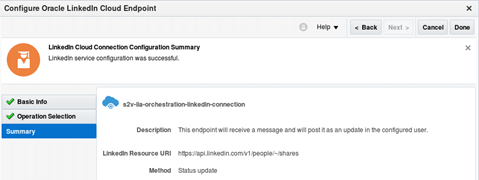
- The LinkedIn configuration wizard will open. Enter how you want to call your endpoint and a sensible description.

- Select “Status update” and click Next
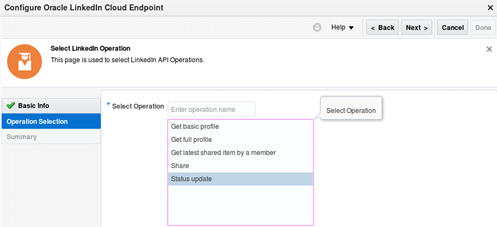
- Review and confirm the summary is correct. Then click Done.
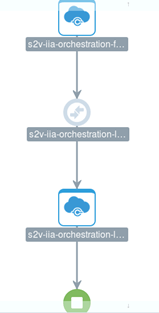
- The bottom of your orchestration looks like this:
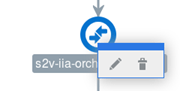
- Now, click on the configuration mapping above the LinkedIn adapter to configure it.
-
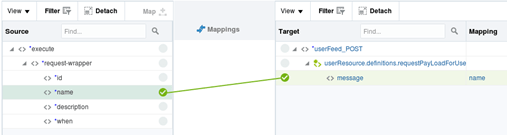
In the mapper drag the “description” element under “request-wrapper” into the target “comment” element.

For Visibility > Code, LinkedIn allows the following codes: anyone and connections-only – In this case we are going to enter anyone manually, as we always want everybody to see our updates in LinkedIn.
- For this click on the code link and enter the word anyone as shown below (No quotes):
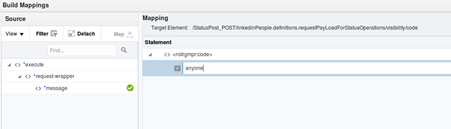
- Click Save. This will close the window and bring you back to the Mapping window. It should look like this:

- Click Save on the Mapping window

- Exit the mapper. The bottom of your orchestration should look like this:
- Save your work so far.
- Test your integration again if you want. This time confirm that the message went to both Facebook and LinkedIn.
- Next, we are going to add another Invoke. This time for Salesforce.
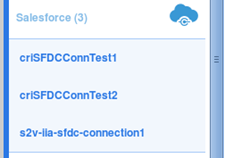
- Click on Invokes and search for your Salesforce connector.
- Drag and drop it below the LinkedIn adapter.
- It will show you the Salesforce connection wizard. Enter a name and description.
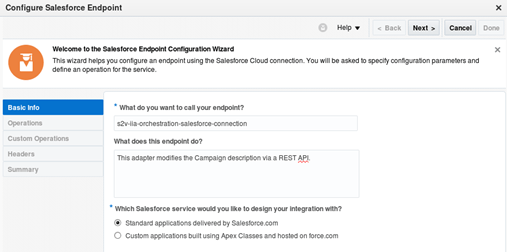
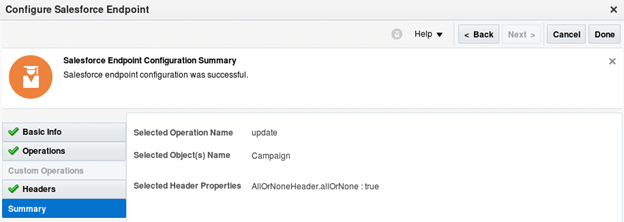
- Click Next. Select Update as the CRUD operation and search for the Campaign Business Object and move it to the right panel.
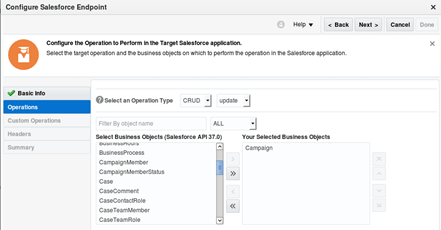
- Click Next. Leave the Headers by default and click Next.
- Review the Summary and click “Done“.
- The bottom of your orchestration should look like this
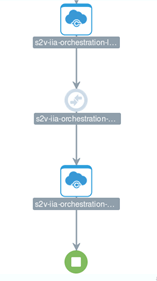
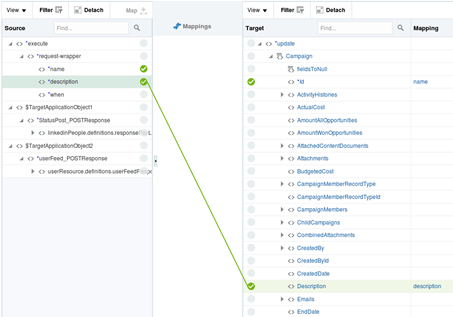
- Click on the Mapping before the Salesforce adapter to configure it.
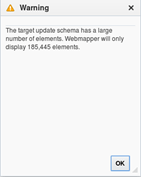
- Salesforce Enterprise WSDL can be pretty daunting. For example simply for Campaigns, it has over 185,445 sub-elements. This is the type of complexity that ICS is helping us deal with. If you see a Warning saying that the target update schema has a large number of elements… just say OK, in this case we are going to update only the “Description” – If we had to update an element that is not shown, we would have to use other approaches, such as SOQL.
-
In the mapper drag the “name” and “description” messages under “request-wrapper” into the target “id” and “description” respectively.
Notice that the structure within “request-wrapper” is the one that you defined when creating freely the JSON payload as part of the REST Trigger at the beginning of the Orchestration. Pretty cool huh?
- Click Save.

- Exit the mapper. The bottom of your orchestration should look like this:

- Save your work so far.
- Test again if you want. This time ensure that the message went to Facebook, LinkedIn and Salesforce under your Campaign’s description.
- Finally, we are going to add the last Invoke. It will be the Google Calendar Connector that you built earlier.
-
Go to Invokes and search for your Google Calendar Connector.

- Then drag and drop it below the Salesforce connector.
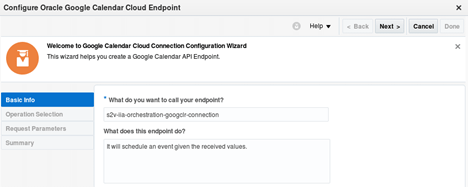
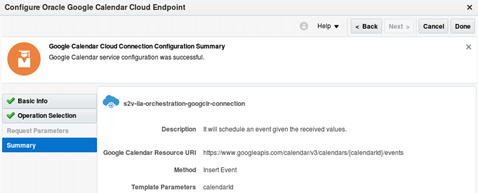
- It will show you the Google Calendar connection wizard. Enter a name and description.
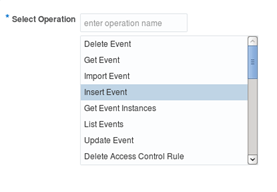
- Click Next. Select “Insert Event” from the allowed Operations – This will allow to create a new entry in the Calendar. Then click Next.
- Review the Summary and click “Done“.
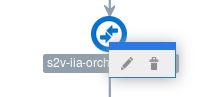
- The bottom of your orchestration should look like this

- Click on the mapping before the Google Connector in order to configure it.
-
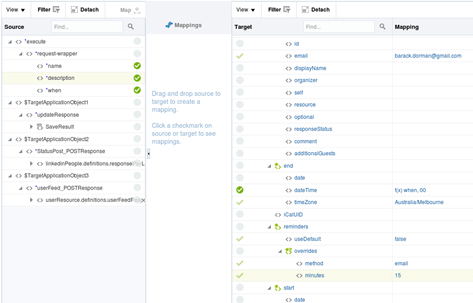
In the mapper you will drag the message elements under “request-wrapper” into the target structure. Notice that the structure within “request-wrapper” is the one that you defined when creating freely the JSON payload that you are expecting as input. Pretty cool huh? Follow the next mappings:
- name -> summary
- description -> description
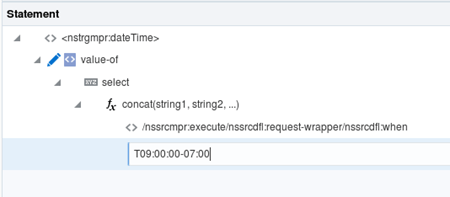
- when -> start/dateTime + “T09:00:00-07:00”
-
when -> end/dateTime + “T17:00:00-07:00”
-
Other configurations on the target that we are fixing for now:
- calendarId: primary
- Location: 417 St. Kilda Rd, 3004, Melbourne, Victoria, Australia
- Start/End timeZone(s)*: Australia/Melbourne
- recurrence: RRULE:FREQ=DAILY;COUNT=1
- attendees/Email(s):
barack.dorman@gmail.com - reminders/useDefault: false
- reminders/overrides/method: email
-
reminders/overrides/minutes: 15
*Note: The time zones need to be according to IANA Time Zone Database names.
-
Notice that you need to use the concatenate function for some fields, such as for “start/end dateTime”. For this, you need to click on the target element that you want to set and on the left search for the operation that you want, drag and drop it into the statement area and finally click on Source to fill the expressions accordingly.
Note: Do Not enter strings within quotes.
For example:
- Once you set all these variables, it should look like this:
- You can Test it by clicking the test icon

You can generate dummy inputs and test the result mapping
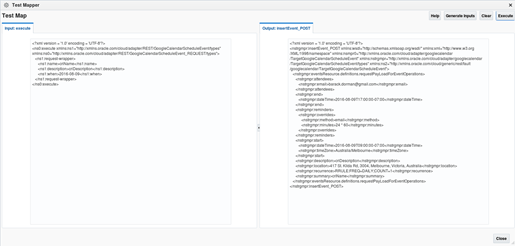
- Click Save on the Mapping window

- Exit the mapper. The integration should look like this
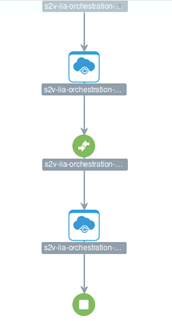
- That’s it, the Orchestration is complete.
- Save your work.
-
Click on Tracking and add the name to the Tracking fields
- Save again and exit the Integration.
- Notice that your integration is not yet “Activated”.
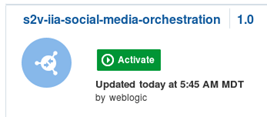
- Click on Activate and tick the box to enabling tracing.
- Click the “information” icon for your integration and copy the Endpoint URL

Since I am using a test environment, the Endpoint is not connected to the Public Cloud, if you click on it will open up a broken link. If you are using your own ICS account, you will not experience this situation. However, let me tell you how I fixed mine… I just removed the “ics/faces/null/” bit from the URI.
I will end up to something like this:
- Try it in a browser and make sure you get the expected metadata:
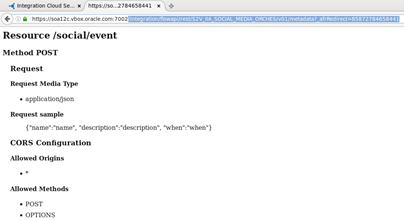
Notice that it will show you the Metadata descriptor of your REST API endpoint, for example, the Accepted Media Type, A JSON request sample, Allowed methods, CORS configuration, etc.
-
Use POSTMAN, SOAPUI or any other REST Test client to send a REST POST command. In this case I am using SOAPUI.
-
In order to get the Endpoint URL, copy the link below and remove the last bit from “metadata”. Then just copy the API that you designed, you can copy it from the metadata page. In this case: “/social/event“
The REST API will be something like this:
https://%5Bserver_endpoint%5D/integration/flowapi/rest/S2V_IIA_SOCIAL_MEDIA_ORCHES/v01/social/event
The last bit in red represents the actual URI of your API created in ICS.

- Make sure to change the method to POST and in the body enter the POST body payload in the structure that you created as part of the ICS integration. You can also copy the entered JSON sample from the metadata page:

- In my case I entered this:
{“name”:”70190000000Xf4w”,
“description”:”Welcome to the Speed 2 Value – Integration in Action Workshop. Now in your own city”,
“when”:”2016-08-10″}
- Leave the Media Type as application/json

- Click the green icon to send the request. You will receive a 202 Accepted response – See that as Raw

-
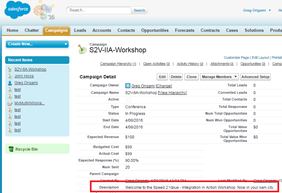
Finally, confirm that you see the update went through. Login into the different Applications, i.e. Facebook, LinkedIn, Salesforce and Google Calendar and validate that the event was created on the day that you mentioned.
|
|
|
|
|
|

How cool is that!!!!
-
Congratulations! You just integrated to multiple SaaS Applications with Oracle Integration Cloud Service.
