Update: There is now an even better way to do this, with first-class support from the OCI Resource Scheduler – just set it to ‘Start’ your Function, and it will be invoked based upon the configured schedule.
Functions in Oracle Cloud Infrastructure are great. As a serverless execution environment with pre-built logging, metrics, etc. it allows developers to simply focus on their code and not worry about all of the supporting infrastructure, while still providing a lot of flexibility through the use of container primitives. As great as Functions are, they are reactive, they can only be invoked and can’t natively be configured to be executed in a spontaneous or scheduled manner. Often this won’t matter, as Functions will be invoked directly or indirectly by users, or in response to events, but sometimes you simply need a bit of code to run periodically.
This blog title seems quite easy and simple but there are bit of steps to manage SOA Market Place Image (SOA MP) Database password reset configuration within application tier which I will discuss in this blog.
There could be multiple situations when user needs to change SOA MP Database password e.g. SOA MP DB password might got expired, or about to expire hence that’s must need to reset to new password which should get further updated all relevant places inside SOA application tier.
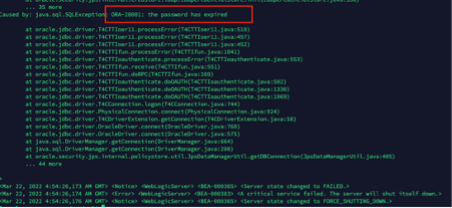
In my case it was for SOA dev/test environment eventually SOA MP DB password has default expiry set for 6-month time and it got expired, due to which SOA application was not coming up and constantly keep throwing below error-
Caused by: java.sql.SQLException: ORA-28001: the password has expired
Note:
In my case below software version were used.
SOA Suite 12.2.1.4
Oracle Autonomous Database 19c
Instruction given here may not work exactly for another SOA and DB version.
To fix above problem. We need to perform below steps –
Need to find out how many places within SOA Application tier DB password been used?
Are the SOA MP DB users locked? or Password expired? or both
Reset & unlock the SOA MP DB user’s password
Create encrypted value of new password for WebLogic Data source & update all Data source files with this new encrypted password and restart all WLS Admin/SOA servers.
Note: If step 4 doesn’t work (In my case, it hasn’t worked but as per Oracle documentation it should work. I may be doing some mistake which hard to troubleshoot so I took alternate path as workaround)5
5. (Optional) force WebLogic to start in Development mode instead of Production mode as clear text password not accepted in Production mode inside JDBC configuration files.
6. (Optional) Use new password as clear string inside JDBC configuration file, bring up WebLogic server and again update new password from WebLogic console for all Data sources, this will encrypt database password inside data source files.
7. Create new DB profile with UNLIMITED limit and assigning to each SOA DB users to avoid password expiry in future.
Need to find out how many places within SOA Application tier DB password been used? –
SOA interact with Database using WebLogic Data source which act as bridge between application tier to Database tier. So, we need to know how many WebLogic Data sources using the SOA Database. There are two ways you can validate this –
If WebLogic Admin server up and running then go to console>>data sources >> and make a note of all Data source except your Custom one which you might have created for some other purpose. E.g.
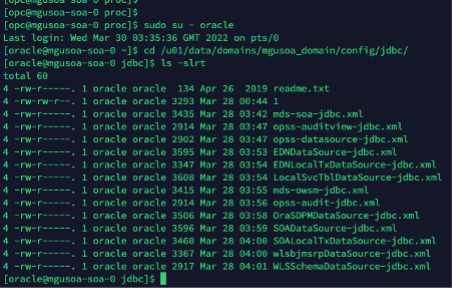
b) If WebLogic server not up and running (which most likely the case) then ssh to server where SOA binaries and domain reside and find out ‘jdbc’ folder, which will list out all Data sources which exists within WebLogic.
E.g.
/u01/data/domains/mgusoa_domain/config/jdbc/
So, now first challenge is sorted out, now we know what are all Data sources which are using SOA MP database, so if we change SOA MP database password all these Data source files needs to be updated with new password.
Are the SOA MP DB users locked? or Password expired? or both
Now, let’s move to next step and check whether SOA MP Database DB users are locked, or password expired or both.
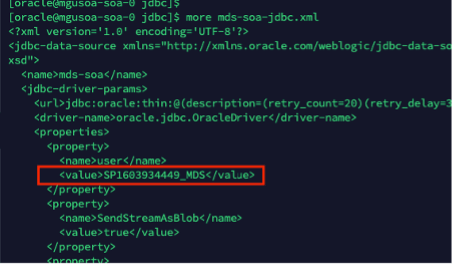
In order to do that, first you need to know DB users name used for SOA. One quick and easy way to open one of Data source files and find out DB prefix e.g. “SP1603934449”
Once you know DB prefix, run below query in SOA Database to know all SOA DB users.
select username from dba_users where username like 'SP1603934449%';
So, now you know all the SOA DB users within SOA Database which are used by SOA application tier. Next step to check each of them whether they are locked, or password expired.
Run below sql query to know their status –
select username, account_status from dba_users where username like 'SP1603934449%';
You should be able to see “account_status” column value either “LOCKED” or “EXPIRED & LOCKED”
In my case most of them with status “EXPIRED & LOCKED”
Reset & unlock the SOA MP DB user’s password
ALTER USER SP1603934449_IUA identified by Lxxx#1xxxxx;
ALTER USER SP1603934449_SOAINFRA ACCOUNT UNLOCK;
commit;
Once password reset and unlocked, run the below SQL query again and account status should be “OPEN” now
select username, account_status from dba_users where username like 'SP1603934449%';
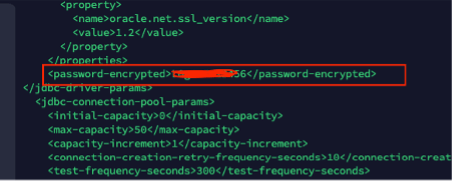
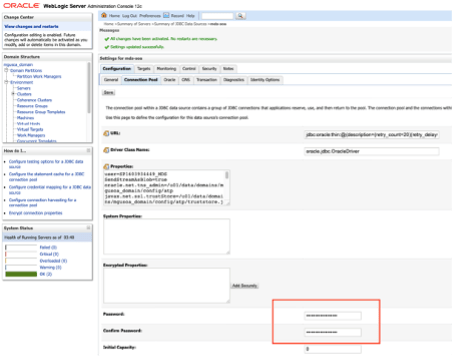
Create encrypted value of new password for Weblogic Datasource & update all datasource files with this new encrypted password and restart all WLS Admin/SOA servers.
WebLogic data source files doesn’t except password in clear text if, WebLogic running in “Production” mode. If WebLogic running in “Development” mode, then it can accept clear text password. In my case, although it was dev/test environment but unfortunately it was set for “Production” mode, so I have to generated encrypted value of new password.
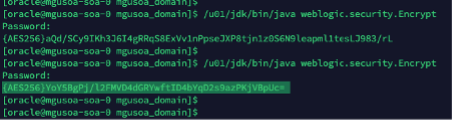
Run the WebLogic Encryption Utility and enter the password you set for the database schemas:
/u01/jdk/bin/java weblogic.security.Encrypt
password: new_password
Once you run “/u01/jdk/bin/java weblogic.security.Encrypt” command it will ask to type new password, type the new password. It will further generate encrypted password value as highlighted in above screen shot.
Once you know the new encrypted value for new password, update all the JDBC data sources files one by one with this new encrypted password and restart the WLS admin/SOA Servers
Your WebLogic server should be up and running after this change.
Note: If step 4 doesn’t work (In my case, it hasn’t worked but as per Oracle documentation it should work. I may be doing some mistake which hard to troubleshoot so I took alternate path as workaround)
(Optional) force WebLogic to start in Development mode instead of Production mode as clear text password not accepted in Production mode inside JDBC configuration files.
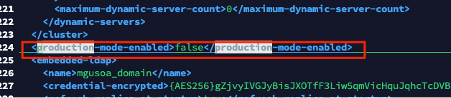
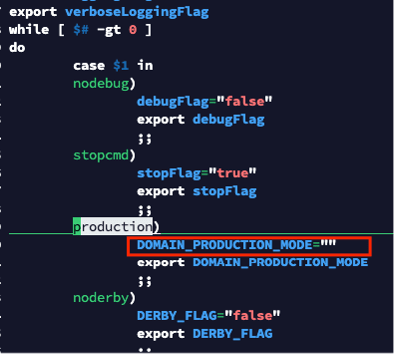
You must update multiple configuration file to force WebLogic to start in “Development” mode.
I have updated below 4 configuration files. The full path is just for reference, you must use your environment path to find out these files. Make Production value either “false” or “” depending up on file existing value.
Once above configuration is done, now you can update all JDBC data source files with clear text password
Once all JDBC data source xml files got updated with new password in clear text format.
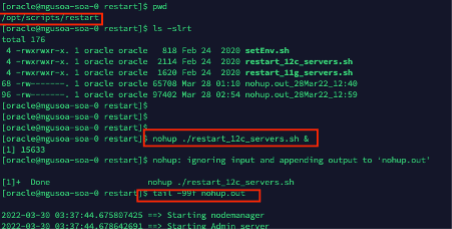
Restart the WLS admin and SOA server using out of box script available in SOA Market Place Image
/opt/scripts/restart/restart_12c_servers.sh
Admin server should go in running mode
Now you can access WebLogic Admin console and start remaining servers if needed.
Last steps to update all data source from Weblogic console again, this will update all JDBC data source files in backend with encrypted password instead of clear text password. Use the same clear text password from WebLogic console for all Data source files and click save button, this will replace clear text password in backend to encrypted password.
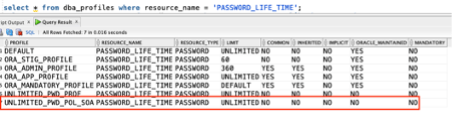
Create new DB profile with UNLIMITED limit and assigning to each SOA DB users to avoid password expiry in future.
Above command should create a database profile with password expiry set to unlimited and can be verified by running below command
select * from dba_profiles where resource_name = 'PASSWORD_LIFE_TIME';
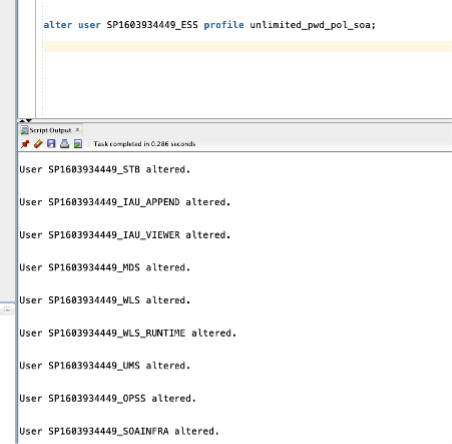
Now, set all SOA DB Users to use that profile.
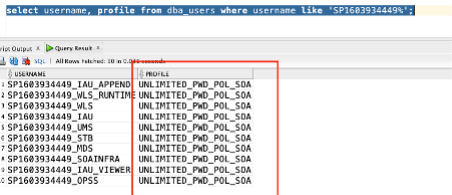
Run below command to check whether profile for each SOA Database user been changed or not?
Above step hopefully will force SOA DB users password not to expire in future and will help to avoid all above steps. However, that’s not recommend for Production environment.
Normally, as part of the review of a hackathon I would write something about the teams and the solutions. This time round I’m doing something a little different. With the three challenges being very specific, I want to share the github repositories and kaggle code that I could find.
(With more to come with the winners being announced)
On Friday 18 March 03:00 PST | 06:00 EST | 10:00 GMT | 15:30 IST | 21:00 AEDT, Hackmakers will announce the winners of the #FormulaAI Hackathon 2022. It will be an exciting moment to conclude the event. Stay tuned at https://www.formulaaihack.com/ to watch the public live stream.
It’s been an immense learning experience for many people (including myself). Here’s a snapshot of some of those learnings when I look back in review. Please note that the content below does not contain any spoilers about winners and solutions delivered.
A real implementation often has different aspects which need to be addressed. Some of them are:
A tool to be used for building the integration among applications and technologies, possibly leveraging a low code environment
A tool to expose the APIs enabling the integration with third party applications applying in addition security policies, caching capabilities, routing, etc
A tool to monitor from IT Operation perspective the entire solution as just one application skipping the need to manage several silos or frameworks
Oracle Cloud can provide the right answer to your developer needs using the best Cloud native services and here identified by OCI API Gateway (API GTW), Oracle Integration (OIC) and OCI Logging and Analytics (LA)
If you are already using Oracle Integration for your development purposes probably you have already noticed the chance you have to configure the API Management solution that you prefer, exposing what you have already built.
From OIC console, you can access the “Setting” section and configure properly what you need
Clicking on the “API Management” link you can configure the connection to your OCI API Gateway instance
How and where can you find the required information?
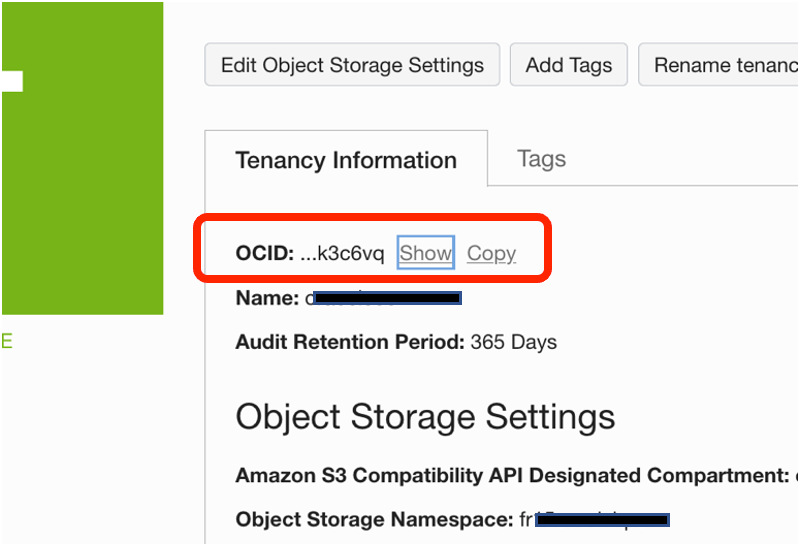
Tenancy OCID can be found navigating the OCI Console and clicking on “Tenancy” details
Copy and paste this value on the previous screen into the Oracle Integration console
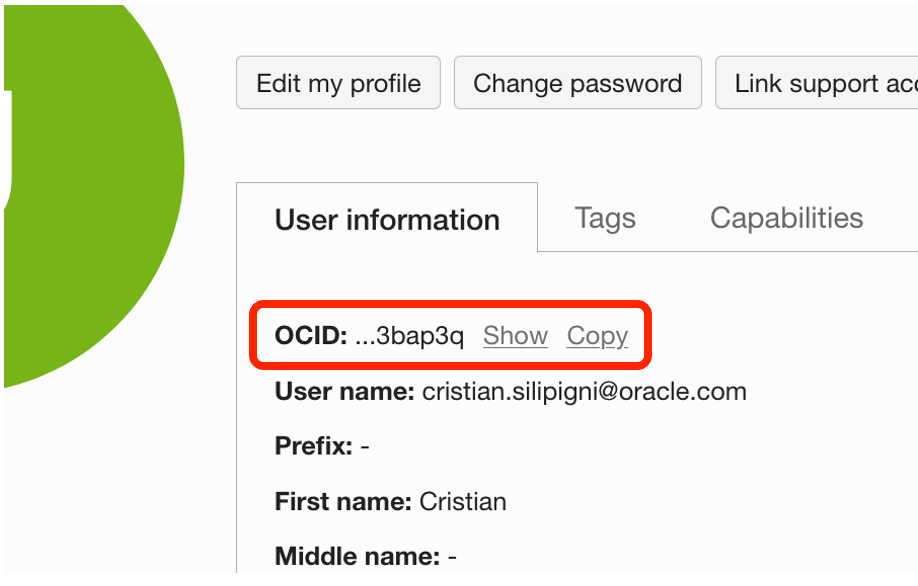
User OCID can be found from OCI Console under the link “My Profile”.
Also in this case, copy and paste the “OCID Id” into the Oracle Integration console
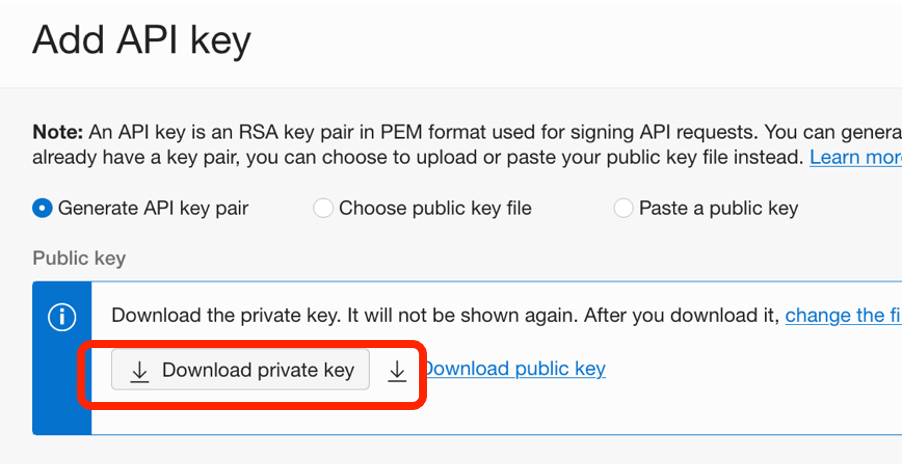
Finger Print: from OCI Console, after having selected “User Profile”, click on “API Keys” and from here you can add a new API Key
Download the “private key” than click “add”
A new key will appear among those eventually already generated previously
Private Key: this one, in pem format, comes from the activities previously done during the API Key creation. Before uploading the key in the API Management setting, you need to convert this one. The key that you have downloaded is in PKCS8 format and this one must be converted to RSA (PKCS1) before using it for the API Management connection, using the following command from your shell
Once converted the file, you can upload your new key to complete the configuration with your API Management connection.
Click “Save” and that’s all
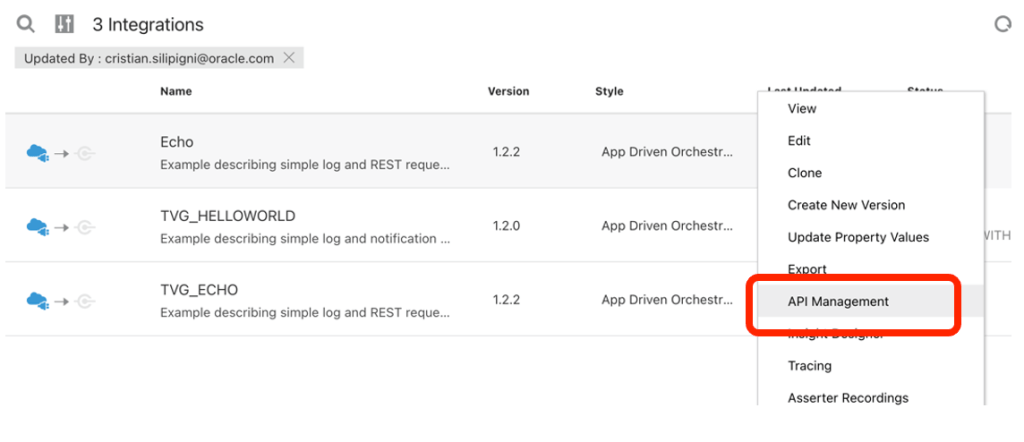
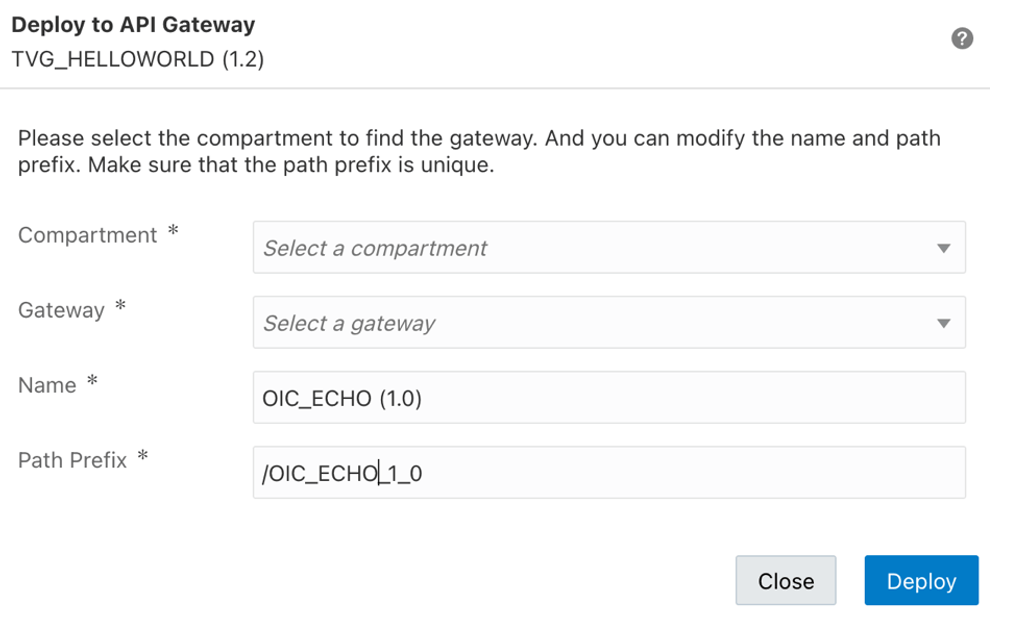
Now from your Oracle Integration console, you can work with your integration flows and after having completed your implementation you are now ready to publish your asset to you OCI API Gateway instance. I’m using the “ECHO” integration flow as an example
Clicking on API Management you can publish the integration flow providing all the required information and details as below presented
selecting the Compartment where your OCI API Gateway is running and the right API GTW instance (for example that one for the TEST environment)
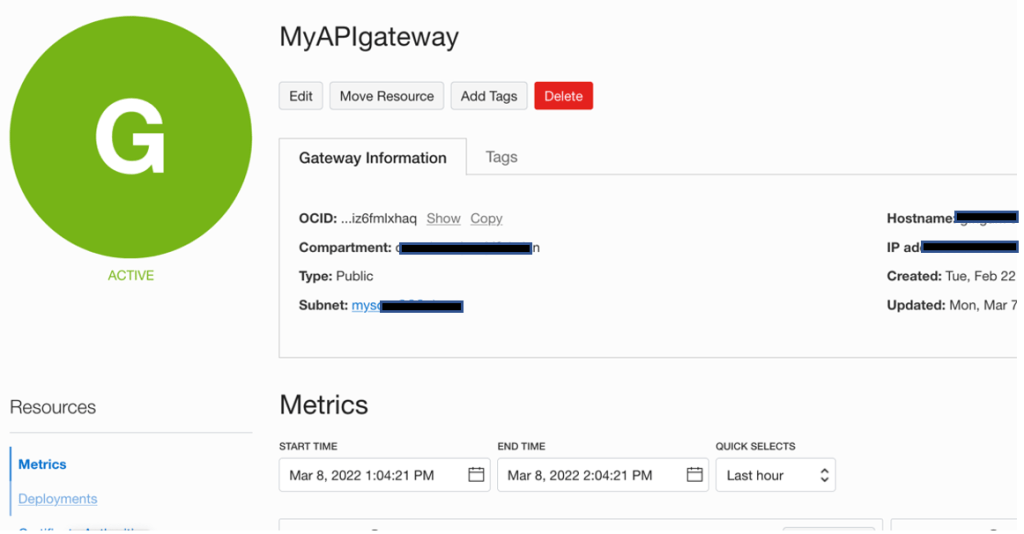
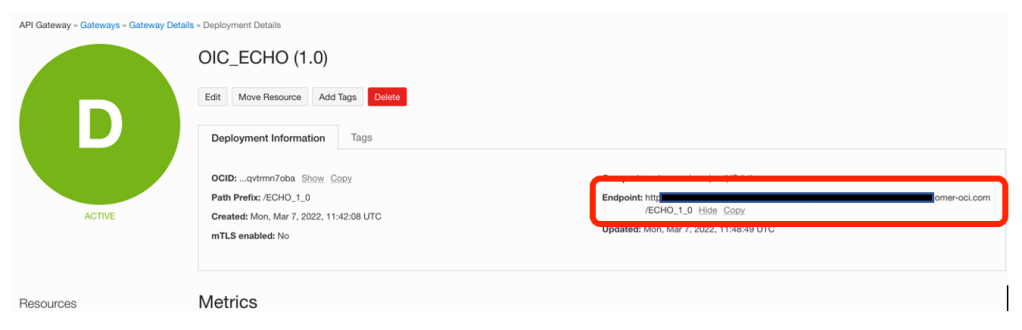
Clicking on the “Deploy” button and wait for few seconds before seeing your service exposed into you OCI API Gateway instance (in my case “MyAPIGateway”)
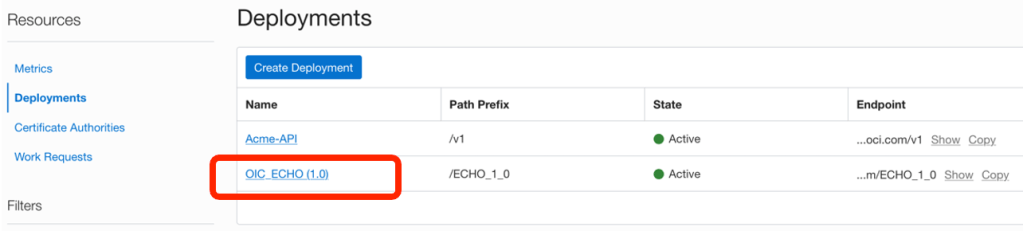
Clicking on the active gateway instance, you can access to the deployed APIs
as below shown
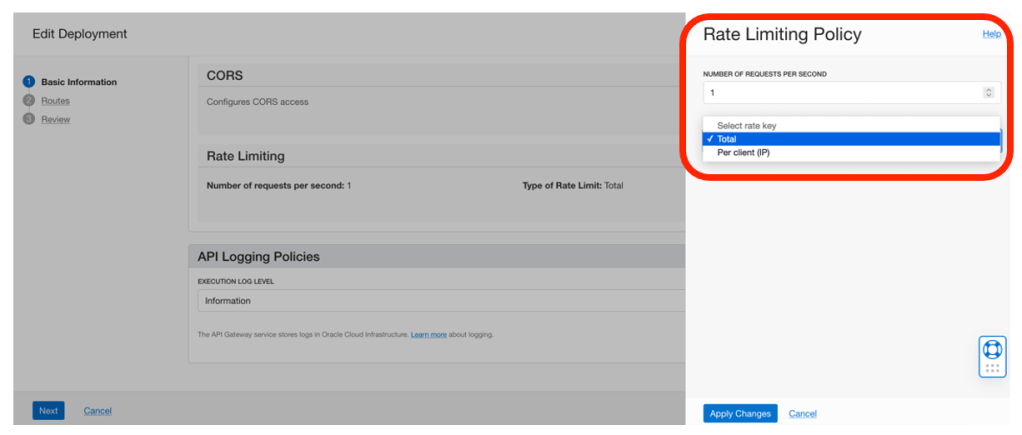
Clicking on your service, it’s possible to configure the policy you want to apply. In the case below shown, a “Rate Limiting” policy has been applied to control and filter the use of this service
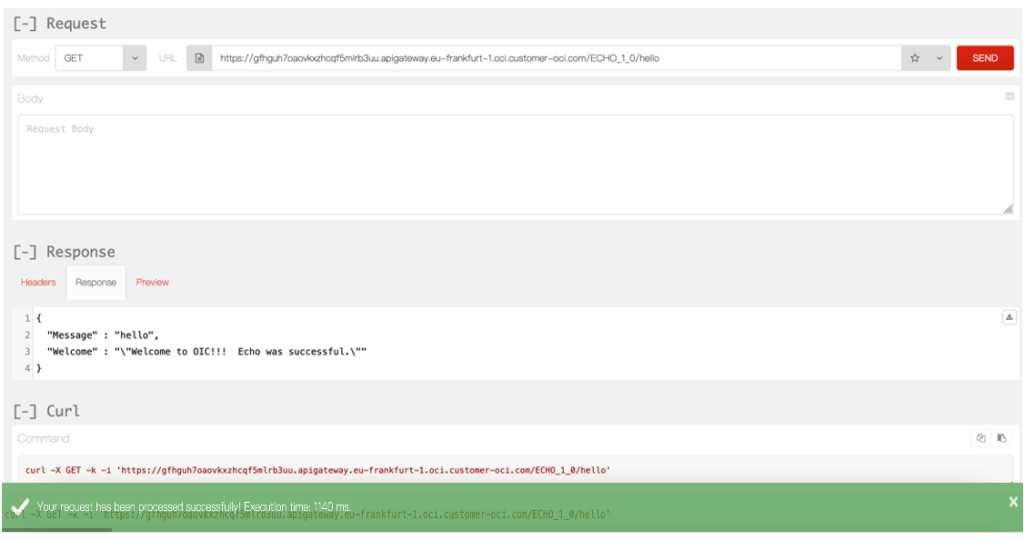
So, jumping again into the previous webpage, where your REST service is detailed, you can copy the URL of the API endpoint to use it for invocation
Open your REST client (or simply a browser) to test your service
The invocation has been successfully tested.
Now, you can monitor the metrics from the OCI API Gateway console in the “Metrics” section to get more details about the behavior; you can select the right time interval to check and get visibility of the API execution
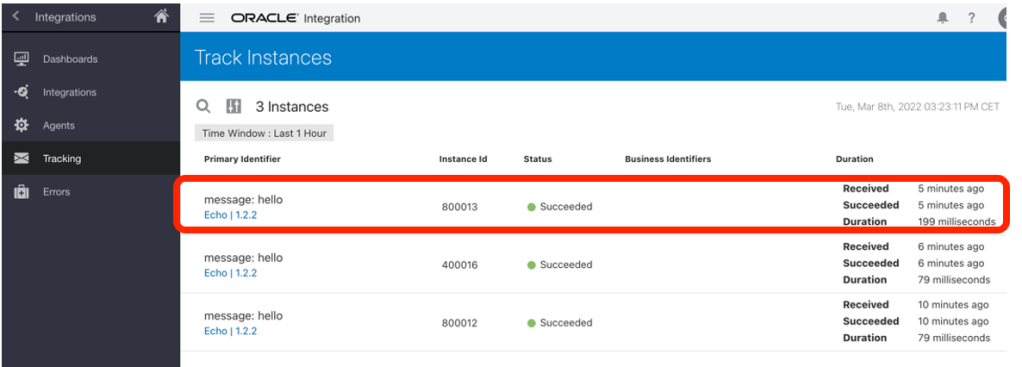
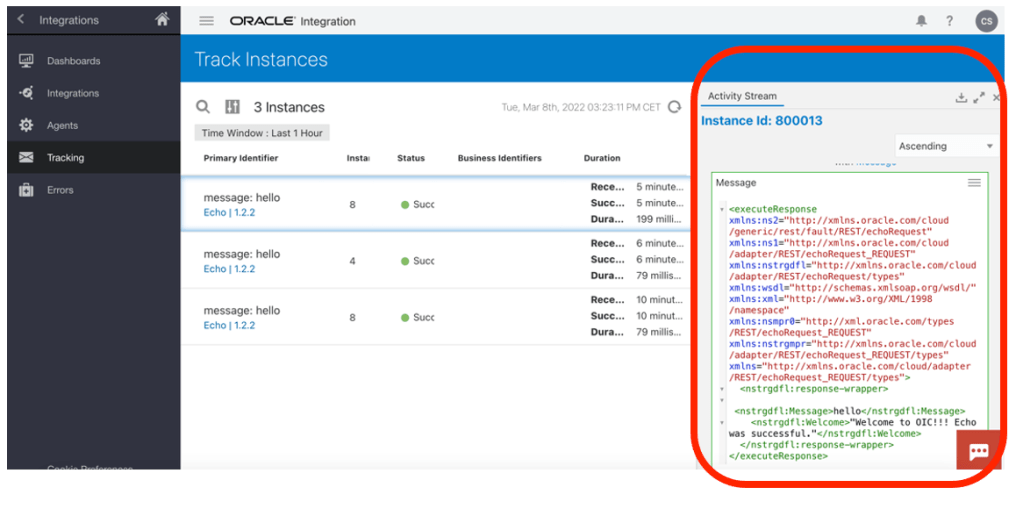
At the same time, you can also have a look at your Oracle Integration console to see how the calls have been managed by the integration platform and if needed you can submit again manually the requests in case of error if, of course, they are involving back-end systems which ahd some problems (networking issues, maintenance, …).
and getting further info about the execution and all details about the business message
In this case, I have used 2 different consoles to monitor OCI API Gateway and Oracle Integration respectevely.
Keep in mind that Oracle Cloud Infrastructure can help you in case you want to consolidate in just one console several information coming from different and disparate OCI Services.
This is the right case for using OCI Logging & Analytics; it allows you to build your own dashboard collecting all info you need from IT Operations perspective and just if needed you can use the dedicated console of each service to leverage deeper and specific management capabilities (errors management, resubmitting faulted instances, changing scheduling parameters, modifying security policies, tuning caching options, etc).
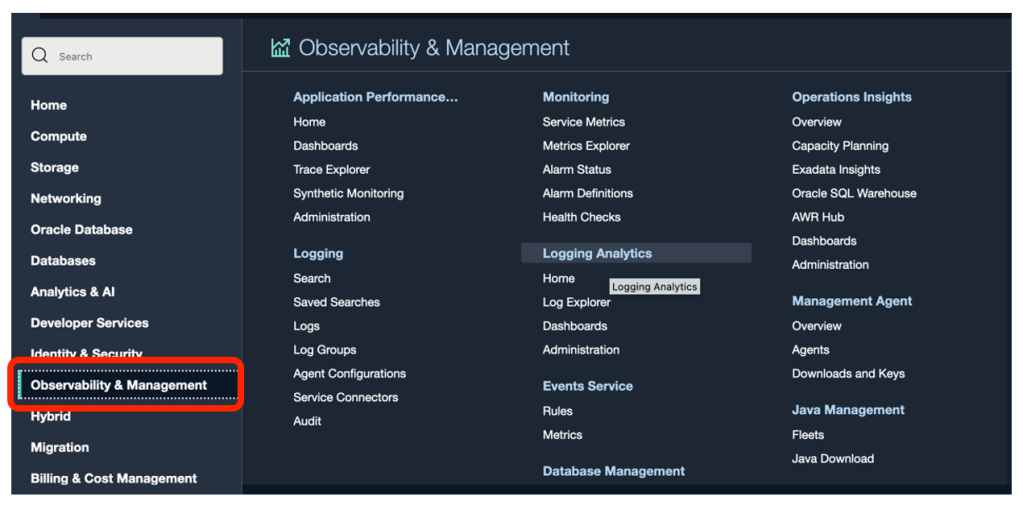
How to use OCI Logging & Analytics?
Using OCI Console and clicking on “Observability and Management” as below described
and select “Logging Analytics” link
From here you can create your own dashboard to include all information you need. In my case I have built a dashboard (“My OCI Dashboard”) collecting info from OCI API Gateway, Oracle Integration and Logging & Analytics itself, as below described:
The screenshot upper represented, includes 6 different widgets which are collecting metrics from different sources so including in just one console all information you want about latency, inbound requests, bytes ingested, bytes sent, etc
How to create a Logging & Analytics dashboard?
Not really hard… on the contrary very straightforward procedure and you can get more details looking at the following blog post:
I have been recently engaged in one assignment where I was expected to make connectivity with NetSuite to create Customer inside NetSuite. However, condition was to connect NetSuite using “Token based Authentication” only. That was Customer’s key requirement to establish secure connectivity to NetSuite.
Token based authentication needs many input parameters such as WSLD URL, Consumer Key, Consumer Secret, Token, Token Secret and Account ID.
I had to spent bit of time to work-out how to get all above parameters values and in this blog I just want to share that learning.
There is already NetSuite Connector Documentation available which describe the instructions about Token Based Authentication. This blog is just expanding that document with some additional info and screenshots.
So, let’s get started-
Prerequisite
Before you establish connectivity from OIC to NetSuite using Token Based Policy there are certain prerequisite which you need to accomplish as listed below-
Enable Client/Server SuiteScript, REST/SOAP Suite Talk and Token based Authentication
To connect to Oracle NetSuite, you must have registered with Oracle NetSuite and enabled key features (such as SOAP and REST web services) on your Oracle NetSuite instance.
1. Visit http://www.netsuite.com to register with Oracle NetSuite. Ensure that you obtain an account with administrator privileges.
2. Enable connection-related features on your Oracle NetSuite instance.
a. On your NetSuite home page, select Setup, then Company, and then Enable Features.
b. Click the SuiteCloud subtab.
c. In the SuiteScript section, check the following boxes:
i. CLIENT SUITESCRIPT. Click I Agree on the SuiteCloud Terms of Service page.
ii. SERVER SUITESCRIPT. Click I Agree on the SuiteCloud Terms of Service page.
d. In the SuiteTalk section, check the following boxes:
i. SOAP WEB SERVICES. Click I Agree on the SuiteCloud Terms of Service page.
ii. REST WEB SERVICES. Click I Agree on the SuiteCloud Terms of Service page.
e. In the Manage Authentication section, check the TOKEN-BASED AUTHENTICATION box. Click I Agree on the SuiteCloud Terms of Service page.
You must enable the TBA feature if you want to use the TBA authentication policy to connect to Oracle NetSuite from external applications.
f. Click Save.
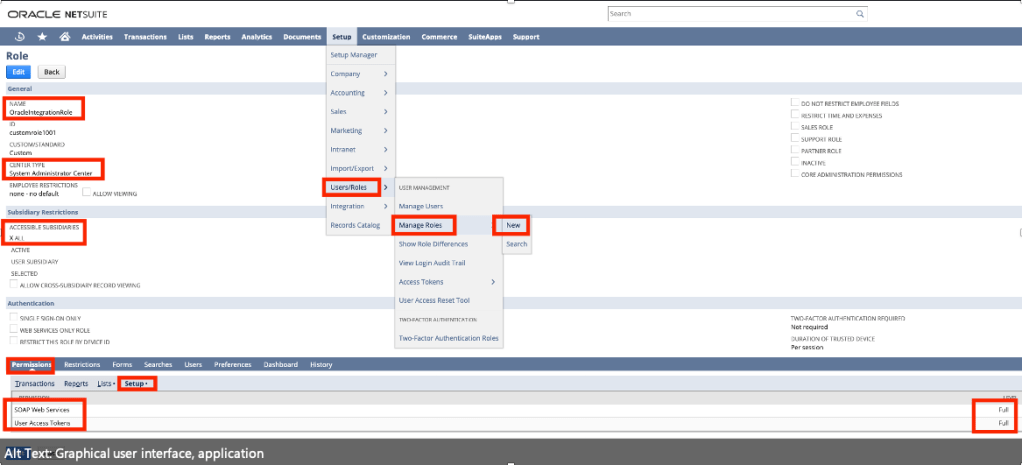
Create an Integration Role with Token-Based Authentication (TBA) Permissions
Create a new role and assign TBA permissions along with other necessary permissions (specific to your integration) to it. You’ll assign the Oracle Integration user account—which you’ll subsequently create—to this role.
Note:
As a best practice, avoid using the Administrator and Full Access roles/users in Oracle NetSuite connections that use the TBA security policy.
To create a new role:
1. On the NetSuite home page, select Setup, then User/Roles, then Manage Roles, and then New.
2. On the Role page:
a. Enter a name for the role, for example, Oracle Integration Role.
b. In the CENTER TYPE drop-down field, select System Administrator Center.
c. In the Subsidiary Restrictions section, select All. For information on subsidiary restrictions, see Restricting Role Access to Subsidiaries.
d. On the Permissions tab, To provide TBA permissions to the new role, you must add the User Access Token permission to the role with full access. This permission is present on the Setup subtab under the Permissions tab.
You can add other permissions to the role depending on the tasks you want to allow the users assigned this role to perform. For any custom role, you must specifically add the SOAP web services permission with the Full level. See Assigning the SOAP Web Services Permission to a Role.
e. After you’ve added all the necessary permissions, click Save to create the new role.
Create a User Account for Oracle Integration
Create a user account for Oracle Integration and assign this account to the Token Base Authentication role “OracleIntegrationRole” you created previously. You’ll use the credentials associated with this user account to connect to NetSuite from Oracle Integration.
follow the procedure provided here:
1. On the NetSuite home page, select Lists, then Employees, then Employees, and then New.
2. On the Employee page:
a. In the NAME fields, enter a first name and last name for the user, for example, Integration User05.
b. In the EMAIL field, enter a valid email address.
c. In the SUBSIDIARY drop-down field, select a subsidiary of your choice.
d. Scroll down and click the Access tab to perform additional configurations.
i. Select the GIVE ACCESS and MANUALLY ASSIGN OR CHANGE PASSWORD check boxes.
ii. In the PASSWORD field, enter a password for the user account.
iii. Re-enter the password in the CONFIRM PASSWORD field.
iv. To assign this user to the “OracleIntegrationRole“ TBA role created previously:
• With the Roles subtab selected, select the TBA role from the ROLE drop-down field; for example, Oracle “OracleIntegrationRole”.
• Click Add.
e. Click Save to create the new user record.
Create an Integration Record for Oracle Integration
Before you can create and assign API tokens (for TBA) to a user account, you must create an integration record for the application that will use this user account to access NetSuite.
Create an integration record for the Oracle Integration application.
1. On the NetSuite home page, select Setup, then Integration, then Manage Integrations, and then New.
2. On the Integration page:
Enter a name for the integration record, for example, “ExtIntegrationApp”
a. Optionally, enter a description for the record.
b. Leave the Enabled option selected in the STATE drop-down field.
c. On the Authentication tab:
i. Leave the TOKEN-BASED AUTHENTICATION check box selected.
ii. Deselect the TBA: AUTHORIZATION FLOW and AUTHORIZATION CODE GRANT check boxes.
d. Click Save.
The confirmation page displays the client credentials for this integration record or application.
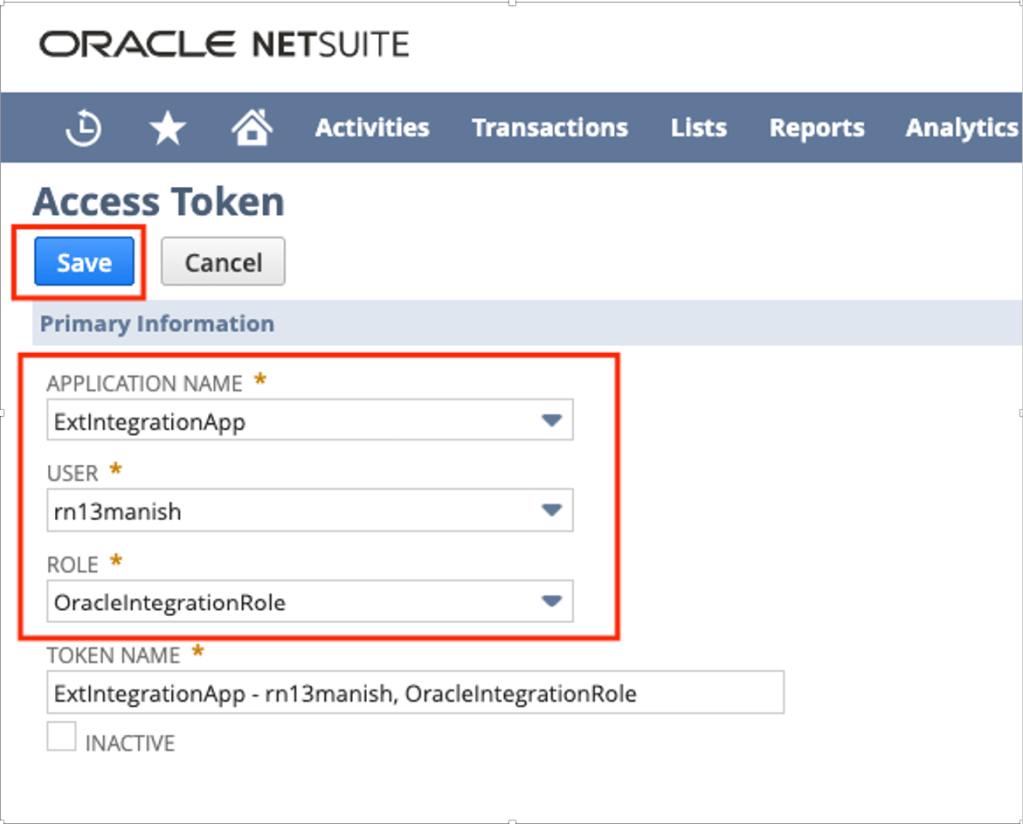
Create an Access Token for the User Account
Create and assign an access token to the Oracle Integration user account.
1. On the NetSuite home page, select Setup, then User/Roles, then Access Tokens, and then New.
Note: “Access Tokens” page was not appearing before, only when I executed “Enable Client/Server SuiteScript, REST/SOAP Suite Talk and Token based Authentication” section as per this document then only “Access Token” page appears.
2. On the Access Token page:
a. In the APPLICATION NAME field, select the integration record created previously e.g. “ExtIntegrationApp”
b. In the USER field, select already existed Oracle Integration’s user account e.g. “rn13manish”
c. In the ROLE field, select the appropriate Token Base Authentication role e.g. “OracleIntegrationRole”
d. Leave the TOKEN NAME field unchanged.
e. Click Save.
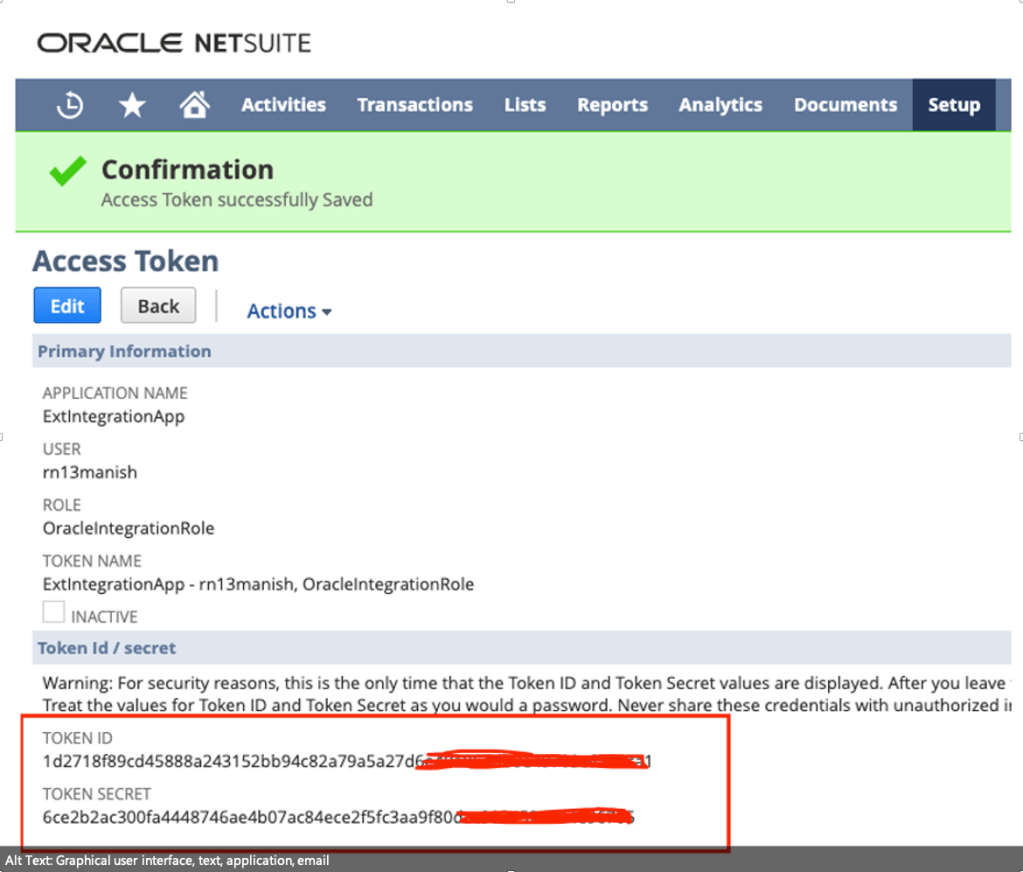
The confirmation page displays the token values for the user account.
3. Note down the Token ID and Token Secret values. You’ll use these credentials to connect to NetSuite from Oracle Integration.
Make a Note of the NetSuite Account ID
Along with other credentials, you’ll require the NetSuite Account ID to connect to NetSuite from Oracle Integration.
To view your account ID:
1. On the NetSuite home page, select Setup, then Integration, and then SOAP Web Services Preferences.
2. Note down the Account ID displayed at the top of the page.
3. Click Cancel to exit the page.
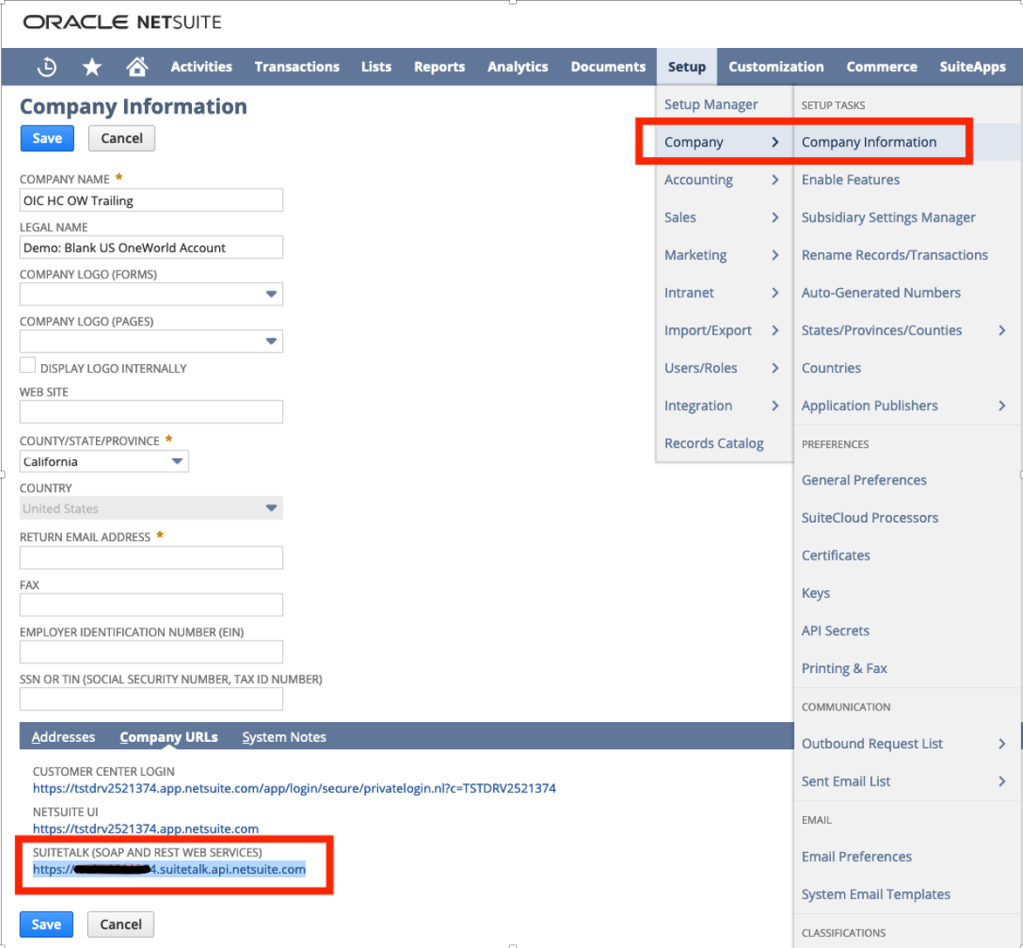
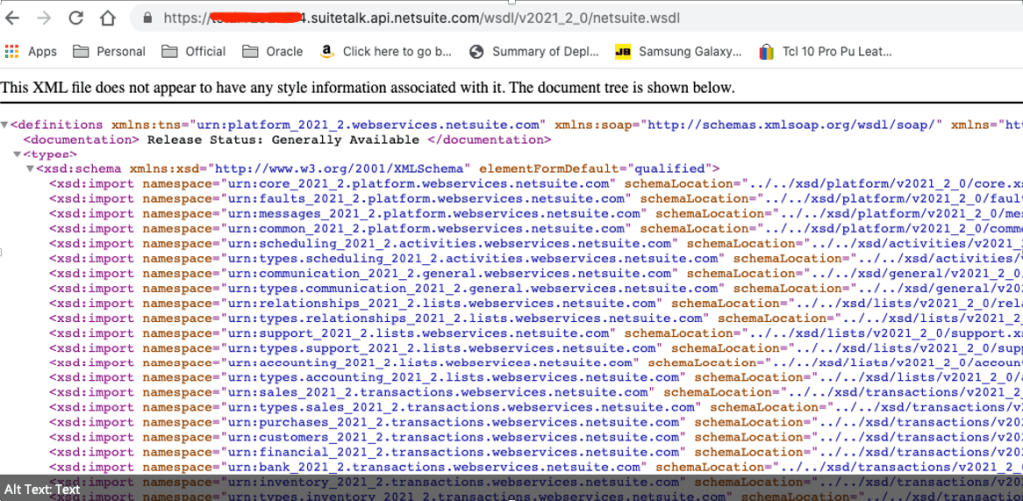
Assemble the Oracle NetSuite WSDL URL
You need to draft the NetSuite WSLD using below technique –
Once you WSDL are ready, make sure you test in browser and it should open –
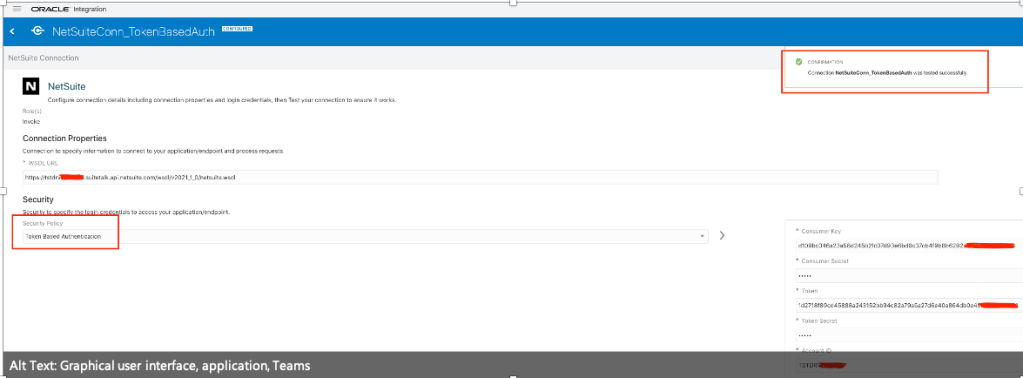
OIC Connection to NetSuite Using Token Based Authentication
Once all parameters values such as WSLD URL, Consumer Key, Consumer Secret, Token, Token Secret and Account ID are ready then make connection to NetSuite using NetSuite Adapter from OIC Home Page >> Integration >> Connection
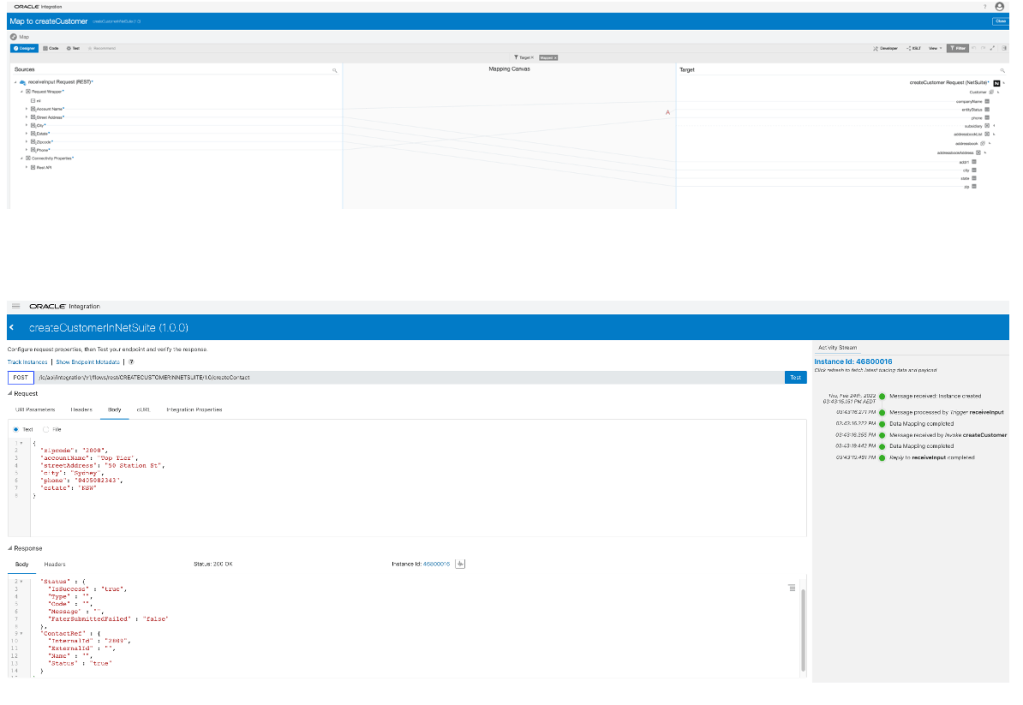
Once connection is established, you can perform any CRUD operation for any business object as per your option available. In my case I did create Customer inside NetSuite by posting a JSON payload via REST Adapter to NetSuite Adapter.
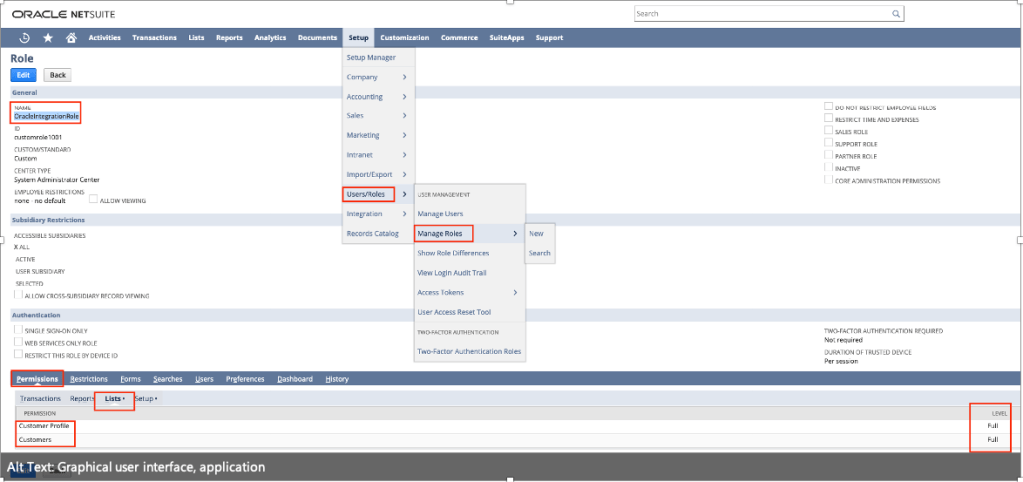
Note: The role what you using to communicate to NetSuite e.g. in my case it was “OracleIntegrationRole” must have given permission to particular business object such as “Customers”, otherwise your integration will be keep failing and will give below error message –
{
“Status” : {
“IsSuccess” : “true”,
“Type” : “ERROR”,
“Code” : “INSUFFICIENT_PERMISSION”,
“Message” : “Permission Violation: You need the ‘Lists -> Customers’ permission to access this page. Please contact your account administrator.”,
“FaterSubmittedFailed” : “”
},
“ContactRef” : {
“InternalId” : “”,
“ExternalId” : “”,
“Name” : “”,
“Status” : “false”
}
}
In order to fix above error. Make sure you give “Customer” and “Customer Profile” permission to “OracleIntegrationRole” role.
Here is my OIC Integration.
Here is my mapping.
Note:
There could be some mandatory field for the object what you trying to create inside NetSuite, so first try creating object directly using NetSuite frontend with minimal fields which will give you idea what are the mandatory fields needed for that object.
Once above JSON got posted and I got success reply, you can further login into NetSuite to validate whether that particular Customer got created or not. In my case its absolutely got created.
Everyone is aware of the continuous integration and continuous development relevance which is nowadays the mantra of DevOps practices.
Oracle Integration is obviously part of the end2end lifecycle development being involved for connecting legacy applications usually deployed on-premise and SaaS applications often provided by Oracle Cloud or hosted on other Cloud providers.
It doesn’t matter where the applications are, where the integration is; the continuous delivery of new integration processes and versions need to be included in a smart and automated tool able to reduce the gap between the different developer teams.
Developers, who have the ownership to build new services and IT Operators, who have the task of deploying new code versions to the different environments, need to converge on one single tool to simplify complex procedures that can be simply considered as two sides of the same coin.
The common need is to keep all environments aligned with the latest implementations, possibly having everything monitored and tracked to grant audit activities in terms of compliance; this is a must when the project is starting to become critical and relevant at the enterprise level.
Oracle Integration (OIC), as you know, includes Visual Builder Cloud Service which allows open-source standards-based integration to develop, collaborate on, and deploy applications within Oracle Cloud.
Just for this, it’s easy to use Visual Builder Studio, the built-in tool, that allows developers to manage the software life cycle automating the development.
Oracle VB Studio natively supports Oracle Integration artifacts, so we can leverage this one to easily promote our integration flows from an environment to another one moving for example our integration projects from development to test environment once you we completed the new implementation and of course ready to test it.
That’s the right path to be used for promoting projects from Test to Production or from Production to a DR environment, this one probably running on a different OCI Region.
Working with the current implementation you can:
Export integration flows
Import integration flows
Delete integration flows
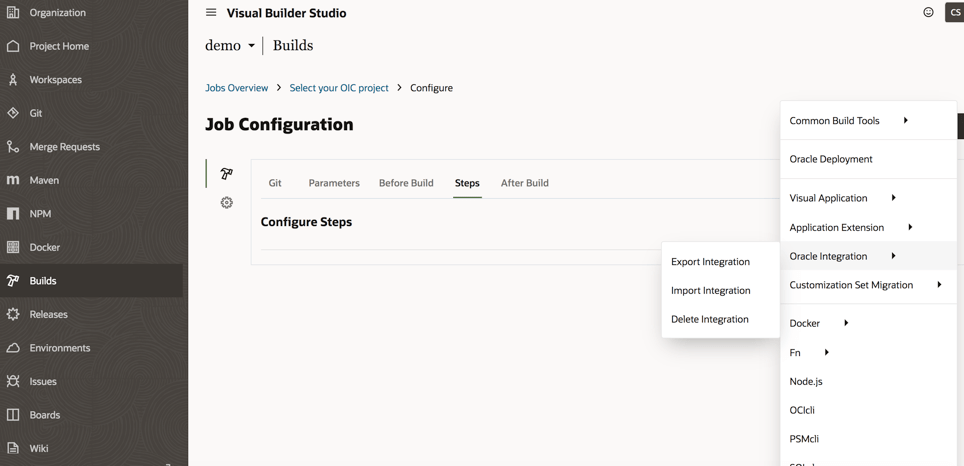
As shown below in the picture, the options we have working with Oracle Visual Builder Studio and OIC
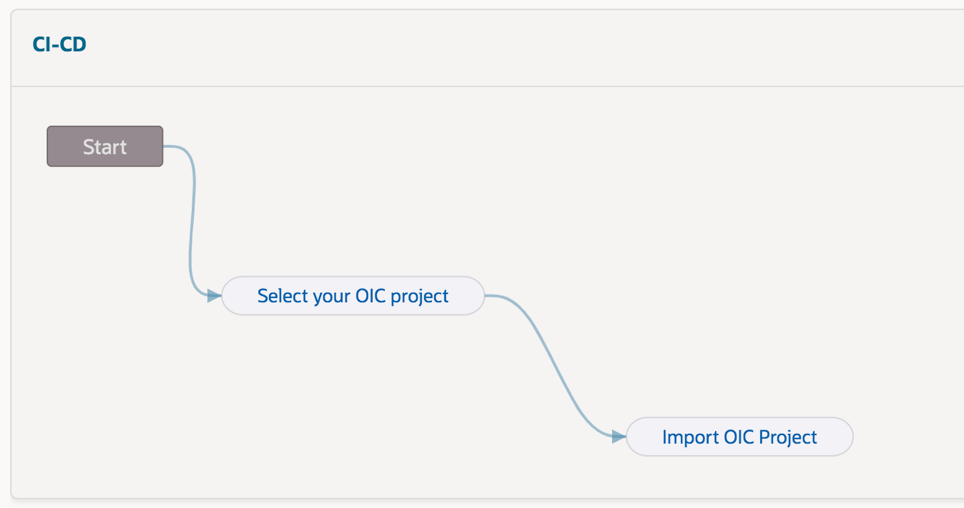
Herewith an example of pipeline that you can easily configure to automate the Export / Import procedure and defining in cascade all steps (“jobs”) to define the required actions, of course this one below just for demo purposes. This procedure will be later explained step-by-step just in case you want to reproduce this one for your own purposes
In order to export our assets from the development environment, for example, it’s enough to configure our source and target environments about the OIC instances
How to configure our OIC environments?
This is a straightforward operation working with VB Studio, as shown below:
We can create all connections we need to configure properly the tool
Once we have configured our instances, we need to build our “pipeline” so to automate the procedure when needed
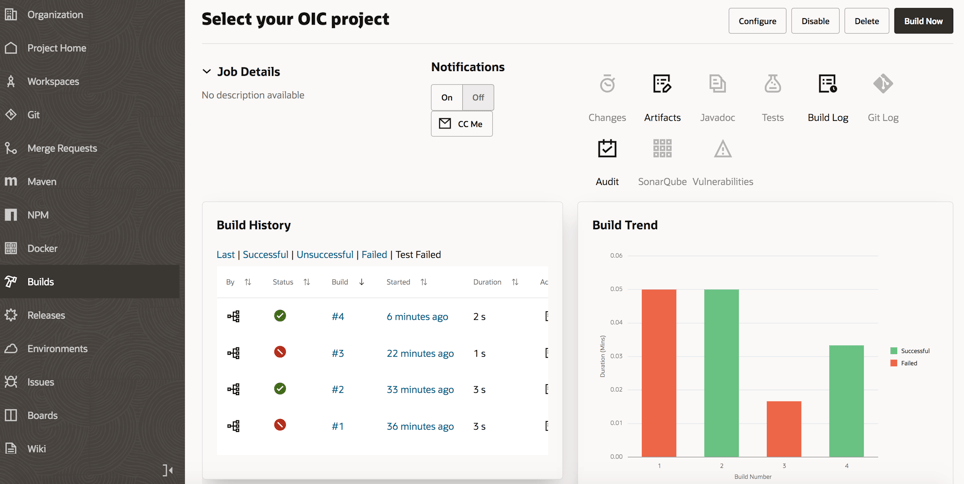
Each pipeline can include all “jobs” we need (in the previous screenshot we have used two different jobs “select your OIC project” and “import OIC project”) so to build the right chain among the different available “jobs”
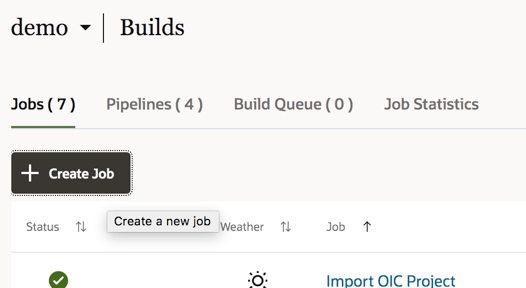
To create a job, select the Build link from the left panel of the Visual Builder studio and then we can create a new job
Each job has some options and parameters to be configured as below the screenshot shows:
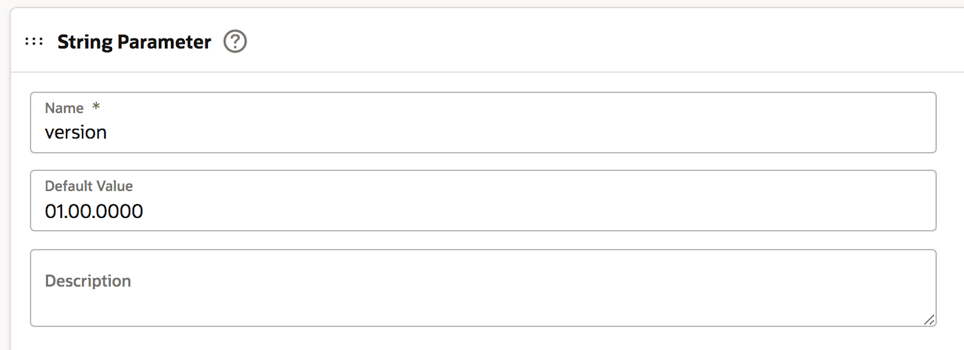
Select the “Parameters” tab to configure the string parameter:
The “Default Value” is the value of the integration flow version on our OIC instance to be selected and moved to the new instance. Of course, this value can be changed when we run the build so to properly set the right integration flow version
Now it’s time to select the “Steps” tab to identify the OIC instance from where we want to export our integration flow
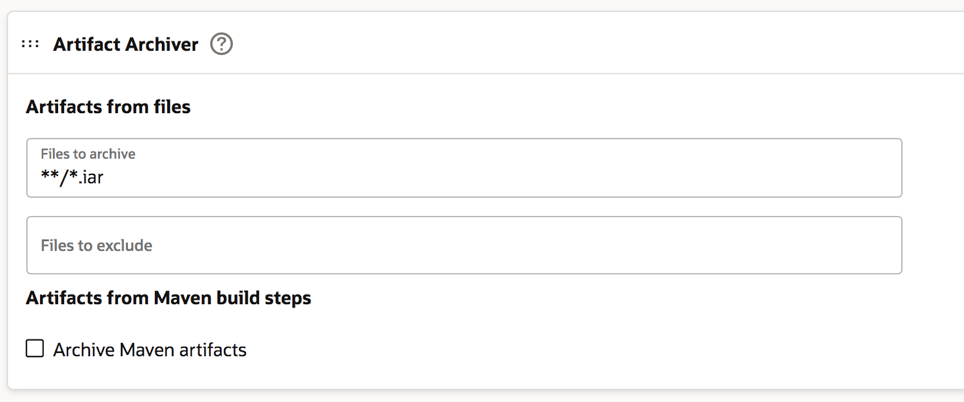
If needed, we can also include the asserter recording just flagging the box. In this case we are moving (exporting / importing) the integration flow named “ECHO” and working with its *.iar file once we have exported this one.
Now you can click the “After Build” tab to configure it as below described. The *.iar extension is the default extension of the integration flow when you decide to download it.
Click save and that’s all. Our first job is properly configured now.
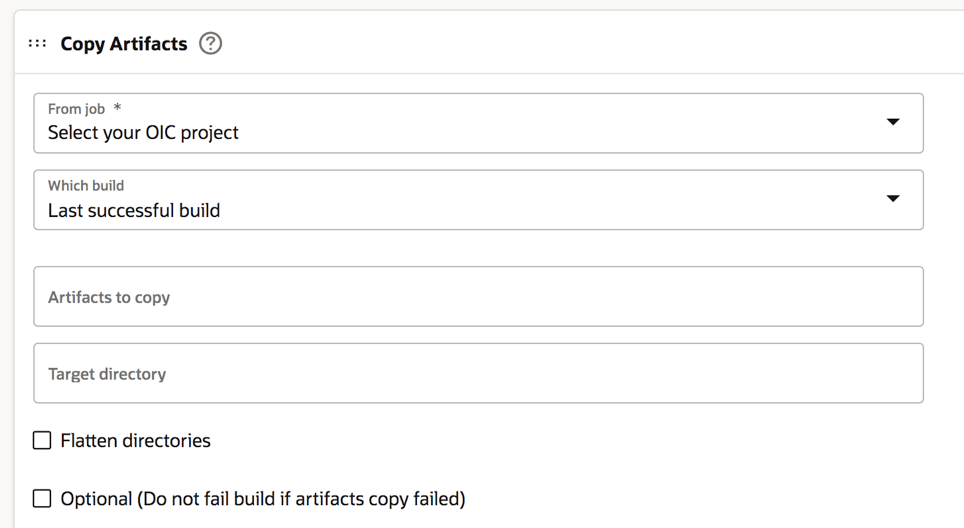
To proceed we are now ready to configure the second job (“import OIC project”).
In this case, the first step to be accomplished is the configuration of the “Before Build” tab as below shown and adding a “Copy Artifacts” option
And now, as we did with the first job, we can properly configure the OIC instance target, in our sample, but in this case for the import action.
We can also check the box about the “activate integration” option so that our integration flow will be imported and started just to have this one ready to be invoked by applications
Also, in this case, we can now save our configuration.
Once these operations have been completed, we are ready to test our pipeline selecting the start button on the right side of the web page and below shown
If the execution of our “build” is properly configured, we can see the “green flag” of our jobs once we run it
Furthermore, we can drill down the execution to look at the log information just in case something wrong having also the chance to download the file including the log for further analysis or if we need to share this one with other people or applications.
From the Visual Builder Studio “Home page” we can also get information about statistics and previous executions so to track the activities managed on the different resources we have
This is for sure the best way to properly manage our environments and the best approach to have under control the lifecycle of our projects and their deployment.
For further information, look at the really interesting content already published here:
#BuildWithAI Hackathon 2021 comes at a different point in time. Last year it was a little of an unknown. This is the second year that this event has been run and there was more of an understanding about what to expect and who might be participating.
As like last time, it is a privilege to write this article as there has been significant effort to get to these outcomes. If all I do is to highlight those that have been generous with their time, knowledge and willingness to participate, then it is a service that I will do every time. Here is a recount of some of the teams that participated at the #BuildWithAI Hackathon 2021 (and who were the winners).
This is a tribute.
The one ask that I do have for those is to connect. Connect with the problem; connect with the team and make this tribute more than an article but a way to #BuildWithAI.
There is nothing like experience. Having been there and having done that is the best benefit that one can offer to those who require our services, the knowhow. Cloud, specifically Infrastructure as a Service (IaaS), is a skill that is in high demand. One way to validate the gained experience is via a certification from your IaaS provider of choice. You are reading this blog post on Red Thunder, which means that Oracle Cloud Infrastructure (OCI) is your vendor of choice!
A certification is also a great way to start gaining experience, and the good news is that there is no better time for earning OCI certifications than today because for the rest of 2021 you can pursuit and earn OCI certifications for free!!! Not only can you secure a free 30 day trial on OCI (including always free resources), but also you can study all the OCI learning material free of charge. Oracle and Oracle University have released all the learning material that serves as a guide to OCI certifications, in addition to free OCI training, OCI certification testing is also free until 31 December, 2021
These are the some of the OCI certifications that you can pursuit and earn free of charge:
Summarizing, the learning material from Oracle University is free of charge, the certification testing is also free until 31 December, 2021. You can subscribe to a free 30 day Oracle Cloud Infrastructure trial, which you can use for doing OCI labs, and you can keep the always free resources for life; resources such as Compute, Virtual Cloud Network, Autonomous Database, Network Load Balancer, among others. Therefore, whether you are new to OCI or already have hands-on experience today is the best time for pursuing your OCI certification.
Last weekend (from Friday 29th Oct to Tuesday 2nd Nov), was the #BuildWithAI Hackathon 2021 where participants, mentors, sponsors and organisers gathered together to solve real world challenges with AI. This event does not standalone. In a world full of change, this (from my perspective) started last year in the #BuildWithAI Hackathon 2020 and continued to build.
This article is about the event but the event itself is just “Another Step”.