Security is the key aspect in any implementation, specially when it comes to publish your API/Integration to external consumer outside of your organization.
Oracle Integration Cloud has capability to design an Integration which could be shared across internal/external Organisation. In this scenario security is paramount to protect that endpoint which will be published through OIC. By default, if your OIC Integration has REST Endpoint with Trigger role, it’s offering Basic Authentication Or OAuth 2.0 Or both Security policy.
With Invoke role there are many other flavours of OAuth grant type which I won’t be covering in this blog. I am more focused on this blog for OAuth 2.0 for OIC Rest Adapter for trigger role only.
One of the recent additions to Oracle Cloud Infrastructure (OCI) is IAM Domains. New OCI tenancies are provisioned with IAM Domains and at time of writing tenancies with IDCS instances are being migrated to IAM Domains.
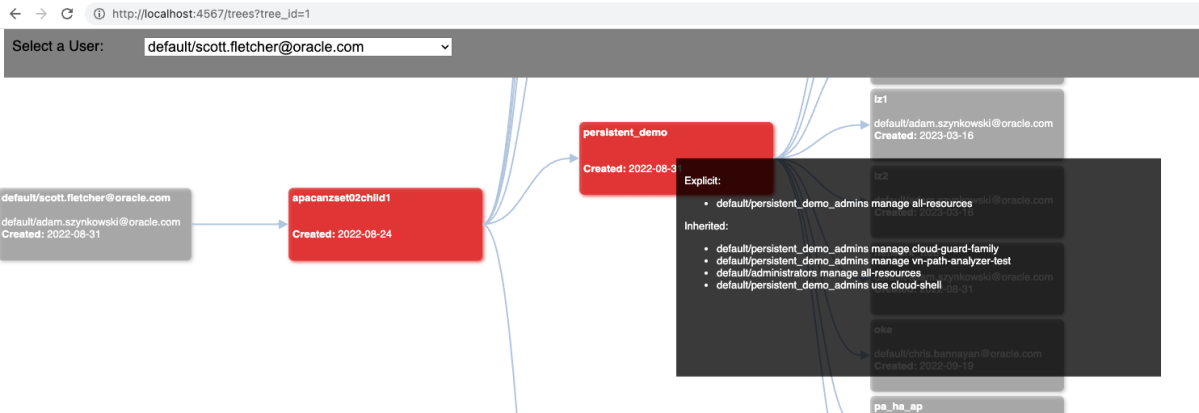
I originally created Peek to create a visual representation of effective user permissions inside an OCI tenancy to assist with performing user access reviews. Excessive permissions and IAM misconfigurations are a common issue found in cloud environments that can lead to privilege escalation and/or unauthorised access to resources and data.
At time of writing the latest release of the OCI CLI now supports interacting with IAM Domain resources and so I have created a version of Peek that works with IAM domains.
Recently came across interesting use case, so thought to cover blog on that topic. One of my Customer was having issue to connect OIC to Oracle Autonomous Database (ADB) which is sitting in private subnet via Oracle Integration Cloud connectivity agent. So, I did some debugging and fix the issue and that learning I am going to cover here. I will explain here how we can setup an ATP Database in private subnet, setup all required security/firewall rules, setup OIC connectivity agent, bastion compute in public subnet and then connecting OIC to ATP DB sitting in private subnet via Connectivity agent.
In this fictitious scenario, customer HR division representative sending employee code to OIC REST endpoint to retrieve detailed information for an employee record which is been stored in Oracle ADB instance located in private subnet. Since, ADB is in private subnet it’s not accessible to outside world even app tier, and that’s where OIC Connectivity agent comes into picture to provide connectivity between OIC which is public internet and ADB database which is in private subnet.
Step-by-step guide discovering how to provision and build a business processwith OCI Process Automation
OCI Process Automation (shortly OPA) is an OCI PaaS Oracle Managed cloud service which helps customers to build their business processes based on Structured or Unstructured models. This is the best solution to easily manage business processes granting to business users to build their own implementations without coding but just using a web browser and drag&drop capabilities… what we usually call a “no code” environment
The article has the goal to explain how, step by step, we can quickly test the features included in OPA… starting from my experience with the tool.
Just to simplify the explanation, I will describe a “happy path” process … in my example building one business process which usually is quite loved by everyone…. mainly when talking about the Vacation Request Approvals 🙂
Oracle Fusion Applications are a suite of applications built on Oracle Cloud that include cloud-based applications for enterprise resource planning, enterprise performance management, supply chain management and manufacturing, human capital management, and customer experience.
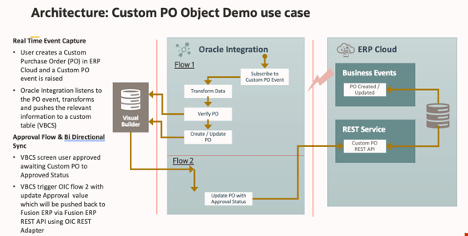
There are numerous use cases where standard object resides inside Fusion ERP needs to be extended to include more fields or completely new Custom object needs to be created.
In this blog, I will be covering how you can create a new Custom Object inside Fusion ERP and trigger transactions for that Custom object.
Oracle Visual Builder is a cloud based UX development Platform as a Service (PaaS) offering from Oracle Cloud. It provides an open-source standards-based solution to develop, collaborate on, and deploy Web and Mobile applications within Oracle Cloud.
VBCS also provide another awesome feature called Business Objects. A business object is a resource, such as an invoice or purchase order, like a database table; it has fields that hold the data for your application. Like a database table, a business object provides the structure for data used with business processes. Business objects are stored in a database.
Business Object also get exposed through REST Endpoint out-of-box, user doesn’t need to install/configure anything other than just creating a Business Object. However, those REST API are protected and need authentication when someone want to access from outside word.
In this blog, I am listing very simple steps what’s needed if developers want to expose Business Object REST API to outside world as anonymous users.
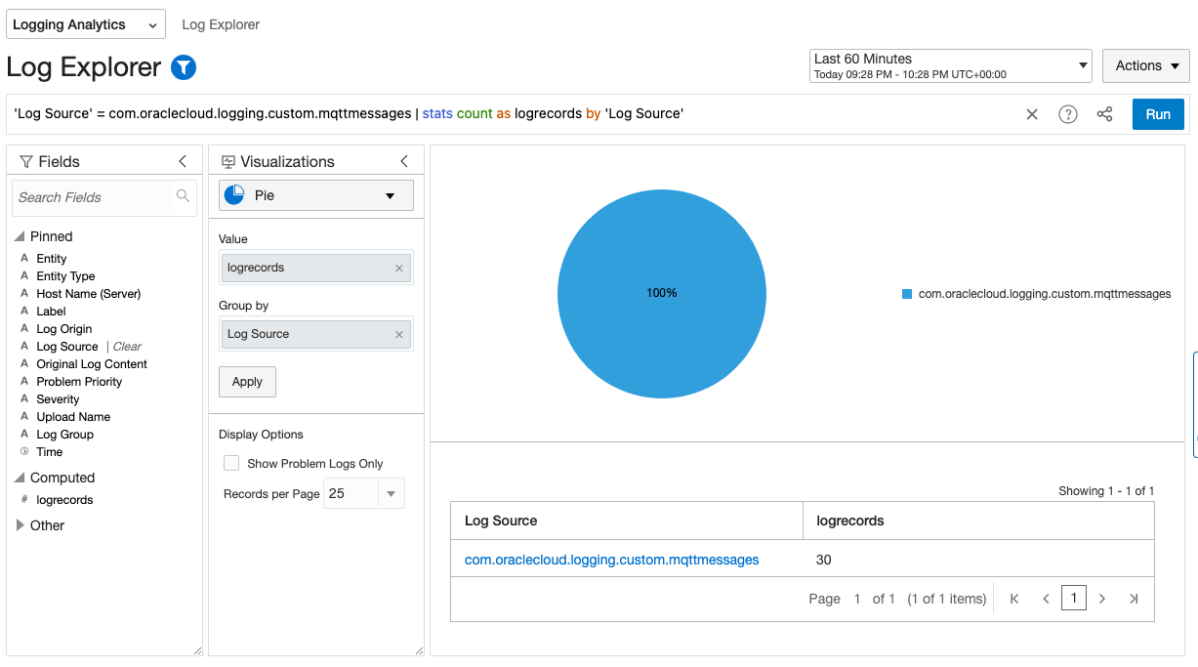
In the world of cloud computing there are often multiple ways to achieve the same or similar result. In Oracle Cloud Infrastructure (OCI) logs are generated by the platform itself such as audit logs, OCI native services such as the Network Firewall Service, and custom logs from compute instances or your applications. These logs typically live in OCI logging where you can view them, or search them if required.
Collecting and storing logs is useful, however if you want to produce insights then you will need a way to analyse and visualise the log data. OCI Logging Analytics allows you to index, enrich, aggregate, explore, search, analyse, correlate, visualise and monitor all log data from your applications and system infrastructure.
From OCI logging there are two common ways in which logs can be ingested into Logging Analytics. The first is using a Service Connector to send logs to an Object Storage bucket, and an Object Collection Rule to then import the logs into Logging Analytics. The second option uses a Service Connector to send the logs directly to Logging Analytics. Both are valid options however require some consideration before use.
HTTPS is essential as it protects the privacy of our data over the Internet. W3’s 2022 report shows nearly 80% of all websites use HTTPS as their default web protocol, up 6% on the previous year.
Getting started with HTTP/TLS is fairly straightforward. Obtain a CA signed certificate, configure it on your web servers and reverse proxy load balancers and you’re good to go. But how do you ensure your configuration stays up-to-date with current industry standards?
CyberSecurity is an arms race. As hardware and software evolves, so do the tools and techniques created to exploit them. This fierce race largely drives the innovation that we see in the industry today.
How does this relate to TLS? Since the inception of SSLv1 by Netscape in the 90’s there’s been many revisions, SSLv2, SSLv3, TLSv1.1, TLSv1.2 with the current version being TLSv1.3. TLSv1.1 was deprecated in 2021, with new versions being released approximately every 5 years. Given the rate at which exploits are discovered these release cycles will also need to keep pace.
For organisations this poses a number of interesting challenges because you can only control what TLS versions you support. Also if your website or API is public then it’s likely you have no control over the connecting client, or which TLS versions they’re able to use.
This blog title seems quite easy and simple but there are bit of steps to manage SOA Market Place Image (SOA MP) Database password reset configuration within application tier which I will discuss in this blog.
There could be multiple situations when user needs to change SOA MP Database password e.g. SOA MP DB password might got expired, or about to expire hence that’s must need to reset to new password which should get further updated all relevant places inside SOA application tier.
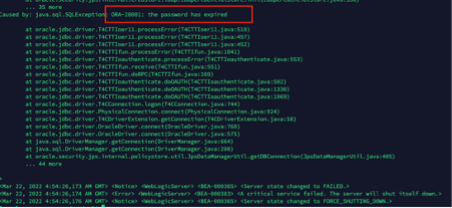
In my case it was for SOA dev/test environment eventually SOA MP DB password has default expiry set for 6-month time and it got expired, due to which SOA application was not coming up and constantly keep throwing below error-
Caused by: java.sql.SQLException: ORA-28001: the password has expired
Note:
In my case below software version were used.
SOA Suite 12.2.1.4
Oracle Autonomous Database 19c
Instruction given here may not work exactly for another SOA and DB version.
To fix above problem. We need to perform below steps –
Need to find out how many places within SOA Application tier DB password been used?
Are the SOA MP DB users locked? or Password expired? or both
Reset & unlock the SOA MP DB user’s password
Create encrypted value of new password for WebLogic Data source & update all Data source files with this new encrypted password and restart all WLS Admin/SOA servers.
Note: If step 4 doesn’t work (In my case, it hasn’t worked but as per Oracle documentation it should work. I may be doing some mistake which hard to troubleshoot so I took alternate path as workaround)5
5. (Optional) force WebLogic to start in Development mode instead of Production mode as clear text password not accepted in Production mode inside JDBC configuration files.
6. (Optional) Use new password as clear string inside JDBC configuration file, bring up WebLogic server and again update new password from WebLogic console for all Data sources, this will encrypt database password inside data source files.
7. Create new DB profile with UNLIMITED limit and assigning to each SOA DB users to avoid password expiry in future.
Need to find out how many places within SOA Application tier DB password been used? –
SOA interact with Database using WebLogic Data source which act as bridge between application tier to Database tier. So, we need to know how many WebLogic Data sources using the SOA Database. There are two ways you can validate this –
If WebLogic Admin server up and running then go to console>>data sources >> and make a note of all Data source except your Custom one which you might have created for some other purpose. E.g.
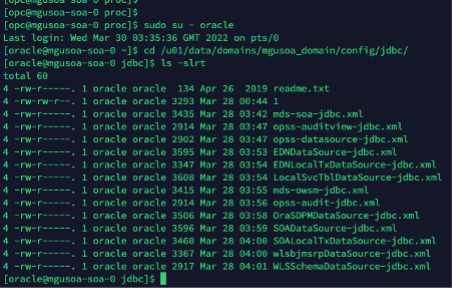
b) If WebLogic server not up and running (which most likely the case) then ssh to server where SOA binaries and domain reside and find out ‘jdbc’ folder, which will list out all Data sources which exists within WebLogic.
E.g.
/u01/data/domains/mgusoa_domain/config/jdbc/
So, now first challenge is sorted out, now we know what are all Data sources which are using SOA MP database, so if we change SOA MP database password all these Data source files needs to be updated with new password.
Are the SOA MP DB users locked? or Password expired? or both
Now, let’s move to next step and check whether SOA MP Database DB users are locked, or password expired or both.
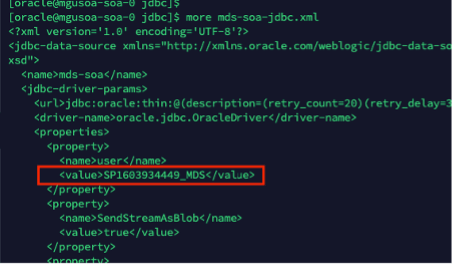
In order to do that, first you need to know DB users name used for SOA. One quick and easy way to open one of Data source files and find out DB prefix e.g. “SP1603934449”
Once you know DB prefix, run below query in SOA Database to know all SOA DB users.
select username from dba_users where username like 'SP1603934449%';
So, now you know all the SOA DB users within SOA Database which are used by SOA application tier. Next step to check each of them whether they are locked, or password expired.
Run below sql query to know their status –
select username, account_status from dba_users where username like 'SP1603934449%';
You should be able to see “account_status” column value either “LOCKED” or “EXPIRED & LOCKED”
In my case most of them with status “EXPIRED & LOCKED”
Reset & unlock the SOA MP DB user’s password
ALTER USER SP1603934449_IUA identified by Lxxx#1xxxxx;
ALTER USER SP1603934449_SOAINFRA ACCOUNT UNLOCK;
commit;
Once password reset and unlocked, run the below SQL query again and account status should be “OPEN” now
select username, account_status from dba_users where username like 'SP1603934449%';
Create encrypted value of new password for Weblogic Datasource & update all datasource files with this new encrypted password and restart all WLS Admin/SOA servers.
WebLogic data source files doesn’t except password in clear text if, WebLogic running in “Production” mode. If WebLogic running in “Development” mode, then it can accept clear text password. In my case, although it was dev/test environment but unfortunately it was set for “Production” mode, so I have to generated encrypted value of new password.
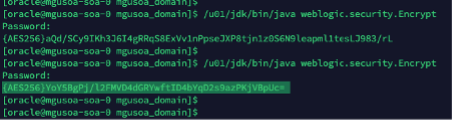
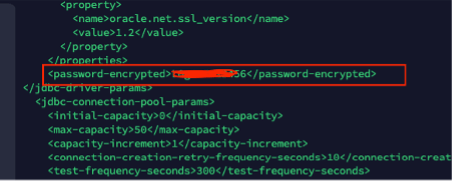
Run the WebLogic Encryption Utility and enter the password you set for the database schemas:
/u01/jdk/bin/java weblogic.security.Encrypt
password: new_password
Once you run “/u01/jdk/bin/java weblogic.security.Encrypt” command it will ask to type new password, type the new password. It will further generate encrypted password value as highlighted in above screen shot.
Once you know the new encrypted value for new password, update all the JDBC data sources files one by one with this new encrypted password and restart the WLS admin/SOA Servers
Your WebLogic server should be up and running after this change.
Note: If step 4 doesn’t work (In my case, it hasn’t worked but as per Oracle documentation it should work. I may be doing some mistake which hard to troubleshoot so I took alternate path as workaround)
(Optional) force WebLogic to start in Development mode instead of Production mode as clear text password not accepted in Production mode inside JDBC configuration files.
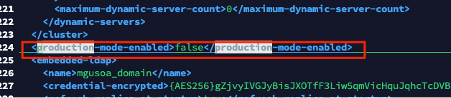
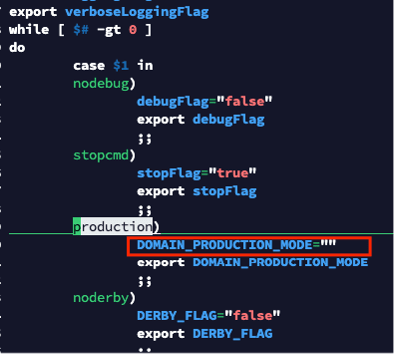
You must update multiple configuration file to force WebLogic to start in “Development” mode.
I have updated below 4 configuration files. The full path is just for reference, you must use your environment path to find out these files. Make Production value either “false” or “” depending up on file existing value.
Once above configuration is done, now you can update all JDBC data source files with clear text password
Once all JDBC data source xml files got updated with new password in clear text format.
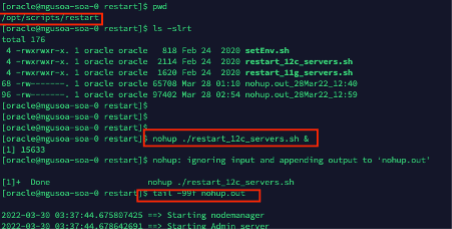
Restart the WLS admin and SOA server using out of box script available in SOA Market Place Image
/opt/scripts/restart/restart_12c_servers.sh
Admin server should go in running mode
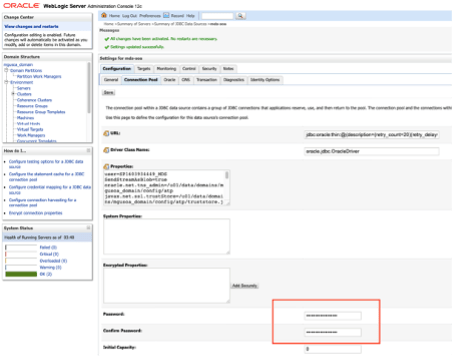
Now you can access WebLogic Admin console and start remaining servers if needed.
Last steps to update all data source from Weblogic console again, this will update all JDBC data source files in backend with encrypted password instead of clear text password. Use the same clear text password from WebLogic console for all Data source files and click save button, this will replace clear text password in backend to encrypted password.
Create new DB profile with UNLIMITED limit and assigning to each SOA DB users to avoid password expiry in future.
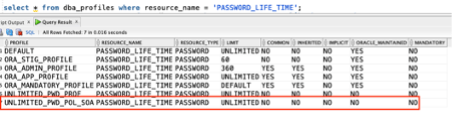
Above command should create a database profile with password expiry set to unlimited and can be verified by running below command
select * from dba_profiles where resource_name = 'PASSWORD_LIFE_TIME';
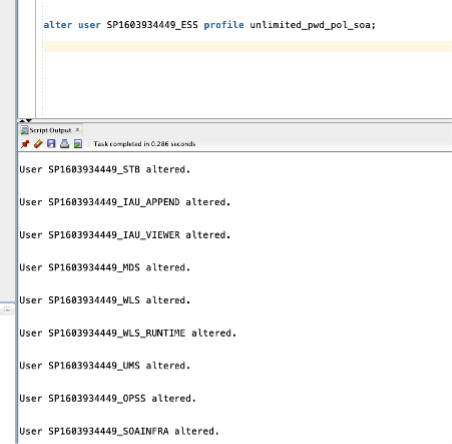
Now, set all SOA DB Users to use that profile.
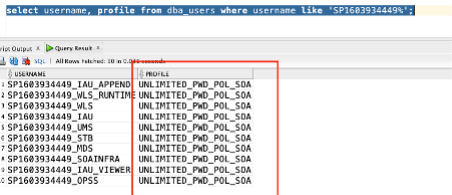
Run below command to check whether profile for each SOA Database user been changed or not?
Above step hopefully will force SOA DB users password not to expire in future and will help to avoid all above steps. However, that’s not recommend for Production environment.
A real implementation often has different aspects which need to be addressed. Some of them are:
A tool to be used for building the integration among applications and technologies, possibly leveraging a low code environment
A tool to expose the APIs enabling the integration with third party applications applying in addition security policies, caching capabilities, routing, etc
A tool to monitor from IT Operation perspective the entire solution as just one application skipping the need to manage several silos or frameworks
Oracle Cloud can provide the right answer to your developer needs using the best Cloud native services and here identified by OCI API Gateway (API GTW), Oracle Integration (OIC) and OCI Logging and Analytics (LA)
If you are already using Oracle Integration for your development purposes probably you have already noticed the chance you have to configure the API Management solution that you prefer, exposing what you have already built.
From OIC console, you can access the “Setting” section and configure properly what you need
Clicking on the “API Management” link you can configure the connection to your OCI API Gateway instance
How and where can you find the required information?
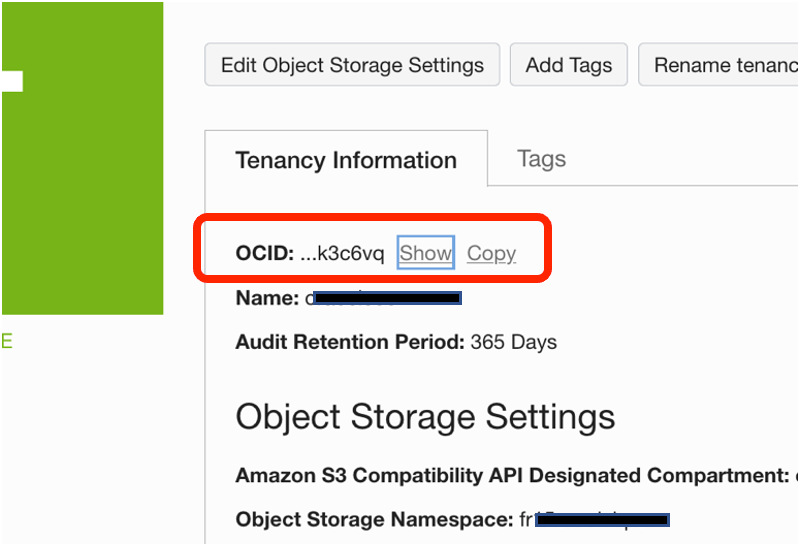
Tenancy OCID can be found navigating the OCI Console and clicking on “Tenancy” details
Copy and paste this value on the previous screen into the Oracle Integration console
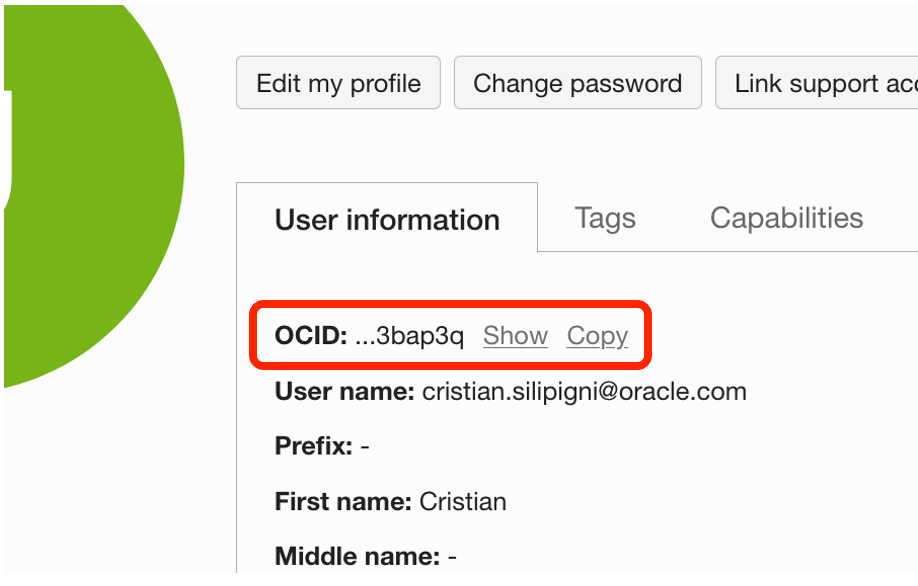
User OCID can be found from OCI Console under the link “My Profile”.
Also in this case, copy and paste the “OCID Id” into the Oracle Integration console
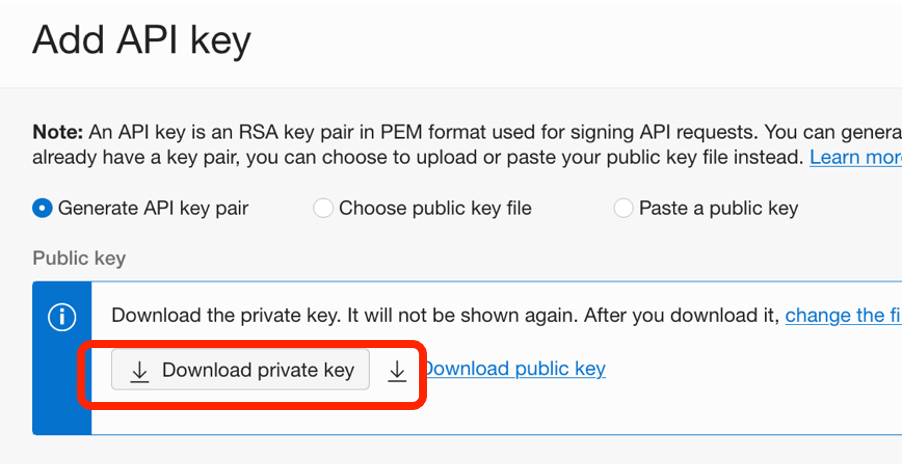
Finger Print: from OCI Console, after having selected “User Profile”, click on “API Keys” and from here you can add a new API Key
Download the “private key” than click “add”
A new key will appear among those eventually already generated previously
Private Key: this one, in pem format, comes from the activities previously done during the API Key creation. Before uploading the key in the API Management setting, you need to convert this one. The key that you have downloaded is in PKCS8 format and this one must be converted to RSA (PKCS1) before using it for the API Management connection, using the following command from your shell
Once converted the file, you can upload your new key to complete the configuration with your API Management connection.
Click “Save” and that’s all
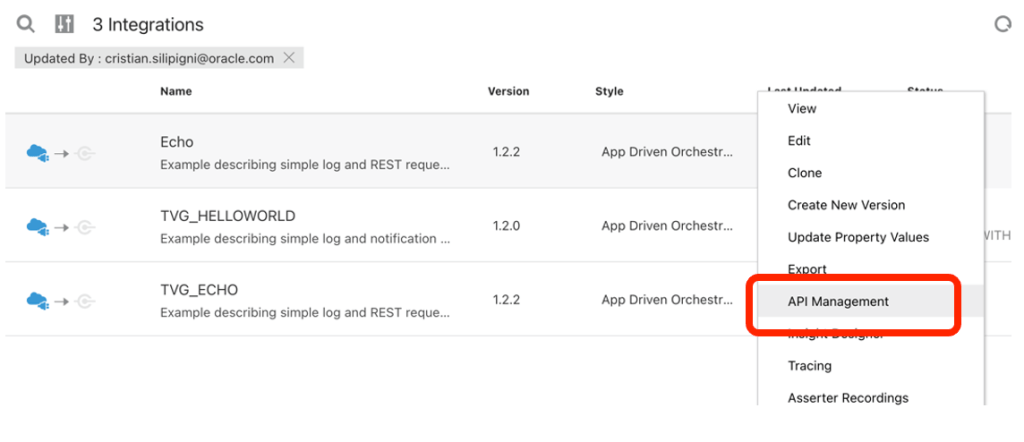
Now from your Oracle Integration console, you can work with your integration flows and after having completed your implementation you are now ready to publish your asset to you OCI API Gateway instance. I’m using the “ECHO” integration flow as an example
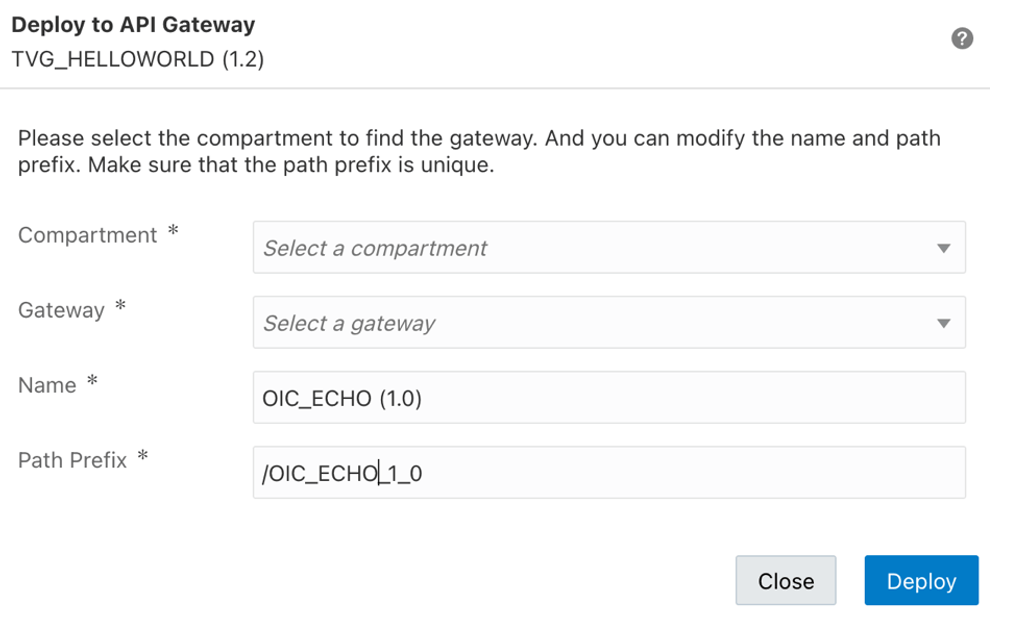
Clicking on API Management you can publish the integration flow providing all the required information and details as below presented
selecting the Compartment where your OCI API Gateway is running and the right API GTW instance (for example that one for the TEST environment)
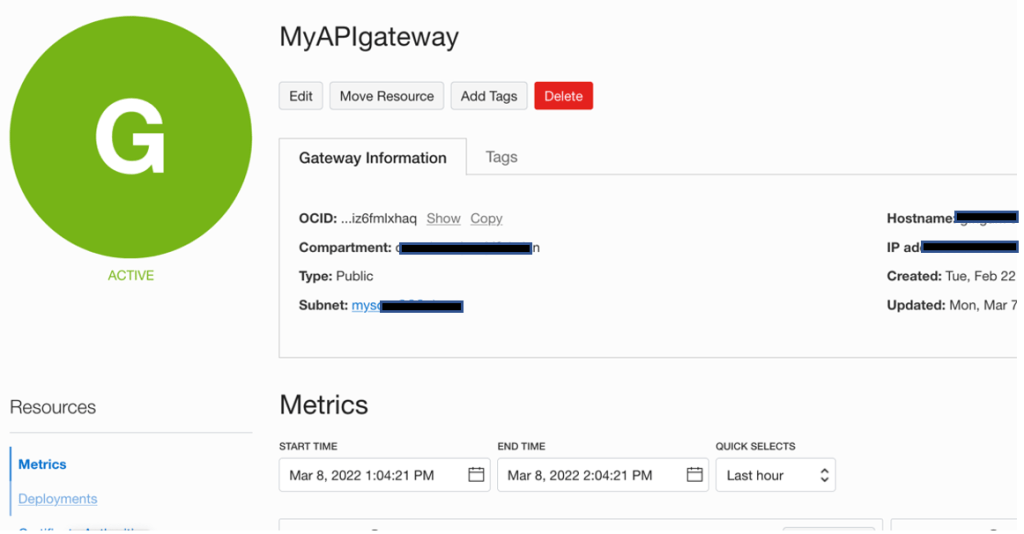
Clicking on the “Deploy” button and wait for few seconds before seeing your service exposed into you OCI API Gateway instance (in my case “MyAPIGateway”)
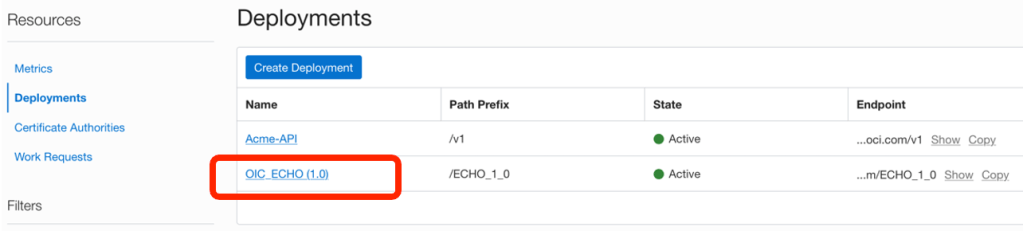
Clicking on the active gateway instance, you can access to the deployed APIs
as below shown
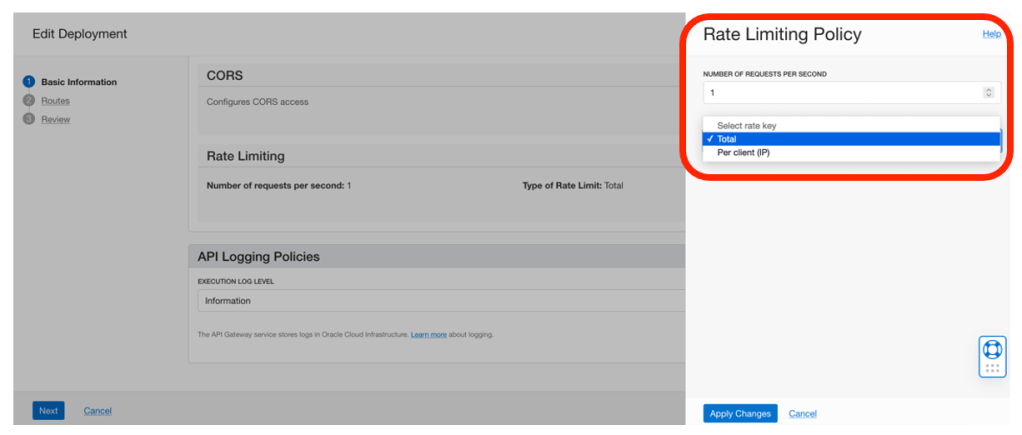
Clicking on your service, it’s possible to configure the policy you want to apply. In the case below shown, a “Rate Limiting” policy has been applied to control and filter the use of this service
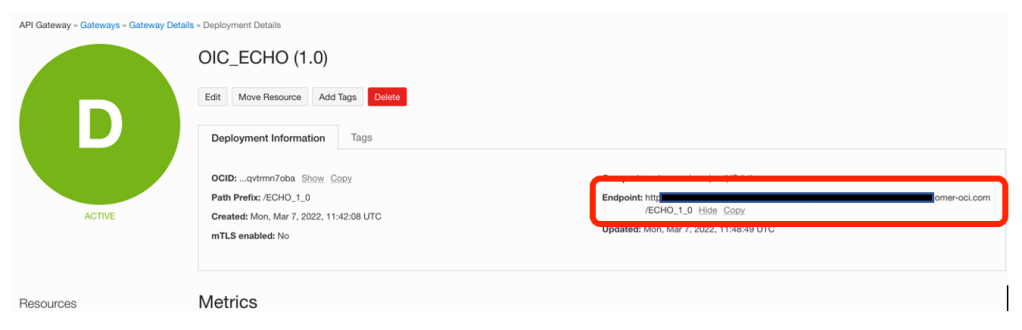
So, jumping again into the previous webpage, where your REST service is detailed, you can copy the URL of the API endpoint to use it for invocation
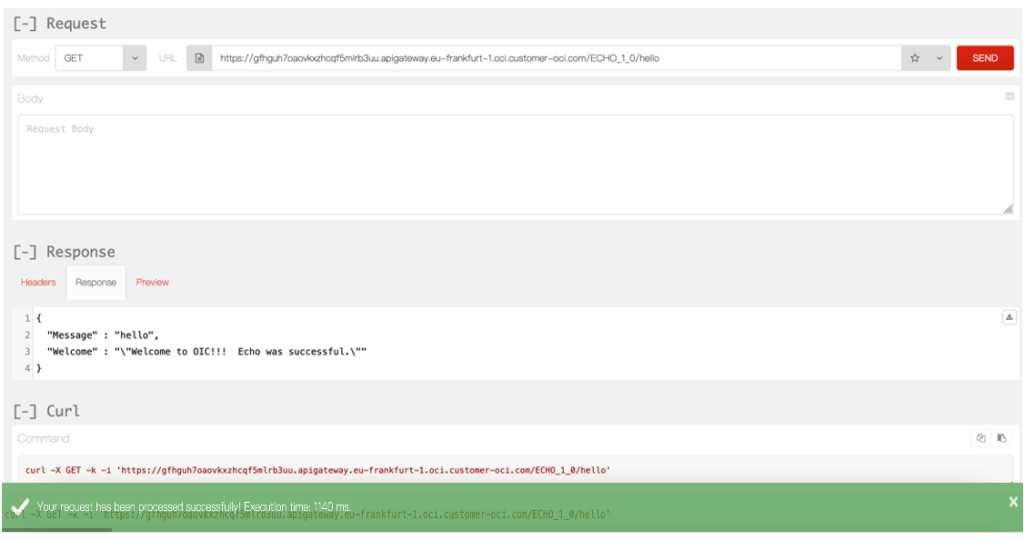
Open your REST client (or simply a browser) to test your service
The invocation has been successfully tested.
Now, you can monitor the metrics from the OCI API Gateway console in the “Metrics” section to get more details about the behavior; you can select the right time interval to check and get visibility of the API execution
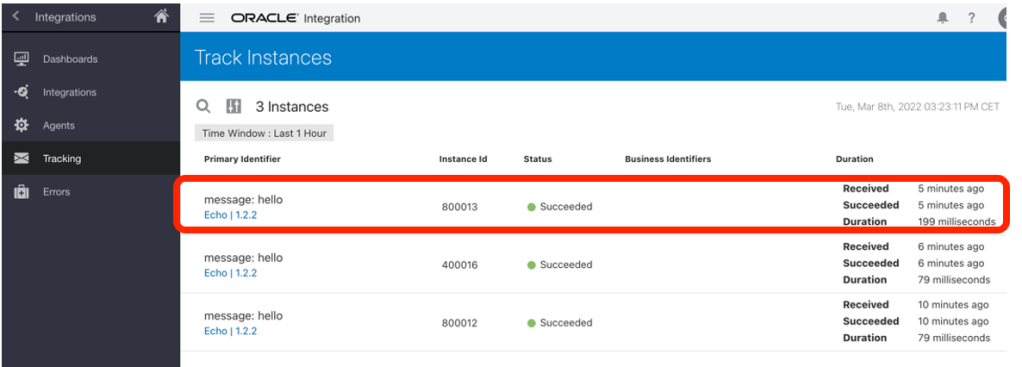
At the same time, you can also have a look at your Oracle Integration console to see how the calls have been managed by the integration platform and if needed you can submit again manually the requests in case of error if, of course, they are involving back-end systems which ahd some problems (networking issues, maintenance, …).
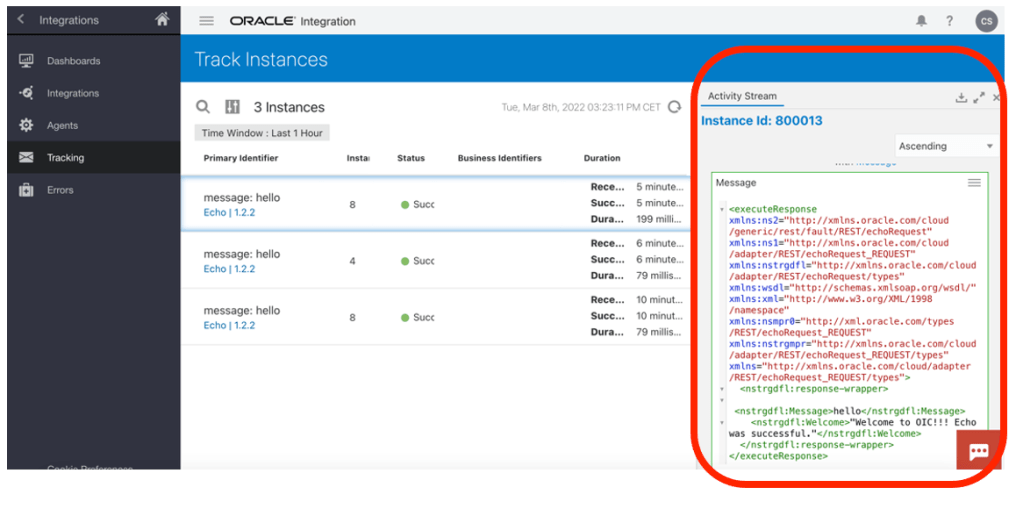
and getting further info about the execution and all details about the business message
In this case, I have used 2 different consoles to monitor OCI API Gateway and Oracle Integration respectevely.
Keep in mind that Oracle Cloud Infrastructure can help you in case you want to consolidate in just one console several information coming from different and disparate OCI Services.
This is the right case for using OCI Logging & Analytics; it allows you to build your own dashboard collecting all info you need from IT Operations perspective and just if needed you can use the dedicated console of each service to leverage deeper and specific management capabilities (errors management, resubmitting faulted instances, changing scheduling parameters, modifying security policies, tuning caching options, etc).
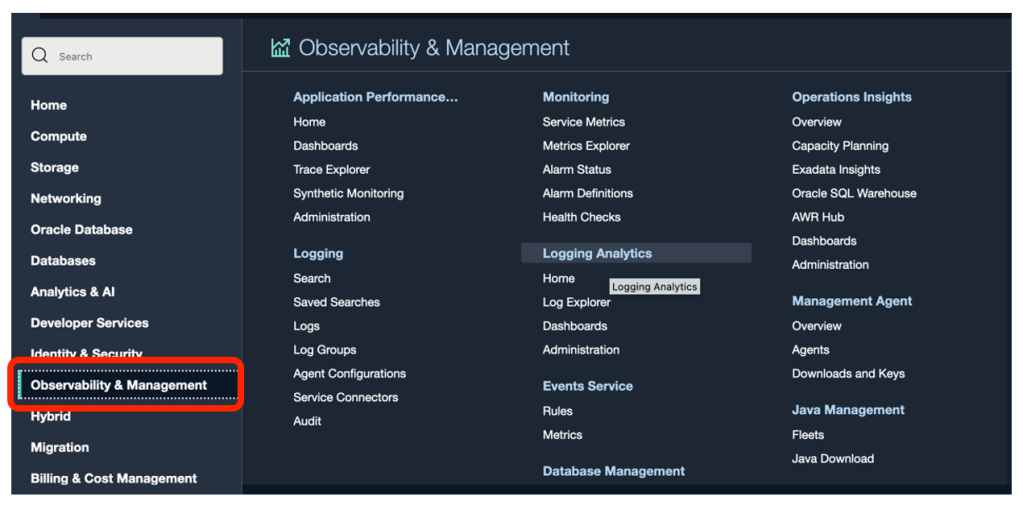
How to use OCI Logging & Analytics?
Using OCI Console and clicking on “Observability and Management” as below described
and select “Logging Analytics” link
From here you can create your own dashboard to include all information you need. In my case I have built a dashboard (“My OCI Dashboard”) collecting info from OCI API Gateway, Oracle Integration and Logging & Analytics itself, as below described:
The screenshot upper represented, includes 6 different widgets which are collecting metrics from different sources so including in just one console all information you want about latency, inbound requests, bytes ingested, bytes sent, etc
How to create a Logging & Analytics dashboard?
Not really hard… on the contrary very straightforward procedure and you can get more details looking at the following blog post: