
Logs are often voluminous can be challenging to navigate through, but it can be a gold mine of valuable data to help administrators troubleshoot and identify issues or trends for operational activities.
To overcome the burden of manually eye-balling millions or (even billions) of rows in log records, bringing that data into OCI Logging Analytics (which is part of the Observability & Manageability Portfolio) will allow administrators to get quick insights, to reduce the time to isolate issues, minimising downtime and prevent impact to end users.
Author: Tam Nguyen
OCI Observability & Management Platform (O&M) – Agent Based Monitoring
There are various ways you can bring telemetry and operational data into OCI Observability & Management (O&M) to proactively monitor and gain operational insights into your IT fleet.
Example of ways you can do this are:
- Service Connector Hub – Route and move data from one OCI service to Another OCI Service (eg. OCI Logging to Logging Analytics)
- API Call – Collect data from files stored on Object Storage or Upload Log data on demand
- Agent Based – Deployment of Agent on Host
If you have targets you want to monitor on-premise or in the cloud (OCI, AWS, Azure etc…) and you have access to the VM or Compute instance (ie. you can SSH or Remote Desktop to the host), then an Agent based method will allow you to collect and bring that data into unified platform in O&M.
In this example we will show how you can deploy Agent based method (on Linux OS) so you can leverage the O&M services including:
- Logging Analytics
- DB Management
- Operations Insights
- Java Management Service
1 – NETWORK COMMUNICATION (For External Targets to OCI)
- We recommend using OCI FastConnect or IPSEC VPN
- Communication Destination to OCI Tenancy – HTTPS (443)
- Whitelist by *.oraclecloud.com (or by IP Range https://docs.cloud.oracle.com/iaas/Content/General/Concepts/addressranges.htm)
NOTE: The additional network communication setup is not required if the targets you are monitoring are within your OCI tenancy account.
2 – ADDITIONAL PRE-REQUISITES
For Setup Compartments, IAM Groups and Policies
Please also check the following tasks has been completed.
https://docs.oracle.com/en-us/iaas/management-agents/doc/perform-prerequisites-deploying-management-agents.html
NOTE: You may need to contact your OCI administrator to grant you the appropriate permissions.
3 – DOWNLOAD AND CREATE KEY
- From OCI Console navigate to:
OBSERVABILITY & MANAGEMENT > MANAGEMENT AGENTS > DOWNLOADS AND KEYS > CREATE KEY
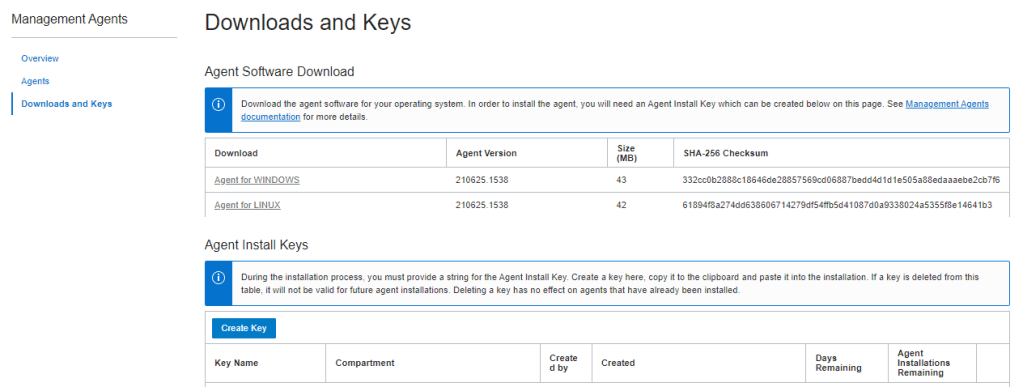
2. Specify details and Click on CREATE
- Key Name (eg. oci-reg-key)
- Compartment (eg. shared_resources)

3. Review Key and Download Key to File (eg. oci-reg-key.txt)
NOTE: Your Key File will be in the format of <Key Name>.txt. Copy it to your target host.

4. Download Agent by clicking on the Agent for your OS (eg. Agent for LINUX) and copy to your target host

4 – INSTALL AGENT
1. Login to the host and locate the downloaded agent file oracle.mgmt_agent.rpm
$ sudo rpm -ivh oracle.mgmt_agent.<version>.Linux-x86_64.rpm
Preparing...                          ################################# [100%]
Checking pre-requisites
        Checking if any previous agent service exists
        Checking if OS has systemd or initd
        Checking available disk space for agent install
        Checking if /opt/oracle/mgmt_agent directory exists
        Checking if 'mgmt_agent' user exists
        Checking Java version
                JAVA_HOME is not set or not readable to root
                Trying default path /usr/bin/java
                Java version: 1.8.0_271 found at /usr/bin/java
Updating / installing...
   1:oracle.mgmt_agent-201113.1621-1  ################################# [100%]

Executing install
        Unpacking software zip
        Copying files to destination dir (/opt/oracle/mgmt_agent)
        Initializing software from template
        Creating 'mgmt_agent' daemon
        Agent Install Logs: /opt/oracle/mgmt_agent/installer-logs/installer.log.0

        Setup agent using input response file (run as any user with 'sudo' privileges)
        Usage:
                sudo /opt/oracle/mgmt_agent/agent_inst/bin/setup.sh opts=[FULL_PATH_TO_INPUT.RSP]

Agent install successful
2. Verify that the agent has been installed.
$ rpm -qa|grep mgmt_agent
oracle.mgmt_agent-201113.1621-1.x86_64
3. Copy the Downloaded key file (eg. oci-reg-key.txt)
$ cp oci-demo-key.txt /tmp/input.rsp
$ chmod 755 /tmp/input.rsp
4. Update the parameter CredentialWalletPassword with your own password in the input.rsp file and then save file.
NOTE: This step is optional to set a wallet password
CredentialWalletPassword = YourP8ssW0rd123!
5. Then execute the setup script to install the agent
$ sudo /opt/oracle/mgmt_agent/agent_inst/bin/setup.sh opts=/tmp/input.rsp
6. When completed, check status of agent on host
For Oracle Linux 6: sudo /sbin/initctl status mgmt_agent
For Oracle Linux 7 or later: sudo systemctl status mgmt_agent

$ sudo systemctl status mgmt_agent
● mgmt_agent.service - mgmt_agent
   Loaded: loaded (/etc/systemd/system/mgmt_agent.service; enabled; vendor preset: disabled)
   Active: active (running) since Thu 2020-12-03 05:20:43 GMT; 6min ago
  Process: 3072 ExecStart=/opt/oracle/mgmt_agent/agent_inst/bin/agentcore start sysd (code=exited, status=0/SUCCESS)
 Main PID: 3148 (wrapper)
   Memory: 248.5M
   CGroup: /system.slice/mgmt_agent.service
           ├─3148 /opt/oracle/mgmt_agent/agent_inst/bin/./wrapper /opt/oracle/mgmt_agent/agent_inst/bin/../config/wrapper.conf wrapper.syslog.ident=mgmt_agent wrapper.pidfile=/opt/oracle/mgmt_agent/agent_inst/bin/../log/mgmt_agent.pid wrapper.daemonize=TRU...
           └─3163 /usr/java/jre1.8.0_271-amd64/bin/java -Dorg.tanukisoftware.wrapper.WrapperSimpleApp.maxStartMainWait=5 -Djava.security.egd=file:///dev/./urandom -XX:+HeapDumpOnOutOfMemoryError -Xmx512m -Djava.library.path=../../201113.1621/lib -classpath...

Dec 03 05:20:31 oma-host systemd[1]: Starting mgmt_agent...
Dec 03 05:20:31 oma-host agentcore[3072]: Starting mgmt_agent...
Dec 03 05:20:38 oma-host agentcore[3072]: Waiting for mgmt_agent.........
Dec 03 05:20:43 oma-host systemd[1]: Started mgmt_agent.
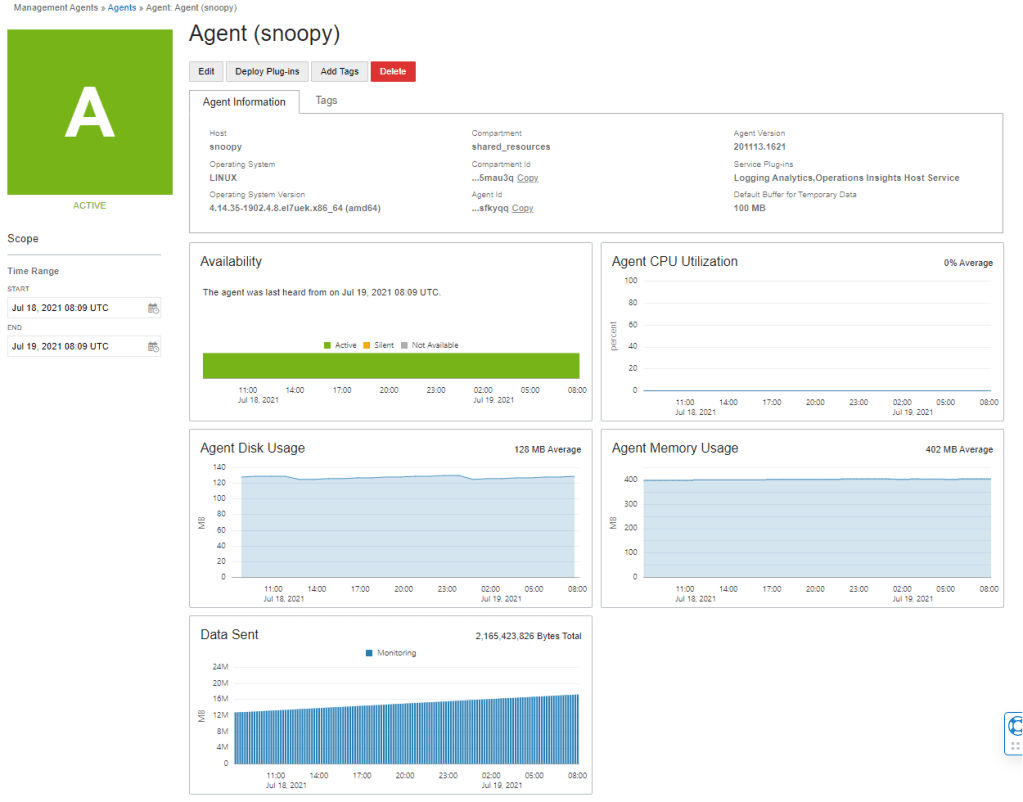
5 – VERIFY AGENT IN CONSOLE AND DEPLOY PLUGIN
- In OCI Console, navigate to:
OBSERVABILITY & MANAGEMENT > MANAGEMENT AGENTS > AGENTS
Then click on the link to drill into the Agent (eg. Agent (snoopy))

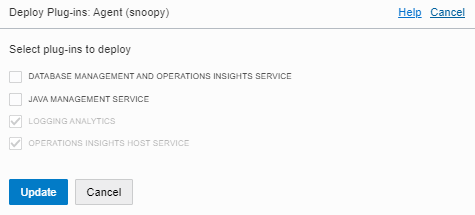
2. Click on the Deploy Plug-Ins button
3. Choose the Plug-ins to deploy for your agent.
NOTE: If the plug-in is greyed out, then the plug-in is already enabled.
Now you should be ready to configure your service for:
- Logging Analytics
- DB Management
- Operations Insights
- Java Management Service
For further details please visit:
https://docs.oracle.com/en-us/iaas/Content/services.htm
Getting Insights with OCI Audit Log with Logging Analytics (via Service Connector)
Recently Clay Magouyrk, EVP of Oracle Cloud Infrastructure engineering announced the new Oracle Cloud Observability and Management Platform.
The new platform will provide OCI native integration to provide operational insights into our OCI services in addition to previous capabilities available in Oracle Management Cloud. Logging Analytics is the first major Oracle Management Cloud Service to be incorporated, and so my fellow colleague @callanhp and I were itching to give it a go and see how we could implement it, so we chose the most available logs we could think of, the audit logs from the OCI control plane.
In this blog we will discuss the mechanics for forwarding OCI Audit Logs to the Logging Analytics service from the Oracle Cloud Observability and Management platform, and discuss how this pattern can be extended to other log sources.
Continue reading “Getting Insights with OCI Audit Log with Logging Analytics (via Service Connector)”Enterprise Manager (EM) Reports using Grafana
Oracle Enterprise Manager (EM) repository has a wealth of operational data (for host, database, middleware, apps and engineered systems) that it collects including configuration and metrics. By using Grafana, you can tap into that data to get Rich Analytics and Visualisations for Reporting.
Let’s have a look at how you can do this.
This assumes you already have an EM deployment running.
The following is a summary of steps to enable EM reporting using Grafana:
1. Review the EM App for Grafana Certification
2. Install Grafana OS Package
3. Deploy EM App for Grafana Plugin
4. Configure EM for Grafana Settings
5. Enable Network Rules for Grafana Console
6. Configure Grafana Data Source
7. Access Dashboards
Upcoming Live Webinar Series – Explore the latest innovations in Oracle Enterprise Manager
Exciting news, the long awaited Oracle Enterprise and Cloud Manageability Virtual Classroom Series has been announced and will run this October and November.
The series will include:
- 7 sessions running weekly from October 13 2020
- 12+ Oracle experts
- Live presentations
- Demos
- Q&A
During the virtual classes, you will get to explore the latest and greatest innovations Enterprise Manager has to offer.
This is a great opportunity for you to learn and benefit from using Enterprise Manager to manage on-premise and cloud deployments for:
- Databases
- Middleware
- Oracle apps (eg. EBS)
- Engineered Systems (eg. Exadata, ZDLRA, PCA)
To register please visit:
Oracle Enterprise and Cloud Manageability Virtual Classroom Series
 |
Multitenant Common Users Accessing Application Tables in PDBs
I recently had a requirement where the Common User in a Multitenant DB environment wanted to access application tables across Pluggable Databases (PDBs) but at the same time access dictionary views across all PDBs without the need to manually switch between containers.
This was because I had to setup a monitoring user account to monitor all PDBs performance as well as application workload.
In this example I will show you how the Common User (created at CDB level) can be configured to access the application tables (create at PDB level)
Continue reading “Multitenant Common Users Accessing Application Tables in PDBs”
Setup Autonomous DB Monitoring in OMC
In this post I will show you how you can setup Autonomous DB monitoring in Oracle Management Cloud (OMC) in under 5 minutes.
NOTE: Make sure you have the appropriate policies setup before you start.
STEP 1
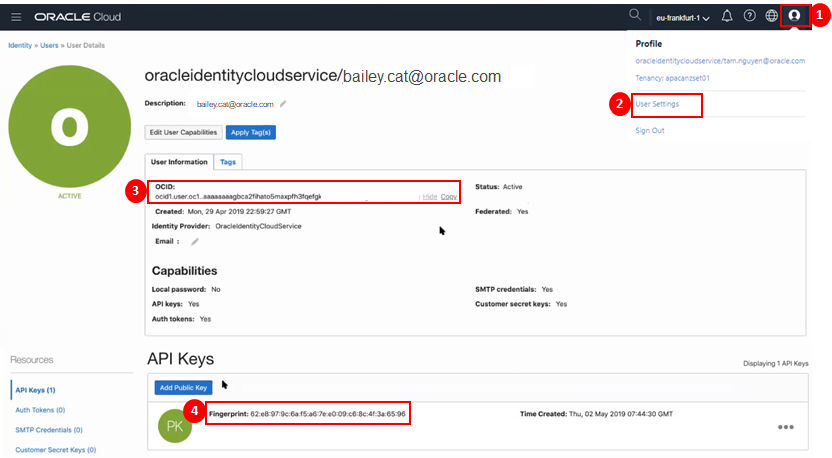
You will need to obtain your OCI User Information associated with your Autonomous Database (ADB) instances from the OCI Console.
- Click on the user icon in top right hand corner of OCI console.
- Select User Settings
- On the User Details page, make a copy of the User OCID
- In addition to this, make a copy of the API Key Fingerprint.
STEP 2
You will need to obtain your OCI Tenant Information associated with your Autonomous Database instances from the OCI Console.
- Navigate to Administration > Tenancy Details
- On the Tenancy Information page, make a Copy of the Tenancy OCID.
HINT: If OCID is hidden, you can click on Show to display entire value if you wish.

STEP 3
In another browser session, launch the OMC Console.
HINT: If the side menu does not appear, click on menu icon
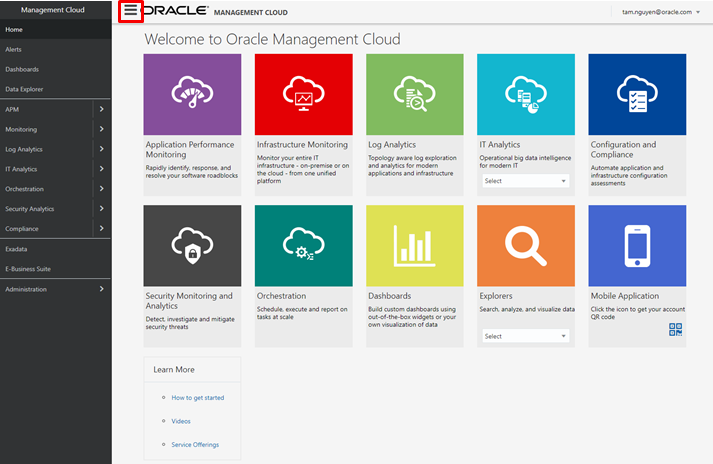
STEP 4
From the side menu, navigate to:
- Select Administration
- Select Discovery
- Select Cloud Discovery Profile

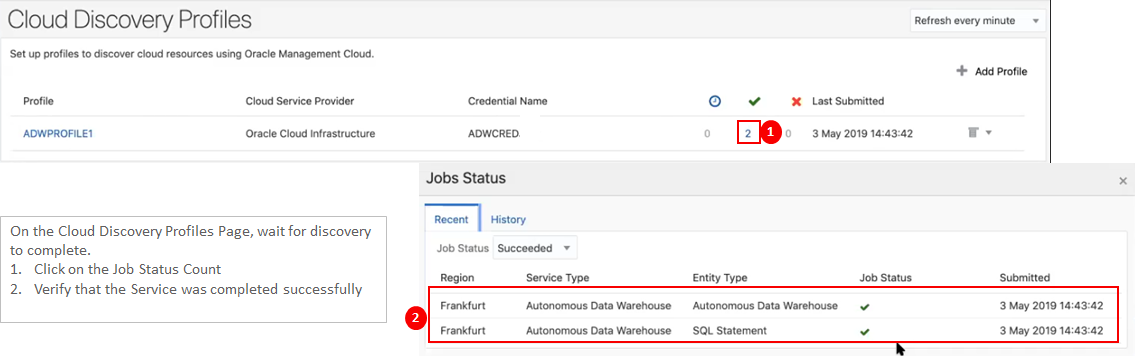
STEP 5
On the Cloud Discovery Profiles Page:
Click on + Add Profile
The Add Discovery Profile Page will appear.
- Specify a Profile Name (eg. ADWPROFILE1)
- Choose Cloud Service Provider Oracle Cloud Infrastructure
- Click + Add
- Select Region (eg. Frankfurt)
- Select Services (eg. Autonomous Data Warehouse)
- Enter Credential Name (eg. ADWCRED)
- Enter User OCID (eg. ocid1.user.oc1.xxxxx)
- Enter Tenancy OCID (eg. ocid1.tenancy.oc1.xxxxx)
- Enter the associated Private key with user API Key
- Enter the Fingerprint (eg. nn:nn:nn:nn:nn:nn:nn)
- Click on Start Discovery

STEP 6
On the Cloud Discovery Profiles Page, wait for discovery to complete.
- Click on the Job Status Count
- Verify that the Service was completed successfully
This completes the setup. Now you are ready to start monitoring and managing your Autonomous Database in OMC. Click here here for more.
Why Would you Monitor an Autonomous Database?
You probably heard that Oracle Autonomous Database (ADB) leverages machine learning to automate with traditional infrastructure related database administration tasks such as security, backups and patching.
No matter how well designed your database infrastructure is, performance and issues relating application or external components which make up the application ecosystem can still have an impact on end user response time or availability. Continue reading “Why Would you Monitor an Autonomous Database?”
