Teaching a trick to easily import Excel Data into Oracle Autonomous Database (ADW and ATP)

The other day my boss shared with me a nice trick that I found it very useful and has simplified my life a lot, when creating demos or quick prototypes. For this reason and knowing how many people are quickly switching into using Oracle Autonomous Database (ADW or ATP), I thought it would be a good idea to be shared as a quick reference.

The trick consists in using SQL Developer to easily import Data from Excel spreadsheets, directly into Oracle Autonomous DB (ADW or ATP). This also opens up a nice wizard that helps create and configure new database tables to be created and then used to import the data. How cool is that?

This complements a previous article that explains how to provision and get started with Oracle Autonomous Transaction Processing Database. Also, we have published articles to get started with Oracle Autonomous Data Warehouse.

Remember, the difference is simple:

Continue reading “Teaching a trick to easily import Excel Data into Oracle Autonomous Database (ADW and ATP)”

Advertisement

Building iOS Mobile App on Oracle Autonomous Visual Builder Cloud Service (VBCS)

The latest VBCS 2.0 release makes developing Mobile Applications faster using a declarative drag and drop approach while giving the flexibility to the developer to inspect the code and inject any additional code that the tool doesn’t provide out of the box. You can build your app from the browser itself without the need for any code editor.

Here is a quick tutorial on how to build a Mobile app using VBCS.
https://youtu.be/6n6p6D4ReLE

Once you develop your mobile app, you can create an Android or iOS build profile that will allow the tool generate the QR code so that you can test your mobile app on the device of your choice.

Continue reading “Building iOS Mobile App on Oracle Autonomous Visual Builder Cloud Service (VBCS)”

Teaching How to get Microservices to Consume Oracle Autonomous Transaction Processing Database (ATP)

A few days ago, we published an article that shows how to provision and connect to Oracle Autonomous Transaction Processing Database (ATP). Based on this, we got multiple requests to also demonstrate how to extend the connection to the Autonomous DB, not only from SQL Developer, but also from polyglot microservices.

In this blog, we are going to take a step forward and create a simple “Hello World” NodeJS application that exposes some REST APIs that push and pull data using an Oracle Autonomous DB. The idea is to give you all knowledge required, to be start building your own microservices, consuming data from Autonomous DB.

Continue reading “Teaching How to get Microservices to Consume Oracle Autonomous Transaction Processing Database (ATP)”

Connect Dockerised Instant Client to Autonomous Data Warehouse

With all the recent exciting releases of Oracle Autonomous PaaS Services, I wanted to explore some of the client connectivity options to work against the Oracle Autonomous Data Warehouse (ADW).
In my cloud subscription I provisioned an instance of ADW which took less than two minutes from start to finish – terrific, now I am ready to leverage the functionality. If you want to know the steps to provision an ADW instance check out this blog post – https://redthunder.blog/2018/07/02/teaching-how-to-get-started-with-oracle-autonomous-data-warehouse-cloud-service/

Obviously an empty data warehouse isn’t particularly useful so one of the first things I wanted to do was to connect a SQL client to the ADW instance so that I can load some data. Initially I used Oracle SQLDeveloper to load data into my ADW instance. I had staged my Excel data files into an Oracle Cloud Object Storage container and then referenced them in my SQL code as External Tables. Carlos has already blogged the steps required for this in https://redthunder.blog/2018/07/02/teaching-how-to-get-started-with-oracle-autonomous-data-warehouse-cloud-service/ . If you follow the steps you will quickly get your ADW instance populated with your data. In fact for the demo scenario my ADW instance was now populated with some data (approx. 1 Million rows of Sales data and associated related dimensions (Product, Customers etc).

My next step (and the subject of this blog post) was to use the Oracle Instant Client in order to query the loaded data. Of course I could easily have viewed the data inside SQLDeveloper but I wanted to try some other approaches. Often in Proof of Concepts there is a need to quickly spin up a tool to create, retrieve, update and delete data. Anyone who has used the Oracle Database would be familiar with the SQL*Plus client which is included as part of the Oracle Instant Client. For those who are not familiar with Oracle Instant client, the Oracle website describes it as follows,

“Free, light-weight, and easily installed Oracle Database tools, libraries and SDKs for building and connecting applications to an Oracle Database instance. Oracle Instant Client enables applications to connect to a local or remote Oracle Database for development and production deployment. The Instant Client libraries provide the necessary network connectivity, as well as basic and high end data features, to make full use of Oracle Database. It underlies the Oracle APIs of popular languages and environments including Node.js, Python and PHP, as well as providing access for OCI, OCCI, JDBC, ODBC and Pro*C applications. Tools included in Instant Client, such as SQL*Plus and Oracle Data Pump, provide quick and convenient data access.”

I used a Vagrant-Box / VirtualBox to avoid having to install development tools such as the Oracle Instant Client directly on my laptop operating system. I found an existing vagrant box that provided me with an Oracle Linux base that also included Docker. This vagrant-box image allowed me to quickly spin up a base environment which in turn allowed me to focus on steps to run the Oracle Instant Client inside a Docker container inside the Virtual Box environment (sounds like a cheesecake recipe – lots of layers). The Dockerfile I used was based on the Oracle Instant Client forked from the official Oracle DockerImages project with some modifications for specifics around connecting to an Oracle Data Warehouse Instance. Continue reading “Connect Dockerised Instant Client to Autonomous Data Warehouse”

Teaching How to get started with Autonomous Database for OLTP

We all know that data is massively valuable to businesses, whether it is to support daily business transactional activities (Online Transaction Processing – OLTP), or to help business with planning, problem solving and decision making (Online Analytical Processing – OLAP). Either way, businesses heavily rely on both ways to support their most important strategies and activities.

Until recently, companies had to heavily invest in provisioning, securing, patching and driving either way of Online Data processing mechanisms. In most cases, even with Cloud adoption, companies still had to rely on their own skills to make sure that their databases were properly patched, secured, tuned and managed.

However, today there is another option with the recent announcements that Oracle have made around Autonomous Databases for both OLAP and OLTP data processing. What this means, is that Oracle has taken automation to a totally new level with the assistance of Machine Learning. The idea is that the DB itself is self-sufficient with a full set of automated activities that range from patching, securing, optimising, etc. This will reduce not only the effort to run data workloads, but removing completely human errors, creating the opportunity to not only keep the lights on, but to focus on crucial business activities around innovation and differentiation.

Continue reading “Teaching How to get started with Autonomous Database for OLTP”

Teaching How to Provision Oracle Autonomous API Platform and API Gateway

Oracle is adding a secret recipe to all their Cloud Services with a nice touch of Machine Learning. This makes it possible to have the new series of “Autonomous” Cloud Services that are self-driving, self-healing and self-securing. Stay tuned, because we are going to keep listening a lot about them.

In this blog I am going to show you how to provision an Autonomous API Platform environment and then provision and register an API Gateway, running on a separate Oracle Linux VM on IaaS.

This is a graphical view of what I will be doing in this blog:

Continue reading “Teaching How to Provision Oracle Autonomous API Platform and API Gateway”

Teaching How to Get Started with Oracle Autonomous Data Warehouse Cloud Service

Data Warehouses have been around for a long time and they bring multiple benefits, but these also come at a cost. Some of the associated challenges that are easily identified when talking about traditional Data Warehouses include:

  • Complexity and Expensive
  • Inability to manage data and user growth
  • Hard to deploy and maintain

Oracle Autonomous Data Warehouse aims at easing these challenges with the ability to:

  • Provision a data warehouse in as little as 15 seconds.
  • Full automation of management of the Data Warehouse
  • Instant scaling with zero-downtime
  • Automated Tuning
  • Migration tools, e.g. Redshift

In this blog, let’s show can easily we can provision a new Oracle Autonomous Data Warehouse, load data into it and run some data visualization on top.

Continue reading “Teaching How to Get Started with Oracle Autonomous Data Warehouse Cloud Service”

Your Place or Ours

Sometimes you just want to build a local environment on your own equipment simply because it’s quick and easy. But you soon realise that other people need access and resources get a bit tight (memory, CPU, etc). That’s when it makes sense to move it from your place into the cloud.

Just recently I realised how useful Oracle Virtual Box’s new export feature is for migrating local VMs into Oracle Public Cloud Infrastructure – Compute Classic. Oracle Virtual Box’s new export formats give me the ability to easily migrate Images to the Oracle Public Cloud where I can scale my environments as required.

Earlier this week I was building a new Oracle Identity and Access Management development environment on my laptop. This worked well from an initial build and configure perspective but there comes a time when I need to make this environment available to my Developers, Testers and other stakeholders. Running this image continuously on my laptop quickly becomes impractical even for development teams.

Continue reading “Your Place or Ours”

Building a Smart Contract with Oracle Blockchain Cloud Service @ #WinterHack2018

Last weekend, I was at the Code Network Winter Hackathon event in Brisbane – https://codenetwork.co/winter-hackathon-2018/. I was there as a sponsor, workshop presenter, mentor and just a general supporter. As such there was some down-time between different activities. So, what a great time to sit down and work on something that I have no idea about (technically) – #Blockchain and Hyperledger. So, as a normal person does – I went searching for relevant content to help. Here’s a couple of the searches that I did.

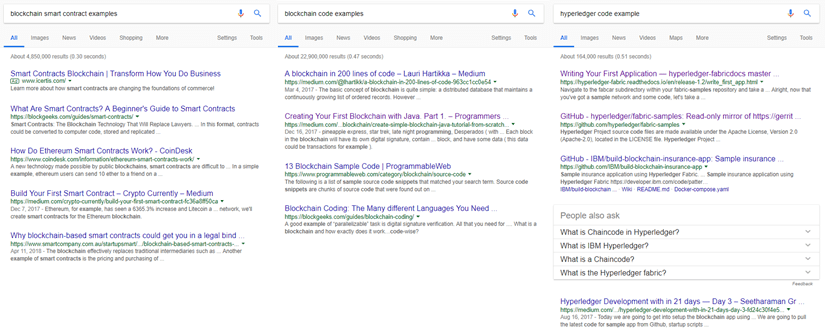
Unfortunately, through many different searches and reading lots of things it became apparent that I didn’t know much and there was lots to learn. There seemed to a massive amount information that looked great. There was content that talked about what a Blockchain is. There was content that talked about the business use cases and examples of why you use a Blockchain technology. There was code that built a Blockchain. I found plenty smart contract examples on github. I learnt more about what I needed to know but it didn’t get me to the place that I wanted to be.

So – how do I develop and play with a Smart Contract?

The main learning for me through this process was the fact that my literacy around Blockchain was not very good. And as hard as I tried, “my search as only as good as my question”. Here’s my attempt of simplifying the landscape so as a developer, you can get started with the valuable bit of blockchain – ie building apps.

For the purposes of the Winter Hackathon, I was inspired by 3 relevant occurences – the Coles promotion called My Little Shopper – https://shop.coles.com.au/a/a-national/promo/little-shop-online (it’s amazing what people and parents would do); Tixel which is a safe and legit way to buy and sell tickets – https://tixel.com.au/Queensland (recently finished their tour of the CEA’s Collider accelerator program for creative tech); and CargoSmart which simplifies the global shipping industry to improve planning and on-time deliveries https://www.cargosmart.com/en/default.htm (and recently working with us on their Blockchain implementation).

WRITING YOUR SMART CONTRACT

When first looking into the implementation and specifically for HyperLedger, it felt like a Smart Contract was this mythical being that protected all intruders and evil spirits from tampering with the legendary Ledger. Oh was I mistaken.

Hey. I see what you truly are. You’re just a Data Access Object with some validation, integrity and
transformation logic with three types of bitbucket calls – GetState, PutState and wait for it …
DeleteState (which doesn’t delete it but only removes the lookup but keeps the transaction history).

With the mystical aura removed and a few different patterns emerging, it has become pretty simple. Here’s a few snapshots of what makes up the Smart Contract. Oh … most implementations are based upon Go. Some other implementations are now in NodeJS.

This is the start of the source file. The main imports are the Fabric Shim and Peer that relate to the Fabric Go SDK. The other imports are more about data manipulation.

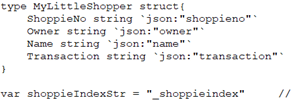
This is the main structure of the state being managed. The json reference is a mapping to the attribute as described in JSON.

The index string is used as a key into data that is stored in the ledger.

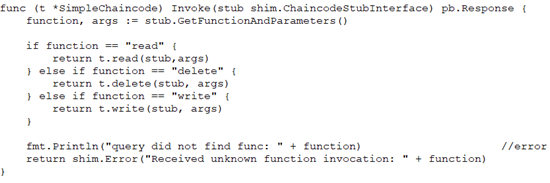
This is the main function that is called by the exposed REST API. The payload itself has references to the chaincode (the Smart Contract implementation) as well as the function to execute and the arguments to pass to the function.

The references to t.read(), t.delete() or t.write()function calls are to delegate functions that implement the underlying GetState, PutState and DelState calls.

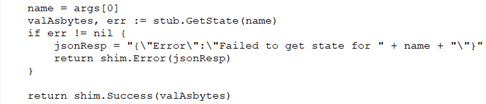
This is an example of a GetState call. Notice that data comes back as a byte array.

There are shim.Error() and shim.Success() functions to return failure and success states.

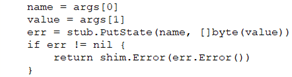
This is an example of a PutState call. Notice that data comes back as a byte array.

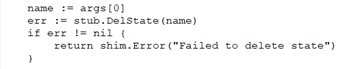
This is an example of a DelState call.
(Not much to it)

Once I wrote the basic CRUD Chaincode, then it needed to be packaged for Oracle Autonomous Blockchain Cloud Service which was my target platform for the purposes of what I was doing at the hackathon. It is quite easy. Zip up the one .go file. And now it was ready for me to install and instantiate on the Blockchain Cloud Service.

GETTING IT TO RUN

With the fun bit over, I needed to create the network that the chaincode would be installed and instantiated. There can 3 main steps:

  1. Create the network (ie. the environment in which the code is run) and organisations (ie. the participants of the interaction)
  2. Configure the network (ie. exchange keys and configuration)
  3. Deploy the chaincode and Run the chaincode via a REST API

Before I started provisioning this service, I went through a fair number blogs, articles, youtube clips and stack overflow questions about how to configure up the Blockchain infrastructure. There were a million and one ways to do it. All of them were detailed and more than what I wanted to do. So, I got an instance of Oracle Autonomous Blockchain Cloud Service and started working on it. The following sections will guide through this process.

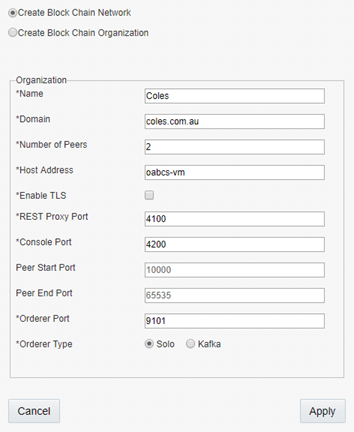
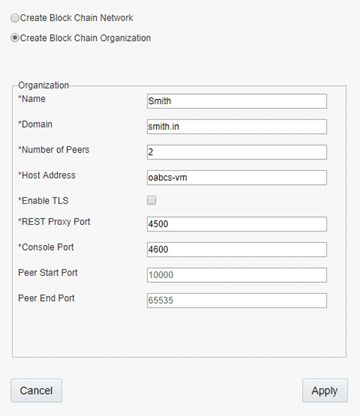
1. Creating the Network and Organisations

For this example, I created one network and two organisations. That’s the first thing that I did. What happens is that the different blockchain services are provisioned for the network and organisations. In the default configuration, there’s a Blockchain Management console started to manage the network and organisations. This in default scenarios is deployed on port 3000 so go to http://<host&gt;:3000.

I create one network and two participant organisations each with their own REST Proxy and Console.
Specifically for the network configuration, there is an additional port for the Orderer.

The result of this was the network and organisations are created and are started.

2. Configuring the Network

With the network and organisations operational, the next step is to configure the network and associate the different participating organisations. What this means is that there is configuration and keys that are shared between these entities.

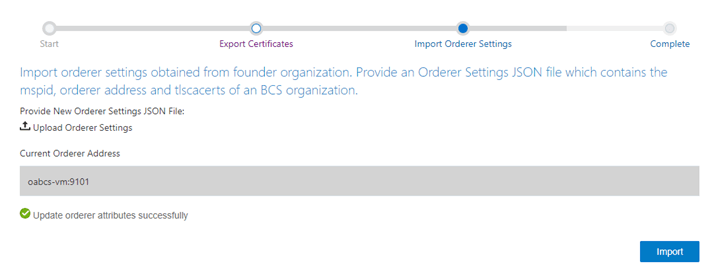
a) Export Orderer Settings

We’ll click on the link for the network (and in this case it’s Coles) and this opens a new console for managing the Blockchain network. Under the Network tab, the different organisations exist. The Orderer settings are extracted to be shared with the participant organisations. This process downloads a JSON file with some configuration.

b) Participants Joining the Network

Going back to the http://<host&gt;:3000 console, we’ll click on the link for managing a Blockchain organisation (and this is repeated for each organisation). Each participant organisation requires to export a set of certificates and import the network Orderer settings. Once completing the import process, we are operational.

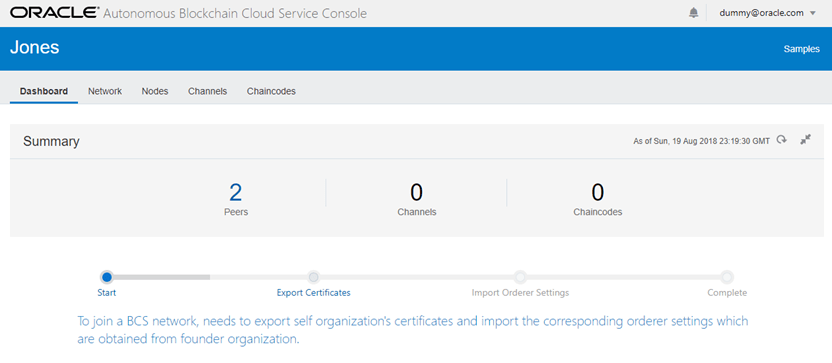
Here’s a screenshot of the workflow to export the certificates which exports a JSON file and import the Orderer settings.

Once everything is complete, we can either go back to the network configuration (ie Blockchain Network console)
or repeat the process for another participant organisation.

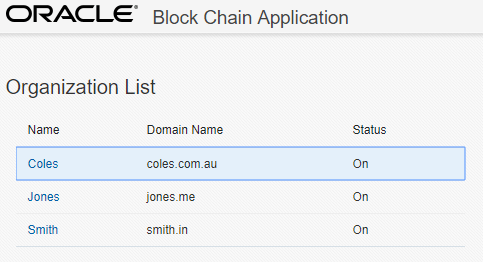
Here’s a screenshot of the existing Orderer network configuration as shown in the Blockchain Network console.

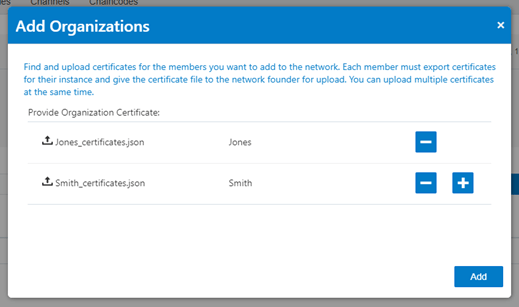
By adding organisations to the network, we upload the JSON files exported from the participating organisations
(using the Blockchain Organisation consoles). In this scenario, we have two different organisations Jones and Smith.

Here’s a screenshot of the existing Orderer network configuration with the newly imported participant organisations.


This is another view of the relationship between the organisations and the network. We are now ready to deploy the chaincode.

3. Deploy the Chaincode

We are now just moments away from the true task we wanted to get it – running the chaincode. With the zip file of our Go code, we can install and instantiate it to be exposed through the REST API of the network.

We navigate to the Chaincode tab in the Blockchain Network console. This is where we see the different chaincodes deployed including different versions.

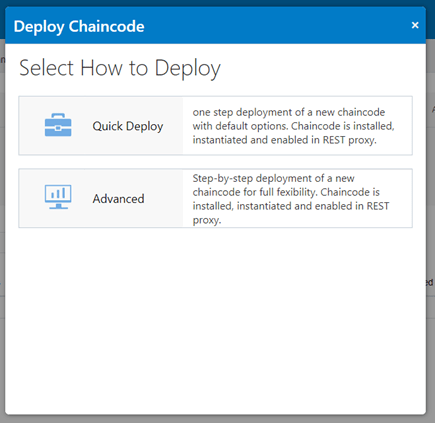
There are a couple of different ways to deploy – Quick and Advanced. I’ve just chosen Quick Deploy to keep the process simple.

The configuration that is required to deploy a chaincode includes: version, which peers to install and instantiate,
uploading the zip file and adding endorsement policies which leads to signing of different transactions.

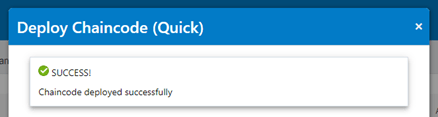
With a few seconds (less than minutes), the chaincode is deployed to the network.
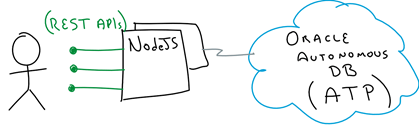
The next part to this is to run it. To save time, I’ve used postman to execute the REST APIs.

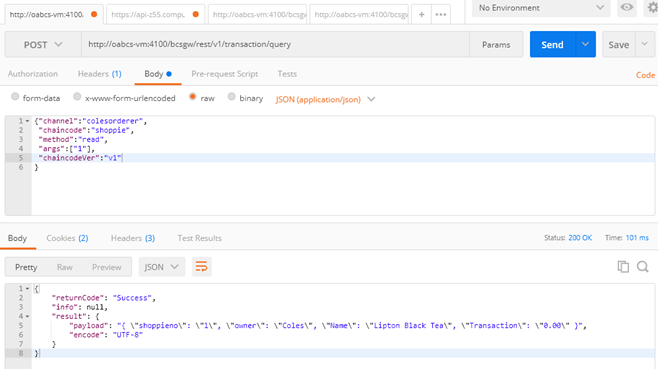
Here we go. The chaincode is deployed and operational. The REST API resources and formats are available here –
https://docs.oracle.com/en/cloud/paas/blockchain-cloud/rest-api/rest-endpoints.html

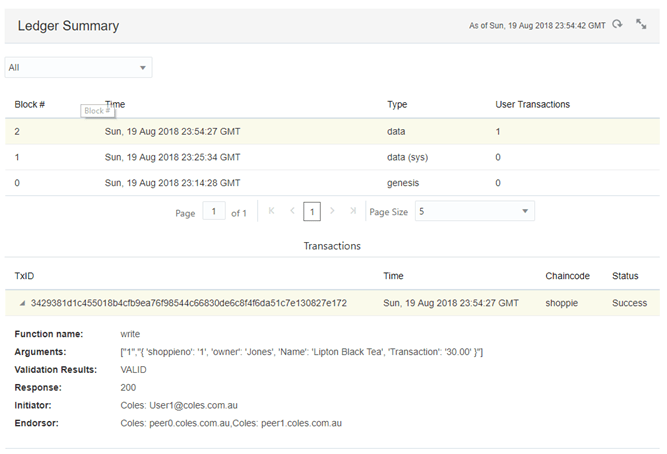
Having a look at the Blockchain Network console and under the Channels tab, I can look at the state of the ledger and other statistics.

We are now done. We’ve built the chaincode (ala the Smart Contract), we’ve spent a little time
configuring the network and organisations that participated in the network
and then we deployed the chaincode (as a zip file) and ran it.

If you want to try this out yourself, you can get trial from https://cloud.oracle.com/tryit and provision an Autonomous Blockchain Cloud Service for yourself.

At the end, as I was looking for search results for this article, I found exactly what I was wanting to find (within seconds) “Blockchain chaincode examples”. Here’s a couple of references that I have found to be useful and simple to get your head around without delving into the depths of the Blockchain infrastructure:

%d bloggers like this: